


hooglebug
-
Posts
669 -
Joined
-
Last visited
-
Days Won
4
Content Type
Profiles
News and Information
Tutorials
Product Reviews
Supplier Listings
Articles
Guitar Of The Month
Links and Resources
Forums
Gallery
Downloads
Posts posted by hooglebug
-
-
can anyone tell me if this is right, and if not tell me what is?
i want to make sure i have this right before i take a soldering iron to anything. what i'm doing is inserting a vexter series fuzz factory into a guitar, but i'm not bothered about the led. would this diagram work?
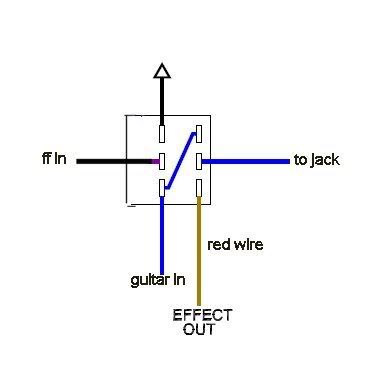
the effects out is the red wire on the vexter going from the top right of the 3pdt switch. the effect in is the black wire at the centre of that switch. i think (but im not sure which is why im asking) that the yellow wire is the led wire.
and would all the earths (from guitar, from ff, to jack) all go on the same lug?
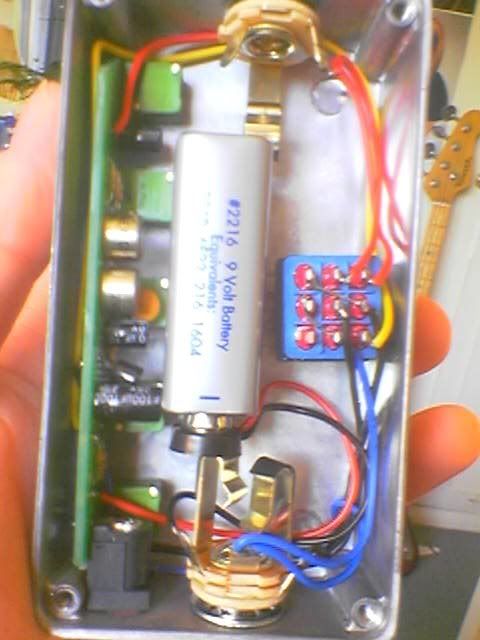
heres a pick of the vexter ff switch so you can see what im talking about
http://i67.photobucket.com/albums/h284/hoo...0908_151132.jpg
thanks in advance for any help
-
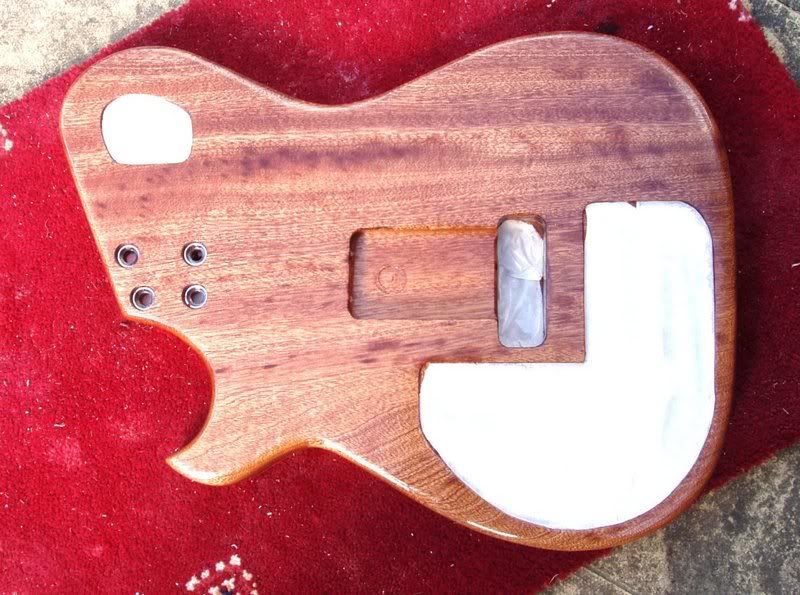
the body has been sprayed. just letting it cure then flat and buff and wire it and its done.
here's a couple of pics
-
-
the binding is on, just needs tidying up. heres a sneaky peak of the top before it gets covered up again
-
sprayed the neck last night. should be glueing the top tonight. latest neck pics-
-
the covering over the plastic was starting to come off, so i took it off, and before i cover it again, i had to take some pics. so here's a tease of what the things going to look like
and a couple of neck shots after a lot of sanding today. annoyingly, theres more figuring on the side thats not seen when you're playing. o well.
-
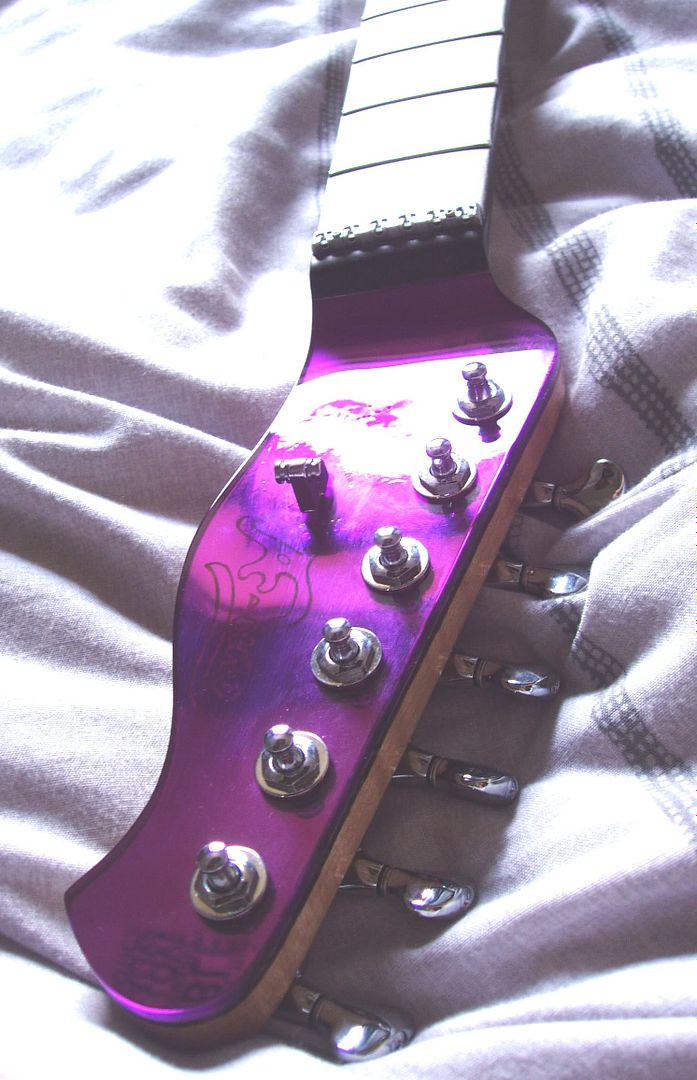
i dont think lil red is looking quite shocked enough!
just a quick post to show my sexy tuners which came today!
-
that side of the bridge isnt a circular cutout like the left hand side, it goes all the way to the end, so you can put the post anywhere along it. i put it there so the post wont foul on the high e saddle when the bar is depressed. i tested it before i did it and it works. it seemed odd to me too but there it is
-
pickups and a few other bits came today. i routed for the pickups and cut the nut slot (lsr roller)
heres a pic of where the knobs may go. i cant really see any other way for them. any suggestions?
-
oops. working now
-
did the back route for the bridge, the bridge posts are in place, cut the mirror top to a rough shape and cut the neck and bridge routes in that. also did a bit of sanding on the neck and the flame is really starting to come through and its looking pretty damn nice
front of body showing neck pocket and bridge route
-
finally the body wood is dry and today i cut the body shape out, and cut the tiny binding channel (tiny because of the plastic top)
cut the neck pocket and the front hole for the trem block (will do the back route tomorrow). test fitted the neck and its a great tight fit.
-
the epoxy in the groove hasnt cured properly yet so i havent been able to scrape that clean, but that can wait till tomorrow. so instead today i carved the neck. still needs a lot of sanding but its pretty good. its a nice soft v shape that flattens out to a c near the body end.
-
theres been a change of plan. iv found some smaller knobs than i was going to use so im still having the two volumes, but in place of the tone im using a tuned filter which, up full (10 on a normal pot) leaves the pickups as they would sound, turning it down thins out the signal to give a single coil sound, and all the way down it gives an electro-acoustic sound.
after making the plastic top on the headstock the right shape there is quite a noticable gap on one side near the fingerboard, so i've cut a small groove all the way round the headstock at the join between the plastic and the wood and filled it with epoxy/ebony dust so it looks like an ebony veneer rather than an ugly gap filled in. just done that so i dont know how it looks yet but tomorrow i'll probably take more pics
-
-
did the radius and the side dots. had to fill in one or two tear outs after recutting the fret slots but otherwise went ok
heres a couple of views
-
tody i cut the fret slots and installed the front fret markers (i'll do the side ones when the radius is done) and also made a radius sanding block.
the pics arent so clear today for some reason
and o yes, come on liverpool!!!!!!!!

-
i've rough cut the plastic for the headstock and shaped it. i also did the logo - it looks pretty cool.
logo (it looks neater than that now i tidied it up a bit after i took the pic)
rough cut headstock plate theres some bubbling and a bit of distortion around where the plastics bend due to the heat gun being held a little too close, but i think it looks pretty good so i'm not bothered about it. plus i dont think id have enough plastic left to do it again so if i was bothered it would have to do.
also, regarding the electronics - im going to be using a p90 (neck) and a mighty mite motherbucker (bridge). now, considering the p90 is around 8k and the motherbucker is almost 22k, and also considering the control area's going to be a bit crowded what with all five ff controls, i was thinking about only having a volume for the mb, with the p90 going straight to the master tone. having never used or even played a guitar with p90's, is there going to be any real problems with not having a volume control for the p90?
-
shaped the fretboard and did the slope of the headstock. since i have no access to a bandsaw i had to do it by hand. but as its going to be faced with the plastic it doesnt need to be ultra neat.
tomorrow im going to make a template for the plastic and bend it over that. i'll do it backwards so i dont mark the front of the plastic.
-
i like the white one, but id make the hanzi/kanji (if thats what they are) straighter. and by the way, what do they say?
-
-
a delivery from david dyke today, about a week earlier than i thought it would come! woo!
the outline of the neck was already on, thats not mine. The ebony has a quite attractive light streak running the length of one side, which i quite like.
-
though i wouldnt mind having the kill switch, it would make an already cluttered control area even more so if i had to have the pu selector there too. so i sacrificed the kill switch to have a little more space.
today im going to do a test bending the plastic and also putting the logo in it to see how it looks. im only doing the bending freehand, but for the real thing obviously i'll use a template.
well, here's the results with the plastic. it did bend with a hair dryer, and i think it will go quite easily over a template. it did leave a mark but i dont mind it, it looks pretty cool in person.
as for the logo, i tried out a few different ways. the AF is done quite deep, the wave at the bottom is done lightly outlined, and the uno is done lightly outlined and inside. personally i like the way the uno looks best, but opinions will be welcomed and listened to.
ps: it doesnt look that messy in person, and i will be more careful with the real thing
-
this is what i was thinking for the layout of the controls.
1= pu selector
2= neck pu volume
3= master tone
4= motherbucker tap 1
5= motherbucker volume + tap 2
6= ff comp, stab and on/off
7= 3 remaining ff controls.
any thoughts or new layout ideas welcome

Manson Mattocaster-esque
in In Progress and Finished Work
Posted
if you're talking about the trem cavity, it is all straight and clean, just looks funny because of dark patches in the wood near the edges. if you're talking about the others, they look all wonky because the tape isnt right to the edges in some places. they are all straight and clean i promise