


Ben
-
Posts
1,281 -
Joined
-
Last visited
Content Type
Profiles
News and Information
Tutorials
Product Reviews
Supplier Listings
Articles
Guitar Of The Month
Links and Resources
Forums
Gallery
Downloads
Posts posted by Ben
-
-
The zebrano looks nice but be carefull Ben, you have only had the wood for a very short time and we are having very erratic weather at the moment. It should really get, as the bare minimum, a couple of weeks to actlimatise to wherever you are building the guitar!!
Why? What will happen? could it warp or crack or something?
I tend to work on it in the garage, then bring it indoors when I'm done with it; if it spends most of its time indoors is there such a problem?
What would you suggest I do? leave it in the garage for two weeks?
Edit: heh just noticed how demanding that post sounds with its 6 questions

It could warp or check. Every board I've purchased from online has warped a small amount, then after a couple weeks it goes back to where it was when I opened the package. If you were to glue it after a few days of getting the board, you might glue it while it's trying to acclimate and the entire body may warp. I've had one board ever check from the lumberyard, but that was because it was during the 40+ consecutive days of 100F+ Texas heat. Gotta be careful where you store your wood! It's best to seal the end-grain and leave it in a more open sheltered from weather area, like a garage. Then bring it in for a couple weeks. I've never had a board check going this route, but every board I have ever worked with has had 8% or less moisture content.
Hmm, well, my wenge should be fine then, since it still has its endgrain sealed, I've left it in the garage and it'll be a few weeks before I'll be making the neck anyway.
What do you think I should do with the zebrano though?
Now I've started working on it is it too late, or should I somehow reseal the end grain and then leave it?
And how likely is it to warp or check? Its a 1 piece blank, and its almost entirely quatersawn. Its so big, hard and solid feeling that I cant imagine it warping... (not that that feeling is based on any knowledge or experience of wood)
Also I take it indoors when I'm not working on it, and the sticker on the side of it said it had been kiln dried I think.
Sorry for all the questions- you've got me worried
-
Powder coating is,in fact,the way it is done...look at Jonathon Esque's blue seven string with the all white hardware and the paw print inlay...it is in the GOTM archives.
Its here:
http://users.pandora.be/marnix.ghesquiere/ondex.html
That guitar's the first thing that came to my mind when I read this thread too.
Edit: Here for the hardware painting bit specifically; http://users.pandora.be/marnix.ghesquiere/hardware.html
-
Just broke my template router bit
:D I'll have to try the shop near me tomorrow... otherwise I'll have to talk my dad into taking me to B&Q
-
to make cutting easier you could drill holes at set intervals and then join them up. I did it on my Zebra wood build and it worked out fine. but it did take some careful routing as it did Tear out like nobody's business if you didn't watch out... looks great though!
btw always wear a mask with zebra wood that stuff is nasty!
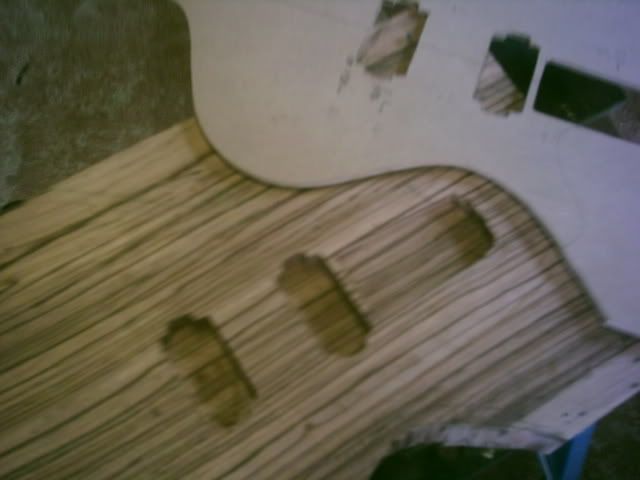
I've finished rough cutting the body and I'm onto routing the outline now- I did actually end up doing what you suggest with the holes.
I also came across the tear out... routing in one direction (where the router bit blade is going with the grain if that makes sense) gives a really nice smooth finish, routing the other way against the grain gives INSANE tearout! luckily I was a good distance from the body outline when I discovered this.
My solution was to route all the curves where the bit goes with the grain from the front, then to flip the blank over and do the others from the other side. Seems to be working so far, not finished yet though.
~And I checked the list on the MIMF; apparantly Zebrawood dust is a sensitizer of the eye & skin, with great potency, but its effects are rare. I've been using a mask for most of the time, but my mask is admittedly pretty crappy.
----
Also when routing I've begun to notice the smell a little more
It smells like farms. Its not that bad really.
-
The zebrano looks nice but be carefull Ben, you have only had the wood for a very short time and we are having very erratic weather at the moment. It should really get, as the bare minimum, a couple of weeks to actlimatise to wherever you are building the guitar!!
Why? What will happen? could it warp or crack or something?
I tend to work on it in the garage, then bring it indoors when I'm done with it; if it spends most of its time indoors is there such a problem?
What would you suggest I do? leave it in the garage for two weeks?
Edit: heh just noticed how demanding that post sounds with its 6 questions
-
oh and I've finished rough-cutting the outline since that pic was taken, and also the zebrano is less green than it looks in those pics.
Also, the weight isn't feeling too bad at the moment, and theres still plenty of wood left to be removed.
-
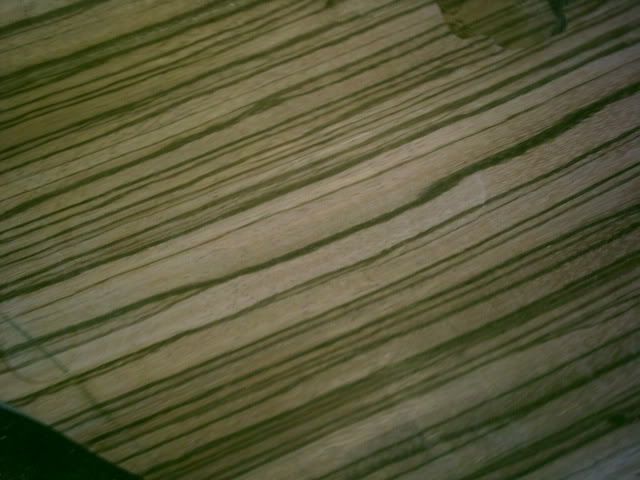
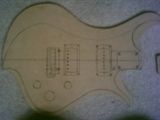
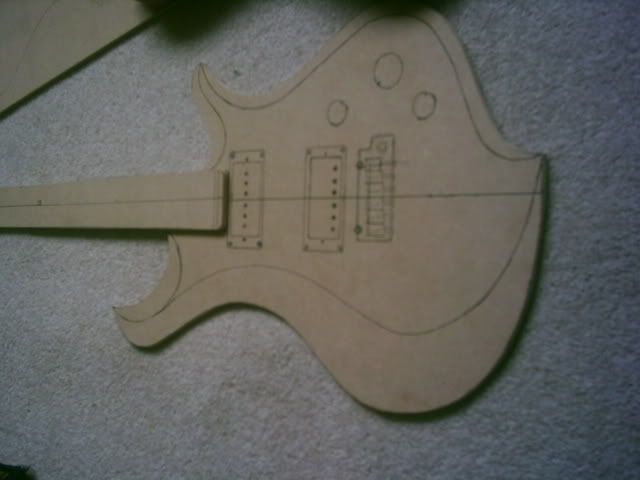
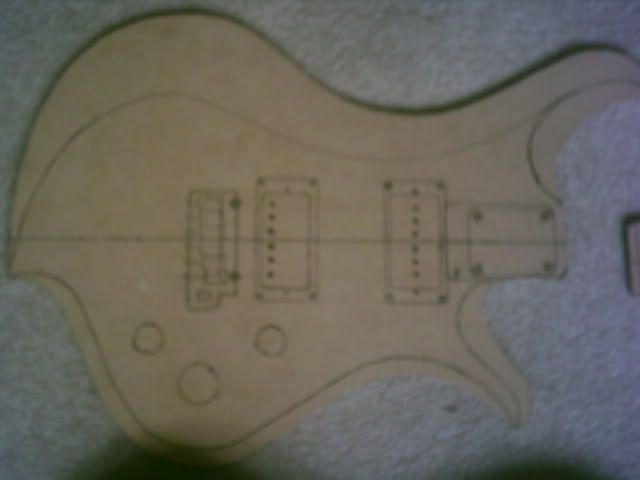
^picture of the grain in my body blank. I think I got a nice piece.
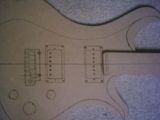
And here is a pic of the pickup and neck pocket routes I did today. Everything went to plan with no problems, except the bridge pickup template slipped a little bit, meaning the route ended up slightly non-perpendicular to the centre-line, but it was only about 1mm max deviation from what I intended so the mounting ring will easily cover it.
http://i62.photobucket.com/albums/h86/bent.../PHTO0021-2.jpg
-
I don't remember zebrawood smelling too good, but with my current dust collection it's hard to tell unless I put my nose against the board. I do plan on building a Wenge baritone neck for my beast guitar with a zebrawood fingerboard soon, would be really cool to compare how your project turns out to the neck I build.
Cool!
Be sure to post pics. I think zebrano and wenge compliment each other really well.
-
I've been having a tough time planing that stuff as well. Certain areas seem to plane like a dream, these were the darker, more quartered, denser areas. The whiter more figured looking areas were crazy. I would get half way down the board everything fine, then chunk! ??? To fix it I would actually have to come back from the opposite direction, the grain direction was all over the place I think. It was tough to figure out. I gotta thin it like you did, and I am going to use a router jig on some rails to take off some and cut the cavity cover plate.
My nose isn't all that good, but many people complain about a horrible smell coming from that stuff, come across this yet? Best of luck and keep them pics coming. J
I had the same problem.. planing in one direction gave me nice results, planing in the opposite direction gave me tear out. Trouble is that the directions varied at different parts of the blank!
I got it ok at the end... just needs sanding to sort out the last few imperfections.
My hands were literally red raw when I finished planing. They're still sore now!
The smell is very weak... what I smell is not a nice smell but its not that bad really. Barely noticable.
I did actually use a router initially to remove the material faster. I routed channels in the surface leaving 'rails' of zebrano for the router to run on, then I planed down the raised sections that I used as rails.
-
My Wood AND My stewmac order both arrived today
My stewmac stuff made it to my doorstep in like 30 hours... wow.
I spent the afternoon thinning my body blank, and then I made a start on rough cutting the outline.
Things I learnt:
1. Zebrano is damn hard to plane.
2. A better plane would be a wise investment.
3. removing less than half an inch of zebrano can make a surprising amount of mess!
4. Zebrano is damn hard to cut (my jigsaw seems to work its way through it at about 1mm a minute
)I'll have to take some pics of the wood tomorrow- it looks really nice
Also I tried the tap test thing on the wood out of curiosity- the zebrano just made a standard noise really... but the wenge however was a different story- my neck blank rang like a bell! I was really surprised by the sound it made, sounded more like I was knocking on metal tubing or something.
-
I like the new burst too
-
I just ordered my pickups and trem,
I decided on:
GFS Crunchy Paf for the bridge, GFS 'Mean 90' for the neck and this trem
Edit: And now I just ordered everything else I need from stewmac
That makes the overall cost for the guitar, including the new tools I bought, just under £150. Not bad!
-
Thanks for the positive comments!
Prostheta- I hadnt really thought about it yet... I'll probably wait until its finished and then see what looks and feels most natural.
I got bored today and decided to make something...
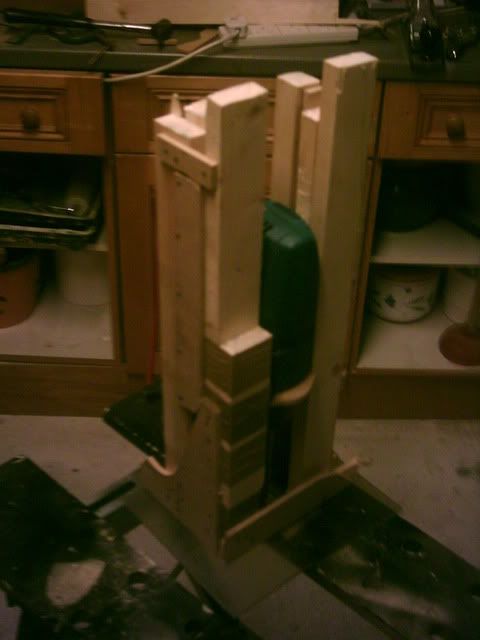
Its a poor-man's drill press
- a stand that holds my electric drill. It doesnt bear the wait of the drill or anything, its basically just a bit that holds the drill, and a set of guide rails that keep it it perpendicular to the surface being drilled.I tried it on scrap and it actually works pretty damn well. It only works on flat surfaces, but that's all I'll need it for. I made it pretty sturdy and it seems to work accurately without the bit wobbling around.
-
Still no sign of the wood... its been a while now. I'm going to phone craft supplies on monday if its not here by then.
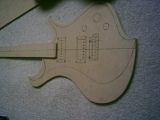
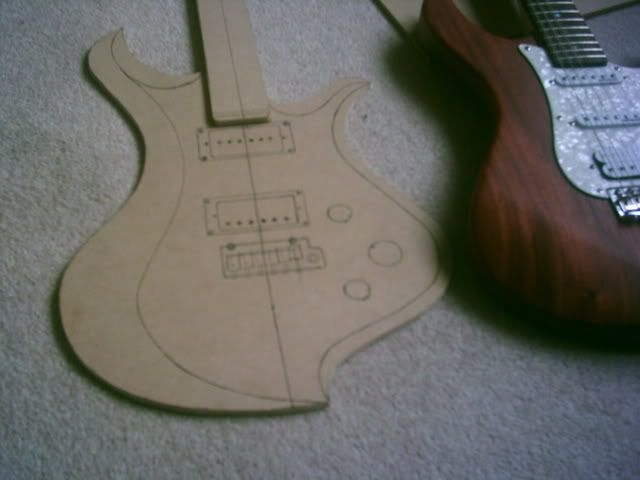
I did however finish my templates for the body and neck (I placed it next to my sisters guitar to give a better indication of its size).
I settled for a 27.5" scale in the end.
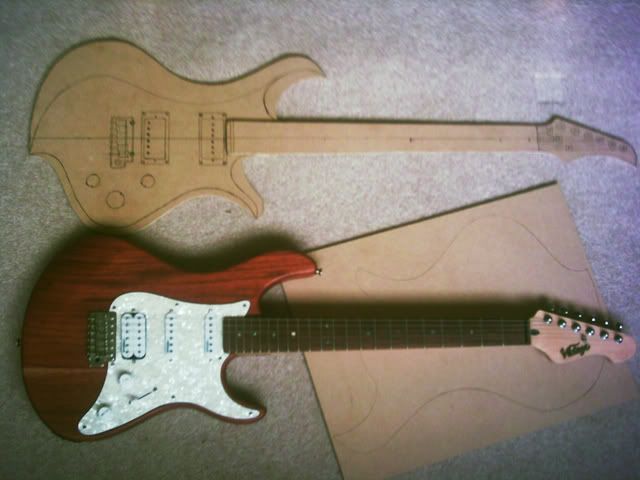
Just one more template to make for the neck pocket, trem and pickup routes.
In the new knob layout, the smaller knob nearest the neck is volume, the other small knob is tone and the 3rd larger knob is the pickup selector.
a few more pics:


-
That burst is lovely
-
Today I bought a load of MDF and drew everything out full size in preparation for making templates. I wish I had my camera- it's looking really promising as a design.
I settled for a 27.5" scale length in the end
In that case you could probably scale the width of the body say 10-15% wider and not ruin the aesthetics - that would help you resolve any neck joining point/access issues....Done

When I first printed out my cad drawing, seeing it full size made me realise that the body was too small. I made it about 1.5 inches wider and now it looks fine. Wont help me with my aim to minimise the weight (since zebrano is very dense), but it definitely needed enlarging.
very cool design I like alot.Cheers!
A and C would be the most versatile.Cool, thanks for the opinion. I may just take your word for it and go with that in fact.
I really have no idea what the others will sound like. I'd guess that B and 3 would sound similar, and I think that D may not be possible with a 4 pole switch, given some of the other configurations I've chosen, but otherwise I've no way of deciding.
I'm fairly big (6 foot 2"), and when I hold my guitar and imagine an extra 2 or 3" on the end of it, it doesnt seem like I'd have any problem with reach.No problem then! That's the beauty of building your own.
As for the pickup options, I can imagine that you might be able to wire the pickup outputs up to a mini set of terminals inside the control cavity that allow you to make connections through the use of tiny jumpers that are just a U-shaped piece of metal covered in plastic, which slides over (and connects) pairs of pins. I've seen such things several times in the electronics we use in our lab at work.
Send the outputs to your rotary switch. This way you could try all sorts of different combinations without having to resolder.
That is a good idea... could end up pretty complicated though, I have enough trouble getting my head around it on paper. I'd have to make sure I laid it all out logically. I thought about prototyping it with a breadboard somehow, but your idea is a lot better.
The configurations are all easy to understand; the challenge is figuring out how to achieve them all when limited to only 4 poles.
i think the design looks great. I think the large headstock suits it well.Cool; because the 6 in a line is staying
When I drew it out full size I tried a few different headstock shapes and tuner arrangements- the one that looked best was the 6-in-a-line, but on the final design the headstock has ended up a little smaller and a slightly different shape to in that image.
Plus the 6 in a line was the only one that would allow me to use an idea I had, that should let me use higher gauge strings without making the strings any harder to bend (I'll explain it fully when I get to that stage in the building process
)I just wish my wood would arrive now
Damn postal strike
-
I'm finalising my wiring diagram now...
Quick poll of opinion;
What sounds would you choose to fill the last 2 spaces on my 6 way rotary switch?
I have decided upon:
1. Bridge humbucker (series)
2. Bridge humbucker (series) + Neck P90 in series with bridge
3. Bridge humbucker (parallel) + Neck P90 in parallel with bridge
4. Neck P-90 on its own.
5. ????
6. ????
The options that I am considering for 5 and 6 are:
A. Bridge single coil (split humbucker) in series with the neck p90
B. Bridge single coil (split humbucker) in parallel with the neck p90
C. Bridge single coil (split humbucker) on its own
D. Bridge single coil (split humbucker) in series and out of phase with the neck p90
E. Bridge humbucker (series) in parallel with the neck p90
F. Bridge humbucker (parallel)
What do you think would provide the best sound/ most tonal variation?
-
The trickiest part about recording on a computer is latency. Even with dual-core processors & gigabytes of RAM you'll need decent audio drivers to get low latency. Search the net for good ASIO drivers for your card & don't go straight for the ones from the manufacturer. My card is several years old but thanks to support from 3rd party drivers it still performs just as well as the more recent models.
Interesting...
On my desktop (which isnt even that new...) I get almost 0 latency... its completely un-noticable, yet on my laptop ( much newer with twice the spec) I get a noticable latency
I'll try and find a 3rd party driver
-
http://uk.youtube.com/watch?v=svRudaDclW0
Is this that amp you were teasing us with minimal info about a bit ago?
If so then it sounds about as good as any amp possibly could via youtube
-
With a 27"-28" scale and a neck-body join at #18-20, methinks you might be really reaching for #1. You might consider moving the entire scale back toward the a** end by a few frets. It will also help with balance.
maybe... but I'm fairly big (6 foot 2"), and when I hold my guitar and imagine an extra 2 or 3" on the end of it, it doesnt seem like I'd have any problem with reach.
I'll be drawing it out full size/ getting someone to print my cad drawing soon, so I'll get a better feel for the dimensions then. Thats probably going to be the easiest way to imagine it when finished.
Thanks for the comments!
-
The headstock design is still preliminary, I just stuck it on there quickly in photoshop, without giving it anything like the careful attention I gave the curves of the body.
I'll be trying some alternative designs for it soon- I dont think the current one compliments the body curves very well. I might even go with a 3X3 or 4X2, since the 6 in a line headstock does look kinda large.
Thanks for the comment though... I might go back into cad/ photoshop and make a perfect rendering of what I want to achieve. This one has a few flaws cos its basically a load of previous renderings I made for other ideas chopped up and reassembled
-
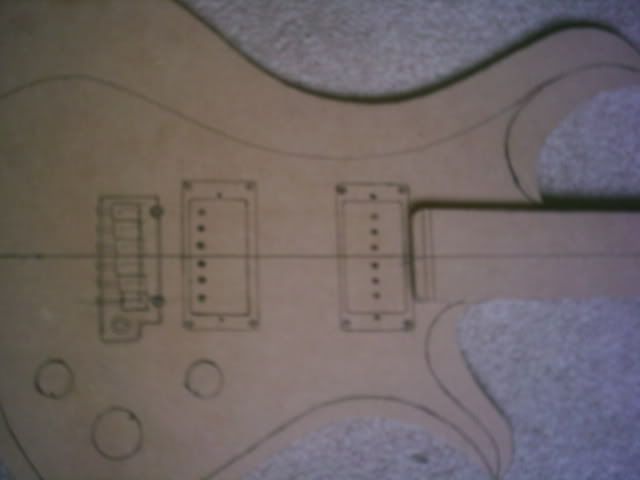
The Design:
The specs:
Body: 1 piece zebrano
Neck: Wenge
Fretboard: Wenge
Neck joint: Bolt-on
Scale length: 27~28" ish (still undecided but it'll be somewhere between those two)
Pickups: GFS; either dual p-90, dual HB or one of each
Bridge: either tremolo or hardtail, undecided
-Rotary pickup selector switch
-Knob configuration will be different to in image
The wood is ordered and as soon as it arrives I'll get started
-
well it was out of either digthemlows and WezV
Same, but in the end I went for digthemlows, with Wes a close second. They were all nice guitars this month.
-
Terry Downs over at TDPRI made an electric out of MDF. Here ya go:
http://www.tdpri.com/forum/telecaster-disc...html#post842180
CMA
That thread was awesome- I like how there were a few people complimenting the tone in the sound clip until he revealed it was an MDF guitar


Zebrano Baritone With Wenge Neck
in In Progress and Finished Work
Posted
Ok cheers
I'm going on holiday for a couple of weeks in a few days, so it will be easier to leave it alone than you'd imagine!
I dont want to screw this up so I'll restrain myself from touching it until we leave. It should end up with almost a month actually thinking about it...
I dont want to leave it any longer than that though- I need to finish this before I go back to uni in october!