


SiZi
-
Posts
29 -
Joined
-
Last visited
Content Type
Profiles
News and Information
Tutorials
Product Reviews
Supplier Listings
Articles
Guitar Of The Month
Links and Resources
Forums
Gallery
Downloads
Posts posted by SiZi
-
-
I’m having a strange grounding issue with my build. I had been using a wireless cable all this while and there was no hum from the pickups. But then I decided to try a wire analog cable to check difference in tone and there was serious hum. I think I have identified the problem - it’s my ground wire from the vol pot to the bridge. It’s a tele style bridge and pickup and so I thought I need to ground the wire such that it rests under the bridge in contact with the bridge right? This is how I’ve done it on previous guitars. But on this build it’s not working! I touch the wire to the guitar wood, the bridge, a copper shield pressed against the wood and even bridge, etc. but nothing. The hum only stops when I hold the wire against my fingers. This tells me that to solve the problem I just need to ground the wire somehow but I can’t figure out how. See pic below for the wire in question. Thanks for your help!

-
23 minutes ago, avengers63 said:
I you want to go in a different direction... I've been wanting a Duncan Quarter Pound strat set for a coupe of years. If money isn't an issue, I'd bet that Fralin's split blades are awesome. In a COMPLETELY different direction, 3 Charlie Christian's would be interesting.
https://www.seymourduncan.com/single-product/quarter-pound-strat
https://www.fralinpickups.com/product/strat-split-blade/
https://www.mojopickups.co.uk/product-category/pickups/charlie-christian/
Thank you so much! I think the Fralin option hits the spot - I found what I was looking for
")
-
44 minutes ago, mistermikev said:
I have some lace sensors... from the 90s. they really are good pickups but I'll tell you the skinny on them from my perspective... a single lace sensor has less hum than a typical single coil pickup... but when you combine two lace sensors or a lace sensor with a std single... they don't cancel hum at all... so they have MORE hum than typical single. They also don't have the "magic" that comes when you combine two std singles. for that reason... they've sat in a box.
so... if you want some things that are "different"... here's some favs of mine...
dimarzio red velvet. this is a great bridge strat pickup... one of my favs. it has a brass plate on the bottom that reflects the magnetic field upward and gives it some extra growl. It ends up somewhere between a strat and a tele pickup.
rio grande tallboy - this is a super overwound single. again... lots of mid bite.
for something different... you might try some of the seymour single sized humbuckers. for me... SL59 is just a great pickup. lower output for a humbucker but just a great sound for the bridge or neck in a strat. similar to lace... when you split these and combine with the middle/neck... they aren't great. I prefer combining a bridge with a std single neck and middle at the sm time. great sound. or you can wire up the entire guitar with single sized humbuckers. a jb in the bridge, seth lover in the middle and 59 in the neck? guaranteed great combo. when you split and combine these mini hums together... since you are combining one thin coil with another similar thin coil... they sound great. so you might go with a super switch and do split/combined in position 2/4 for a more strat like sound... and full humbuckers in 1/3/5 for more 'humbucker' sounds.
you could go all active emgs... emgs have a sound all their own... and I'd say they aren't as good for cleans but mark knopfler sure makes them sound good. you can see a live vid of him doing 'brother in arms' with all emg singles and it's about as good as it gets.
just some ideas.
Thank you so much for the great ideas! I’ll look into these
-
 1
1
-
-
30 minutes ago, Bizman62 said:
I don't know if you'd get any major difference with the Lace Sensor Golds compared to your vintage spec ones. Their marketing speech heavily relies on the "50's sound with less noise" with "wider harmonic range" as a side note. Then again I've never used either "true vintage specs" or Lace Sensors. All I know is that even the cheap ones I've been using seem to produce the recognizable characteristic tones of a certain guitar, at least to a degree according to more savvy players.
That said even I with my sub-mediocre playing skills can tell that there's audible differences between pickups of the same type. Back in the day I tried a Strat with a much hotter bridge pickup. Most likely the previous owner had used that for boosting his soloing instead of using a pedal but it was totally unplayable for me. Noiseless sounds good on paper but how much of the characteristics of a single coil comes from the hum? You can't tell until you try!
Happy hunting!
Thanks for your input. I too am suspicious about how different they will sound from my vintage spec PUs. I saw some videos that showed lace sensors to be quite different in their build and this the physics of how they work and so I wondered if that might translate to something tangibly distinct while playing.
I have been looking for what else is out there as a single cool option for a Strat. If nothing I’ll probably just settle on Lace Golds. Let’s see…
-
Hi All,
I’d love your opinion… I’m on my second build, this one is a Strat. I am wondering which pickups to try. I have a bunch of vintage spec Strat single coil guitars already, and vintage Ibanez and Tokai humbuckers too, and a P90 on my last build. So, I want to try something new on Build#2, something I don’t have.
I was thinking Lace Sensor Gold. Any thoughts on this, or any other suggestions for me to try?
I play SRV, Jimi, Mayer, type stuff.
Thanks so much!
Sia -
1 hour ago, avengers63 said:
I wasn't referencing the HEADSTOCK angle, but the NECK angle. With a Gibson-style tune-o-matic bridge, an archtop, or an acoustic, the neck isn't parallel to the face of the guitar. It's at a bit of an angle. This lets the strings still be relatively close to the body/pickups while compensating for the bridge height. Of you examine a Gibson, specifically a Les Paul since you're making a carved top, you'll see not only the neck angle but that the carve isn't even, resulting in the top of the carve not being on the same plane as the rest of the body.
As you're making a carved Strat, this isn't nearly as important for you at this point. Still, I'd greatly encourage you to research the topic. The more knowledge you have, the more informed a decision you can make on how you are to proceed.
Thank you for clarifying. Let me read more and think about this. Thanks again!
-
42 minutes ago, avengers63 said:
1. I think Bizman has that one covered.
2. I've never heard of them. What I've experienced - It's OK to be frugal, but don't be cheap. Make sure they're using quality parts. Take some time investigating what the different magnet types sound like. Don't be afraid to buy used pickups on eBay, but be aware that there's a possibility they might be damaged. YouTube is your friend, especially for sound comparisons.
3. 45mm is about right for a Strat-like body thickness, so you're off to a good start. The carve depends on the neck angle and type of bridge. Staying with a Strat style hard tail and no neck angle, I wouldn't go more than 5-10mm. The more exaggerated the carve, the worse it looks, at least in my eyes.
Thank you. Your persepctive on point 3 is something I did not think of ie headstock angle and how that plays into the symmetry of contour in terms of aesthetics
-
1 hour ago, Bizman62 said:
That seems strange unless you're really going to the edges in which case you may have an issue. That said I did the math with a 300 mm radius for a 56 mm wide fretboard and if I calculated correctly X would be 298.8 mm. Adding to that the 1.5 mm of your inlay we'll get 300.3 mm which means you'd still have an extra 0.3 mm at the very edge. Or if it sounds clearer the cavity for the inlay would be 0.3 mm deep at the edge. That may sound very little but it's 20% of the total thickness.
Yes I had similar calculations. The inlay goes all the way up the 7th fret - there is a large wave and then a smaller but longer one. So, at the narrower end of the fretboard (like 50mm width) the amount of material at the edges is VERY tiny (since this inlay goes quite close to the edges). This would still be Ok if I had confidence in the precision of my work. A little here and there and it could be the difference between .3mm and zero material left (this is what happened to me the last time I tried the same inlay- though that was with a 9.5 radius). The thing is I also don’t know how many mm I would need to shave off to get from flat to 12 inches. And so the depth of the inlay is another issue (I don’t want to route after radius- this was a bad experience the last time because the MOP didn’t sit flat and eventually cracked). Basically, the steps I would need to follow are first routing, then radius. And with how close the depth calculations are I feel I will mess it up - it will need to be trial and error to some extent even after all calculations. And this is why I need back up fretboards for this particular task.
-
I’m thinking I will carve the top 15mm (0.6inch) of the body. And I will put 7mm binding after that. So, if we measure from the bottom of the body width, the binding will start at around 23mm (0.9inch) from the bottom and then the contouring will start from 30mm (1.18 inch) from then bottom, and the bridge will sit at 45mm (1.77 inch) from the bottom.
does anything sound off here?
-
2 hours ago, SiZi said:
Wow super helpful. Let me give this a shot!
Based on my calculations a 12 inch radius doesn’t look feasible. Even 16 inches is close. The inlay is only 1.5 mm. I think it might be better suited for 16 inch or flat radius on an acoustic. I will try this out on my 3rd build, where I will use a two piece neck (separate fretboard) so that if I make a mistake it’s only the fretboard that is wasted. My current build is a one piece neck so I don’t want to risk it all.
thanks so much for the help!
Does anyone have suggestions about the contouring depth? I am wondering how deep I should route at the edges in order to contour from the top of the body like a PRS or Les Paul. The body measures 45mm (1.77 inch) thick at present. Thanks!
-
3 hours ago, Bizman62 said:
I'd say 12 is a good radius. However, if uncertain, I once made this little math excercise that tells how thin your inlay will be at the corners. Or rather, how wide can you make your inlay before the edges reach zero thickness.

Wow super helpful. Let me give this a shot!
-
My previous build was a tele body, so this time I am thinking of a Strat body. Walnut body and neck. Also, I want to learn a few new things so the neck will be a one piece. For the body, I am thinking of trying binding + contouring the top like a PRS. Body colour I’m thinking black under and shell pink on top. Heavy relic to show off the grain of the wood in key areas. For the fretboard, I am considering a rather large MOP inlay of a large wave.
Questions for the more experienced builders on this forum, if you might be willing to share your perspective please:
1. Considering the rather large MOP inlay, I feel like I should make the radius 12 because I am worried a tighter radius will make me sand into the MOP at the edges - will 12 be OK? Or should it be flatter? Any thoughts?
2. For pickups I was thinking of 1962 replicas made by General Vintage Tone. Not cheap. Does anyone have experience with their pickups? Worth the price?
3. the body measures 45mm thick. What do you suggest is a good thickness to which I should drop the body around the edges and contour from the top down to that height?Thanks so much!


-
Wabi-Sabi xCaster
The idea of someone like me (with zero woodworking experience) being able to turn planks of wood into an actual functioning guitar seemed absurd. Then I came across this fantastic tutorial (link), making it seem possible. I had to give it a shot! The build started off with clear direction. I wanted to make a plain old vintage-spec Surf Blue Esquire. But, I was thrown off course during the 18 month build journey thanks to overambitious design plans coupled with very limited knowledge, skills, raw materials, and tooling… The build was done in a small spare room in my apartment! It was made with 100% hand tools at first. I am too embarrassed to reveal precisely how many total hours I invested in completing the first iteration - a surf blue Esquire. But, it was completed in 3 months and I was shocked and pleased by the results. My pride didn’t last too long though because I started noticing serious mistakes everywhere. Disappointed, I gave up. Then, a few months later, I decided to give building another shot. I stripped the guitar down and started redoing virtually everything. Several months later, success!

 Why “Wabi Sabi”?
This poor guitar went through more cycles of iteration than any musical instrument should endure! I decided to celebrate the scars it had collected through the process, rather than hiding them apologetically. This idea fit well with my original theme of Wabi-Sabi (侘寂), which I interpret as being a celebration of the reality that nothing is perfect and nothing lasts forever. This guitar has picked up dings, gouges, scratches, and markings from drilling/filling/re-drilling holes and removing/adding wood for patch up work. These scars paint a picture of my journey from knowing nothing about woodworking to eventually building a guitar that I am proud of. Also, I have intentionally stripped some of the paint work and protective coating off the screws, body, etc. to give the natural ageing process a head start. I have added some copper elements to the guitar because of their patina-prone properties, to make further visible the effects of time on the guitar. The idea was to make a guitar that seems to live and breathe, organically changing over time as it grows older.

Why xCaster?
Well, it's a Strat but also a Tele, depending on which angle you look at it from. I love the slabiness of the Tele body, its minimal two-pickup system, and its character-filled bridge pick up. But, at the same time, I like some of the contours of the Strat, and I prefer its headstock design. So, I mixed all these elements up! I also added some unique features of my own.

Specs:- String-through-body bridge
- Body - European Ash
- Color: Matte black nitro/poly blend spray can, top coat is matte clear 2k spray can.
- Neck - Maple with ebony fretboard, Neck is stained brown, and finished with boiled linseed oil. Measures 0.98 inches at the first fret and 0.85 inches at the twelfth fret, with a soft V shape (like ‘57 Fender). Radius is 9.5. Vintage clay dots.
- Pickguard - 99% copper
- Total weight - 10 lbs
- Scale length - 25.5”
- Truss rod - I made a slot in the body and pickguard, along with a custom length Allen key to be able to adjust it without removing the neck or pickguard
- Headstock - I used a ‘60s strat template. The 2mm rosewood inlay was in fact a cover up! I had messed up inlaying my logo into the maple fretboard previously, and so routed that part out and put in some rosewood instead and then successfully put my MOP logo on it. The copper name plate on the headstock was laser etched and then made to pop with some Laskin’s engraving filler
- Nut - TUSQ
- Tuners - Gotoh SG 381
- Pickups - Bridge has a replica of David Gilmour's 1955 Esquire. It is wound with period correct Heavy Enamel AWG42 wire, wrapped with 8 strand white cotton string, and has been wax potted. The pick up has a copper plated steel baseplate, raised D and G magnets, and North up polarity just like the '50s original. It presents around 6.9k Ohms resistance. For the neck, I had a '50s style P90 made precisely to pair with the bridge pickup. It presents about 6.7k Ohms resistance. The pickup has a nickel silver baseplate, rough cast A4 magnets, and single shielded push back wire. The pickups are supported by two 250k Fender pots with a treble bleed network that I made. The control plate has a three way switch and one tone and one volume knob.
There is a lot of backstory to every design choice but it was too much to include here. You can visit my website and read more about it if you like (link).
Here is a video of how the neck pickup sounds clean with only reverb on a 1W tube amp volume turned up a little past 3 quarters of the way…-
3
-
On 1/20/2023 at 12:56 AM, Bizman62 said:
No sound often is related to a short to ground. One culprit can be the copper tape: If any of the bare wires/solderings touch the wire, that may be the cause. It's easy to test: If you get sound with the control panel outside the cavity, you can tell for sure that the copper is touching something.
Another potential culprit is that if you've covered the jack hole with copper, the hot lug may touch the copper and ground it. Again, simply unscrew the jack and pull it out.
Ask me how I know...
I had the same issue and the copper tape was the culprit. Took it out of the control cavity and everything worked fine.
-
1 hour ago, henrim said:
It usually does beep so I guess you can call it that.
Yes that is definitely a good point - I’ve used the multi to check pick up resistance but I don’t know how to check for continuity here. One on the lug and the other should go where?
-
1
-
-
Yup, it worked
Thank you all so much!
-
1
-
-
20 minutes ago, Bizman62 said:
I'm not good at it either but I've managed to follow that type of drawings...
What I've learned about wiring is that it's a loop starting and ending at the jack. Well, not actually, the loop continues through the amp but inside the guitar everything should make a loop from the hot to the ground of the jack, or alternative loops to be more exact.
And regarding your issue with the switch: Searching for DM-30 switch diagrams revealed that you're not alone, there's been many others struggling with the same problem! Apparently the switch is commonly used in Made In Japan Teles but the diagrams are harder to find. This is the clearest I could find using a DM-30: https://www.customworldguitarparts.com/netherlands/tele-wired-gold-control-plate-mighty-mite-orange-drop.html
But that's different to what was shown at https://forum.seymourduncan.com/forum/the-guitar-shop/6060590-dm-30-wiring-diagram?p=6060843#post6060843
Wow this is very different from what the regular switches require. No wonder I have been struggling! Because I have successfully wired up much more complicated set ups and was shocked that I couldn’t manage this simple 3 way switch! I’ll try these tomorrow morning and report back
 Thanks so much! If Curtisa manages to share a diagram I’ll try that too. I’ll keep everyone posted.
-
39 minutes ago, curtisa said:
Actually, scratch that. The photo of the switch you're using suggests it will not work if you just follow the original diagram as-is. There's some transposition you're going to have to do to make it work.
It's late in my time zone. Assuming no-one else manages to pick this up I can whip up a revised drawing for you in the morning if you like.
I think the fact that my switch is different is causing me confusion. Yes I would greatly appreciate a diagram whenever convenient, thanks so much for the offer!
-
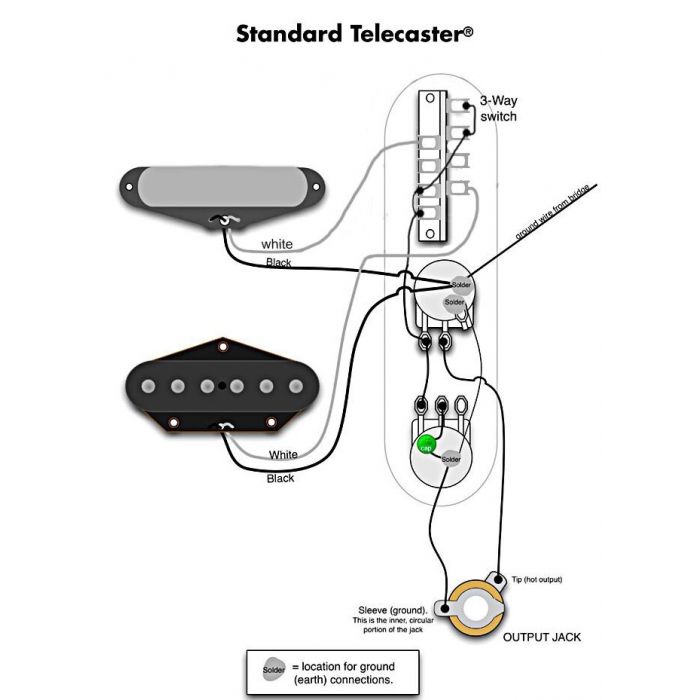
ok, here is how I have rewired it. But now none of the pickups work in any position. The neck and bridge only work if I revert back to connecting CDEF with F also connected to the pot lug (but still none of pick ups work in the middle position)

-
44 minutes ago, henrim said:
Don’t connect any lugs of the switch to ground.
The body of the switch should be connected to ground though. The plate appears to be painted but I guess paint is removed under the pots and and switch.
So I should remove ground and connect BDEG? Let me try that and report back. Thanks
-
20 minutes ago, Bizman62 said:


If that drawing is accurate, your ground wiring is a bit off. B-D-E-G should connect to the lug of the pot. Instead you have C-D-E-F connected to ground.

Just to clarify… are you suggesting that I should not connect CDEF with each other, but instead connect BDEG and connect the ground to BDEG?
just FYI, I tried to connect BDEG (with ground at F (as it was) but that didn’t work.
Sorry, if these are silly questions, I just don’t understand the logic of how this wiring stuff works in spite of watching many videos
-
And here is a pic of the exact switch

-
Thanks for the suggestions. Here are pics of the control plate, as well as diagrams to explain what I’ve done (because the pics are tough to see through clearly). I’ve also attached a diagram of what my switch and it’s lugs look like and named each lug to help you with suggestions. I truly appreciate the support!


-
11 minutes ago, Bizman62 said:
A photo of your control plate would help.
Sure will do tomorrow, thanks


Help! Grounding Issue!
in Electronics Chat
Posted
Ah! I was wondering about that! Let me try this. Thanks so much for the suggestion