


low end fuzz
-
Posts
909 -
Joined
-
Last visited
Content Type
Profiles
News and Information
Tutorials
Product Reviews
Supplier Listings
Articles
Guitar Of The Month
Links and Resources
Forums
Gallery
Downloads
Posts posted by low end fuzz
-
-

it does look cool
-
what you have there is plastic and plywood;
jst look at the company name 'toyland';
its made for some 8 year old to have , so his parents dont slap him around for throwing it down the stairs;
even for a beginer, you have to have something that will stay in tune and not break, these guitars cant even offer that, as well as sounding like crap!
stay away;
if you wanna have a project involing gutiars...make one!
even just the body out of some pine and buy a completted neck; it would be cheaper and you can learn something
-
please share; i love seeing peoples work who arent afraid of a lil extra glueing
-
i wanna try some brass nameplates on the headstock; i think that screwed in w/ a couple of gold screws has the potential of looking really classy;
i thought of getting them done at a trophy store, but are too expensive for all the comprimises id have to make; fonts and using my own brass and what not;
i wanna cut the metal into a scroll type thing; kinda like a bubbly 'z' on its side; yu kno?
with my font type ive been uing;
any ideas of places that could be a lil more accomidating?
i also thought about using a dremal engraver, but i use one at work and i can barely make the date readable
(first class craftsman)even a 'stamp' (like stamping serial#s) but customized to specs;
anyone?
thanks
-
that neck looks amazing; but beware of multiple venneers in the neck, especially side by side; it dosent look like a 'firstbuild' (far from it); but with the rounding shape of the neck, those glue lines show theyre ugly head more than anywhere and are impossible to fill when the next layer is another veneer, possibly with the same problem;
but i am exited to see this bad boy;
keep this post alive
-
ive never heard that; and since no one else is adding anything, i'll put in my 2 cents;
first, pearl is flattened from shell, and ive never seen a piece thicker than a mm (or so)
not saying it dosent exist , but not to my knowledge;
second, its not so much that its brittle, which i would consider it; as much as natural cracks all thru it, that im sure would make shaing a dangerous task; if your pearl inlay cracks in half, you can inlay it w/o anyone the wiser; putting a nut that is (or at one time) 2 pieces cant be good;
i did however always want to try a nice wood nut with pearl between laminates, just for asthetics;
and i know thta would make it more than one piece, but wood with epoxy or glue would be harder than just the wood itself, where it just dosent happen with bone or plastic; or pearl?......
-
if you used wood, it would cost less than the epoxy
-
i think it would sound good as a body; im not a huge fan of walnut 'guitars' ( i like bass)
but just get yourself some muddier pickups if your really worried;
the neck will prolly contrast very well, because yuor purplehaert will eventually take on walmnut characteristics;
woops didnt read it right; you ARE makking basses;
they will sound awsome;
make em jazz basses!!!
-
anyone know where i could find one?
-
id wait more like a week
-
if you level sand; re-apply and rub out the finish; you dont have to worry about brush lines or anything, just make the coats thick enough that you dont sand thru
-
i tried it once , i put fresh oil ontop another, waited and put the stain on while the oil was still laving fingerprints;
it didnt stain the wood but coulored the oil
-
i dunno; i havent set my final heel height/angle yet;
thanx everybody
-
thats a fair question;
ive seen them before; dont know if they put epoxy or something on it for strength;
personnally i just wanted to try; if it blows out, i'll let you know;
but i bet the frets would give it the extra strength; if any, it needed
-
yur your own toughest critic;
but why let something go your not 100% on
id love to see some pics
the paper bag is great, im not sure what grit it would resemble, but theres a perfect roughness there, without the problem of the lil grit stones(?)
anyways its good
-
assuming its the same thing thats happened to me; oil as a finish doesnt scratch, it both lets scratches through, and highlights the tiniest scratches in the wood; thats why i gave up on tung oil, im too clumsy;
but i got many perfect, but its patience, and going thru an entire catolog of sandpaper;
using the traditional (after machine sanding) 100 grit to 220; i continiue up about every 200 grit (ie 400, 600, steel wool 0 s.w. 00 sw. 0000) and i raise the grain in between each of these higher sandings, cause i belevie that constantly swelling the wood closes up some would be scratches; as in , i find i get a better sheen; then after the first couple of coats wet sand w/oil as the lube (a tip i got on here) and finish by sanding it with a brown paper bag; and after the first few sandings w/ oil, dont go the direction of the grain, your gonna want your scratch patterns every direction for an even sheen.
-
thanks guys;
any schematics? or some info on what goes into wiring them?
thanx again
-
i tried a search here, and google and what not; and maybe im asking the wrong searches?
is there someone/where that can give a good outline of these?
i get that there lil pickups in each of the saddles, but are all piezos active? does it need a 'motherboard' of some kind?; do they sound good/att all while another pickup is on?
any help would be great; and i appoligize if there is a big long post all about them ,right under this one
-
-
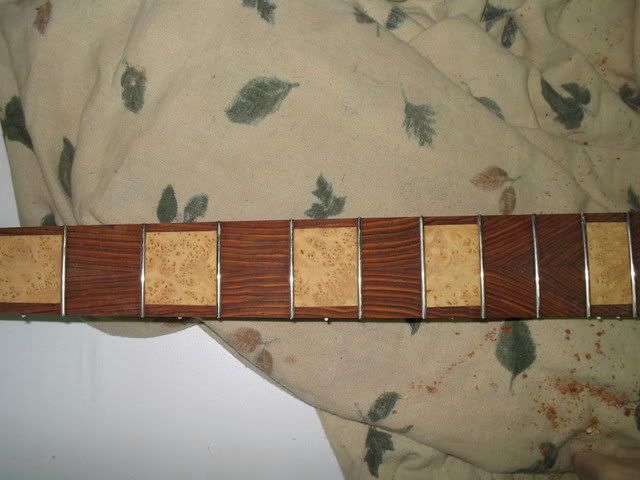
theres two filled in side markers on the wrong side of the fingerboard of this one; the rosewood dust worked perfect to hide them;
but from that moment on, everything was labeled 'left handed/top/bottom' in masking tape on everything!
-
definatly thanks;
its more work than i would like; but you gotta do what you gotta do; thanks
-
ya, we're on the same page, but here is my situation,
*sidenote* i have used bushings before and for the most part they can be put in by hammering them in thru a slightly larger, tapered front hole in comparison to the pole from the back; these tuners though have a big diffrence;
the pole piece is .545 in diameter, while the bushing is .725
i dont have the 'perfect' size for the bushing, and am trying to get them in while having both sides snug;at the same time they have to be dead center; i hope that makes sense;
ive had guitar (6) bushings that were a big difference before and i drilled out the pole piece of the tuner to a nice fit; then i wedege a dowel in there so i could remark the center, then drilled out the top portion; but these bushings are too big for any of my bits, and i cant find a 23/32 bit at stores, which is what they call for;
the only thing i can think of is grabbing my smallest flush bit for my router and canging the bearing to make a super small rabbet and do it that way; but that is even still awkward; im gonna try a scrap piece tommorow but i think the finger board will get in the way of my router base;
thanks
-
-
who has a method for installing machine heads w/ bushings wider than the poles;
how to keep them lines up; how close you are to true size, and keeping both ends snug;
thanx


Brass Nameplate
in Inlays and Finishing Chat
Posted
really?
that sounds kinda cool;
i wouldnt know where to get this press n peel;
any help?