


low end fuzz
-
Posts
909 -
Joined
-
Last visited
Content Type
Profiles
News and Information
Tutorials
Product Reviews
Supplier Listings
Articles
Guitar Of The Month
Links and Resources
Forums
Gallery
Downloads
Posts posted by low end fuzz
-
-
cool;
my buddy loves tru-oil, but the w.o.p. is waay cheaper and builds faster, so it always gets my endorsement wheather ppl want it or not. lol
-
Tracing onto MDF isn't a bad idea if you don't have many tools. Careful of the dust from that stuff though. It's not nice. If you don't have access to a pillar drill or bobbin sander to finish the edges, wrap sandpaper around a tin or an aerosol or whatever. Great for shaping up the edges alond with a flat faced sanding block.
MDF is a great way to make templates. You can make a thin 5mm template, then use a router with a template guiding bit to transfer the shape to something larger like 10-15mm MDF.
I'm a firm believer in spending a LOT of time on making good templates. The guitar will only ever be as good as the template you made it from.
totally!!
even hardboard is great for preliminary template (to then transfer)
im sure i dont have to tell you; but for the ppl who will say "thats stupid, why not just make 1 and be done"
where i run (ran) into my biggest headaches was when you had a nice thick templtae and all was good routing your pickups and such, then you go to stick in the pups and something aint right; the small angle that unnoticably found its way into your template has turned your cavity into a wedge like effect, that is multiplied every pass you go beyond the template. one pass on roter from that template ensures the edge is as straigth as the bit, which should be good; if not your in real trouble.
-
if its ease of application your looking for, try the wipe-on poly;
its a wipe on varnish with some poly for protection, it looks like a hand rubbed finish that comes in satin or gloss; but i just buy gloss and take the sheen off with 0000 steel wool, if you build up a thick top w/o buffing it off with wool or 2000 (on the neck) it does tend to have that tacky plastic feel.
-
body is all routed, grainfilled and inlaid (faux pickguard) and no it dosent look like a cavity cover.........
the neck is all fretted and awaiting some leveleing that should have been done if not for a serious case of A.D.D.
i decided to bran my logo i the front as opose to a removable heel cover and the headstock will get a brass serial stamp ; if for no other reason to be different.
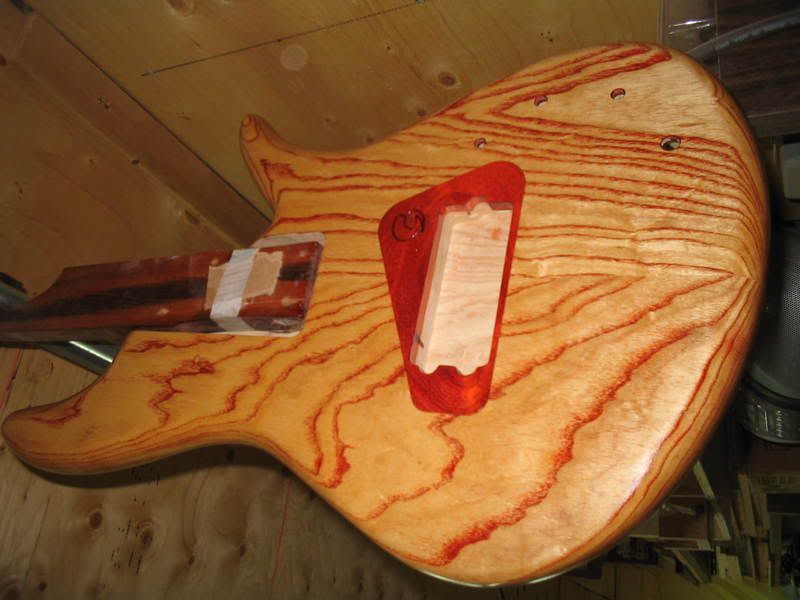
the colour grainfill was a bitch to match to the padauk (which is gonna change in a year anyway!) and when i rushed it on it was athousand degrees and was not very cooperative in the sqeegeeing phase, so there was alot of sanding; it never bothered me with clear fill but this was another beast; both trying to get off excess w/o removing to much and making sure not to sand voids; must practice and fix air conditioner;
next post should be a finished product, or an update of disaster.
grant
-
just put it in like normal;
an extra inch off the top or bottom wont change muc, since your problems ;if any; are gonna happen somewhere between the 5th and14th
its waay more important to be able to access the rod than be 'perfectly' in the middle; to me
-
No, I don't think so.
Presuming that you're routing / carving out both pieces to create the hollow, you'll be taking out up to 7/8" from the bottom, and up to 5/8" from the top, that leaves you with a 2" body,with a hollow of 1-1/2".
Depending on how you want to shape / carve the actual body, especially the top will determine how you go about the internal carving... how much you shallow it out internally, as you get closer to your edges, so as to compensate for how much you carve off the top.
If you leave the top flat, for example,the join between the two pieces will be harder to hide, as it's 7/8" down from the top, than if you carve the top down towards the edges, that way you can use a binding or an accent lamination to hide the join.
Gee, I hope what I'm trying to say here makes sense!
im having trouble understanding this; not sooo much that i dont know what 'your' saying;
but you could put a 1/4" forstner hole under the top and still be 'technically' a semi hollow;
so if its an origainl design, just base it around your supply;
i read this thrice , so i might be missing the 'spirit' of what your trying to say , but i think your saying the problem would be profiling the edges of the body and start digging into the hollow of the body, right?
-
yess!
carl thompson is the man!
which would put you in a close second with this (ya that s acompliment)
i wsa initially upset you went for a bolt on ,but it looks outstanding, good work; aand ya fast! what was that about 10 mins!
-
why not?
if anything you'll have to hollow it 1/2" less, but its still a semi hollow;
-
is the 'tree'/bar really nescessary when the strings are in a locking nut?
i would assume that they wouldnt, but technically never thought about it before
-
gotm
shoulda made a 36" yayyayyaya
-
update
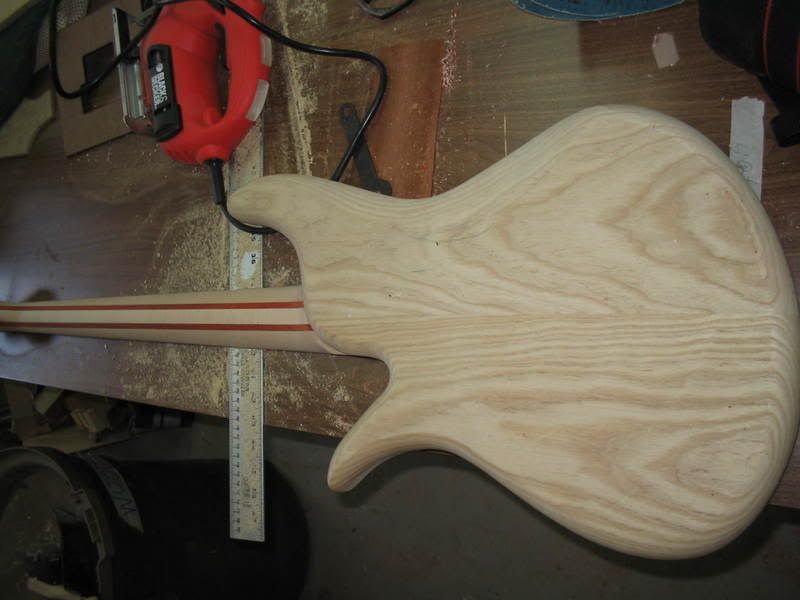
body rounded over
palm rest tummy cut
neck pocket routed and heel fitted
theres my lil racing stripe that i want to start doing again on unfaced haedstocks;
i screwed up alil by sending the entire length of the neck through the router for the truss rod on the first pass; (that lil square under the fb add-on) but im doing my inlay there cause theres no room at the top; i was torn whether to do it there or on the heel cap, but it made my mind up for me.
-
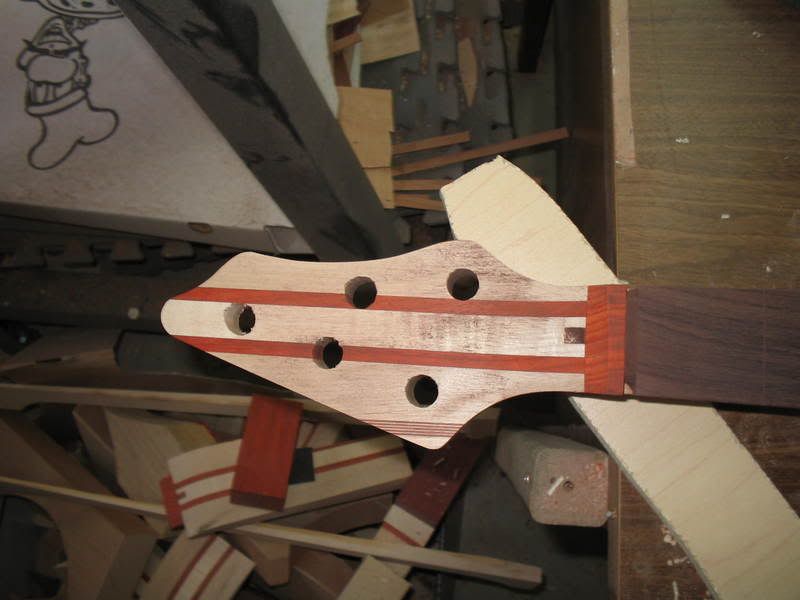
been working on this for awhile and took some shots
the tuners need to be replaced; they have mock up ones on still;
some polishing an small scraches to deal with, and itink im gonna paint the screw heads white in the heel cover; but maybe not;
bartolni jazz w/ preamp
and badass2 bridge
1pc maple neck (first for me)
-
here s the specs
2pc swamp ash body
5pc neck maple/paduak/culry maple
stinray 5 bartolini
schaller roller bridge
gotoh tuners
3 band bartolini 4 knobs
all gold everyting (its afirst for me for a bass)
rosewood fingeroard
stainless frets
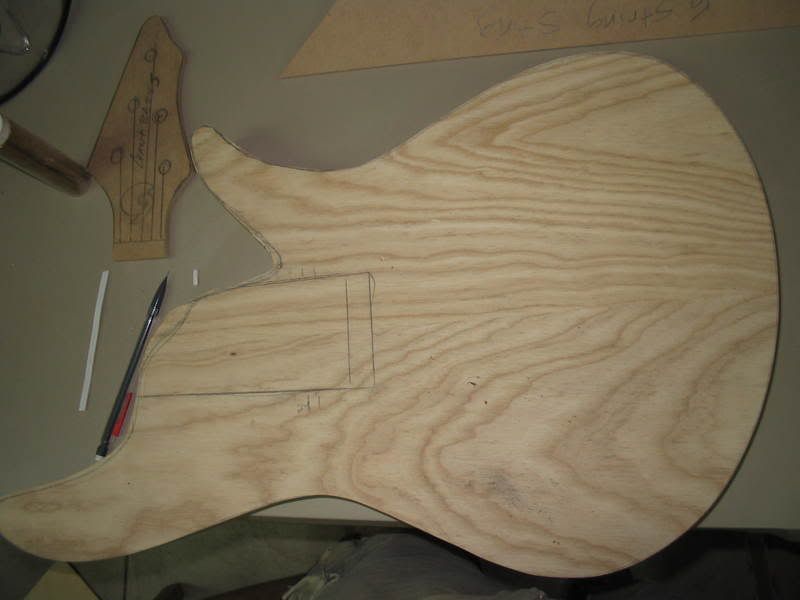
the graain will be filled w/ a 'mandarin' type colour, that will hopefully give the flavour of the neck in the body
heres alll 4 pics
http://s68.photobucket.com/albums/i23/lowendfuzz/5%20string/
-
i would agree w/ erik, and disagree with ihocky;
although it makes sense to want the strings to pull the neck, its not something that should be that quik;
loosen the strings, do the 1/8- 1/4 turn;
tighten strings and play around with it; it may seem right away that othing happened but after a lil playing and time , the neck will slowly(properly) give more releif with the strings pulling over a period of time;
like bending sides, if you do it slow the wood ''naturally'' finds it place; if its rushed it will return to where its been for a long time
-
well; not being a fan of the 'cloud guitar' in general (altho prince is good s#!!) it shows you put alot of work into it; you should post pics on this site, cause that other site is a bit of a pain in the arse;
as far as the tape thing; if the paint 'chipped' when you removed the tape youve waited tooo long;
you want the paint to set (like flash off) but still have the rubbery consistantsy so it will come apart easily;
even if it means painting removing the tape and masking off again; quality is a ruthless b*tch!
good jarbe!
grant
-
"IF" you were cutting thousands of brass nuts; what would you use?
-
holy crap!
a couple of years;
i was gonna say slow down and plan your aproach more, but i think you just need a lesson in making templates.
in the time it took you to route the pocket and fill it ,just to route it agian, you could have maade templates for every aspect of the build;
search some in progress builds and steal some ideas, its not that haerd to get a pocket relativley close as long as your methods are resonable;
read and succeed! (patent pending)
-
why not some super runny ca glue?
if its on a rounded/shaped edge you can put the glue in and roll a rubber roller (like from an o.s.sander)
and there you go; if you make a mess and have to fix it, you might screw your colour so be careful
-
ya, that would look cool with all that spruce, but denting is always an issue;
you might wanna consider an epoxy sealer; a topcoat is only as good as the substrate
-
that would be cool;
you could technically have it covering everyhting, like the hardware; i dunno sounds cool;
.................gummi de milo

thats the real reason i wrote anyhting
-
I have a related question:
Just finished my first bolt-on neck, it will be finished with Tru-Oil. I've made the neck pocket already, and the join is so tight that I can pick up the body from lying horizontally just by lifting the neck up. I've been led to believe this is the ideal scenario of join to achieve. So, my question is this:
as I will be painting the body, will I still be able to fit the neck in the pocket, or will I have to slightly "slacken" the joint to allow for paint thickness? How do you guys do this? Thanks!
DJ
tape off the inside of the pocket;
when i do clear colour and it builds up along the edge ,i grab a block with some 150 and gently glide the inside of the pocket, not coarse enough to dramatically change the size but more than enogh to scrape additional lacquer.
but yes get rid of it, when you go to put in an alrady snug neck you'll encourage ugly chipiin.
-
just based on experience of myself and friends;
epoxy is great for everything (west system i refer)
on the fingerboard it will seperate easier with heat (havent tried it myself)
grain fill sealer;
it seems like wood glue is the obvious answer for sticking two pieces of wood together, but i think alot of the people that use it for everytihng probably have something like the west system where you are suck with a shot glass of this stuff when a quarter of that will cover an entire guitar, and its expensive, so cut the losses with something that works excelent.
and unlike glue, i woud not want to jump the gun on getting it out of the clamps, which could be dangerous in a small area with neck blanks and 30 clamps all over the floor!
-
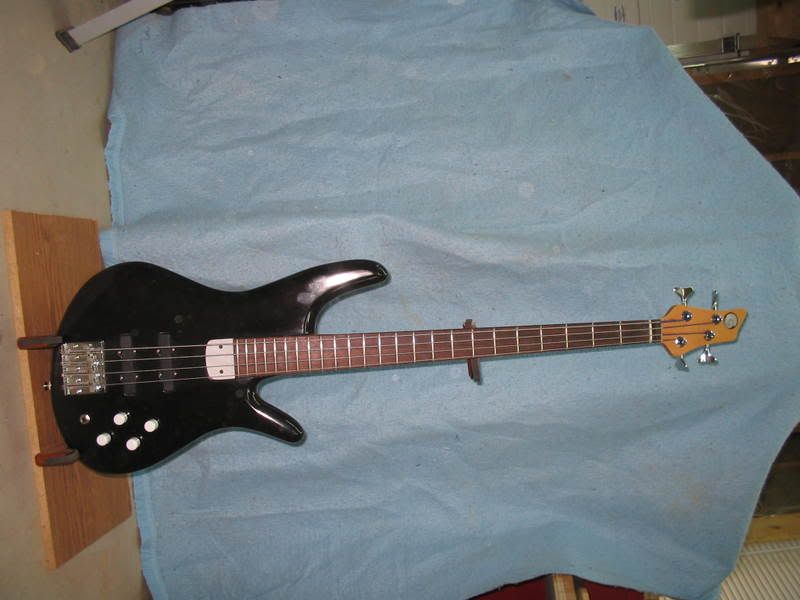
clean, original and beutiful;
what more could you ask for?
................maybe a bass
-
very nice!

Make A Template Without A Template?
in Solidbody Guitar and Bass Chat
Posted
spreading leftover epoxy is a great way to stiffen up the mdf and use epoxy going to waste;
the plastic is better for transparacy (im guseeing its clear) but i just put a bunc of holes along the center line of my templates