


low end fuzz
-
Posts
909 -
Joined
-
Last visited
Content Type
Profiles
News and Information
Tutorials
Product Reviews
Supplier Listings
Articles
Guitar Of The Month
Links and Resources
Forums
Gallery
Downloads
Posts posted by low end fuzz
-
-
no, it seems legit;
thats why you search ebay!
-
like most things on ebay, they are prolly hipshot 'style' made in hong kong with a shipping price that evens everyting out; so in the end you pay the same, for inferior products;
your page wouldnt load so i dont know
-
this is very searchable,
but tru-oil and wipe on poly, are basically varishes thinned down so much that you can apply them with a rag, they still get a lil absorbed into the wood, but they also build on the surface; which is better for protecting; they still have a hand rubbed feel and look for the most part;
any 'transparent' finish will show the grain
tung oil is a chinese oil from a tree or something, this is the real stuff, you can make this stuff feel like suede, it takes roughly 2-3 months to completly cure on the surface; not that you cant use it, but it will smell and the fact is, its not cured;
this really has no protection from any hits or bumps , but as a feature is the best for keeping moisture out because of how deeply its penetrated the wood, and it makes wood look amazing;
my personal fav. is lacquer the body and oil the neck, if you got time go for the tung if not i use wipe on poly and steel wool the 3rd and final coat;
if its a hand rubbed finish for the whole body its all w.o.p. and sanding is depentant on request
-
Ok starting to get it now. So here's the new plan:
1. Apply Sanding sealer
2. Apply Black Grainfiller (stained with analine dye)
3. Sand Back
4. Clear/Or ad brighter dye colours on top and then clear.
2-3 things;
first off, let me know how dyeing the grainfill w/ analine works, i just never think about it, but it would open such a big world of colour for me ,thanx;
for the washcoat, use regular finish, its new wood so you dont need a buffer zone between materials, it will help to level your finish easily which is why its recomended, but (insert 3rd idea( if you want the wood(oposes to the grain) to be different colour, dye it first ,then seal))) if you spray regular finish as a sealer add grainfill then sanding sealer yada yada yada, when your leveling and all that jazz, you'll feel if youve gone too far into the finish if you pass the sanding sealer (soft) into your 'topcoat' material (hard); cause nothing sucks more than going back and refilling pores and at the same time recolouring the wood!
i do this on everything now color or not because i suck at sanding thru edges

-
im a canadian in an american resession;
everythings for sale!
-
so, its pretty much unanimous ;you get what you pay for;
i do like those 'everything' packs from like s.duncan
thanx fellers
-
there ya go!
thats a furlannetto F-bass from 15 min, down the road;
George is the man!!
but you guys got it; black pore filler;
just washcoat the wood first or the black will get into the smallest of pores and stain up the wood; which both ruin the stunning effect;
you want to see something cool, look at his ceruse!
fbass.com
-
is the left over barb sharp enouh to grip into maple? (soft binding)
-
thanx;
im asking in the essence of making a new body, so needing everything incl. pickguard;
but ill check some out on ebay; any 'brand names' that exeptionally good for this?
-
so i seen these while i was browsing, and it dosent seem like a half bad price, for the time it saves of a throw together/drop in;
but besides the reference to 6k ohms there is no info on the pickups themselves; anyone try them?
are they chinese skweelers, or something else,
e.g. if i was upgrading a squire ; would it be an upgrade or downgrade?
thanx
-
so i got a bound fingerboard here, and was about to hammer in some frets,
so i cut them to size and marked where i wanted to remove the tang on the bottom;
i tested cutting it off w/ flush cutters on a spare piece; keep in mind this was a straight cutoff from some old stew mac wire; now im using lmii wire that aleady has a radius; which i think is the problem; cause when i went to cut it off, even in lil bites at a time, it bent the wire up and slid down the tang because of those lil triangle teeth;
pissed;
so i cut the bulk off and used a grinder to get them down, not very clean, but it worked; but; its way to much work to do 48 times; for me at least ; and i can hear you , the answer is 'yes' im lazy.......extremely;
now my question
stew macs tang nipper; am i gonna have the same problem cutting bent wire? or should i go and get more straight wire which i know works with my regular flush cuts?
the problem i have; besides the board already been bound and glued and, basically a neck w/o frets, is that i dont like the straight wire cut into lengths, theres too much waste as opose to a continouis loop;
and i dont wanna spend 43$ on something thats not gonna solve anything
thanks for reading; im sure your family misses you!
[Mod edit: moved to Tools and Shop Talk forum]
-
a faster answer (no disrespect xanthus; and im sure none taken) is yes with lots of room to spare, even on a 7.25 radius
-
but thats just paint right?
he prolly tried to build up with just that;
ive never used it, but i bet some hard top coats of clear would of been fine
-
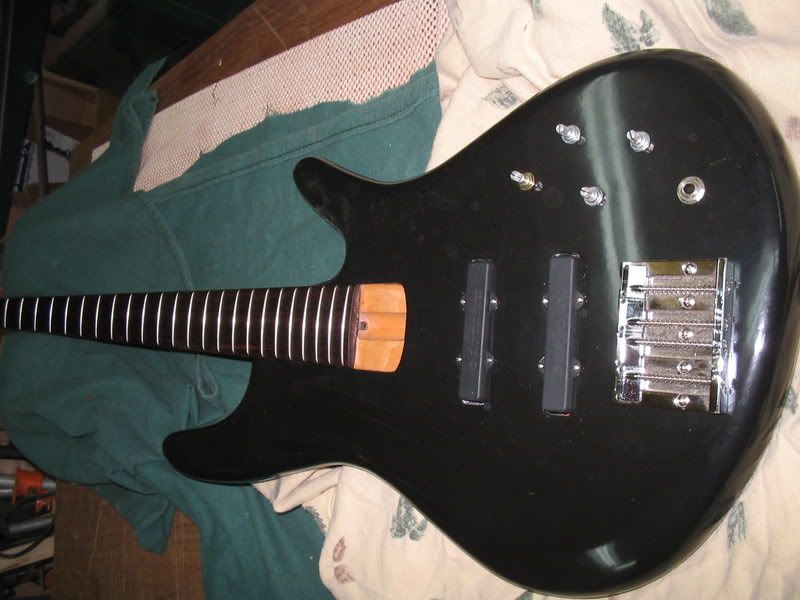
heres the blacquer one mid-completion;
one piece maple neck, 2piece alder body; pearl inlay; badass bridge, bartolini pups and preamp 35" 9.5 lbs bfore hardware
very basic; other pics are at the photobucket link up a few posts for those interested
-
it looks cool; but i dont know what im looking at;
is catain Kirk being transported in those links or is that he sun?
whats the product, you mentioned a name i think, but it dosent register; interested ,please lemme know
thanx
-
I wasn't quite sure I read your post correctly wohzah, was your buddy saying that the best method for installing a truss rod would be diagonal? In not being a luthier I don't know that one could offer such a suggestion without any experience in guitars, I know it is a form of woodworking, but such things don't always translate, ya know? Anyway, I'm not even sure if thats what you were saying, just checking to see. Having the truss rod off to one side too far would likely throw some twist into the neck. Just like having two truss rods side by side, if they aren't turned equally, you can add twist into the neck. I would imagine that having one truss rod off to one side would be in effect, the same as the pressure on one side would be different than the other, thus inducing twist. How much off it would need to be, I would have no idea, but I wouldn't really be happy or comfortable with a neck unless it was very, very close to center at least.
now, im with you on the 'truss rod in the center' thing;
to me ,thats just the way it is
but diagonal supporst and bracing in a 'x' fashion is a great way to strengthen structures; so id assume thats what this guy was pulling out of his a$$;
but if i could add to this discussion for s#!ts and giggles;
why should the rod not be placed closer to the bass side of the neck; there is far more tension present from the thikcer strings, if the rod is completly in the middle and the strain is coming uneven from side to side ,is that not enough to twist the neck on the 'corners' while only retaining straightness thru the middle?
-
how would the bridge be crooked just becuause the truss rod isnt centered? that makes no sense. if you align the bridge with the fretboard, it will still be aligned.
no, he glued the fb on crooked in contrast to his laminations;
1.5 mm of centre at the bottom dosent look bad; but when you carve the neck, by the time you get to the nut, your outside lams are going to look very uneven, now combine that with the entire length of a neck thru; byt the time he gets to bridge ; the bridge is going to be way off center ;
i would follow setch' advice; this is how you learn to make guitars, by fixing mistakes, not reading a blog and mastering your first build, you'll be happy after for the experience and it will beat in the importance of positioning during glue-up;
or........ you could paint the whole thing and no one will ever know; it will still be a hand made guitar out of good wood
but paint sucks, if it wasnt your initial intention
-
well, let me know how it works out, id like to know;
but i wouldnt be 'pretty sure' about anything, unless i tried it myself
-
you most definitly do not need big expensive tools for good inlays. all you really need is a dremel with a router base attachment. with that, you can do it all. or even a regular router with a really small bit.
i mean, without electricity at all.
i would assume you were amish, if you didnt post that on the internet, but why would you want to do that?
inlays (for me at least) take long enough already;
the reason youd want to use a dremal/router, is the becasue your trying to acheive their very motion, a plunge and hollow type of deal;
what are you trying to inlay?
the fingerboard? definatley want a dremal;
a body? if its big enough and its like a top or something, you could cut it out with a coping saw and inlay prior to gluing;
but even then, your gonna want a starting hole that would take an electric drill (technically)
dremel 60$
base (if bought) 50$
an inaly that dosent look like its sitting in a puddle of epoxy; priceless
-
use something real like 'cica 1850';
i dont know how alcohol could help when its cured, at least in a way that dosent make the same amount of work more messy
-
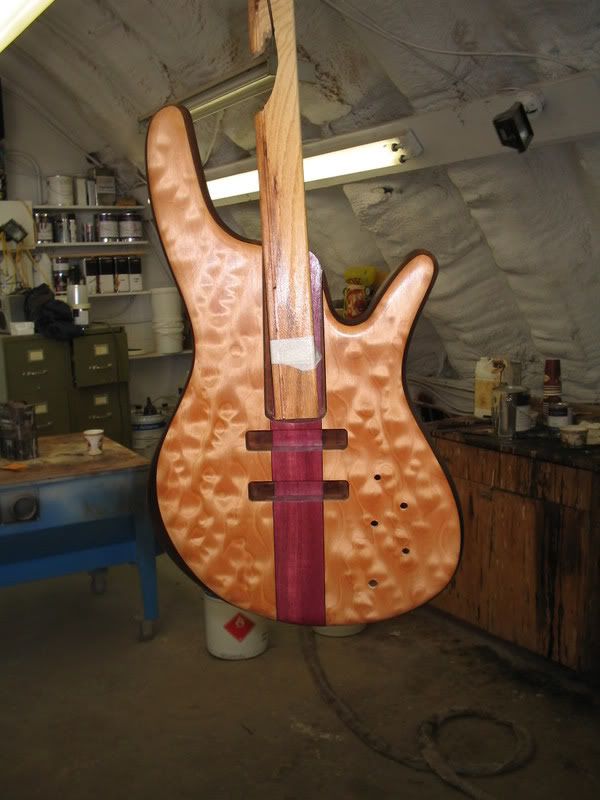
actually; its an experimental one piece oak neck; mounted with 3 #8s and masking tape;
ive opted to leave the headstock unfinished; cause my hand was there.
-
bullseye is a shellac type finish ,i beleive, which on itself would sand off fine; but i seem to recall some bullseye cans saying something like 'penetrates' or something on it; i might of been looking at to many things at once, but i remeber something like that, and i didnt want to touch it; that would make the stripping process hard
-
a wet front
-
mmmmmmmm


Oil Questions
in Inlays and Finishing Chat
Posted
ive got that book, second revision and everything;
"though too thin to resist scraching or water vapour, it has established a firm position in the paint and coatings because it is one of the most water resistant oils"
my point was wanting to use oil on the neck and using the best for keeping beer and sweat from entering the neck;
there isnt any finish you could apply that would guarentee water vapour from passing through thats why you keep your prize instruments in climate control;
tung oil may not 'fully cure' but after a few months its as 'cured' as its gonna be