


another doug
-
Posts
155 -
Joined
-
Last visited
Content Type
Profiles
News and Information
Tutorials
Product Reviews
Supplier Listings
Articles
Guitar Of The Month
Links and Resources
Forums
Gallery
Downloads
Posts posted by another doug
-
-
I'm not one of the pros here, but I've used zebrawood with good results:
Hard to tell in this pic, but the fretboard on my bass is zebrawood(zebrano?). I wasn't sure about it's suitability at the time, so it is bound, oiled(with the stewmac fretboard oil), and the fret slots all got a dab of titebond in the hopes of firming up the sides of the slots. Maybe unnecessary or ineffective, but I decided to try everything I could think of.
I have since seen a couple instruments on the net with zebrawood fingerboards. I think they look great.
I'll see if I can find a close-up pic when I get home tonight.
-
It goes a lot quicker if you put a drill bit in there.
But seriously though, what were you drilling? I'm guessing ferrules.
-
Not really to my taste, but if you do build it I'd recommend straplocks or something. The first thing I saw when I looked at that shape was the strap continually popping off of a normal strap button!
-
I like it a lot. The natural finish was definitely the way to go. All the work looks very smooth and clean.
3 questions:
What is the finish?
Is it the angle of the photo, or is the pickup a bit off-center?
Did you make the neck?
-
I once used that stuff while refacing my kitchen cabinets. I would stay away from it entirely. I may not have heated it enough, but after a couple hot, humid summers it started to peel away in places. Also, I think you'd be hard pressed (no pun intended, but it gave me a giggle) to get rid of the glue line with that stuff.
-
Here's my most recent, about a year old:
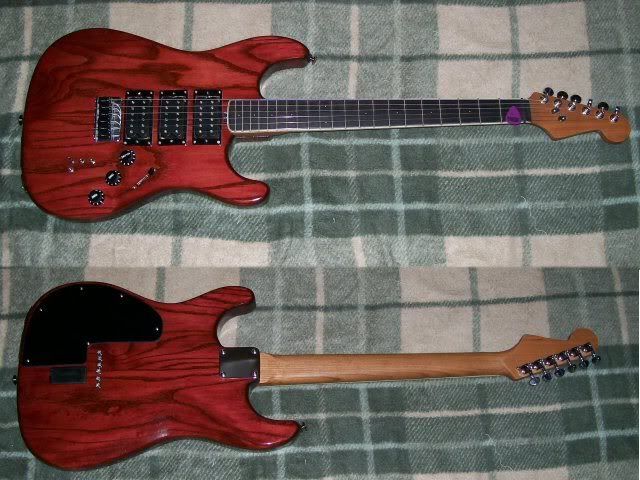
After a couple of over ambitious projects, I decided to keep it simple. I used my old Japanese Fender Strat to get the basic shape. The body is ash (not swamp ash, though), finished with a burgundy stain and topped with Deft lacquer. The neck is cherry with an ebony fretboard, finished with tung oil. Again, there is a spoke nut at the body end of the neck. I wasn't sure about the suitability of cherry, but so far it's holding up very well (probably helped by the fact that it's thicker than normal).
It has Grover locking tuners, and a hard-tail string-through bridge.
It has three Dimarzio Dual-sound pickups, each with a humbucker/single coil/parallel switch (overkill, but I wanted this one to be as versatile as possible). The saddles are Graph Tech Piezos, connected to the acoustic preamp and the Graph Tech Hexpander, which provides midi output. There is a volume and tone control, and a regular five way switch. The knob which would normally be the second tone is actually the volume for the piezos. There is also a piezo/both/magnetic switch and a midi output jack.
Again, this one has a few issues. Most notably, the bridge was wider than the one on my old strat, so the strings are a bit too close to the edge of the fretboard near the neck pocket. I researched and measured, and measured and researched, and still ordered the wrong stuff!
 Also, the ferrules on the back don't line up properly because the drill bit wandered (and there was a thread about this the week after I drilled them! D'oh!). It would also benefit from F-spaced pickups. Finally, the finish is starting to sink into the grain a bit (and I thought I had finally got the hang of grain-filling!).
On the whole I am pleased with this guitar, though. I promised myself I would fix a couple of the ones I have already made before I make any more, but we'll see what happens!
Thanks for looking. I figured if I was going to comment on anyone else's work, I'd better get mine out there, warts and all!
Doug
-
Thanks for the kind words everyone!
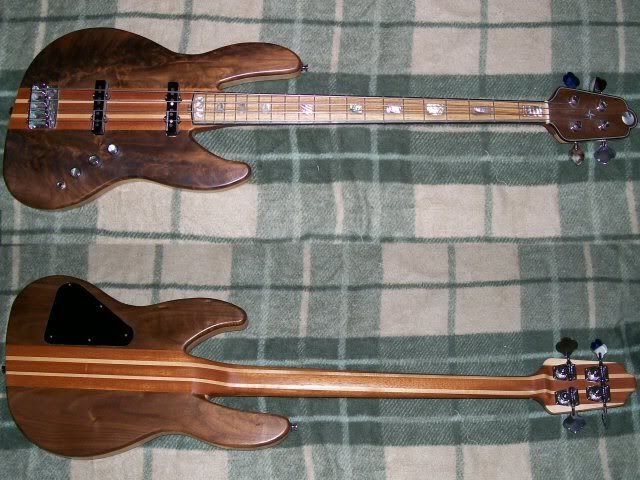
Here's number three:
It's modeled after a Jazz bass, but I made the cutaways deeper to reach the high frets (and the sting path is off a bit). I'm not happy with the shape, so that's another thing that I'm going to revisit later.
The neckthrough is maple and mahogany again, and the wings are made of a maple core, plain walnut back, and the far more interesting walnut front (it doesn't really show up too well in that picture, though). There is also a walnut headstock veneer, with my "logo" and a compass star of inlaid mop and abalone. It has a tung oil finish.
The fretboard is zebrawood with abalone block inlays, bound with a black & white stripe and tortoise celluloid binding. There is a stewmac trussrod with the spoke nut sticking out of the body end of the neck.
Plain old cheap bass tuners and bridge.
The pickups are a set of active Basslines JBass pickups (I can't remember which one). There are two volume controls and one tone.
Even though I haven't touched it (except to play it, naturally) in a couple years, it's still not really finished, since I still need to take a little off of the back of the neck. It's pretty thick! I also need to fix the action, and to do that I need to deepen the pickup routs so I can lower the pickups! But I'm not a bass player really, so It hasn't been a priority. It's playable, but the action is pretty high. All in all, I was pretty proud of a lot of the work I did on this one, even though I still made plenty of mistakes.
Again, stay tuned for the final chapter (so far). It'll probably be tomorrow though.
Thanks for looking.
Doug
-
Wow. I had to go back 5 pages to remember what it looked like!
Thirsty, for a second guitar, that is pretty fine looking work. I'm not big on the green burst, and there are a couple of minor aesthetic issues, but the craftsmanship is way above anything I've made yet (and my next will be number 5). It may not be professional luthier quality, but it's not that far off. At this rate, your next one will be smokin'!
Glad to hear you plan on continuing the thread, cuz I want closure!
-
I forgot to mention, the last one was made 5+ years ago.
Here's number two, made 3 or 4 years ago:
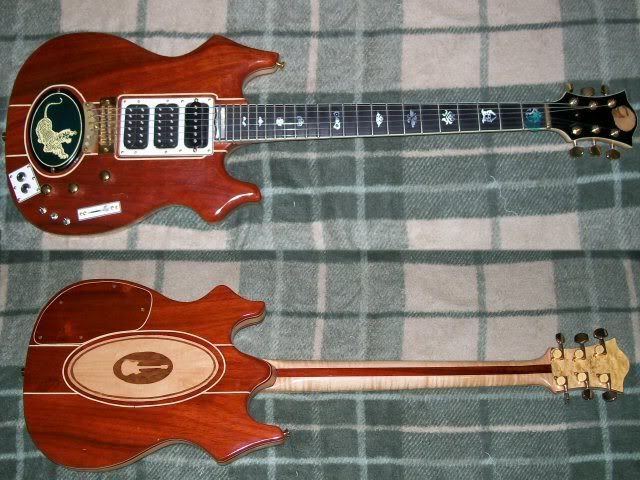
As you can see, it is modeled on Jerry Garcia's "Tiger" guitar.
The body has a one inch thick maple core, with laminations of bloodwood and maple. The top and back are padauk, and the neck is padauk and curly maple, with an ebony fingerboard and headstock veneer. The cream lines in the top and back are binding material, which was glued to the padauk core. The padauk wings were then scribed, cut, and sanded until it all fit together nicely.
The inlays on the neck are the result of my over-ambitiosness. Very intricate inlay on a pre-radiused board with no inlay experience! Some are great, but some got sanded down too far, and others just look a bit blah.
The inlay on the back and the one on the headstock are both made of veneers of maple and teak. This was not my most successful experiment, as cutting such a shallow hole for it was a pain, and I sanded through the teak on the back (D'oh!).
I made all the white covers out of w/b/w pickguard material. The tailpiece was shaped from a lump of brass via lots of drilling, sanding, filing, polishing, and dremel-ing. It still doesn't look great, so it's on the list of things I want to fix. The cover behind the tailpiece is a temporary. It's supposed to be ebony inlaid with mop, but now it's just a printout glued onto a dyed piece of alder
.The electronics are wired like Jerry Garcia's guitar: 2 Dimarzio Super 2's with coil taps, 1 Dimarzio sds-1, 2 tones, 1 master volume, an effects loop with bypass switch, and a unity gain buffer pre-amp (I'm not an electronics guy, but I think that this makes sure you don't lose too much signal in the effects loop).
Most of my research came from this site: Garcia's Tiger
PS. Jerry's guitar was chambered, and weighed 13 1/2 lbs. Mine isn't, and only weighs 12 (still huge, I know).
Stay tuned for number three!
Doug
-
Hello all! I joined in September after lurking for about a year and a half. I have added my two cents to a few topics, so I figured I'd better get off my butt and share some of my work.
I am not a pro by any stretch of the imagination, but I have made three electric guitars and one bass. All are playable, but they also have some problems (mostly cosmetic), and I plan on revisiting a couple of them in the future. In fact, I have already refinished my first one (twice!).
It all started when I came across Melvin's Hiscock's book in a used bookstore. After reading that I was hooked! It didn't even occur to me that there may be info online until much later, so all of these guitars were made without some of the knowledge that I have gained here (most notably, none of them were made using templates). I don't have a lot of time to devote to this hobby, so each guitar usually takes more than a year, and I have settled for "good enough" more often than I should have.
Enough disclaimers! Here's my first guitar:
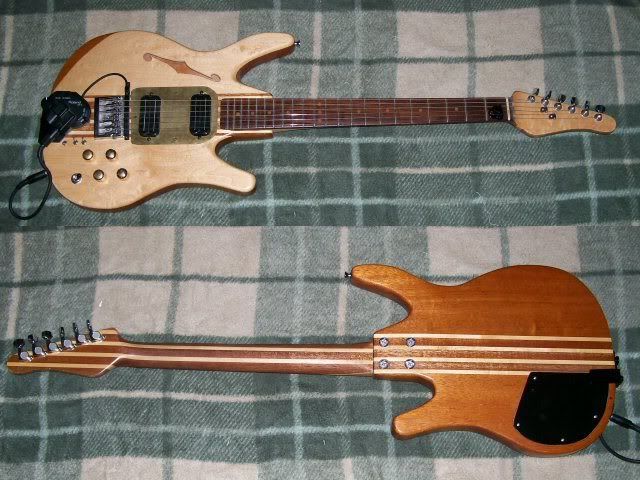
The neck and center of the body are laminations of maple and mahogany. The wings are mahogany with a birdseye maple top (although not a particularly strong birdseye). There is a birdseye maple veneer over the front of the headstock. It has a pre-slotted rosewood fretboard from stewmac. There were originally no dots, but I kept getting lost on the fretboard so there are now plain old hardwood dowels from the hardware store (not spaced very accurately).
The finish was originally nitro lacquer, but I sprayed it wrong, so it was very brittle. I later sanded it off and it now has a gloss tung oil finish.
The pickups are the old stewmac fake Lawrences, since I was unsure about getting my string spacing correct the first time out of the gate. There are individual volume and tone controls and phase switches. There is also a phase switch to throw the pickups out of phase with each other, and a regular gibson-style pickup selector. The Roland pickup is the latest addition.
The bridge is a schaller roller bridge, with adjustable string spacing. It is set to the narrowest setting, and I later angled it slightly to get the strings even closer together, because my neck ended up a bit narrow.
I think I covered it all! Stay tuned for number two!
Doug
-
1) This is what the floyd rose is SUPPOSED to do. None of the excellent replies mentioned so far that half of your extreme problem is the fact that it works as it should
2) This will always be apparent in floating bridge systems without a tremol-no or similar device
I am correct on this guys right? Did it take that long?
Um, I think you're missing something here, 9956. The problem is that the strings stay out of tune after using the trem. Surely that's not what's supposed to happen. I agree with your assessment of number 2, though.
Buckethead, as far as the string bending issue is concerned, I would just make sure no open strings are ringing when you bend. Unless a floating bridge is locked down in some way, bending a string will pull on the bridge. lowering the pitch of all the other strings.
-
Looks pretty good so far to me. I'm not sure if it's because you're not done sanding or if you meant it to be like that, but the body looks a bit lumpy around the edges (mostly right behind the bridge). You may want to look into using a template and router to cut the outline; it takes a lot of work out of sanding the outline by hand.
I'm with goat on moving the treble side cutaway back towards the bridge (as it is, it makes the shape look kind of awkward). I would even consider cutting off the whole lower wing and re-gluing it a few inches back, if possible.
Actually, this looks a lot like my first builds, so I am going to offer a big piece of advice that would have made my guitars fifty times better: take your time, and make sure it is right. Don't rush to play it (that is always the hardest part for me).
Other than the body shape issues, it looks like you're doing good work so far, and I really like the knobs! Keep us posted on the rest of the build!
-
In my opinion, the most important thing is that you have good solid wood between the bridge and neck pocket. I don't know that I would use plywood for the wings, but the idea of adding decorative sides to a solid wood core goes all the way back to Les Paul's "log."
Will it sound good? We can all sit around and argue about the tonal qualities of this wood and that wood, and that may give you some ideas, but you won't know for sure until you build it. It could end up sounding bad, but it might also be great. I don't see why it "won't" sound good (unless you mean acoustically; that would probably sound pretty crap). I think the pickups and the choice of wood to go through the core of the body would make more difference than light plywood wings.
Just my 2 cents
-
In my opinion, there are only two options: leave it alone, or install a neck pickup. This guitar is so sleek and clean that anything other than necessary hardware would kind of spoil the effect. Any kind of decorative inlay or pickguard wouldn't fit.
Just my 2 cents
-
It is my understanding that a conversion neck is made to work with the existing bridge location and neck pocket of a Fender-style 25.5" scale length. Therefore, the 24.75" conversion neck would actually have less playable range than a normal neck. Whether the difference is enough to result in fewer frets, I'm not sure, but that's the theory as I understand it.
As this applies to StefanR, this means that the conversion neck will only work if his guitar was designed to have a bridge and neck pocket set up for a strat-style, 25.5" scale, guitar.
-
One word of advice: check that the string spacing on the new trem matches that on your existing trem. They are not all the same, and if you get a wider spacing, the E strings may be too close to the edge of the fretboard (from experience
) -
What if theyre leveld and fine? i mean i think it should be fine really, im getting the hiscock book tomorrow most likely the store called me and told me they had it in, so it might be in there? but if everythign looks ok i should have to touch it, and about tightening the truss rod, how much do i tighten it? but im hoping i dont have to do none of that stuff :-/
Dude, a lot of this was answered in the post you quoted. As Fryovanni said, the frets will probably not be "leveled and fine." Even if they are, you will still have to perform the setup steps (from the tutorial area of the main site, projectguitar.com) in order to set the action and intonation. This is where you will find out how to use the truss rod. There is no set amount of trussrod adjustment; you just adjust it until you don't need to anymore. Read through the tutorial. It may seem daunting, but once you get the hang of it every guitar you have will play great.
As far as the Hiscock book, you will never regret that purchase.
-
Wow. It looks like this is gonna be one killer guitar!
Those woods and the body shape are very elegant, and your workmanship looks very clean. The right hardware would make this one top notch instrument!Are you finishing it in nitro? What did you grainfill with? I looked through the old posts, but couldn't find that info.
Looking forward to seeing this one come to life!
-
I have noticed that you have made the headstock ears. Please do not glue them to the neck before bandsawing the neck side profile, because it is hard to do proper sawing that way.
I'm pretty sure Macimalac just meant that it would be easier to cut the profile if you had a flat surface to run through a bandsaw. I happen to agree with him, but there is more than one way to skin a cat.
By the way, this project is looking good. I've been thinking about doing an sg myself, so I'm looking forward to seeing more progress. Good luck!
-
I can't answer all of your questions, but I am a sucker for cheap tools, so I can give you a couple thoughts.
As for the bandsaw, it depends on what you want to use it for. I use mine for roughing out guitar bodies and necks, and that's about it. I need to go at them from several angles to cut an entire body because it can't reach very far. Also, the blade wanders quite a bit, so it is only used for very rough cuts. If that's what you want, go for it, although there are some people who use a jigsaw effectively, so that may be another (possibly cheaper) option.
As for the drill press, I don't know enough about HP to help with that, but I can say be aware of how far into a guitar body you will be able to drill. My little drill press is great for tuner holes and neck-mounting holes, and I'll bet I could mount a robosander to it, but it can't reach far enough to drill string-through holes or rough out pickup cavities.
Hope that helps!
-
Firstly, I hope you meant .008, since .08 is a really big gap! Also, I'm assuming you adjusted the bridge rather than the nut in order to set the intonation.
If the string is in tune at the nut, and at the 12th fret, then all the frets in between should be in tune as well. If one or the other is off, then you have an intonation issue and need to re-adjust the saddle until it is in tune all along the neck. It may be that the extra downward pressure at the bridge has thrown the intonation out of whack.
If the string is in tune at the nut and 12th fret, but not in between, then I'm not sure what that could be. Maybe try a new set of strings?
I don't know enough about the saga lp to know how it is supposed to fit together, but don't assume it is the same as a gibson. You could always try shimming the neck to change the angle in order to set the bridge lower. It's easier than routing, and far more reversible!
Those more experienced than me may have better ideas.
-
Just throwing things out there:
When the third fret is sharp, are any of the others off that much? Is the first fret in tune? is the twentieth fret in tune? Is it all the strings or just one?
From what I got from your original post, I can't see any reason why any notes would be different if the twelth fret harmonic is still in tune, unless the nut was so high that you had to stretch the string a lot to fret the note (and it sounds like that is not the case).
I believe that the string is at the same tension between the bridge and nut if it is tuned to the same note. However, there was a recent thread discussing the effect of extra string length before the bridge and after the nut. Maybe something to look at, but I think that the change in length lowering the tailpiece would be too small to make a difference (maybe something to do with changing the break angle over the bridge?).
Also, I can't speak for RGman, but it seems to me that he missed the part where you said you retuned after lowering the tailpiece.
Finally, I would like to vote for finishing this project. Even though it's just a saga, any extra work you need to put into it is extra experience going into your next (probably more expensive) projects. All of my projects still need finishing touches that I never got around to before going on to the next one! Don't be like me!
-
I assume that the vertical pencil line on the front is where the bridge will be located?
If so, I love how it is lined up with the "pinch" in the grain of the wood.
Looks great so far!
-
I don't know what to make out of this comment! I think that you mean visiting the site, since we all know that "trolling" is a term used for people that are looking to make trouble! And I seriously doubt that he is!
Are you kidding!? He's cost me thousands of dollars!
Sorry to go off-topic, but I couldn't resist the (half)joke!
 Also, the ferrules on the back don't line up properly because the drill bit wandered (and there was a thread about this the week after I drilled them! D'oh!). It would also benefit from F-spaced pickups. Finally, the finish is starting to sink into the grain a bit (and I thought I had finally got the hang of grain-filling!).
Is Loud String Scraping, Wiping Etc... Normal?
in Electronics Chat
Posted
IMO, you will always get string noise with roundwound strings. I think it's probably more of a technique issue. I would think that if your fingers were switching between notes fast enough, the string noise would be minimal, even if it's louder on some guitars more than others.
Just my 2 cents.