


FlashJim
-
Posts
24 -
Joined
-
Last visited
Content Type
Profiles
News and Information
Tutorials
Product Reviews
Supplier Listings
Articles
Guitar Of The Month
Links and Resources
Forums
Gallery
Downloads
Posts posted by FlashJim
-
-
Were you able to test it? Post some pics!
-
Is this it?
Google "router sled" and you can find dozens of DIY solutions.
-
One thing scrollsaws are great for is cutting thin stock. Double bevel marquetry is actually easy when you use a scrollsaw. David Marks from the TV show "Wood Works" mentions it on his website.
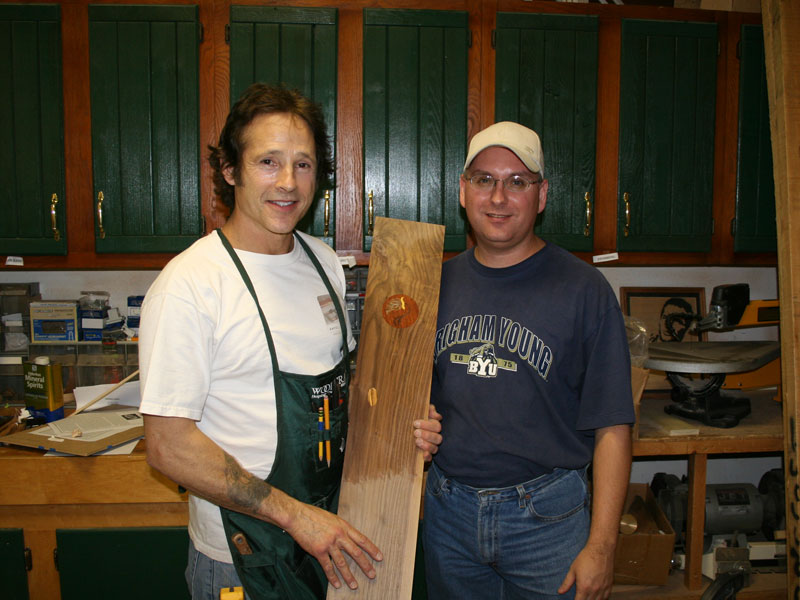
David and me with my first inlay ever.
-
My wife wanted to do something in the garage with me, so I sent her to a scrollsaw class at Woodcraft. She loved it. She also ended up wanting the same scrollsaw they had. Now she owns the most expensive piece of equipment in my garage, a Dewalt DW788. It's a really nice mid-priced scrollsaw. You can find them on Craigslist as cheap as $150 if you are patient. I wasn't and I paid retail, but she's happy and I can get back to buying tools for myself.
-
Jeremyp, did you get the planer? Post a pic if you did.
Also, you wouldn't happen to be in Texas, would you?

-
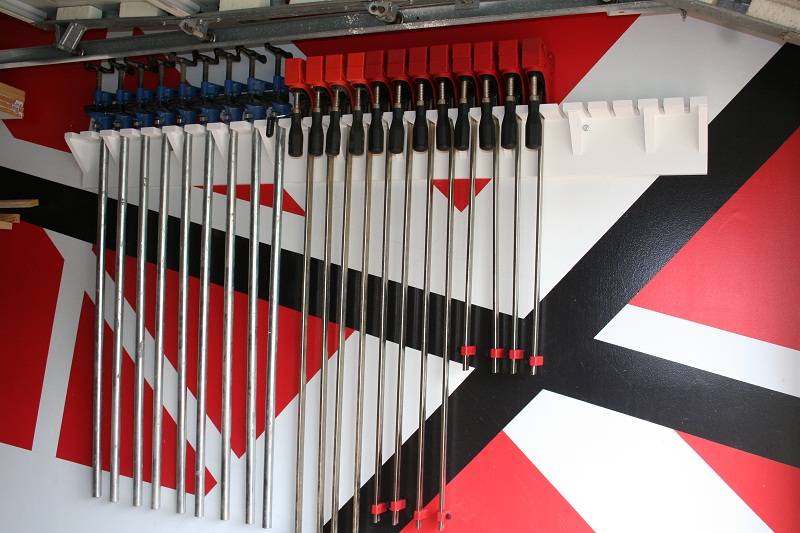
My eyes went straight past the clamps to the wall behind them hahahaha. My wife would straight murder me
. But thats a good idea, I just have all my clamps stuck down on a wall
LOL ... yeah, my garage is a little different than most.
 My wife actually helped me paint it.
 -
I've gotten into building speakers so I decided to get myself a few clamps. Amazon had a great sale on Jet parallel clamps about a month ago and I bought a few. That's when I realized I had no place to put them. My older Rockler pipe clamps were "stored" on the garage floor. The solution was a wall mounted clamp rack made from scrap plywood and 1x4 pine. A dozen gussets, paint and a few lag screws later, I have this hanging on my garage wall. Now I need something for all of my smaller clamps.
-
Thanks for all of the info!
I guess I should have given more background. My son is 10 years old and this was his first guitar. He was wanting to do something fun with it so he wanted to do something like EVH's guitar. The guitar is a beater at the moment, so I don't want to sink too much into it.
-
I'm looking for a tremolo for one of my son's guitars. I came across this on ebay and I was wondering if anyone had any experience with it.
Ebay link to cheap "Floyd Rose" knock off
Any comments?
-
I've made a maple/ ebony/ maple/ ebony/ maple neck, and there are 2 veneers in between each laminate. I'm going to upload a picture shortly.
I love laminated pieces. I'll be sure to check back for the pics.
-
I just got the Craftsman 10 in. Band Saw. Last night when I looked online it was $99.99 and went in today and that eneded yesterday, just my luck . Well I got it anyways, looks to be a nice saw. I didnt like the plastic on the Ryobi and Delta $99 ones so I went ahead with this one for $50 more.
So now I can get started on my build. I have all the wood ready to start.
You're going to like that bandsaw. I was wondering if anyone here was going to snag one. $99 would have been killer, but even $149 is good for that saw.
I posted about replacing the guide bearings on it's big brother, the 22401. It's MUCH nicer now.
-
I do wonder if the thrust bearing not having a guide slot will effect perfomance.
The OE bearing didn't have a slot.
I am not sure how much more expensive Carters replacement bearings would be vs skateboard(Carter sells them for about $2.50, Thrust w/slot is a bit more)Actually, Carter sells the replacement bearings for their 2300 series for $8.25 each. Part # BRG-38
-
brilliant, thanks for the tutorial. I don't have that saw but I guess that the bearings are usually the same size? seems like a worthwhile upgrade & looks funky too!
[EDIT] you can get various makes of skateboard bearings, I'd guess that they're of equal or better quality then those used on bandsaw's as they have to put up with a lot of constant pressure...especially from pro-skaters.
Yep, standard size:
Bore: 8mm
Diameter: 22mm
Width: 7mm
The bearings I used were 608-2RS ABEC7. I have 4 extras, so I'll probably tear one apart to compare them to the originals.
The originals have a stamped metal seal. That's the weak point of these bearings. All would be fine if they did their job ... seal.
The thrust bearing actually saw action and spun the seal off on the first time the blade touched it. It's a common problem with this model saw. Luckily I know a few dozen people that own the same saw and I planned ahead. I bought the new bearings before I bought the saw. -
I recently bought the Sears Craftsman 22401 14" Bandsaw. I love the saw, but had a problem. If you haven't replaced your guide bearings yet, be prepared to. I had a grand total of maybe 10 minutes on my new 22401 when it started slinging grease.
I hope this helps someone.
Metal seal completely gone

Use the 22401's included hex wrench for removal

Everything will be reused except for the bearing itself

The biggest lump of grease left by the bearings

All of the bearings are removed in the same fashion


The tube of 10 new bearings were bought on Ebay.

Reuse the hardware including the sleeve

Reassemble in reverse order


All I have to do is replace the bottom bearings and I'll be done!
-
Would you trust a bloke who endeavours to get all his screws in perfect alignment to build
you a guitar?
Don't come to my house. Even the screws on the lightswitch trim are aligned.
Nice trim rings!!
-
He basically says, "You want some cheap pickups? These don't suck." Still--I trust them to be reasonably decent.
Good enough for me.
I picked up the last set. They'll be going into my son's first guitar. -
I've been looking at a few ebay auctions for various pickups. Does anyone have an opinion of these?
-
You know--I rather like the tone of poplar, maybe even better than alder. It's got a nice, midrangy rock sound to it. It's not the prettiest looking wood and that, I think, is why it's cheaper rather than it being strictly inferior as a tonewood.
Poplar can be pretty too. Not all of it has the green tint that is associated with it. I've seen some Craftsman style furniture built with it and it looked great. Still, most consider it paint grade.
-
Thanks for the tips!
-
I'm considering making a new body for my 9 year old son's Washburn BT Mini. It's a 22 3/4" scale from the late 90's and I believe was made in Korea. It came with a maple/rosewood neck, Grover tuners and two K-10 humbuckers. The one we have was before they switched over to a Chinese version and dropped the Grovers. The old BTM as well as it's replacement, the X5, have plywood bodies.
As it sits today, it has a new set of Grover locking 18:1 Rotomatics and a new top loading bridge. My son wants it painted flat black so the wheels started turning in my head. I'm thinking about doing everything new except for the neck and tuners.
My question is, if it was your project, what pickups, wood, and hardware would you use? I'm thinking Alder since it'll be painted. I'll be keeping the Rotomatics.
Any comments would be welcome.
-
I used to have them on my guitar, the part with the hole on it actually rotates around until it lines up with another whole behind it, that's where the string goes through. Just rotate that little metal area above the nut securing it to the headstock and the holes should line up, then they just work like regular tuners.
The 402 don't have a hole at all. That's where my confusion came from. I came across the instructions for the ones with holes.
Basically I came up with:
1. Run the string around the thumbscrew, between the spacers.
2. Tighten the thumbscrew to lock the string in place.
3. Clip string.
4. Tune.
-
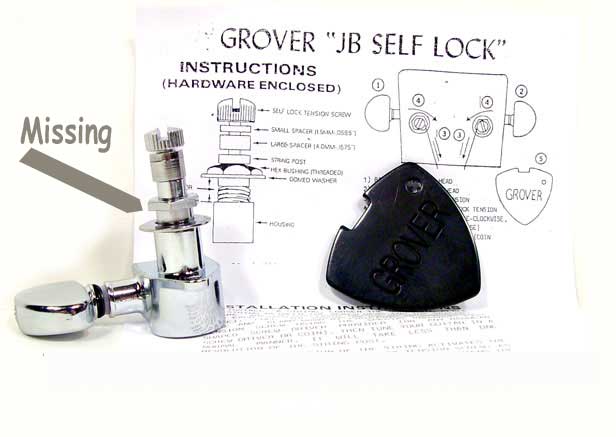
I thought I'd go ahead and install one to see what it looked like. I have the wire between the small and large spacer. I tightened the thumbscrew and tuned the string.
It seems that is the way these work. There's no hole to run the string through.
I'll contact Grover to see if they can point me in the right direction.
Look right? All comments welcome.

Huh, the instructions are right there, in the picture. You'd think they could at least stand the page up.,
Anyway, theres mention of them here. , in one of the reviews. Just hit "edit" in your toolbar, click, "Find on this page", type "Grover".
Thanks! I'll check that out. You posted while I was typing mine last post.
I'm glad I found that pic of the instructions. At least I know I have everything put together correctly.
-
Hi all,
Big time newb here.
I snagged a set of Grover 18:1 Locking Rotomatics tuners (402C) off ebay and they seem to be complete except for the instructions.
Grover doesn't seem to have any archived instructions. Uh, how do you string them? I've been searching on the Net for an hour and haven't come up with anything.
This is the same model:
Thanks for any help you could give me.

 My wife actually helped me paint it.
Homemade Pup Winder (pics)
in Tools and Shop Chat
Posted
Very cool!