


Acousticraft
-
Posts
477 -
Joined
-
Last visited
Content Type
Profiles
News and Information
Tutorials
Product Reviews
Supplier Listings
Articles
Guitar Of The Month
Links and Resources
Forums
Gallery
Downloads
Posts posted by Acousticraft
-
-
The Liquid gloss takes at least 2 days to dry properly and takes a long time to set up as it creeps for the self levelling thing it does. Ive used quite a bit it for all the inlays of paua I have used for fret markers and sound hole rosettes on various guitars. Every guitar has to have a bit of paua on it and there is a good range of colours available.
I used an old brush to apply it and done it all in one hit including the cavities and hung it up. I guess if you did the top and sides with it sitting flat the finish would probably be near perfect. I think the trick is to put it on very thinly so it doesn't flow out too much.
It sands and polishes well after a few days curing and gives a glass finish with one coat. The brush cleans up with lacquer thinners.
I will wet sand it and finish the whole guitar and neck with Microcat Lacquer.
The aluminium is available from an Aluminium supplier or through some of the Window manufacturing companies.
-
I have used a slither of thin brass and superglued it into the slot to raise the string. It seems to work ok.
The superglue and baking soda sounds an easy fix.
-
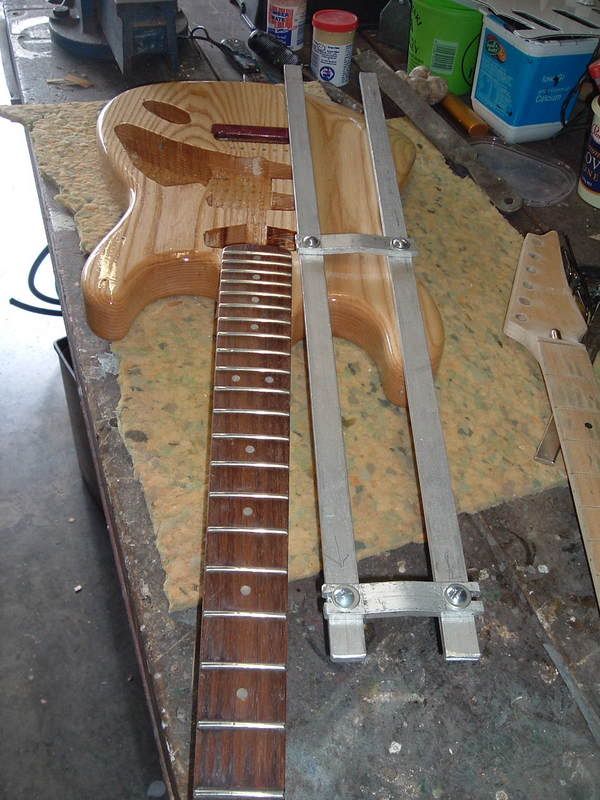
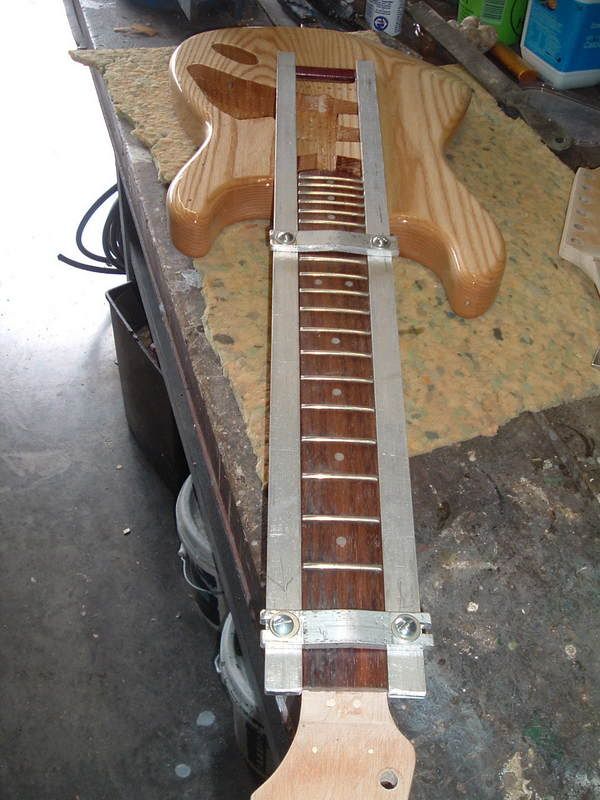
All the guitars I have built both acoustics and electrics have had glued in necks. I have found from experience once you have your neck glued and clamped then there is little or no room to run a straight edge along the edge of the finger board to check for alignment to centre line of guitar.
I had some 20x6 (3/4x 1/4" aluminium flat so made up an adjustable jig that will sit in place while clamping or screwing of neck is performed. We all know that feeling when a neck has been glued and a subsequent check reveals it is off line slightly.
This way the jig can stay in place until the glue has set if wanted and it is reassuring to see it is perfectly aligned to the bridge.
The Ash body has ben sealed with one coat of Liquid Gloss epoxy but needs to be sanded back once it cures.
http://i54.photobucket.com/albums/g111/One...Image0003-1.jpg
http://i54.photobucket.com/albums/g111/One...Image0002-3.jpg
http://i54.photobucket.com/albums/g111/One...Image0001-3.jpg
-
I have built an Ash strat body and thought I would try sealing it with resin. I used a product called Craftsman Liquid Gloss (resin and hardener) available from Spotlight stores in Australia and here in NZ. I dont know if it is an epoxy or not as it doesn't say on the containers.
I have previously used it for filling inlays on fret markers and sound hole rosettes and is a brilliant product that is crystal clear and cures to a hard surface after a few days curing and sands and polishes well. It stays clear and doesn't seem to yellow.
It is one of those self levelling resins that take several hours to set up and is used often on table tops to get a hard glass finish with one coat.
I brush painted the the body and sealed the cavities and hung it up by the tail pin screw. It covered really well with a few minor runs that will sand out before I lacquer finish it. The end grain covered like glass so must try some on Sapelle and see if it will seal that as it is a very porous wood. Im almost tempted to sand it smooth and lay it level and put a second coat on so it self levels although it is probably better to spray it with lacquer to build up the required finish.
-
Mines 16"x 19" long but once strapped on because of the contoured back fits like a glove. I used it for a gig at the weekend and thought it felt really good as I have been favouring my LP junior clone of late because of the overwound pickups which are great for shred.
-
I am assuming you have the type with the press in bushes.
Find a bolt or punch that will fit in the hole snugly and drive out the old bushes from the back. Usually most bolt on tuners require a 10mm hole. The instructions with the tuners will confirm the correct size.
What I have done before for the same modification is to drill a 10mm hole thru a small 2" thick block with a drill press so the hole is straight and line up the hole in the block with the peghead hole and clamp it in place with a piece of scrap on the other side to stop tearout as the drill breaks through. Then you have a guide to run a 10mm drill bit thru to enlarge the hole.
You can use a hand drill to do this no problem.
-
What about Jimmy Page on Stairway to heaven. One of my favourites.
Eagles Hotel California has that cool solo that changes keys.
Mark Knoffler Sultans of Swing, Brothers in arms.
Mark Farner from Grand Funk Railroad had some mean solos.
Gilmour Another brick in the wall.
-
They look pretty awesome. I suggest you give your string ends a haircut.
-
I have made 5 guitars now with the simple curved truss rod and just wrap a couple of layers of plastic insulating tape around it. I haven't had any rattles and the glue wont stick to it. No problemo.
-
Fit a longer screw is the safest option.
-
Like a scroll saw and about as melodic.
-
The centre pup is usually reverse wound. If you use neck and middle (position 2) or bridge and middle (position 4) then the two coils together act like a humbucker which cancels out any hum.
-
That piece is the center block and they are generally solid but I cant see any reason why they cant be hollow apart from where the pups, bridge and tail piece sit. On my next 335 build I will do that as a method of reducing weight as well as using some lighter Mahogany. The piece I used must of had lead in it as it was very heavy. It was an offcut I had had for years to.
-
Thanks Marksound. Thats great information to set it up as per factory specs.
-
Hey very nice job Myka. It looks awesome.
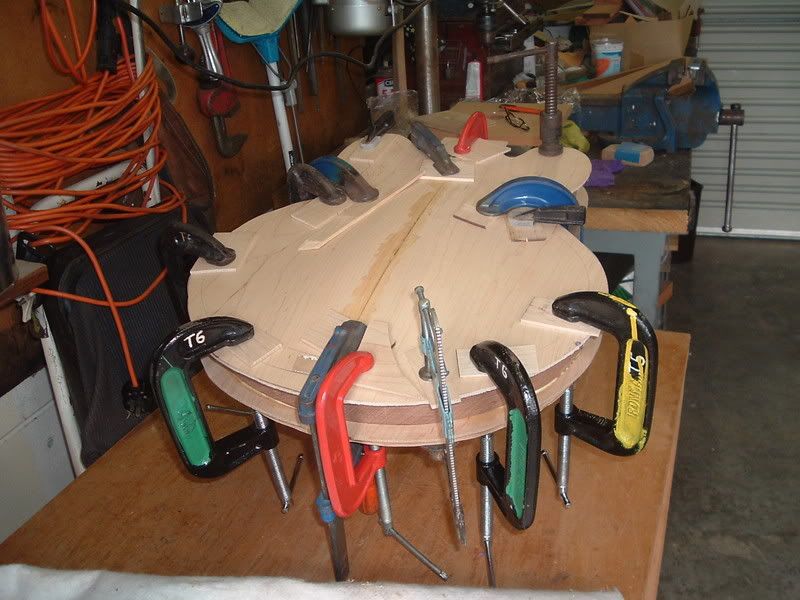
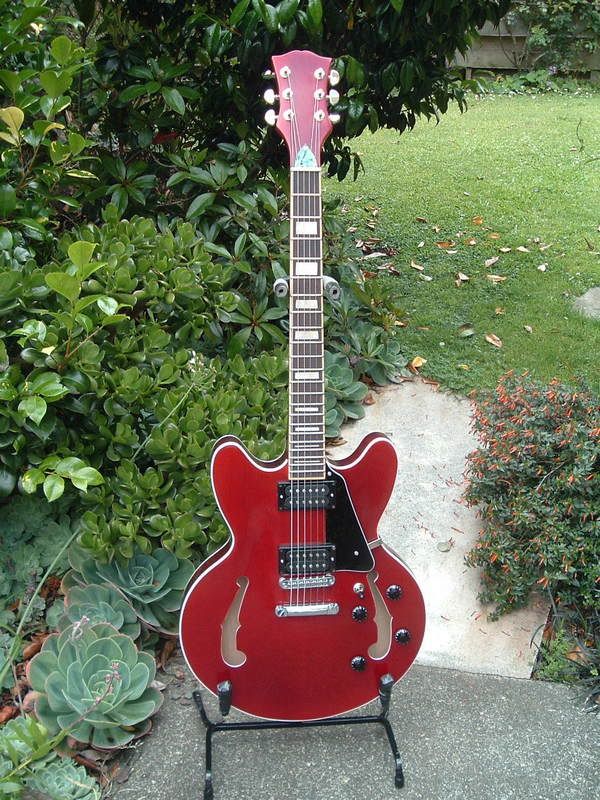
I made my 335 clone by cutting the body out of 1-3'4" Mahogany and then cutting out the inside leaving (25mm) 1" around the outside rim and a center block section. Then I shaped some profile blocks for front and back and glued them on.
The front and back are about 3.5mm thick Maple which I clamped into place with a clamping ring the same shape as the body. It took lots of clamps but turned out ok in the end but quite heavy. It has quite a warm tone not quite as bright as I thought it would be but I like it. I would remove more wood if I make another to lighten it down.
http://i54.photobucket.com/albums/g111/One.../OCT2006059.jpg
http://i54.photobucket.com/albums/g111/One.../OCT2006068.jpg
http://i54.photobucket.com/albums/g111/One...Image0001-1.jpg
-
Im building an Ash bodied strat and the body is nearly complete. I contoured the body with my belt sander and Router then filed and sanded it smooth. I was really pleased how nice the curves finished up. Then I fitted everything up and drilled all the holes but I have a question re the trem. I have had no experience with a trem but I was given a complete Ibanez Mahogany body with all electrics and hard wear which included the tremolo. I also got a neck that came off another guitar that was set up for a Floyd Rose locking nut but have removed all that and I have filled up the holes by gluing in some dowels.
It has the knife edge trem with six screws it pivots on and I went to a bit of trouble to clamp it in place so I could accurately drill the 6 holes so they are bang on centre so it rocks smoothly.
I am assuming the trem should tilt forward and sit on the knife edge at maximum travel about 15deg?
If that is the case I guess the screws have to be adjusted so they are all exactly even at that point.
I have an idea of lubing the screws with a drop of silicone spray so it moves freely and over the saddle and nut as well.
Is there any advantage putting more than the three springs on it or will that make it to heavy to move.
I have to get a trem arm as that was missing.
-
I cant see why you cant use it and it must be hard wearing if they use it for decks on boats. I have an off cut I will use for an acoustic bridge in the future.
People tend to get hung up about using the traditional woods but I have used Pacific Rosewood for a fingerboard on an acoustic and Kwila for the body of a Les Paul Junior. I actually really like the combination of Kwila body and Sapelle neck. Gives a nice bright sound.
-
Generally the two pack laquers and urethanes achieve greater hardness than single pack ones. Ive only used the single pack laquer and am pleased at the hardness. It probably takes months maybe years to achieve maximum hardness.
-
Do google search. You should find something.
-
Hey nice work ME.
Does the volume suffer with the strings not over the sound hole?
I guess you could make it oval Macifferi style if that was a problem.
-
Well thinned lacquer seems to work OK for sanding sealer. On my last lacquer job I used sanding sealer but didn't think it was much better than plain thinned lacquer that Ive used on all previous finishes. No problem with incompatibility as well.
-
You can use standard tuners but you probably want to find some small light ones as the weight adds up.
-
I use either of my two electric builds that both have humbuckers. A Les Paul junior style and a 335 semi hollow.
Plugged thru my Boss OD1 and Vox Valvetronic amp Im in blues heaven.
http://i54.photobucket.com/albums/g111/One...Image0001-1.jpg
http://i54.photobucket.com/albums/g111/One...01Image0012.jpg
-
I wondered whether anyone had tried designing a headstock logo and using a photocopy machine to copy and print it out on those clear OHP transparency sheets. If you did it on computer you could copy and paste a whole page full of logos and cut them out with scissors. Im not sure how epoxy or lacquer would affect the surface though.
I may just experiment with that and see what happens.
Weird Problem With My Bass
in Players Corner
Posted
Does it stop when you touch the strings? If so it is probably the bridge not earthed to the back of the control pots/shielded cavity. Also check the earth to the output jack as a bad earth joint or broken wire can do weird things as well.