


Andronico
-
Posts
235 -
Joined
-
Last visited
Content Type
Profiles
News and Information
Tutorials
Product Reviews
Supplier Listings
Articles
Guitar Of The Month
Links and Resources
Forums
Gallery
Downloads
Posts posted by Andronico
-
-
Very simple, i have a friend who was repairing a Kelly, and i took some cardboard and traced the shape on it, and that was it. I don't trust the plans i find on the web, even if they are on CAD they have never been of the real size to me...better to buy templates at www.guitabuildingtemplates.com but i don't think they have Kelly templates.
Ok, now I know who can send me by mail a paper with the real Kelly shape when I need it...

Che, si la necesitas, me decis que yo te la envio a Argentina ( pero no envio valijas llenas de dólares!! jajaja
 )
)Why not ? It´s a pity !
-
Very simple, i have a friend who was repairing a Kelly, and i took some cardboard and traced the shape on it, and that was it. I don't trust the plans i find on the web, even if they are on CAD they have never been of the real size to me...better to buy templates at www.guitabuildingtemplates.com but i don't think they have Kelly templates.
Ok, now I know who can send me by mail a paper with the real Kelly shape when I need it...
-
Hi friend, I like your guitars !
Will both guitars be painted in solid colours ?
Where you find the sizes of the kelly, I love this guitar shape.
-
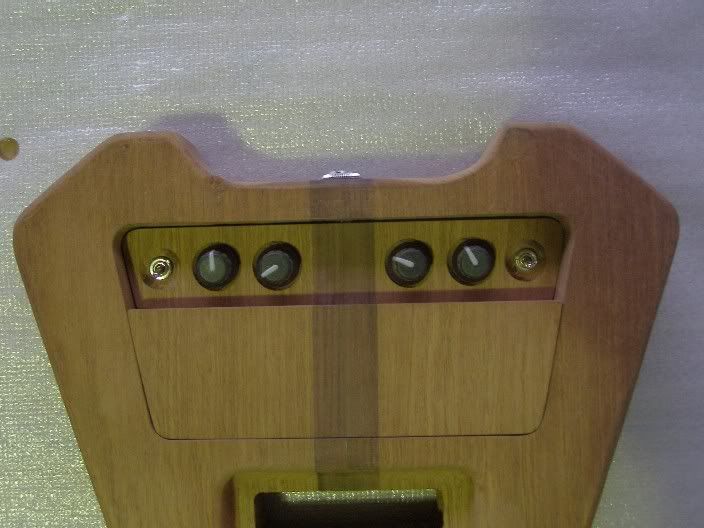
I was working in the GT2 cover :
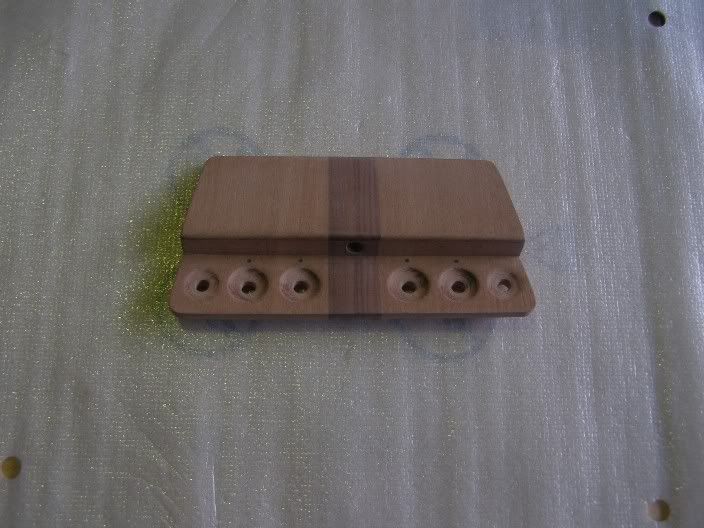
The small black dots are to indicate the start point of the pots.
I tested the cover with the knobs and switches to see if all fits well (before glued all the parts) :
http://i264.photobucket.com/albums/ii186/a...RearCover05.jpg
Step by step pics :
http://i264.photobucket.com/albums/ii186/a...RearCover01.jpg
http://i264.photobucket.com/albums/ii186/a...RearCover02.jpg
http://i264.photobucket.com/albums/ii186/a...RearCover03.jpg
-
Good looking pedals ! Congratulations.
-
Well done, it´s beautiful !
-
Beautiful baby man ! You have to be proud of your son !
-
really interesting this batteries. i can see that this electronic part you uderstand very well!
Yes, these batteries works well. It cost four times than an alkaline battery and has one third of the power but I´m a green guy (or want to be one)...
-
Little more progress to report :
I was working in the battery charger circuit, it´s based in the following article but adapted for 9V bateries instead of 12V ones.
http://www.owlnet.rice.edu/~elec201/Book/batteries.html
This charger is very simple and cut off the current to the battery when it´s charged. That´s good !
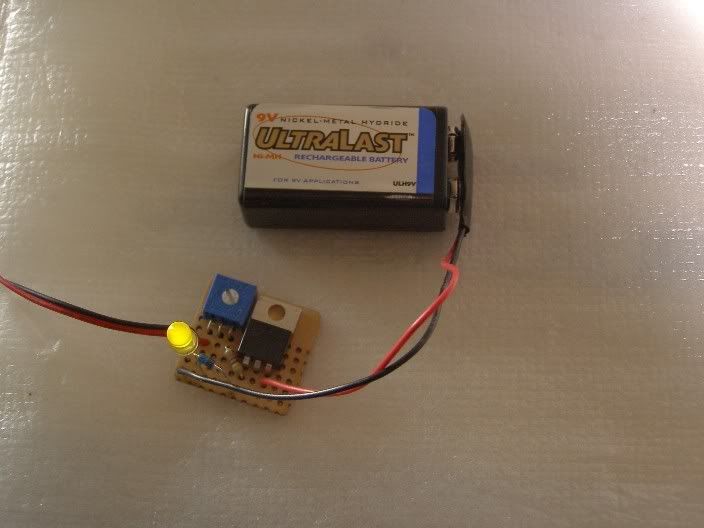
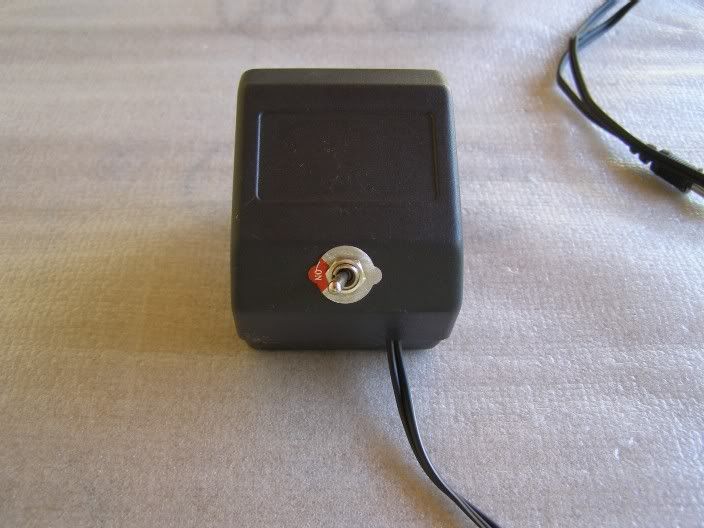
Then I need a AC-DC adapter to use with the charger and with the portable amp.
For the charger I need about 12V and 9V (regulated is better) for the amp. I thought that the more simple and cheapest idea was to buy a normal 220VAC to 12VDC adapter (yes the bargain ones) and improve it.
For this I open the plastic envelope and put a small board with a diode bridge, 7809 regulator, filter capacitors and a switch to select between 12V DC filtered output (bypassing the 7809 regulator) and 9V DC filtered and regulared output.
The result is :
Outside pic :
http://i264.photobucket.com/albums/ii186/a...werSupply02.jpg
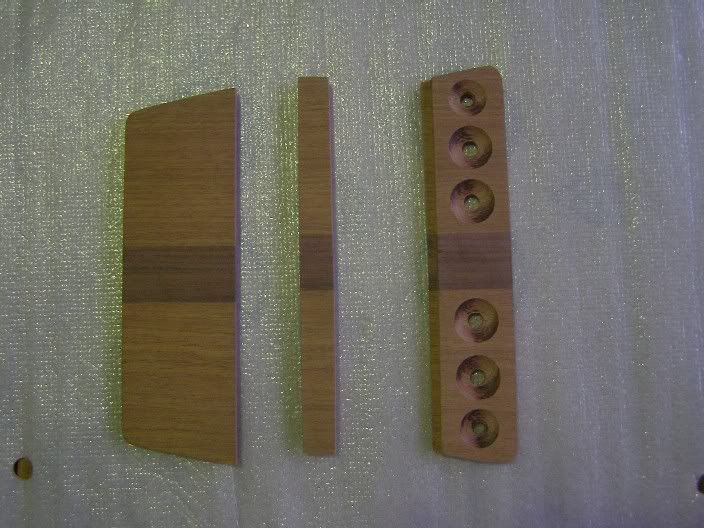
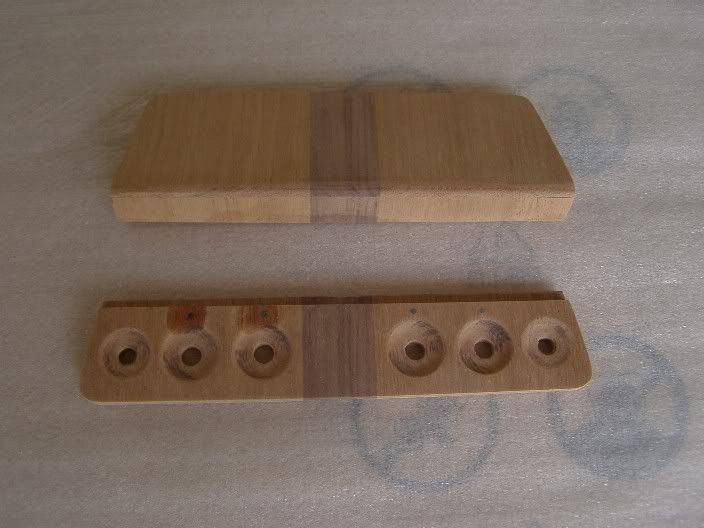
Now, during I wait for the chromium plate of the tuners hardware (they are late), I´ll begin with the cover of the GT2. I think that make it of wood is not the easyest way but the result will be better.
-
rob_tart, LPboco & Blackdog : thank you for your kind words !
I am really intrigued about your tuner design. Looking forward to see how well they perform.The metal frame that keep the tuners together looks like aluminum, will it be stiff enough under string tension ??
No, the metal frame is iron, 1.5mm thick.
So you have basically eliminated the Fender Clean models from your GT2 !?!? So it's going to be all gain and saturation !?!?! Shame on you !!!!Yes, when I turn the GT2 on it´s all gain and saturation. But I can turn it off and use the pickups without modelling...
I was working in the battery charger and the power supply for the charger and the portable amp, I think that tomorrow I´ll have a new update.
-
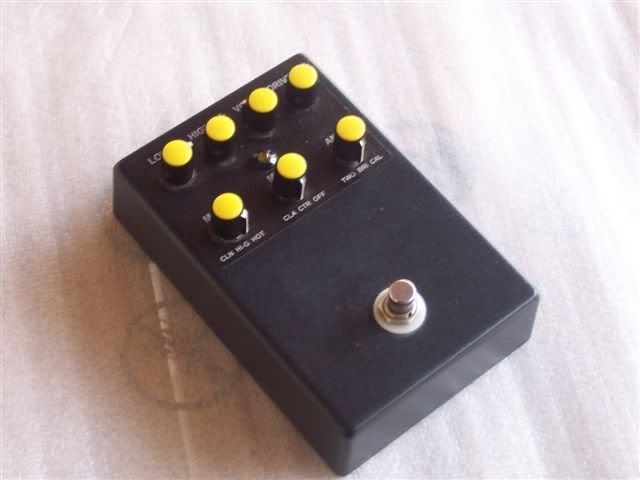
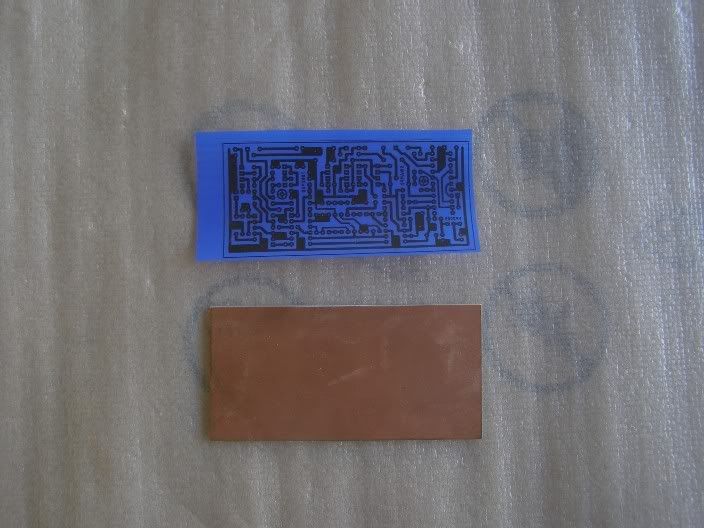
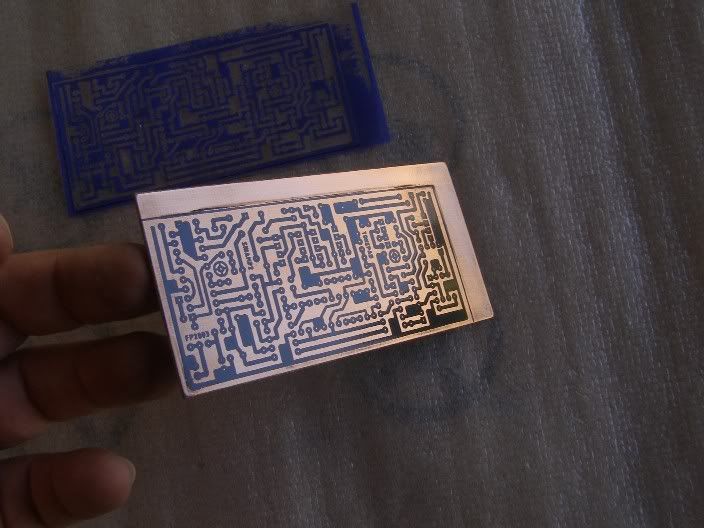
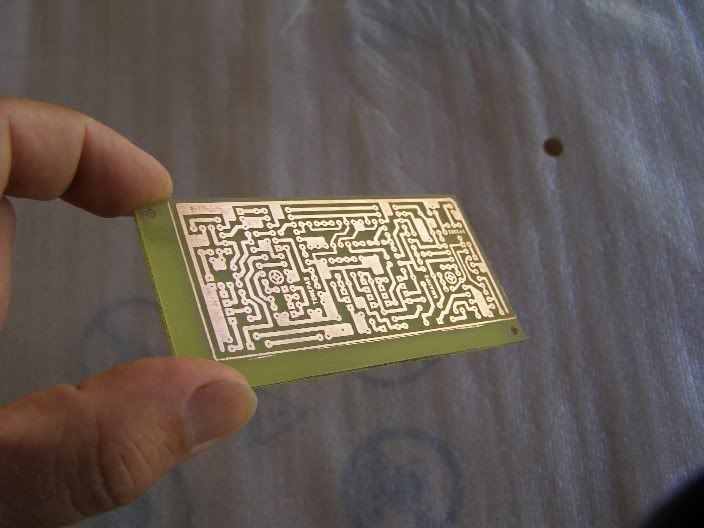
Reporting about the GT2 board :
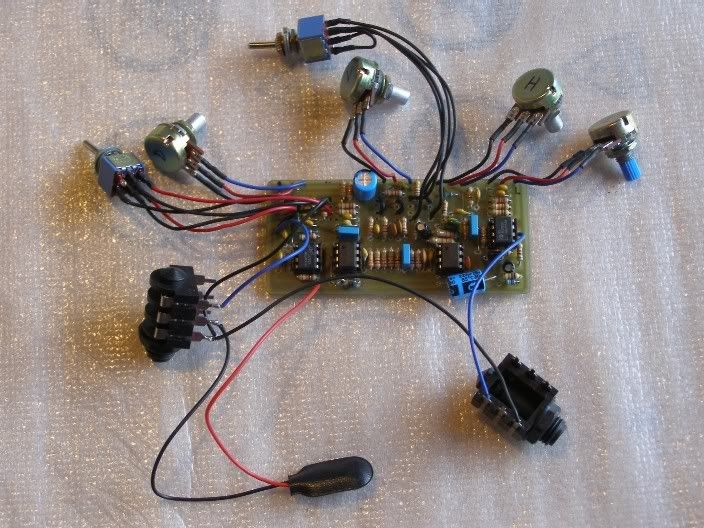
The GT2 is completed and tested with my regular amp. It works well.
This implementation has a reduced number of options because I don´t use all of them :
The pots are the same of the original GT2 : High, Low, Gain and Level.
The AMPs selections are : California (Mesa) and British (Marshall). It hasn´t the Twid (Fender) option.
The MODE selections are : High Gain and Hot Wire. It hasn´t the Clean option.
The MIC selection is fixed in Center option.
I choose this configuration because I´ve been using a GT2 with my practice guitar for almost a year and these are the selections that I use.
Now I have to make the battery charger circuit, more updates coming...
-
Not nearly perfect (my wife does a much cleaner job, but she was busy with a Tiffany Lamp project...), but close enough. Inlay on rosewood is much more forgiving than on maple. The body inlay will (hopfully) be done by her.
Not perfect ? I think that looks very well !
So now I will start fretting. Second time ever, and first time with binding... Wish me luck.Your fretting will be right as usual, you have the skills to do it well. But in case you need it, good luck !
-
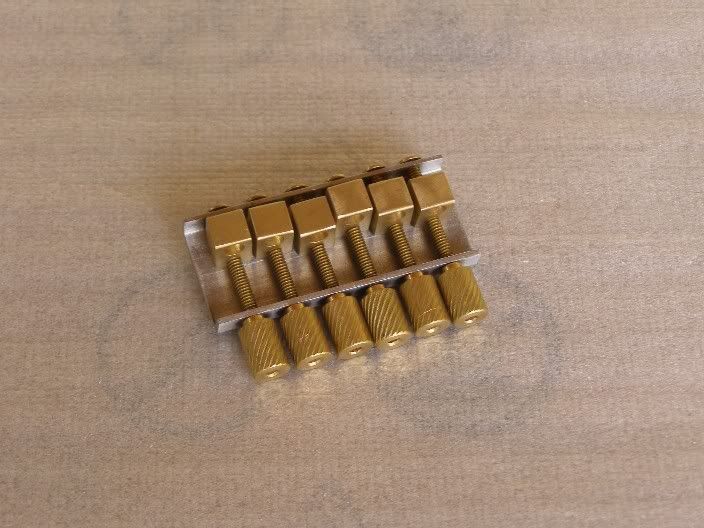
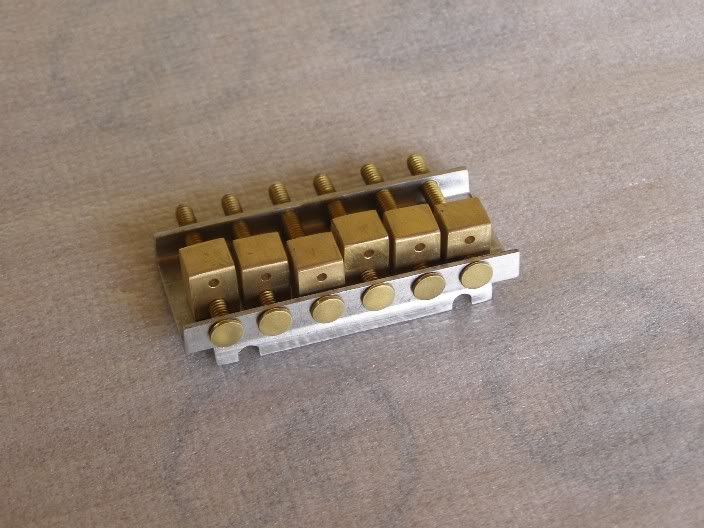
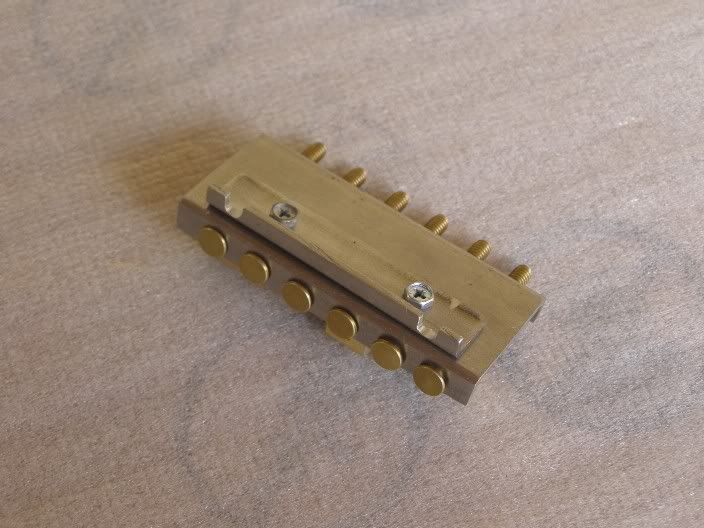
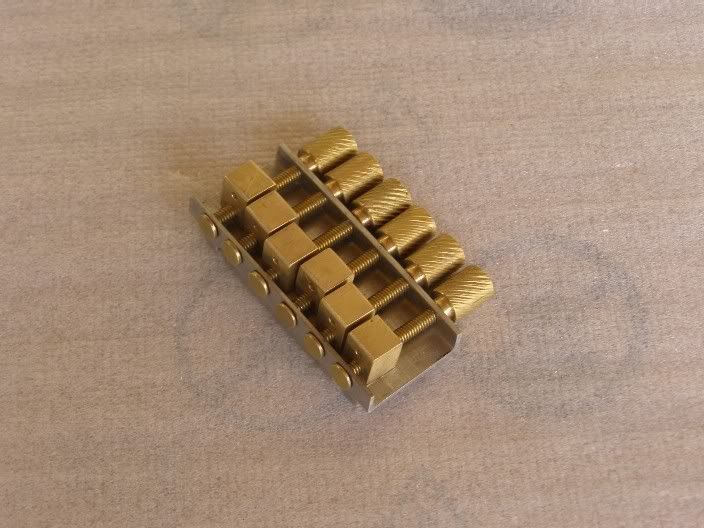
Thanks, the tuners will be black, and the bridge will be one I am making from the same wood as the fingerboard, with adjustable brass saddles. Pickup will be an EMG HZ35 passive.
The saddles will be black like the tuners or just brass color ? Controls ?
-
Wow, that child is a beauty ! You are right we need sunglasses to see the fingerboard, but it´s cool !
What colour/type of hardware are you thinking about ?
-
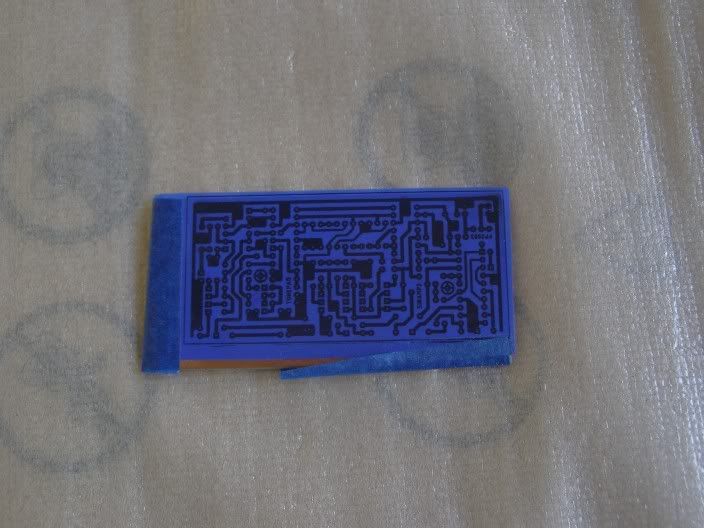
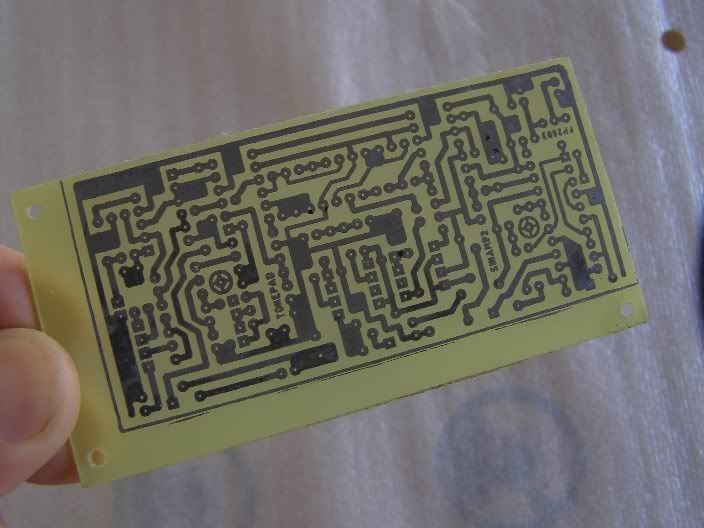
During the last Saturday I was working in the GT2 board :
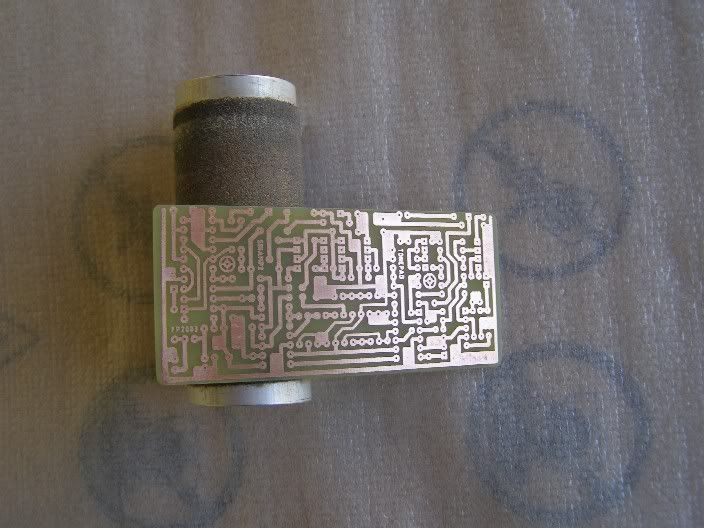
Following are the usual step by step pics :
http://i264.photobucket.com/albums/ii186/a...itar/GT2_01.jpg
http://i264.photobucket.com/albums/ii186/a...itar/GT2_02.jpg
http://i264.photobucket.com/albums/ii186/a...itar/GT2_03.jpg
http://i264.photobucket.com/albums/ii186/a...itar/GT2_04.jpg
http://i264.photobucket.com/albums/ii186/a...itar/GT2_05.jpg
Now I have to populate the board and test it out of the guitar.
-
What sort of strings are you gonna use with this? is it gonna be double ended ones? cause if it is I don't see how you're gonna string them through. I really like watchin' the whole thing comin' together.
No, regular strings. The ball end pass through the tuner jaw and the other end pass through the headpice and it´s fixed using a screw like a locking nut.
-
man, this tuner is really amazing. but i have to tell you... I have no idea how it works!
you put the ball-end of the strings in the neck, right? and how you tie the string in this tuner?
It's possible to do many turns on it? Or you have to pull the string before start tuning?
(can you understand my doubts?)
the body looks really nice too. I'm waiting to see how the Gt2 will look into it!
well, I'm waiting for news!
Thank you Kiki, about the tuner :
First I put the tuner jaw in the place nearest the hardtail (remember that the tuners are placed under the hardtail). Then I pass the string through the jaw. If you look in detail next pic you can see a hole in the jaw (the bigger one) to hold the ball end of the string.
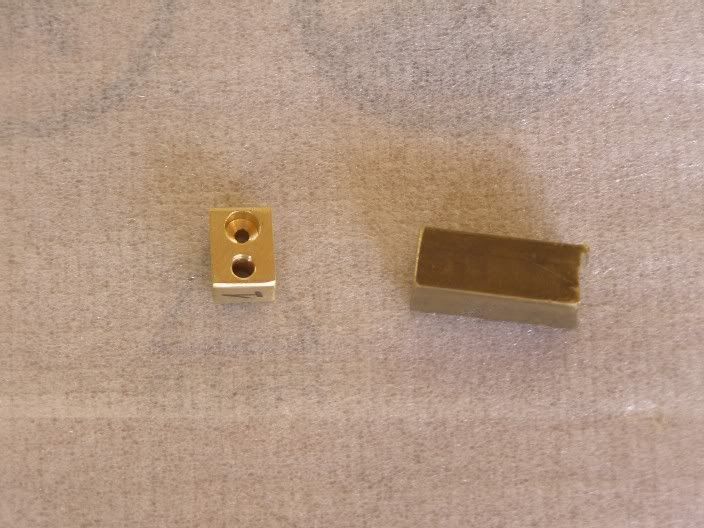
Then the string pass through the hardtail directly to the nut and then to the headpiece. The headpiece has screws to hold the strings. Now I have to use the tuner pegs to intonate the strings. That´s all !
Yesterday I left the tuners for the chromium plate, they will be ready in the middle of next week.
-
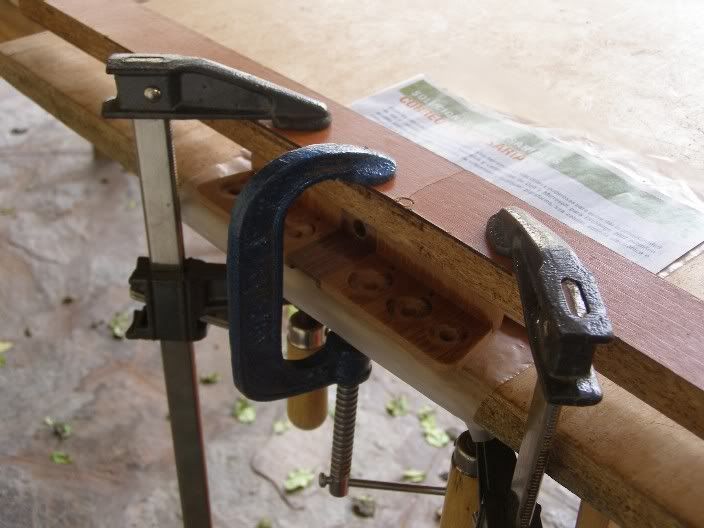
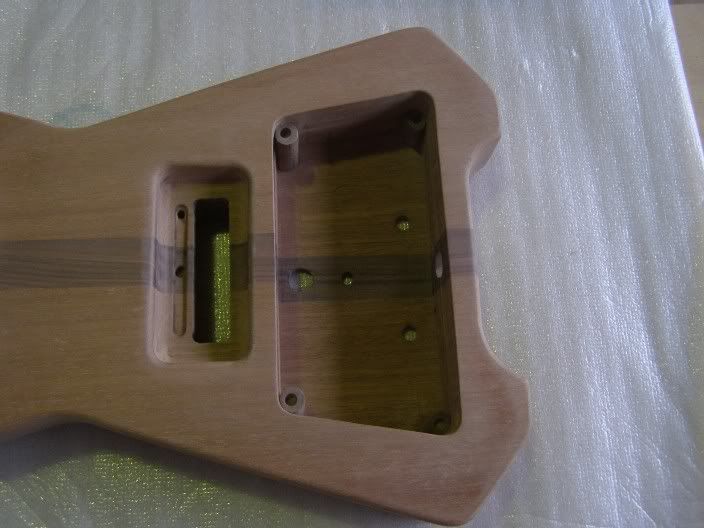
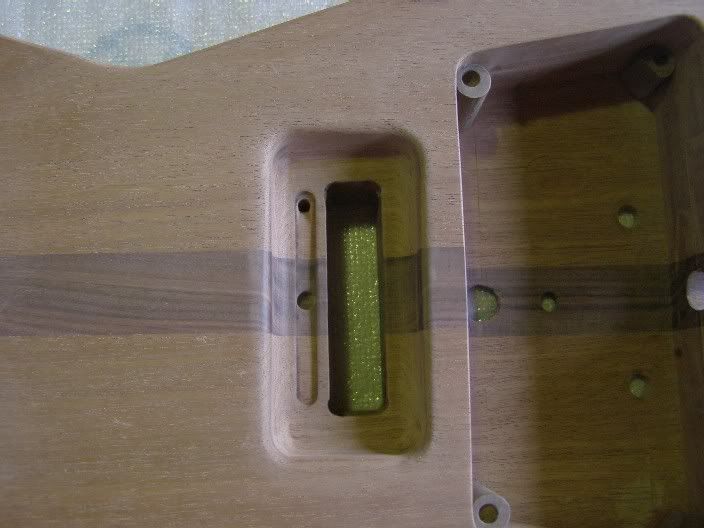
I have to decide the material for the GT2´s cover... but I made a little progress in the body :
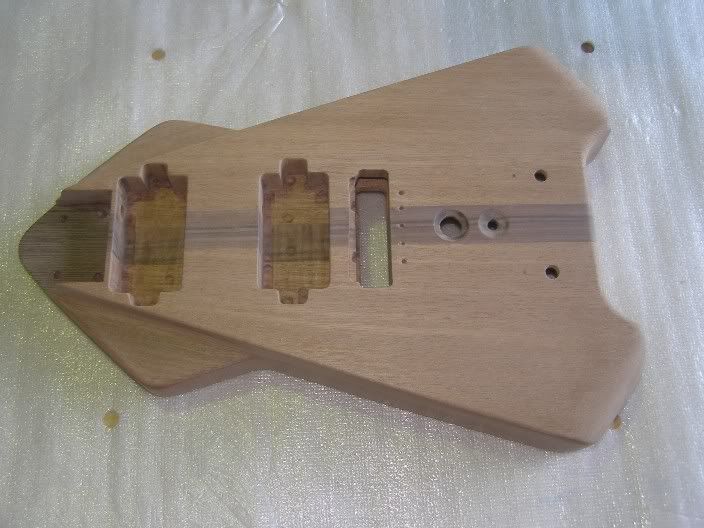
When I tested the neck, the action was too high, so I put a little slice of wenge into the neck pocket and now it´s ok.
http://i264.photobucket.com/albums/ii186/a...itar/Body14.jpg
The GT2´s compartment has the stands for the cover installed and drilled for the neo magnets :
http://i264.photobucket.com/albums/ii186/a...itar/Body16.jpg
Inside the hollow for the tuner pegs I made a support for the allen tool that I need to fix the strings in the headpiece.
The tool is inserted in the little hole and a small magnet keeps it in place.
http://i264.photobucket.com/albums/ii186/a...itar/Body17.jpg
-
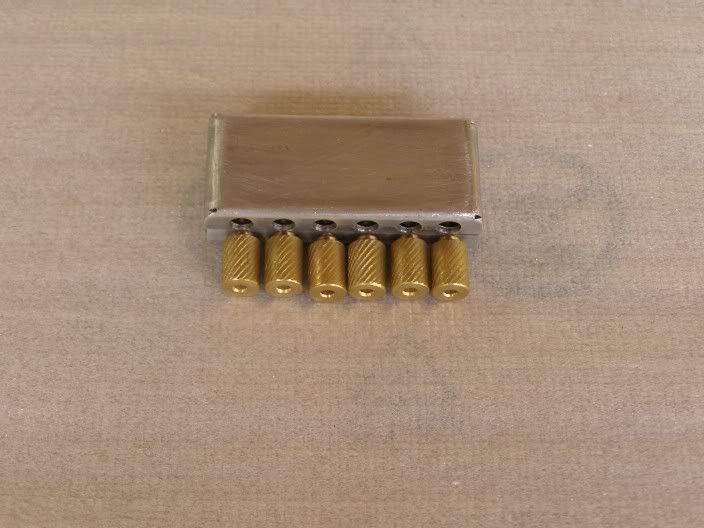
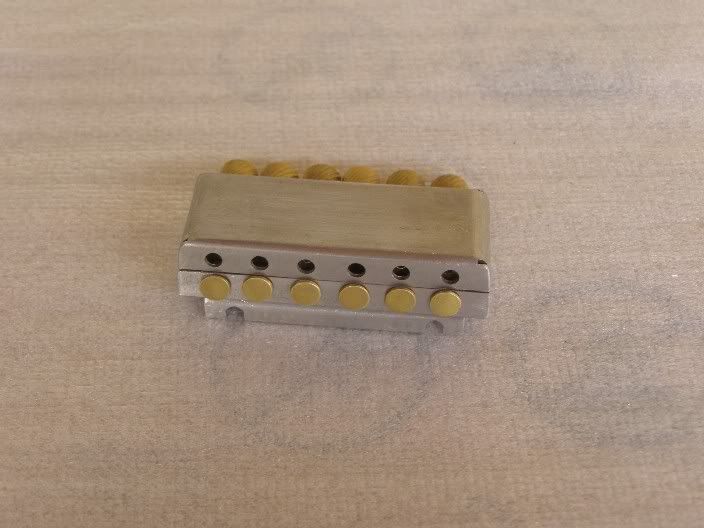
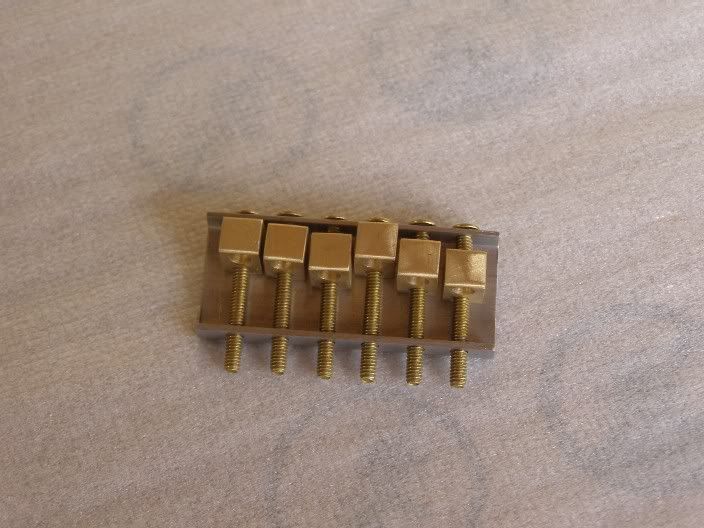
Reporting the tuner´s progress :
The tuners are completed. I tested it and works well.
More pics with the cover :
http://i264.photobucket.com/albums/ii186/a...tar/Tuner16.jpg
http://i264.photobucket.com/albums/ii186/a...tar/Tuner17.jpg
More pics showing each part of the tuner :
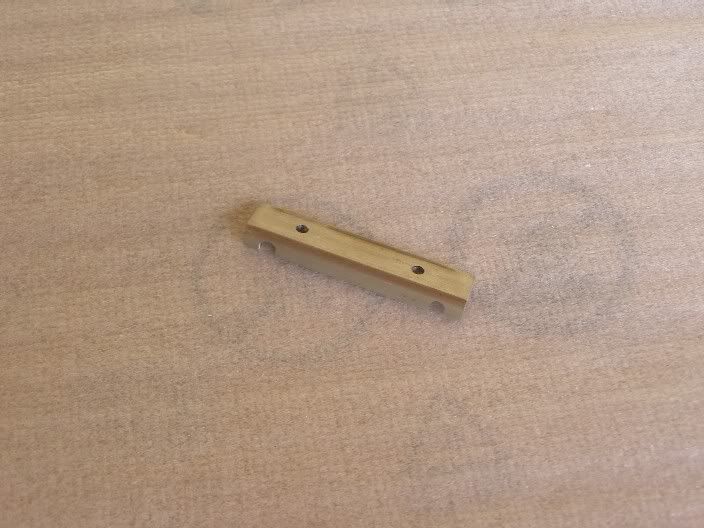
Tuner Jaws :
http://i264.photobucket.com/albums/ii186/a...tar/Tuner01.jpg
http://i264.photobucket.com/albums/ii186/a...tar/Tuner02.jpg
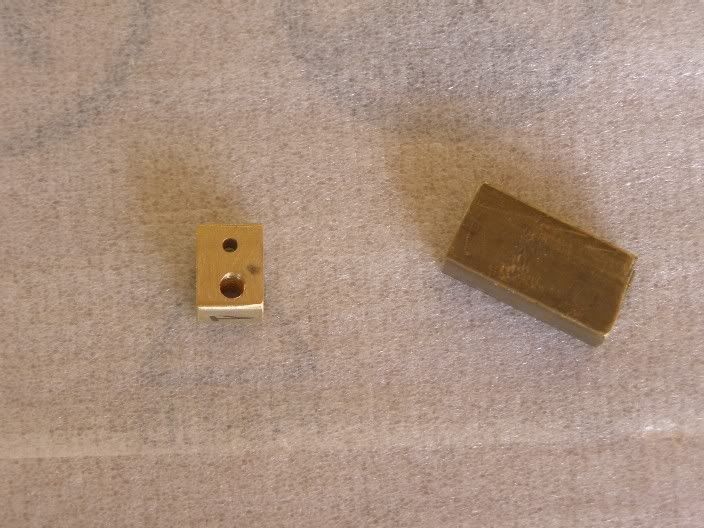
Tuner Pegs (my friend made them with his lathe, really well made !)
http://i264.photobucket.com/albums/ii186/a...tar/Tuner03.jpg
http://i264.photobucket.com/albums/ii186/a...tar/Tuner04.jpg
http://i264.photobucket.com/albums/ii186/a...tar/Tuner05.jpg
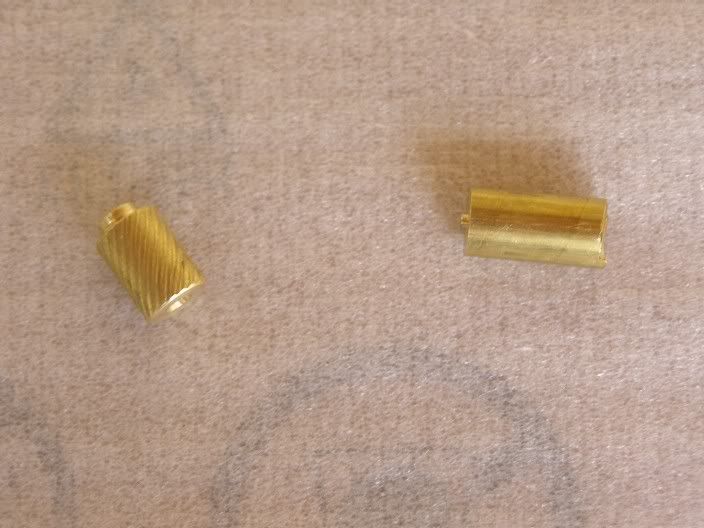
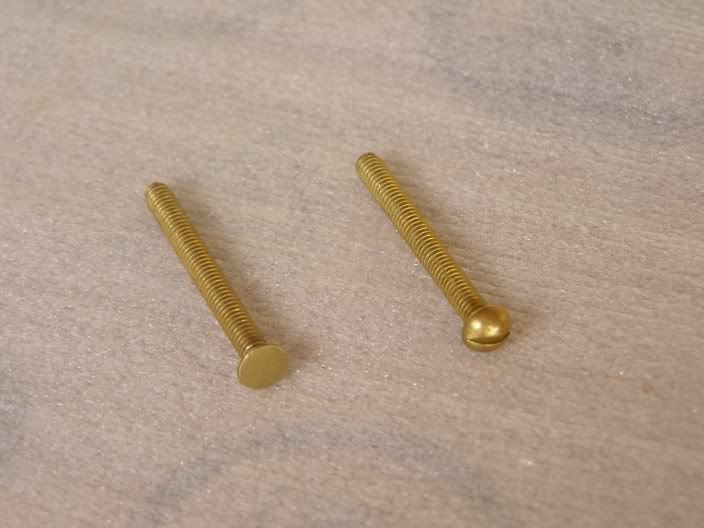
Jaw Screws :
http://i264.photobucket.com/albums/ii186/a...tar/Tuner06.jpg
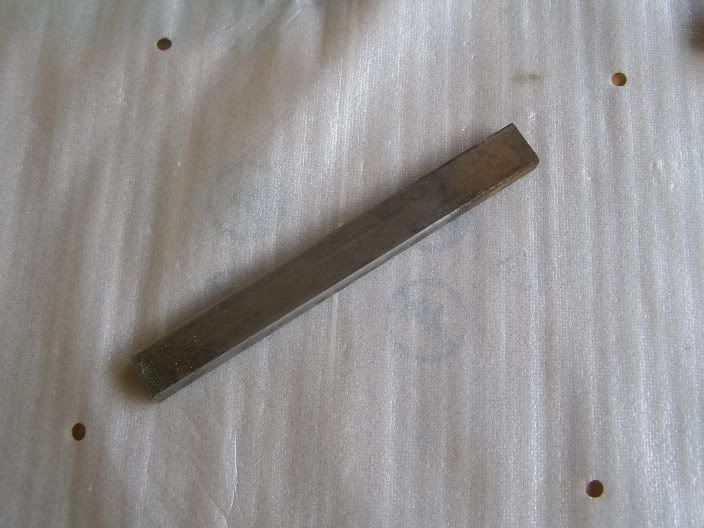
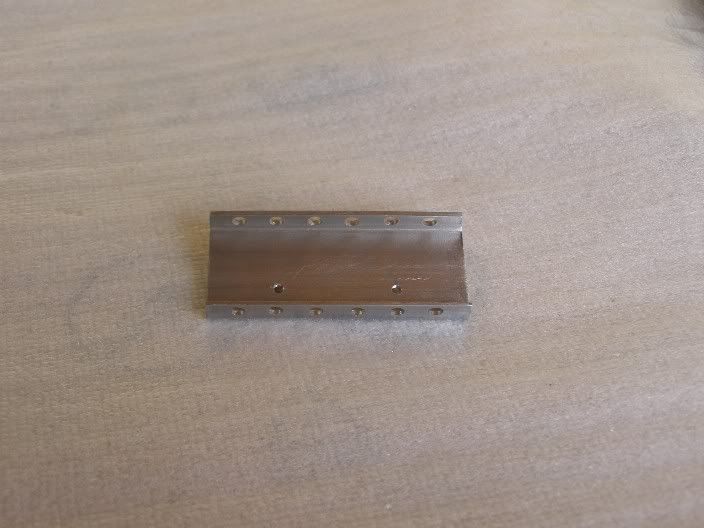
Tuner Base : (made with a piece of iron)
http://i264.photobucket.com/albums/ii186/a...tar/Tuner07.jpg
http://i264.photobucket.com/albums/ii186/a...tar/Tuner08.jpg
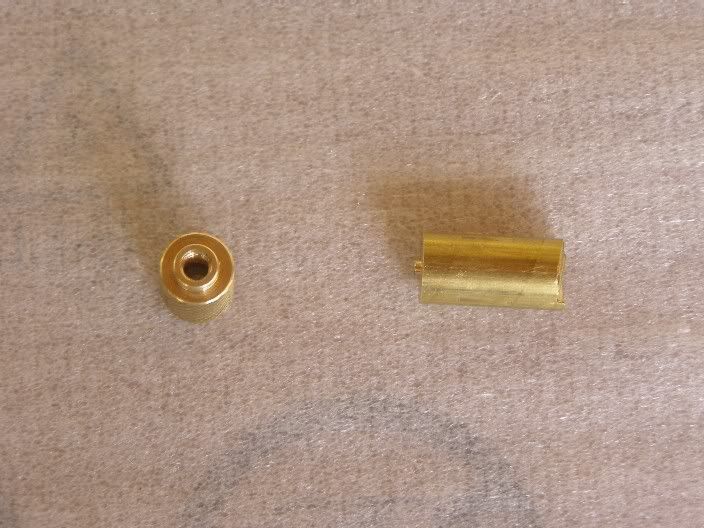
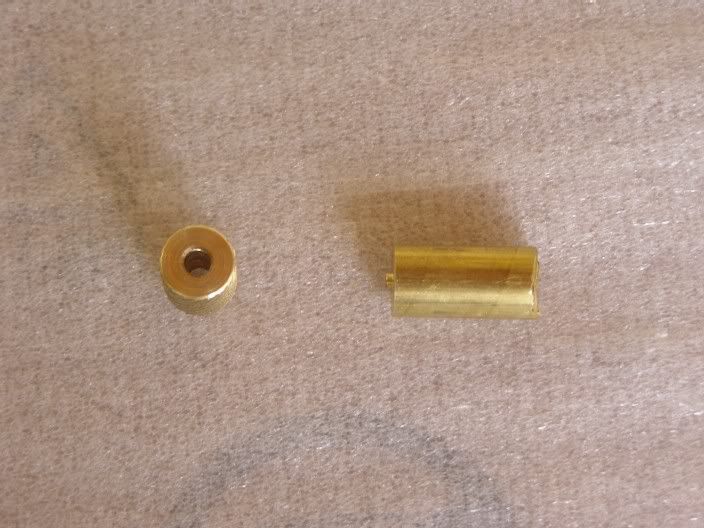
Tuner Cover :
http://i264.photobucket.com/albums/ii186/a...tar/Tuner09.jpg
Tuner Fixation :
http://i264.photobucket.com/albums/ii186/a...tar/Tuner10.jpg
Assembling the tuners :
http://i264.photobucket.com/albums/ii186/a...tar/Tuner11.jpg
http://i264.photobucket.com/albums/ii186/a...tar/Tuner12.jpg
http://i264.photobucket.com/albums/ii186/a...tar/Tuner13.jpg
http://i264.photobucket.com/albums/ii186/a...tar/Tuner15.jpg
The headpiece and tuners are ready for the chromium plate and I have to begin with the GT2 board and the portable amp !
But first I have to decide which material use for the GT2 cover...
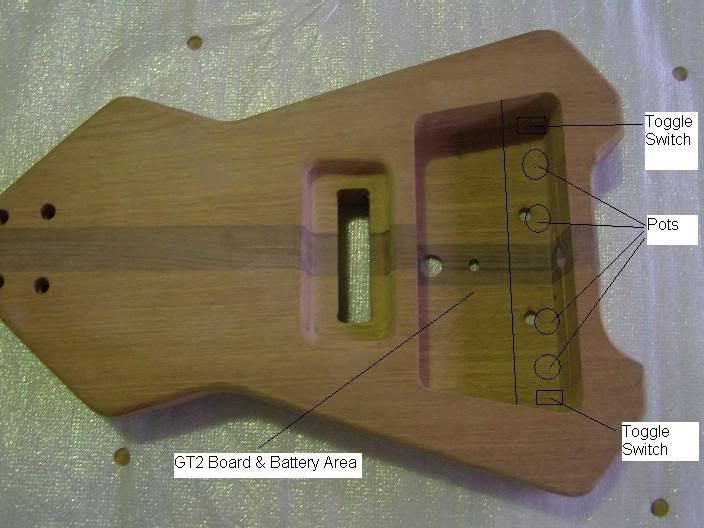
The following diagram explains the way the GT2´s controls will be :
http://i264.photobucket.com/albums/ii186/a...CoverSketch.jpg
The left part of the cavity will be used for the GT2 board, battery and front switches. The right part for the GT2 controls, front pots and output jack.
The right part have to be recessed Of course. The idea is fix the cover using small neo magnets.
You can see that the cover can´t be straight. What material you suggest to use for the cover : metal, plastic, wood, other ?
Any idea is welcome friends.
-
Good job !
-
Looks fantastic ! Congratulations !
-
Update,
I cut out the soundholes. After I tried about 20+ variations, I found what looked best to me, kinda sexy in my thinking
Not the traditional sound holes, but they have more volumectric area, appoximately 20% more than the traditional round ones. Now my question to you all. The worm holes (yes, that's why they call it ambrosia maple due to the ambrosia worm) look closely on the top, there are (6) six of them. I'm thinking about filling them with side dot markers? What do you think? I would really like some opinions on this? It might look cool then again kinda hokey?Thanks
MK
Wow, the step by step pics are excellents ! Great job MK, congrats !
-
Beautiful !! Which colour you´ll use for stain ?
-
Thanks for the link. I have one of the original SansAmps from 1993 (later reissued as the Classic), and I still think is one of the most organic and warm sounding solid state pedals out there. There was a lot of point-to-point wiring in those and a board/module completely potted in black epoxy. The GT2 was intended to be pretty much the same but easier to use.
Talking about pedals I just finished building a Compressor kit from these guys:
Highly recommendable, sounds great and comes with absolutely everything down to the rubber feet. They even include all the additional components needed for the most popular mods...
This is the GT2 that I made a year ago :
I haven´t tried with BYOC but I´ll keep in mind for the future, thanks.

 )
)
Cnc Inlay Help Needed
in Inlays and Finishing Chat
Posted
I think that if you use different colours you don´t need the letters. Is more easy to recognize colours than letters on a fingerboard. Just my 2 cents.