


Andronico
-
Posts
235 -
Joined
-
Last visited
Content Type
Profiles
News and Information
Tutorials
Product Reviews
Supplier Listings
Articles
Guitar Of The Month
Links and Resources
Forums
Gallery
Downloads
Posts posted by Andronico
-
-
Cool! I've been thinking of something along similar lines, except what I'd want to do is somehow convert a tremblock into a tuner-housing as well, that way I can still have a trem on the guitar. Can't wait to see your solution --do you have any pictures or drawings you can share in the meantime?
Oh yeah, I like the design of the guitar too (and WezV, I'd never seen that Burns before, thanks!)
Sorry but I haven´t any good enough drawing of the tuner, but I promise that will begin with the tuners ASAP. I must confess that when I was thinking about the tuners through the body, the idea of using a tremolo and replace the tremblock crosses my mind but I prefer to begin with a more easy implementation (remember that it´s my first guitar). But I think that can works (with very little changes) with the idea of replacing the tremblock ! Perhaps the next one or you can try it !

Regarding the body design, I like it too and didn´t see it in my country and remember that I need a simetrical design in order to be used for me and my lefty child.
-
hi neighbor, saludos desde brasil!
pretty interesting project!
the body looks very good, I'm waiting for news.
I'd like to built a travel guitar someday, similar to tyours.
but i was thinking in a built-in-amp, with a few efects inside.
hasta luego
Hi Kiki, un abrazo para ti también !
Thanks for your comments, my first idea was to put a small amp inside but the body is really small and the GT2 board and its controls will use the most part of it. And finally I decided to leave the amp out of the guitar. Perhaps in another project...
-
I posted that while you where replying to the original question.
It'd be nice to see a drawing on how you're gonna pull this of, I've got some ideas of my own that I might put into practise one day.
Hi Aidlook I have only a draw in paper but don´t worry in a couple of days I´ll be working in the tuners. Perhaps we have similar ideas about it.
-
Fantastic work !
-
Ok, this are the last days of my holidays and I can´t wait until weekend to continue with the travel guitar...

So I spent a few hours last night and this morning to advance with the body.
Here are the results :
http://i264.photobucket.com/albums/ii186/a...itar/Body07.jpg
http://i264.photobucket.com/albums/ii186/a...itar/Body08.jpg
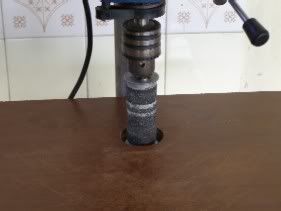
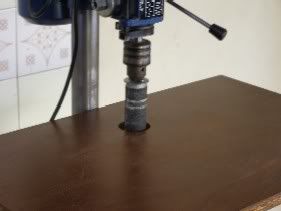
The body was sanded all around to the final size with my drill press using the sanding tool that I made some weeks ago :
http://projectguitar.ibforums.com/index.php?showtopic=33990
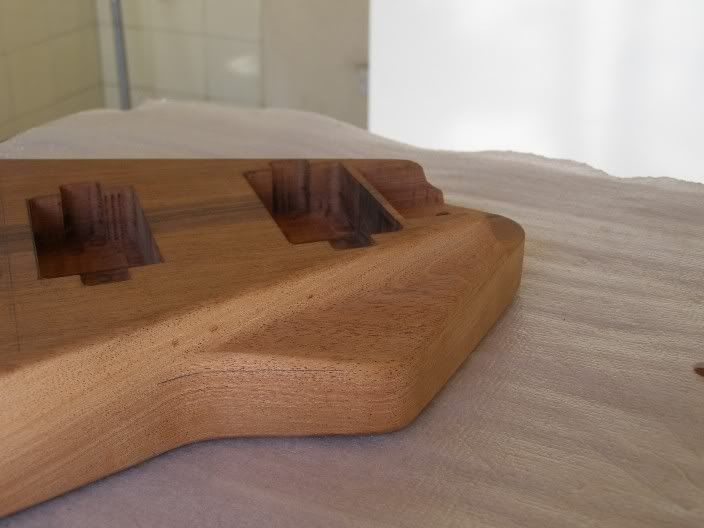
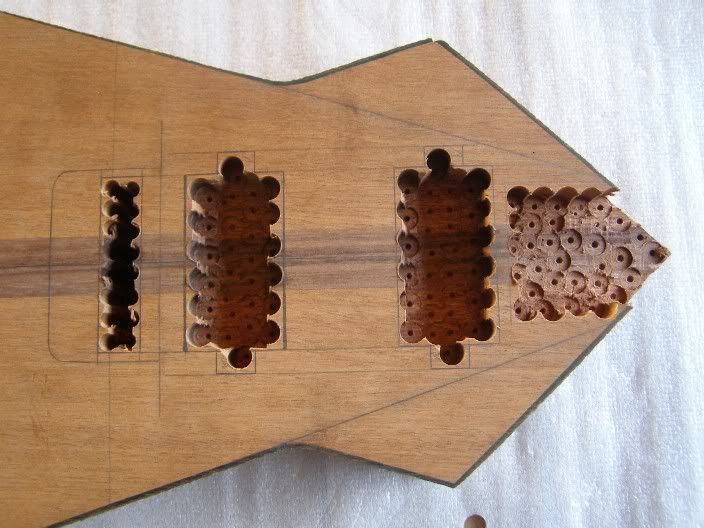
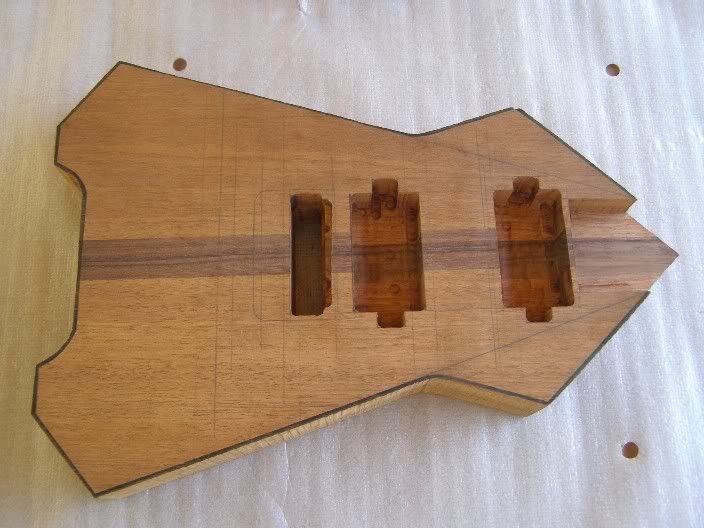
Quick question. YOu have a headless neck and a hard tail. how are you planning to tune the guitar?I know that I wasn´t very clear with my explanation about the use of a hardtail bridge with a headless guitar, so I try to be more specific :
1) This hardtail uses the strings passing through the body.
2) The common way to tune a headless guitar is in horizontal form. The tuner stretches the strings moving the saddles horizontally.
3) My tuners will be under the hardtail (in vertical position not horizontal) in the some path that the strings are passed in a common through the body design.
4) I can access the tuner´s pegs on the back of the body.
I think that when I begin with the tuner hardware all will be more clear.
-
Quick question. YOu have a headless neck and a hard tail. how are you planning to tune the guitar?
The tuner hardware will be under the hard tail, and I´ll access it on the back side of the body. I know that is not the most confortable way but it´s a travel guitar and I need space for the GT2 board and control.
WezV, I thought that RiverHead had an original design, but... perhaps they had a little help...
-
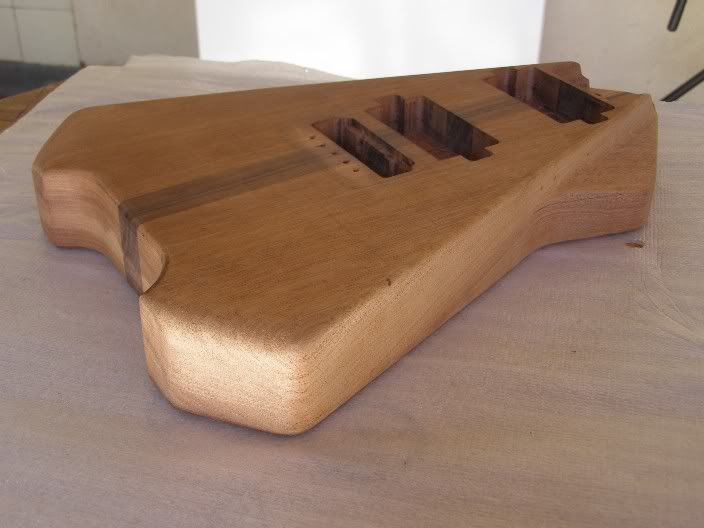
Well, continue with the guitar.
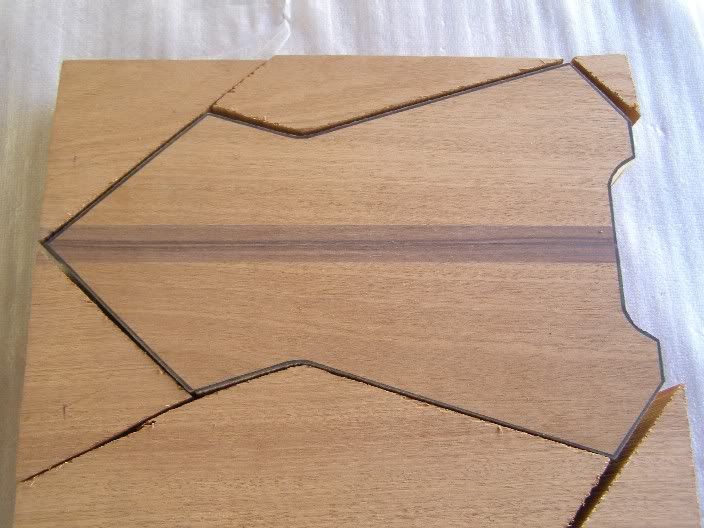
The body :
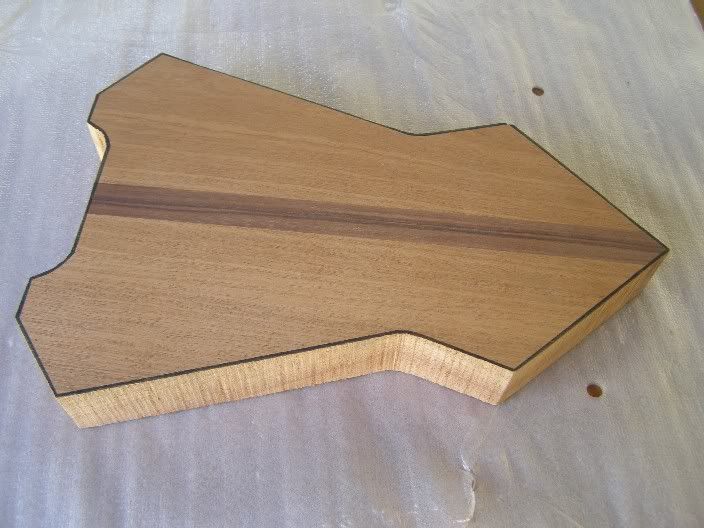
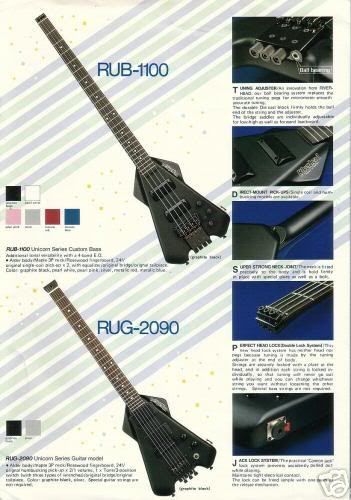
The style is inspired in the RiverHead Unicord. I found a site about these guitars :
http://www.handen.us/riverhead/index5.html
The owner of this site is a very friendly Finnish guy named Hande that sent me different measurements of the body parts.
With this measurements and the pics I draw a diagram in paper. Thanks Hande !
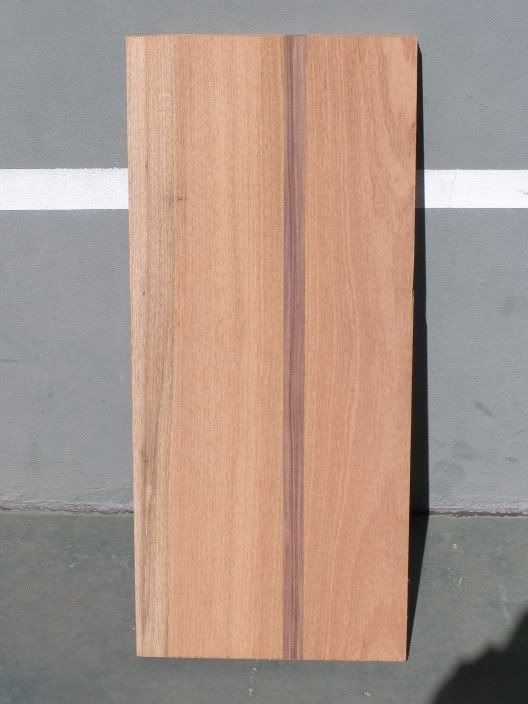
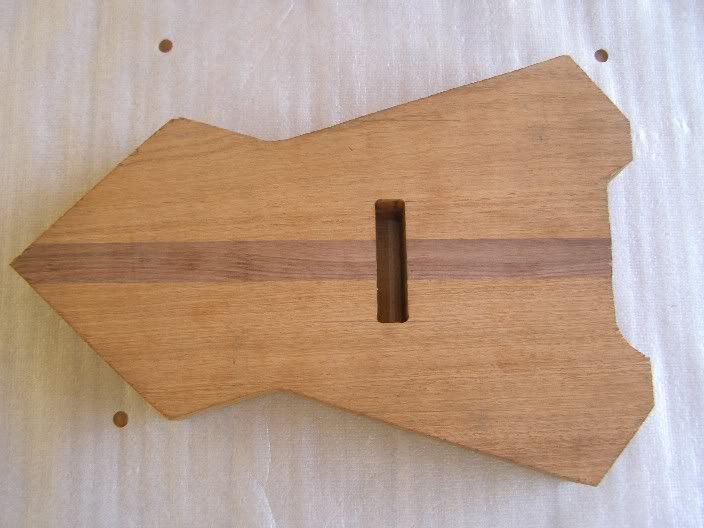
The woods for the body are mahogany with a strip of jacaranda in the centre.
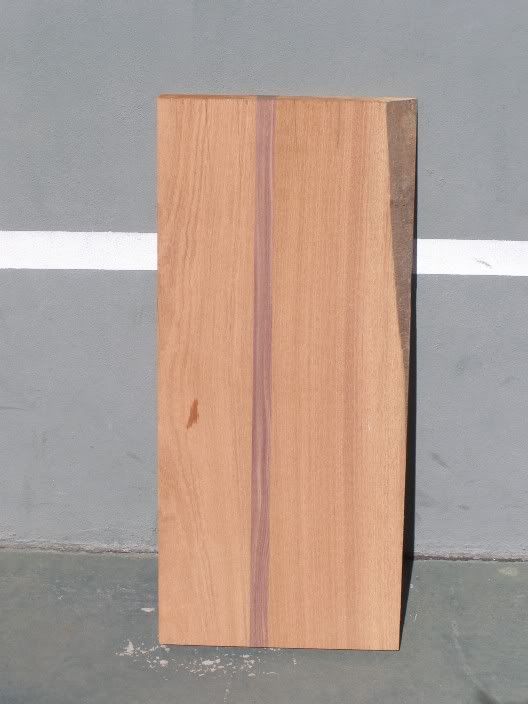
http://i264.photobucket.com/albums/ii186/a...tar/Blank02.jpg
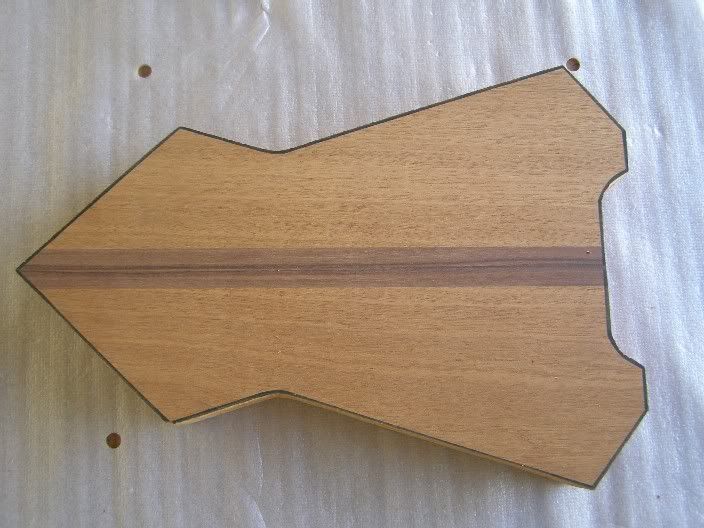
Beginning with the body :
http://i264.photobucket.com/albums/ii186/a...itar/Body01.jpg
http://i264.photobucket.com/albums/ii186/a...itar/Body02.jpg
http://i264.photobucket.com/albums/ii186/a...itar/Body03.jpg
http://i264.photobucket.com/albums/ii186/a...itar/Body04.jpg
http://i264.photobucket.com/albums/ii186/a...itar/Body05.jpg
http://i264.photobucket.com/albums/ii186/a...itar/Body06.jpg
I hope to finish the most part of the body on weekend in order to begin with the headless hardware.
More pics soon...
-
Hi, my name is Julián and live in Buenos Aires, Argentina.
I´m learning guitar with a Gibson S1 and during the last year I was thinking about the possibility of make a little travel guitar in order to use it when I´m on holidays (I´m not sure if my wife and kids will be happy with this situation...)
The idea is to make a headless guitar, a portable amp and a custom case for the guitar + amp + cables.
I´m righty but my 14 years old kid is lefty and he´s playing classical guitar. I want that this guitar can be easily changed to be played for him (if he wants to play electric in the future).
The guitar will have the following specifications :
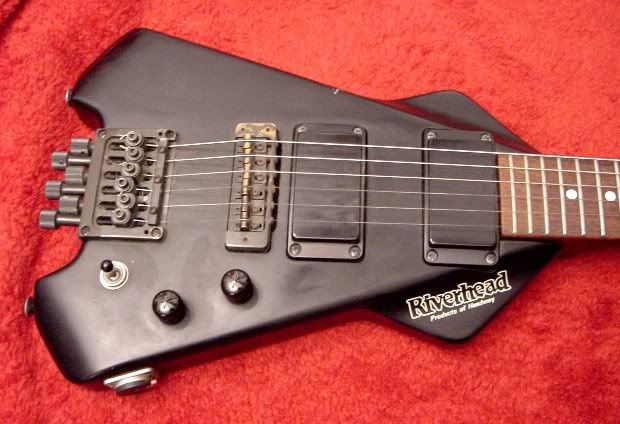
1) Mahogany body inspired in the style of the Riverhead Unicorn but customised for righty/lefty use.
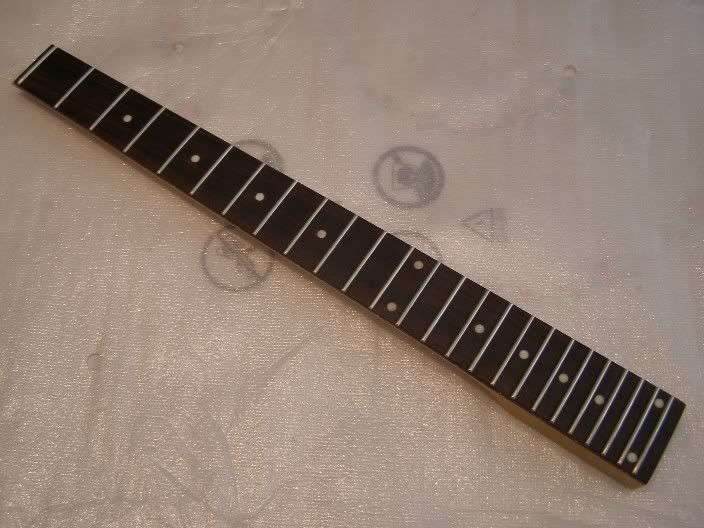
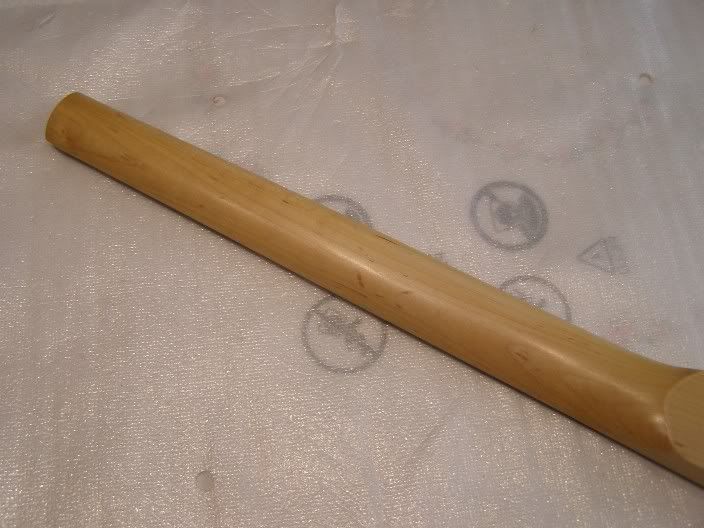
2) Headless neck with 25.5 scale and 24 frets.
3) HardTail bridge.
4) Home made custom headless hardware.
5) Two humbuckers pickups.
6) Built in SansAmp GT2 board (because I use this pedal everytime) with rechargeable 9V Battery and charge circuit.
7) Controls in the front : One toggle switch to select pickups, two volumes, effect on/off switch.
8) Controls In the back : GT2 pots and switches.
9) And of course must be cheap ! Remember that I live in South America ...
For people that don´t know the Riverhead unicorn here are some pics :
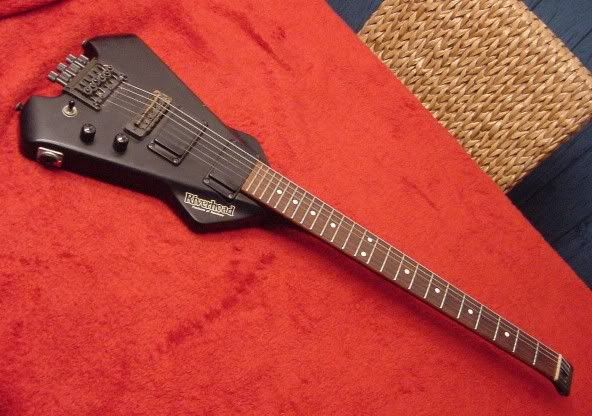
http://i264.photobucket.com/albums/ii186/a...itar/RIVER2.jpg
http://i264.photobucket.com/albums/ii186/a...r/riverhead.jpg
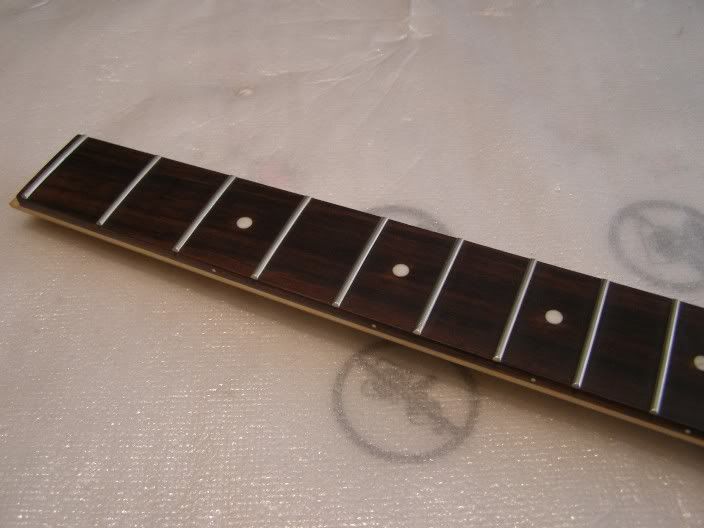
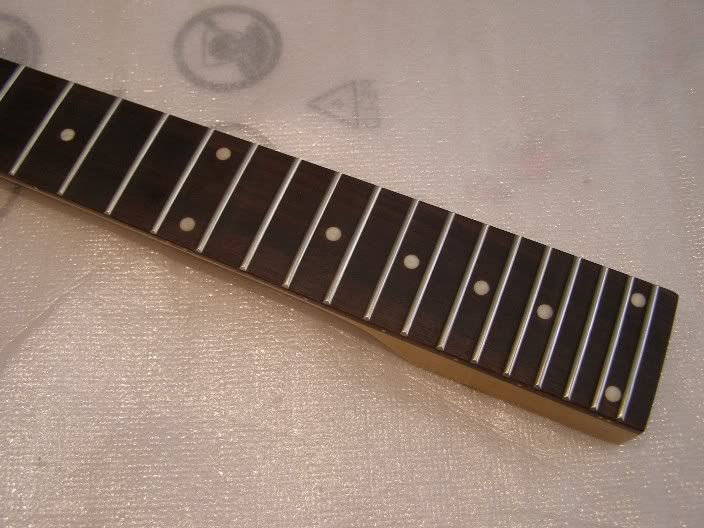
The neck that I bought from Guitar Fetish for dirty $ 32.00 (shipping included) :
http://i264.photobucket.com/albums/ii186/a...itar/Neck04.jpg
http://i264.photobucket.com/albums/ii186/a...itar/Neck03.jpg
http://i264.photobucket.com/albums/ii186/a...itar/Neck02.jpg
http://i264.photobucket.com/albums/ii186/a...itar/Neck01.jpg
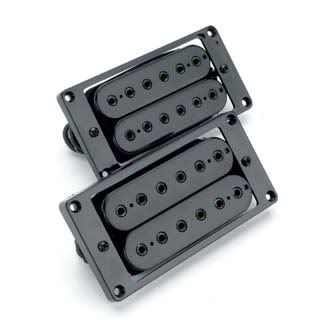
The Hex Humbuckers (from Guitar Fetish too, but not GFS brand !)
http://i264.photobucket.com/albums/ii186/a...r/HexPickUp.jpg
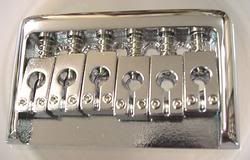
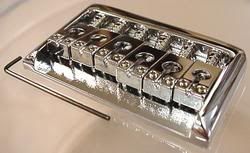
The HardTail bridge :
http://i264.photobucket.com/albums/ii186/a...r/HardTail2.jpg
http://i264.photobucket.com/albums/ii186/a...r/HardTail1.jpg
-
You mentioned Robo Sander and I thought thats what you wanted to build. I cant believe you dont have standard sanding drums in your country. Strangley I have relatives in your country but have no clue who or where they are.
Anyway good luck with your drum sander. I guess it's hard for someone from the US to grasp not having a dozen choices for every tool made. You neeed a good chinese connection forget the US.
Yes, I can buy a drum sander in my country, but only professional ones, not for hobby purpose
And nothing for about 5 bucks and 2 hours of free time on weekend...
-
I don't have the robo sander. I also dint look all your linked pictures.
I hate to bring you down to earth with all the work you did but I believe metal against a pattern was a bad Idea. If the metal on the bottom is not free floating (you are able to stop the metal guide motion in a running drill press) it will rip up your pattern.
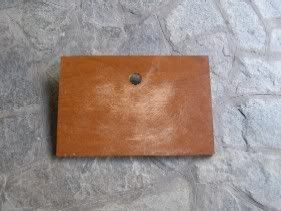
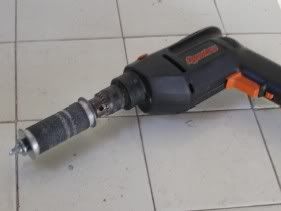
Hi Woodenspoke, don´t worry, I don´t use this tool to follow a pattern, if you look carefully to the pics you can see that the table covers the big flat washer. The idea was to have a tool to sand the borders of the wood but without a pattern (specially curved pieces of wood not straight lines). If I want to use patterns I have to replace the washer with a free wheel or something like that (like you mention) but was not my original idea. I tested the tool with a piece of mahogany and works ok. The final test will be in about ten days when I´ll begin with my first guitar project. Thanks for your cooperation
-
Good tip Rich, thank you !
-
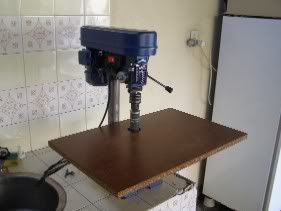
I´ll begin with my first homemade guitar project in a couple of days (or weeks ?), I have some tools (manual drill, drill press, router, etc) but need a sanding station.
I live in Argentina and is impossible to buy something like the RoboSander because nobody sells it here and the shipping charges to my country are very expensive.
My only solution was, hey why not build a similar tool ?
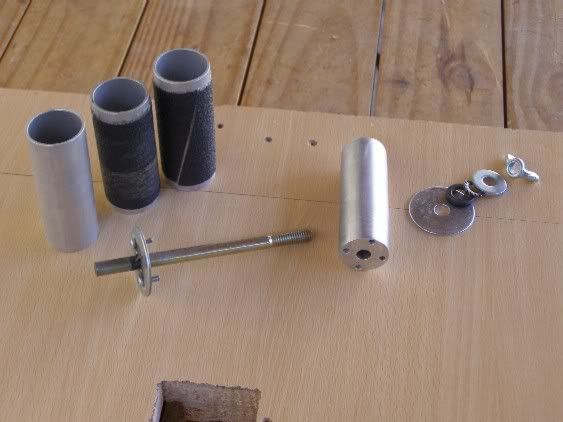
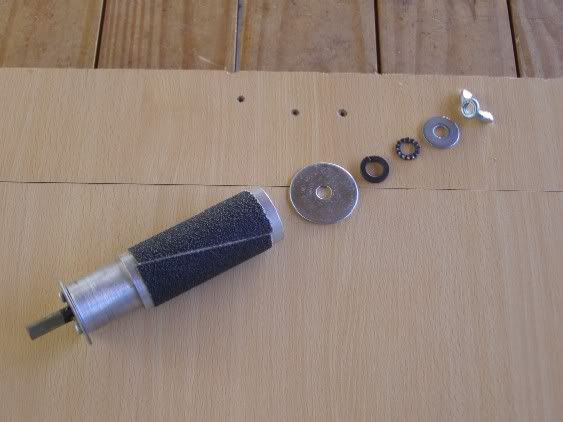
Following are the list of material, instructions and pics, please excuse me for my poor english but is not my natural language.
List of materials :
1. Steel bolt aprox 5¨ long x 5/16.
2. Flat washers 1 1/2¨ (that fits your size of bolt).
1. Aluminum tubular bar aprox 3 1/16¨ long x 1 2/16¨ thickness.
6. Aluminum tube pieces aprox 3 2/16¨ long x 1 2/16¨ interior size.
2. Small screws for metal.
1. Flat washer 1¨ (that fits your size of bolt).
1. Star washer (that fits your size of bolt).
1. Spring washer (that fits your size of bolt).
1. Wing nut (that fits your size of bolt).
1. Thin sheet of sandpaper (mine is not paper is fabric)
1. Midium sheet of sandpaper.
1. Thick sheet of sandpaper.
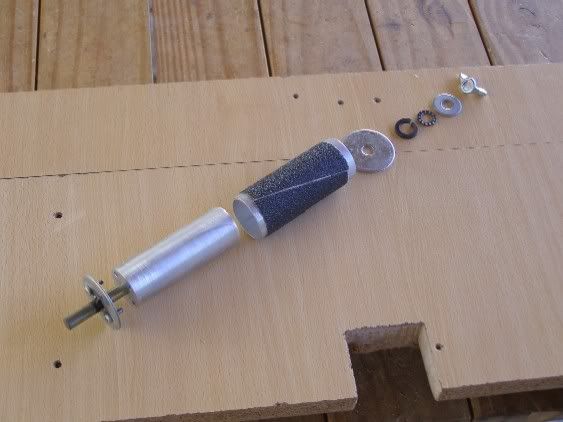
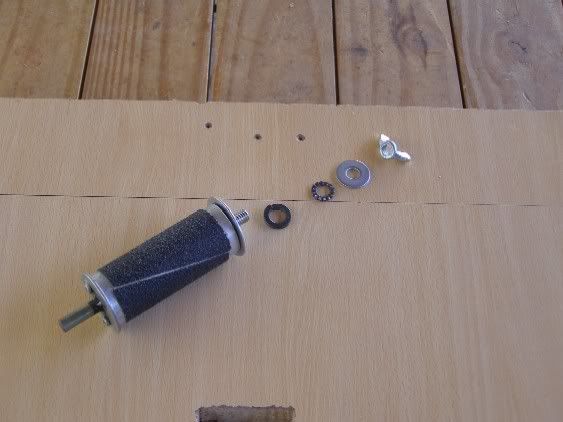
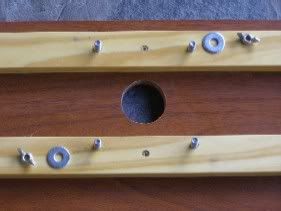
Steps to follow :
a. You have to cut the head of the bolt.
b. Make two holes in one of the big flat washer in line with the central hole. This holes must be threaded to the size of the small screws for metal.
c. Solder this washer to the bolt (aprox 1¨ from its beginning).
d. Make one hole in the center of the aluminum bar, across it that fits your steel bolt.
e. Make two small holes in the aluminum bar in line with the central hole that fits the small screws for metal.
At this time the aluminum bar must fits the steel bolt and the two small screws in the flat washer. Check it, please.
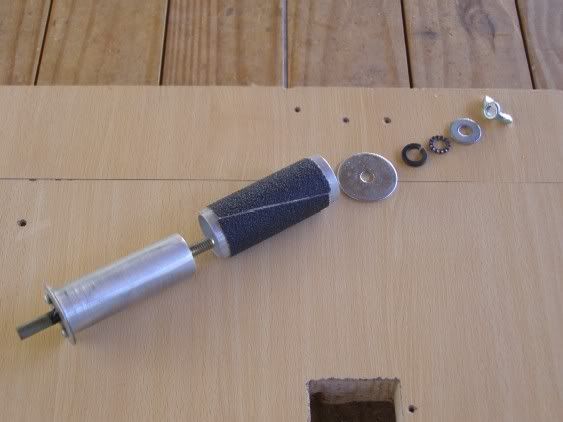
f. Cut a piece of sandpaper and use contact glue to stick it to one aluminum tube.
g. Join the parts of the tool and use it !
You can have 6 alunimum tubes ready with sandpaper (2 with thin, 2 with midium and 2 with thick sandpaper). When the sandpaper is smooth you have to put it of, clean the aluminum tube with solvent and stick a new one.
Here are the pics (one pic explains more than 1000 words !)

All the parts separated :
http://i264.photobucket.com/albums/ii186/a...ion/sander1.jpg
Assembling the tool :
http://i264.photobucket.com/albums/ii186/a...ion/sander2.jpg
http://i264.photobucket.com/albums/ii186/a...ion/sander3.jpg
http://i264.photobucket.com/albums/ii186/a...ion/sander4.jpg
http://i264.photobucket.com/albums/ii186/a...ion/sander5.jpg
http://i264.photobucket.com/albums/ii186/a...ion/sander6.jpg
You can use it in a drill press :
http://i264.photobucket.com/albums/ii186/a...on/sander14.jpg
http://i264.photobucket.com/albums/ii186/a...on/sander13.jpg
http://i264.photobucket.com/albums/ii186/a...on/sander12.jpg
Sander Table :
http://i264.photobucket.com/albums/ii186/a...on/sander15.jpg
http://i264.photobucket.com/albums/ii186/a...on/sander16.jpg
http://i264.photobucket.com/albums/ii186/a...on/sander18.jpg
Or just in a manual drill :
http://i264.photobucket.com/albums/ii186/a...on/sander21.jpg
Hope that helps !
Have a nice day
-
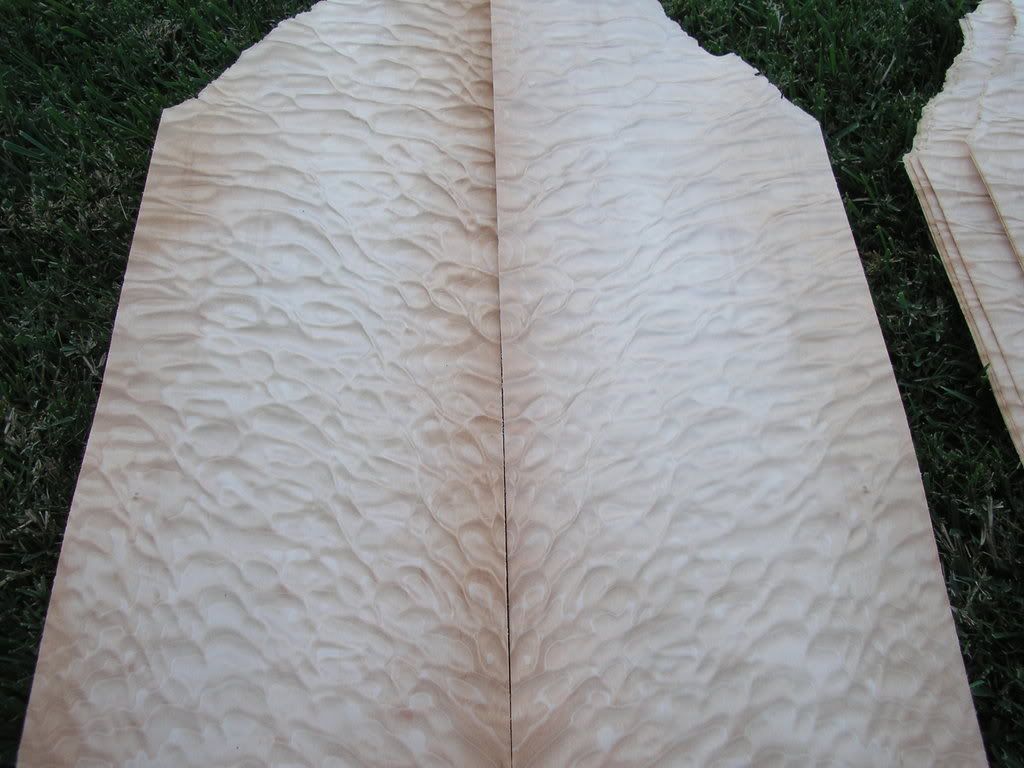
Hello Dean, this kind of veneer is impossible to find in my country (Argentina).
http://i236.photobucket.com/albums/ff185/r...er/PA270651.jpg
Please let me know if you have more and the price. Perhaps I can buy some.
Thanks.
-
This morning I´ve received an email from Guitar Center telling me that the strings were shipped !
I´m happy
-
Yes I get a backorder notice this morning.
Merry Christmas
-
Your guitar is fantastic !
Felicitaciones Hermano !
Please, please, enter it in the GOTM.
-
Fantastic bass man ! Congratulations for your kid !!
He looks very proud for his work.
-
BlackDog your guitar is fantastic !!! Congrats man !
-
Congratulations Salvatore !
Your new guitar is beatiful, amazing, sexy...
Please post in progress pictures !
-
Very beautiful
Congrats !
-
Thank you PTU !, it´s crazy... I live in Santos Lugares, about 10 minutes from DAC. Do you live in San Martin ? Have you bought a solid top or a veneer ?
-
Hi PTU, glad to see that your project is in the right way.
Can you tell me where you bought the quilted maple top ? Locally ?
-
Hi Wez, that´s a beautiful tele really
!! Only one thing I could change, HB without the ring or with a metal chrome one.I hope that my firts home made guitar can be at least 10% of yours !
And... I like Harry Potter as well
I´m a child of forty !! -
Very very very nice!!! Really a GREAT job!
John has made amazing guitars for his sons !
Perhaps he wants a new child (40 years old one)...


Travel Guitar With Build In Gt2
in In Progress and Finished Work
Posted
Thank you Trynyty for your kind words, the idea of the pocket POD is more usefull than a GT2 but I want to make all the electronics, and think that the SansAmp is a good start point for my guitar.
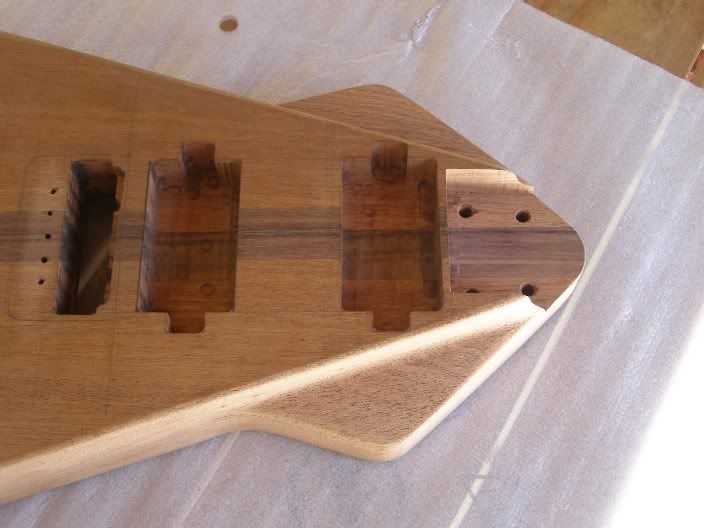
I bought the neck the last May 1st from Guitar Fetish, they had only two New Old Stock headless necks and I picked one. I´ll make the headpiece and the tuners soon. I think that I can show a pic of the neck fitted into the body tomorrow.
Thanks again.