


djhollowman
-
Posts
453 -
Joined
-
Last visited
Content Type
Profiles
News and Information
Tutorials
Product Reviews
Supplier Listings
Articles
Guitar Of The Month
Links and Resources
Forums
Gallery
Downloads
Posts posted by djhollowman
-
-
Plenty of experience with this problem...
Of all the suggetions mentioned so far, only the scrapers will work. But there's a learning curve to using them, and you don't want to practice on your neck.
Tape off the ebony, then carefully sand the maple with 220 grit (new sheet) until the dust is removed. Now spray the maple with a few coats of rattle can shellac, remove the tape and then sand the ebony while trying to keep off the maple. Take the ebony down to whatever grit you want to finish with, then tape it off again and go back and do the same on the maple (again...don't mix your ebony and maple papers).
thanks man, that sounds like a sensible suggestion!

DJ
-
36th fret - you sure??
-
Hi Doug,
Yes I have, and it makes very little difference, sadly!
The problem is that the dust is so fine it gets everywhere, and it gets rubbed into the sandpaper and then rubbed into the maple.
Even if I hold the neck so that the ebony dust is falling away from the maple, the black dust is still present on the paper.
Any other thoughts anyone??
Thanks,
DJ
-
Hi all,
I'm currently sanding the edges of my ebony fretboard, which is already glued to my maple neck (which has yet to be shaped)
I'm noticing the ebony sanding dust is starting to discolour the maple.
Is this going to be a problem? Will it come off, and leave the maple nice and clean?
I was assuming I could sand both woods together, and that the maple would clean up afterwards.
I thought it would be the best way to ensure a straight edge along the neck and 'board.
Should I rig up a straightedge and use a router bit?
Appreciate any help.
DJ
-
Imagine how it feels for noobs like me then!!!
-
I would use a regular solid body bridge.
+1
although you say you think it will make things easier, I'd be worried that it would make things more complicated actually!
A basic bridge is very easy to source, very cheap to buy, very easy to install, and very easy to set up and adjust. (...and that's a lot of "very"s!)
My advice would be to have a serious re-think - it is, of course, your guitar, and it's what you want that matters
DJ
-
I am wanting to make a solid body guitar,im wondering how to shape the bridge i dont want it to be adgustable so it will be simpler.
i dont know anything about how to shape it.
Hello, and welcome!
I think it would help if you could explain a little more, and even link to a picture of something like what you have in mind.
Most solid body bridges are adjustable, in terms of height (for action) and string length (for intonation)
Do you mean you want to make a bridge like an acoustic guitar?
DJ
-
I also really like the look of the cover with magnets and matching grain.
Loved the photos in this topic, J!
The matching grain is obviously a highly desirable effect, but the magnetic cover intrigues me.
Is the idea behind the use of magnets purely to avoid visible screw heads?
I mean, how often are you going to be opening the cavity?
I guess if you have active pickups you'll need access to change the battery every so often!
Just curious as to how this method came to be used.
DJ
-
Having a perfect radius is only important if that feels right to you - it's much more important to have the board be flat along it's length, so that the wood under each string path is flat, whether you're talking a compound (conical) radius or a consistent (cylindrical) radius. The radius exists mostly to make the board more comfortable under your hand. Of course you want your radius to match what your bridge can achieve without having to jigger it all up or slot the saddles very deep. I've played older cheap guitars where the fretboard radius seems like it had to have been done freehand on a belt sander or something - rather than a continual radius arc, it curves much more at the sides of the board - I guess if you drew the radius out, it would look like half an oval rather than a portion of a circle. But with the string paths perfectly flat, it still played great. Felt a little weird though - I wouldn't want to build something with that sort of radius - I guess what I'm saying is that you may be able to get things reasonable with long flat tools rather than a radius block.
I certainly think you can do fine without a super long radius block - I get things roughed in with straight lengths using a carpenters level as mentioned below, or something similar. I make sure the center of my board is perfectly flat before I do my radius. I also carefully take a bit off the edges to start roughing in the radius, while keeping things reasonably level down the whole length.
The flat area down the length in the center of the board gives me something to watch as I put my radius on with a radius block - once I've only got a small line of untouched wood in the middle, I know I'm there - (marking the middle of the board with white pencil helps this stand out) if I see that "untouched" area is getting thinner more in one area (like the middle of the board) then I back off sanding there. (Working towards having that line in the center is sort of the same concept as crowning frets where you try and leave that perfectly thin marker line)
If the center line of your board (or whatever the highest point of your radius is, I suppose it doesn't have to be the center) isn't flat before you start, it's easy to follow this method and still end up with an undulating board - you've just duplicated the dips and valleys along that center line across the entire radius!
Remember when done to check the flatness of the board across the string paths, not just the center!
While tweaking the rod to get things closer to flat can help when leveling, avoid messing it around too much - I did this on one of my early builds only to find out that I had shot myself in the foot by tweaking it a little bit too much and after putting strings on the thing, was unable to get the board back to flat! Of course, if you have to tweak it in the right direction to get flat, you've just compensated for string pull, and you might not have to use the rod at all after stringing it up. Although, after putting carbon fiber in my necks, I hardly ever need to adjust the truss rods at all - which makes a flat board more important!
You could avoid all this board levelling and just use really tall frets!
Thanks a lot, that's good advice, and very useful!
I'm currently sanding it flat using 60grit paper on the narrow edge of a 24" level, and this is working very well.
I see what you mean about not forgetting about the non-central edges of the 'board.
I scribbled all over the face with a pencil, to show up where it was low.
My only concern now is that the 12th fret inlay [a beautiful chinese symbol, done on a CNC machine] is where the highest point is, just hoping I don't have to go right thru it with the sanding! Should be OK.
After a few more hours I should be where I need to be - I really do see the value of getting it flat at this stage!
DJ
-
So, would a radius block which is as long as the fretboard be the real answer??
DJ
Yeah - those aluminium ones stew-mac sell look the business. definately on my wish list
http://www.stewmac.com/shop/Tools/Sanding_...ing_Blocks.html
you can use something like this if you already have a radiused board
http://www.stewmac.com/shop/Tools/Special_...d_Levelers.html
you just need to be carefull not to change the radius, straight sanding along the length only. You can probably find something else locally that will do just as good a job, like the carpenters level setch suggested.
Yes, I've seen those at stewmac's site.
I had been trying to source everything locally cos of the delivery costs, but soon I'll have enough items required to make it worthwhile placing an order from them!
Wondering if my local engineering firm could provide me with a steel box-section that would be flat/straight enough.
I have a 24" level as well, could try that!
Thanks Wez!
-
This guy makes pickups with wooden veneers on the front for ornamentation.
afterall, its a novelty itemNovelty? Really? You would never guess, would you!? Can't see PRS making these, right enough.....
Actually, I have a book with a little bit about this one - Eastwood Rochdale.
DJ
-
Not certain but maybe, Off Topic? Meaning that cool little trick isn't directly related to the question at hand. I swear everytime I feel like I have a grip on all the different hip internet words someone posts a bunch more that I have never seen. So, to all those people QUWGHFUOQHE. J
ahhh...I see!
And yeah, I know what you mean.....it's all TTGXCPUI77's really though, isn't it??!!
DJ
(It's my topic, I'm allowed to deviate...)
-
get it as flat as humanly possible - the more work you do now the easier and better your fret job will be.
I use standard radius blocks, sanding back and forth along the entire length to rough radius/level it. That tends to create a dip in the middle so then i concentrate on either end till its nearly level then finally sand along the whole length in one direction only. Definately not the best way and i would prefer something longer to save all the pissing about but i havnt got around to sorting it yet. My point is that you should be able to get a level board even with basic tools, it just takes more checking and thought!!
thanks Wez! That's just exactly what I thought!!
Hmm...........gonna have to make a radius block after all! Thought I'd get away with that by buying a pre-radiused 'board.....knickers!
Ah well, better get on with it................
So, would a radius block which is as long as the fretboard be the real answer??
DJ
-
Photos:
To be honest, these pics have made it look worse than it is!
DJ
-
Hi all,
Reckon I already know the answer to this one, but here goes:
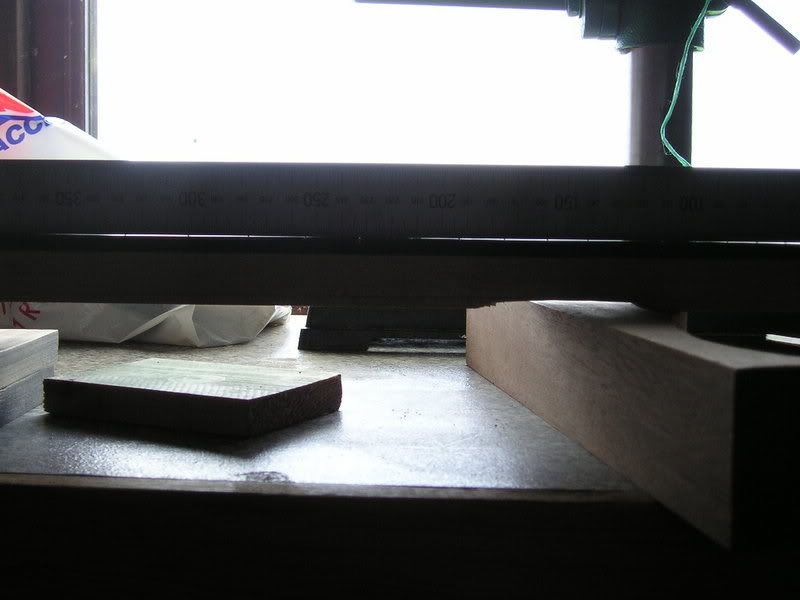
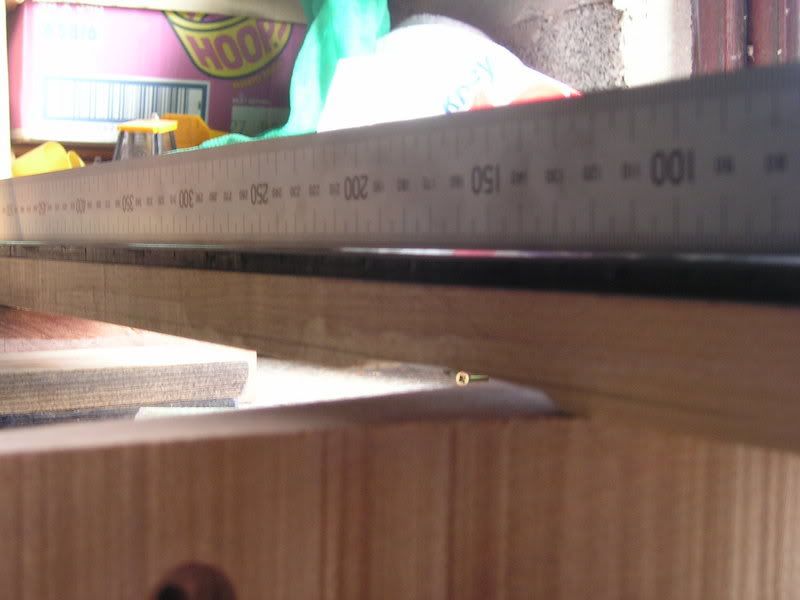
I have glued my fretboard onto my neck, and when looking down the 'board I notice it's not completely flat and level.
There are several undulations along the length of it, sometimes most of a millimetre of difference. They are visible as gaps along the length when I hold my straight edge along the 'board. (The straight edge is totally straight, I did check BTW!)
The 'board was bought pre-slotted and pre-radiused. It's made of ebony.
The neck surface was TOTALLY flat before glueing.
I think it's possible that my clamping was not a total success!
It's also possible that the board was not entirely flat when I bought it!
Anyway, I'm left wondering how flat the 'board surface must be before fretting........and I'm pretty sure the answer will be: very flat.
I just can't see how the fret levelling would be able to compensate for that amount of variation in the 'board surface.
Are all fretboards entirely flat and level before fretting??
(Perhaps you could get away with a very minor deviation from straight??)
I don't have another fretboard without frets in it to look at for a comparison either.
I have other necks to look at, but all you see are the frets when you try to look down the length.
So, assuming I will now have to do some sanding/levelling: what's the best way to get the 'board level?
Appreciate anything helpful.......
Could post photo if rqd.
DJ
-
Thanks for the comments guys!
Yeah, I have heard of micromesh, must get some now!!
Great for buffing out CA drop fills once levelled also...OT perhaps...CA=Cyano Acrylate=superglue?????? Is this right??
What does the OT bit mean?
Thanks,
DJ
-
I think that you need to get a little more information. Altho most people will say that it is a bad idea, Carvin does their ebony boards radius on a machine with a ton of water running thru them, go to their site and order the free DVD and see for your self
Thanks fellas!
I've requested the Carvin DVD, which will be of interest anyway, but as I'm in UK I'm not sure if I'll get it!
Any other thoughts anyone??
DJ
-
Hi all!
Hope this is the right area to post this in....
I'm finishing an ebony fretboard, and I'd like some opinions on how best to get a nice sheen on it.
I've just finished wet-sanding it with 1200 carbide paper, and it looks quite good - I would just like it to have a bit more sheen.
It's lovely and flat, and very smooth to the touch. I only really want to improve the appearance of it now.
Also, what would darken it a bit? It appears to have become lighter after sanding.
Appreciate any help.
Thanks,
DJ
-
If you're in UK try Craft Supplies. But get their printed catalogue - their website is almost useless!
I bought an ebony board from them; it's 25.5" scale length, 24 fret, pre-radiused to 16" and pre-slotted. It's 69mm wide, so it's just wide enough!
They don't mention width (or whether they're to suit 6-strings or 7-strings) but if you ask for one wide as possible you should be fine.
Also, ask them to pack it well - I had one arrive broken, which was a pity since it was a couple of mm wider than the replacement!!
Hope this helps!
DJ
-
I think he's taking it in good spirit!
DJ
-
so... what does it do exactly?
Oh, and DJ, you beat me to the Justin Hawkins thing!
haha! Actually this tremologic-thingy looks a bit like Justins teeth!
Hmm, Wheres the bar?... I dont get it ... Do you press down or pull on the things at the back of the tremolo to detune and upward bend the strings? Can it bomb dive? Can you tap and detune at the same time? isnt the wiggle stick more conveinent?... I just dont get it... I think ill stick with my floyd rose though.... Is it even a tremolo? Im confused...+1, I don't really get this either.
61st post! Woohoo!
DJ
-
Thanks for your input fellas!
This is one of those things where it all depends on the way it cracked and how well you can fix things. If you look at a fretboard that is slotted, you have little strength left at the slots(there just is not much left). If the break or crack can be cleanly reconnected, I personally could and would fix it. If it is a sloppy break don't waste your time. This is where common sense comes into play. your biggest concern would be making sure it can be cleanly put back together, final strength is not at issue, accuracy of fit and a clean seamless look is.Peace,Rich
Yeah, I'm happy to hear that final strength isn't the issue here, cos that's kinda what I thought - I mean, it would be glued onto the neck along the entire length if it was gonna be used again obviously.
The break is quite clean:
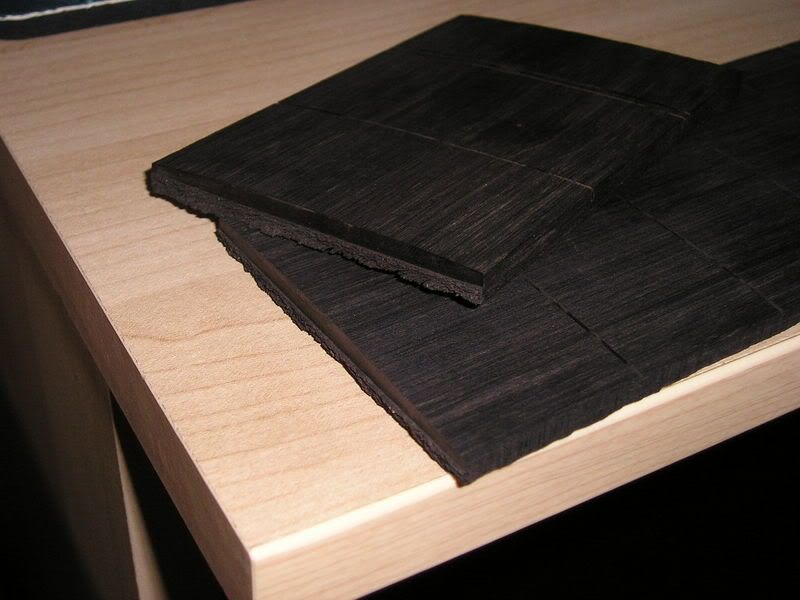
I mean it has a slightly ragged edge, but at least it runs nicely along the fret slot and not diagonally!
You could also bind the fretboard to hide any existing cracks. Once glued to the neck the board would naturally want to compress the fracture together which would help to put pressure on the fret that has to go into the slot. Since it didn’t cost you anything I’d use it to learn on by fixing it and successfully gluing it to a neck. Throw some binding on it and no one will ever know it was fractured. That’s more experiencing than using it for fretting practice.You could also use it for a short scale guitar too. That would be interesting. Since it’s pre slotted you would just measure the same as you would on the board before it was broken. Nut to 12th, double it, 12th to bridge.
Good thinking about the binding! I've never bound anything before, although I do know how to do it.
The short scale idea appeals as well. It was a 24 fret 'board before the break, so now it would become a 22 fret job! Am I right in thinking I could simply measure nut to 12th, and use that distance again to calculate the bridge position? Bearing in mind it's pre-slotted, would all the remaining frets be in the right positions?? It was a 25.5" scale length before the break.
You can use it to laminate a body.Do you mean slice it very thinly to get enough out of it?
Thanks all!
DJ
-
The ebony baseplate will create the correct string height which may be more necisary due to the extreme thinness of the black machine guitars. The saddles themselves are height adjustable as well. I suppoose you could fit them direcctly to the top but the ebony will hold the screw threads better and also allow you to hide the ground wire(s) easily
Ahh.......makes sense!
Thanks Wez!
-
I've seen a photo of Devin Townsend wielding that Blackmachine 8 string!
Haha! That doesnt surprise me. Doug came with me to see SYL on their UK tour a while back, tho he had never heard them before that afternoon!!!. I remember him standing there in utter amazement with his mouth wide open throughout the whole gig! He said then he would have love to build a guitar for Devin.
Doug loves his metal!
Do you have any idea where you saw that pic?
I reckon The Dev has that effect on everyone! I'll never forget the first time I heard SYL. I knew of Dev from Vai before that of course, however, as much as I LOVE Vai, I'm really a headbanger first'n'foremost!!
Anyway, yeah I have the magazine I saw it in (Total Guitar, I could look up the issue number if ya want) but I see they were discussing it here too - there's even a (crap) scan of it!
Devin was looking into getting an ESP 8 string built- he's an ESP endorsee, he has the Horizon 7 string sig model. Earlier this year I asked SYL's guitarist about Dev's 8 string on MySpace, and he shot me a message saying that Dev didn't get an ESP 8 string, and that he was playing more 6 strings nowadays! Right after that I heard that he was sick of it all, and his wife was due to give birth, and he would be putting everything on hold indefinately - but he's released at least two albums since then!! Good old Dev!
I would love to see him live!
DJ

Ebony Sanding Dust Contaminating Maple Neck
in Solidbody Guitar and Bass Chat
Posted
I'm not familiar with scrapers at all.
Do you mean eg. cabinet scrapers like these?
What I lack in experience I make up for in willingness (and open-mindedness!) so I'm eager to try this out on some spare wood!!
Therefore I would welcome any help regarding scrapers.
thanks,
DJ