


psikoT
-
Posts
732 -
Joined
-
Last visited
-
Days Won
38
Content Type
Profiles
News and Information
Tutorials
Product Reviews
Supplier Listings
Articles
Guitar Of The Month
Links and Resources
Forums
Gallery
Downloads
Posts posted by psikoT
-
-
No problem, it's not easy to figure out... I had to redesign the headstock in several builds just because I've added some veneers to it. Keep in mind that for every 3mm veneer, the headstock is like 10 mm shorter. Stupid trigonometry... ^^
-
1 hour ago, Jdogg said:
regarding the scarf... how thick is your maple? I like to have about 7/8" thickness on the headstock piece. perhaps thin it down as shown and add a thicker headstock veneer to bring the thickness back up? or you could laminate the headstock area to bring up the thickness... see my gremlin build for what I mean...
Hi, the blank was for a bass neck, so it's thicker than needed, 33mm to be more precise... that gives me a lot to play with.
BTW, veneering the headstock will substract length to itself. Anyway, it will have triple veneering, as usual in my builds, which I have to take in consideration in the final calculation.
-
While I was typing I found the solution to fix the headstock length... since it is a very thick piece, I can remove some millimeters of thickness to get it longer. Simple trigonometry!
")

-
 1
1
-
-
Ok, so I decided to go for a scarf joint this time... it was my first scarf joint ever and already had a mistake calculating the length of the headstock, got it 8 mm shorter than planned...

Cutting that piece of maple was not easy, had to make some corrections in the way...

I've made a jig for this purpose. Next time I'll think on adding some stops to avoid touching the jig with the router bit.


But it worked very well...

After some sanding, I got perfect flat surfaces, ready to glue.


Not sure what's easier, the scarf joint or the laminated way... laminated necks look cooler, but scarf joint requires less wood.
On 13/4/2017 at 10:46 PM, curtisa said:If it were me I'd position them in the middle of the truss rod's length. Pretty much as you have them in the photo.
Thanks, I'll do it like so...
 On 13/4/2017 at 11:04 PM, Mr Natural said:
are there two fret boards in that pic?
Yes, there are two... Gabon Ebony and Crelicam Ebony. I like the blank itself, but not sure if it's going to be "too much", and not sure about the combination with the rosewood top... we will see.
Thanks for watching!
-
1
-
-
That's a nice mini guitar... ^^
-
Can you work faster, please? I can't wait to see this done!

-
1
-
-
On 15/4/2017 at 8:45 PM, Prostheta said:
I described this elsewhere, however the way I do it is to rub the grainfiller in and start to buff it off against the grain direction before it sets up fully. When I start on the SG, I'll photo it and then video it for the one after.
I've always used the filling rubber (?) (we call it "muñequilla") in circles, but yeah, also gave some passes against the grain direction as you said...
This time I've made a more liquid mix and it worked much better, so this is while rubbing...

This is how it looks almost dried...

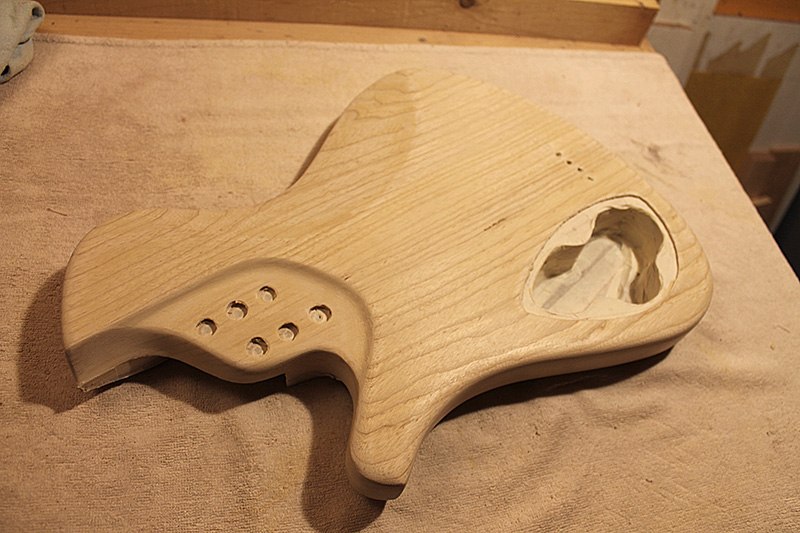
And this is after sanding...

It looks quite light but everything blends as soon I apply some mineral spirits...

I should give another pass but man, that was hard work... it filled the holes at 50%, hope the nitro does the rest.
Now it's ready for the nitro finish... sanded, masked and cleaned everything... just need to buy solvent and a brush.
Cheers
-
4
-
-
5 hours ago, Prostheta said:
Nice little grain filling rubbers you've made there! Is there any product in them? For example, when pumice grain filling? I don't know why you'd do both at the same time anyway, however that's what they look like. I'll discuss that as part of the French polishing Scott.
There isn't any product in them, they should be filled with cotton, but I forgot to buy, so had to cut some stripes of the same fabric and put them inside. It worked well.
I'm gonna use both dark and light filler, but separately. I've masked the top to avoid the mess...

I don't have pictures of the filling process, sorry... but I fear I didn't do it properly. I put too much filler and it was really hard to sand the remain...
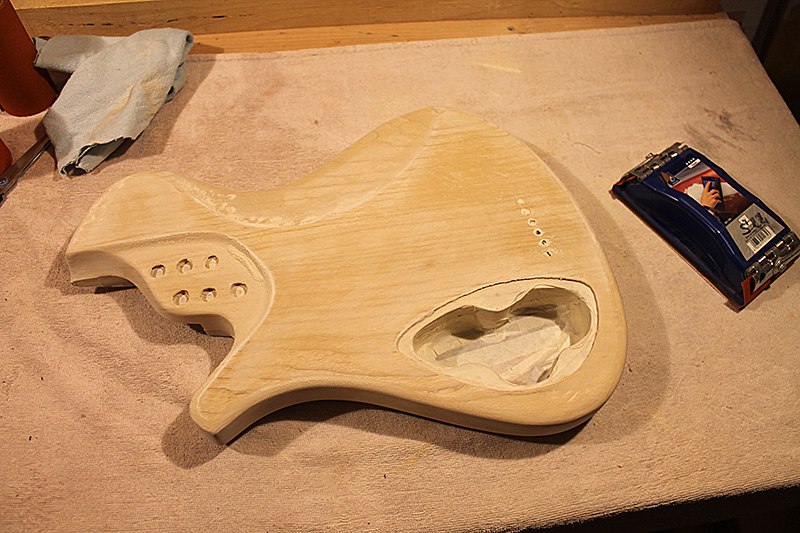
And this is after shit loads of sanding, and still there are some areas to do.... next time I'll make the mix more liquid.

-
Sorry for post resurrection, but ithis is not finished yet... now it comes the worse part of the whole process.
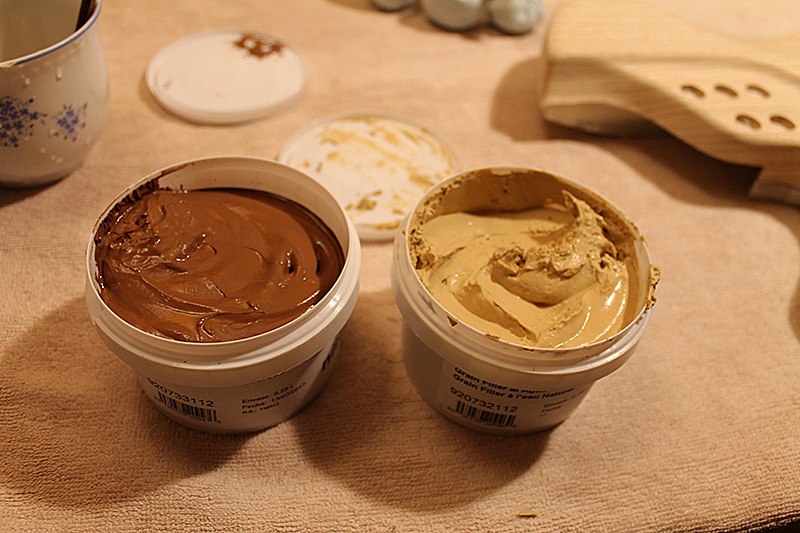
After a very long and stupid winter, finally I can laquer this one. I bought some water based grain filler, which is way faster than the common nitro based one, and way less toxic. I got one for ash and another one for rosewood. I've masked the rosewood top and started applying it over the ash.
Gave a couple of coats, I'll see tomorrow how it works, probably needs to get more coats, Ash is a sucker.

-
Thanks for watching, guys.
The wood arrived today...
 now I just need time.


A little bit dissapointed with them though... the fingerboard looks weird, nothing to do with the picture. ^^ I think I will go for the black ebony, still deciding. And the rosewood top looks quite stripy to me, but I guess I have to deal with it.
I'm gonna install some carbon fiber rods this time, but they are 5 mm thick, so I'll need a proper router bit. I use a 6mm one for the trussrod but I guess it's not valid. This is the first time I use carbon fiber and not sure where to install them, as they are really short (370mm). I've seen a guy who uses even shorter ones and places them close to the heel.... any advice about carbon fiber rods is really appreciated.
That's it. Can't wait to start this one.
Cheers!
-
1
-
-
I like your hand drawn designs, rare to see nowadays. I couldn't manage it without a computer.
-
- Popular Post
- Popular Post
Hi guys,
is not very orhtodox to me to start a new project without finishing the previous one, but here in Vienna I have a short timeframe with relatively good weather and I have to move fast otherwise I'll get stuck at some point.
So I had a couple of pickups here around and I thought that it would be nice to make them sound somehow... so I need a guitar to hold them.
Still waiting for the wood to arrive and quite busy at the moment, but I hope to give it a go as soon as I can.
Here is the first mockup:

Nothing special, just a superstratish I wanted to have since long time ago. The design is not 100% mine, the body contour is taken from a RAN crusher with some mods but the top carve is gonna be different, hope to have sucess this time. Specs are:
- Madagascar Rosewood top
- Alder body
- Rock maple neck
- Crelicam Ebony fingerboard, 666mm scale
This will be the first time I'll make a scarf joint and a 6 in line headstock. I feel like a noob.
Cheers!
-
5
-
Congratulations!
-
1
-
-
Here u go, don't have to wait. I was in the computer already.
Better if you spend the money in beers. ^^
-
What about recessing around (PRS style)... ?
EDIT: oops... too late!
-
1
-
-
On 3/11/2017 at 8:44 AM, Andyjr1515 said:
The other thing I did last time was add a couple of sacraficial blocks of the same thickness either end of the fretboard to allow a little overrun - previously I was finding I was tending to 'dig in' at the end of my sanding stroke, resulting in the first few or last few frets ending up lower than the rest. Mind you, that might just be me and my poor technique....
That's a common problem when sanding a fretboard which already has the taper, as there's less surface to sand in the first frets. That's why some people radius the fretboard before shaping it. But yeah, not going too far helps to minimize the effect.
-
I'm very fan of kmensik's work, love his concept of simplicity and caring for details...
But I prefer unique designs, and the fact that the texan one was designed on the fly (with no computer aid) makes it a really special guitar, so it got my vote. Congratulations @ScottR , you're the boss.
-
Stunning guitar! O_O
-
1
-
-
I think I did the same in some of my guitars, 22 or 23 frets, don't remember well, trying to get the neck pickup closer to an "imaginary" 24th fret...
-
Congratulations, Scott.!!

-
1
-
-
On 1/23/2017 at 4:24 PM, ScottR said:
Thanks psikoT! I'm looking forward to seeing yours done as well. Too bad nice weather is so far away in Austria.
Ahhh... nice weather, it doesn't exist here. We switch from arctic winter to saharan summer in a blink... I hope I can start thinking on resuming the project in two months, let's see.
-
1
-
-
Great build, congratulations... it looks really cool!
-
Stunning gloss!
-
I didn't know that nitro could be removed with acetone... live and learn.
-
1
-
")


 now I just need time.


Not a singlecut
in In Progress and Finished Work
Posted
So I removed some material from the headstock and got a nice 22 cm long piece, more than enough to keep the original design. Now I'm afraid about the joint ending too close to the volute, we'll see.
Then I've proceed to glue both pieces, in a not very proffesional way... hope I don't have to level the neck surface too much.
Yeah, I guess I'll save it for the next one... still thinking what would match well with it, maybe a wenge top.