


ddgman2001
-
Posts
82 -
Joined
-
Last visited
Content Type
Profiles
News and Information
Tutorials
Product Reviews
Supplier Listings
Articles
Guitar Of The Month
Links and Resources
Forums
Gallery
Downloads
Posts posted by ddgman2001
-
-
Anyone know of an Automotive basecoat color that would pass for Candy Apple Red?
Trying to spray a clean ground coat, then candy over top is making my life miserable. I've seen a Cadillac STS recently that looked pretty close.
-
Burgundy Mist metallic
Lucite 2936-L 60-65
59 Oldsmobile
Ask your paint supplier.
http://curtisnovak.com/restors/FenderColor...rgundyMist.html
Thanks, that get's me close. My supplier has the chip, can't mix the color, but we can at least compare chips to find one they can.
Mattia, I'm thinking early Fender custom colors.
-
I'm looking for info on Burgundy Mist. If it was a car color, what was it's original name, what model and year. Any other thoughts on how to have it made in a modern Urethane (PPG) would be helpful.
-
If there's a Benjamin Moore dealer in your area, they make a grain filler.
-
Check out Ed Roman's take on CNC guitars in some other part of this forum. Then ignore everything he says. Twice, if possible.
Just found it. It's called "Why does everyone hate Ed Roman?"
I don't got the smarts to do that "link" thing or I would.
There's a lot of dimensioning, jointing, planing, gluing, bandsawing, sanding etc that a CNC can't do or isn't the best tool for the job.
-
That's not a pin router. I think it's called a Z-arm router. I've only seen one before.
-
...the travel along the rails is a little sticky, probably some of that residual grease they coat the rods with for shipping. Do you guys use anything special to lube the rails?
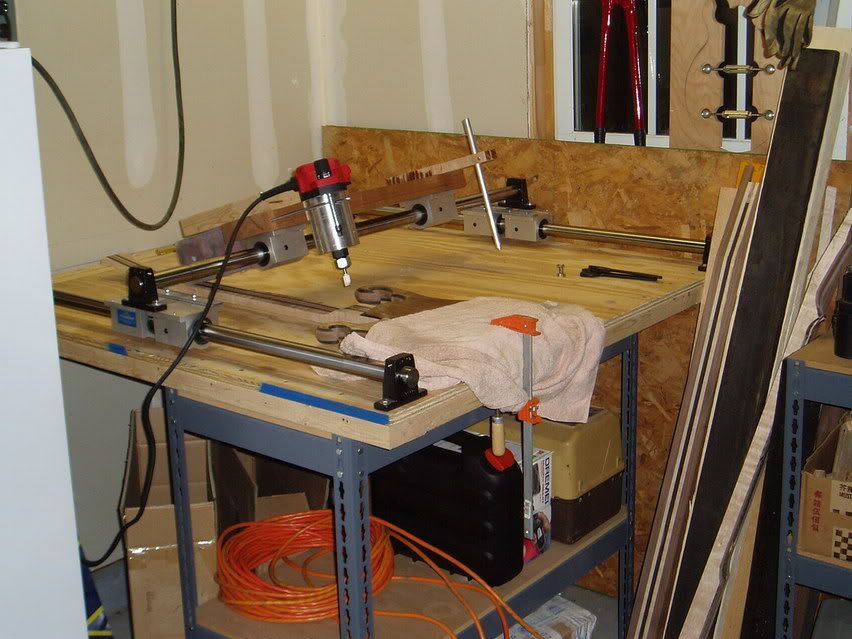
It looks to me like you don't have enough separation between the rail bearings. The closer they are together, the more easily racking and binding will occur. The farther apart they are the smoother they will run under load.
-
Ok I've been looking for The hammerite textured finish stuff And I cant realy find Much, what I have found Is Not good! I've read sofar that It's not any good On wood, it chips realy easy, and It's pricey

Ok so Is There A finish out the That Can give Me a black asphalt textured look
or Something That will do The black Hammerd textured metal look That will work well With wood?
!!METAL MATT!!
The Hammertone finish should work fine over sanded Autobody primer. Check out General Paint on 33rd St.
-
The taper used to hold the chuck in place isn't designed for a lot of side stress and vibration. On newer presses anyway you risk the chuck falling out.
I've routed wood and milled steel on my uncle's old press with a cross-slide vise. It worked fine on that press but it was 40 years old. I've bought 4 presses since then - various Deltas and imports. They've all had problems with the chucks falling out.
-
Nice work! You guys are really firing me up.
I read somewhere that the technique is to get the body in the water, then swirl coat while slowly removing the body. It seems to me you'd get less water trapped under the finish if the swirl coat was applied while lowering the body into the water instead.
Any thoughts?
-
Most industrial epoxy suppliers i.e. West Systems, System3, etc will have epoxies and more importantly hardeners formulated for exotic woods. The good epoxy isn't that expensive on a volume basis. If you were to add up the cost of a gallon's worth of Devcon tubes, the industrial stuff would look like a real bargain.
-
Well, I took the surform to the back of my tele yesterday....I copied the contour from my strat onto the back and went at it....so far so good, only took about 15 minutes to get it roughly into shape. Still have to sand it but...
I started wondering about getting more extreme with the contour --specifically, widening the contour the tail of the guitar so that the contour will cover roughly half of the body down there (the area from neck to bridge will remain pretty much untouched).
That'll help take off some of the weight.
I'm also hoping it'll approach the comfort level of my Melody Maker, which is very thin (33 mm!). But by leaving most of the guitar, and especially the neck/bridge region, at the original thickness, I won't sacrifice tone. (The MM is quite thin-sounding too)
My main question --what do you think will happen in terms of comfort while playing the guitar? If the contour continues all the way to the tail, do you think the guitar will 'pull away' from me while playing?
Any other risk involved with an extreme contour like this?
As long as I'm at it: is there a way to calculate the balance between body weight and neck weight? Since I'm planning on taking a lot of weight off the body, I don't want to end up with (another) neck heavy guitar...
Leave the neck and strings on. Remove a little at a time and test in a sitting and standing position. It's pretty easy to screw up volume/weight/balance calculations. The other way is much safer, just take your time.
-
I still dont understand. The whole point of a pin router is the pin acting as the guide, in place of a bearing., running against a bottom mounted template. I see what you were doing I guess, I just dont undestand the point.
Jay, that's pretty much the point. Bearings are only available in a limited number of sizes. Pins can be any size. We have pins down to 1/16" (handy for doing the switch blade slot.) We also have a set of pins .010" under, .005" under, exact, .005" over and .010" over our main straight bit size (3/8").
A couple of more advantages are:
Templates are a lot easier to make if they're 1:1. They are a little more of a pain to align on the opposite side of the workpiece, but there are ways to guarantee alignment.
The machine is big and bulky and stays put. You move the work piece instead of having to clamp the workpiece to something big and bulky and move a 10 lb router.
Even though the bit is exposed, you can see the cut much better. I feel safer using my pin router than using the table router where the bit is usually obscured by the workpiece.
-
It's all about the internal stresses.
People who champion air dried argue that the wood loses moisture at a slow and varied rate. As the wood is drying, the weather changes, so the moisture loss is always fluctuating i.e. the wood loses a little moisture during the day, then gains a little at night, loses a little during hot days, gains a little during rainy days etc. This allows the core moisture content to catch up with the skin moisture content and in theory should reduce the internal stresses to the bare minimum.
Modern kilns try and duplicate this at a faster rate.
We use a lot of hard maple from North America and a lot of bubinga from Africa. The maple is pretty predictable, the bubinga moves around a little more after it's cut. This could be directly related to the properties of the wood or it could be that kiln technology is better in North America. We had a couple hundred bft of pau ferro that was extremely case hardened. It was perfectly straight in the rough, but when we tried to re-saw it, it cupped and bowed so bad that the last 1/8" would crack and break off before the saw had a chance to cut it.
-
I run 80 - 220 actually. The 220 drum sits .010" lower than the 80 drum, and that's plenty to take out the 80 grit scratches. Plus, the rear drum doesn't wear out anywhere near as quick, so it's just easier to run it there all the time rather than adjust it constantly. You have to remember, that rear drum is taking a very small pass compared to the front drum, so it doesn't really wear that fast.
That's interesting. How did you dial in the height of the second drum?
-
Pardon my ignorance, what does aanj stand for? I've searched and not found a description or photo.
Jivin, that looks like low pile grey carpet to me.
-
It depends on the finish you plan on spraying over top. The thicker the finish the courser the final grit before finishing. We shoot polyester. The manufacture recommends nothing finer than 180. We go to 220 because we haven't figured out how to keep the 180 grit scratches from appearing under the finish.
-
I looked into the Woodmaster a year or two ago. After a lot of searching the net, I couldn't find anyone saying anything bad about them.
I was most interested in the gangsaw feature so pretty much ignored the thickness sander feature.
I can't remember what type of method they use for attaching the abrasive. If it's velcro you'll burn less, but you'll have trouble getting a really flat surface.
-
The continuous rolls of stickit are expensive, but I love them. We stock 100, 220 and 320. We go through 220 and 320 the most, but 100 is indispensable.
We only use the 320 for final leveling of fingerboards and leveling frets in our operation so YMMV.
-
You can get bondo with fibre glass strands already in it. It's a little bit of a pain to work with though.
-
That Dupont article is cool. It mentions they use Dupont for colors and clearcoat. Clearcoat means topcoat - not sealer. I'd be very surprized if they are using acrylic polyurethane for a sealer.
-
From what I understand PRS uses a polyester sealer. The advantage of polyester is that it cures fast and has an extremely high solids content. It's tough to sand, but doesn't gum up your paper as much as nitro or polyU. Also polyester sealer will shrink less than polyurethane.
Most production shops seal with polyester, shade/color with polyurethane and either clearcoat with polyester or polyurethane/acrylic polyurethane.
In my experience polyester clearcoat is much tougher to buff out, but it resists scratches better so passes through assembly without being sent back for touch up buffs. And I can feel confident that it will survive in the stores longer without looking worn and beat up.
The polyurethane clearcoats I've used in the past were easier to buff (acrylic polyurethane being the easiest) than polyester, but also easier to scratch. After several months it hardens up OK, but I'd go out of business if I had to let instruments hang for several months before buffing. Yeah, you can try and force cure polyurethane with heat, but even low heat dries out the wood and causes the gluelines shift slightly.
-
Squirel cages and window fans are nice and quiet. They move a lot of air until the filter starts to clog up, then the air flow gets choked off really quick.
If space is tight, the engineering and testing has already been done on this one leaving time to build guitars instead.
http://www.shopvac.com/web/products/aircle...=index&StoreID=
If you have room for a 1 hp dust collector, this type is pretty quiet.
http://www.houseoftools.com/product.htm?pid=16309
We plug one of these into an mdf box with a top made out of dowels wrapped in pipe insulation. It works well and is pretty quiet.
We upgraded the bag to a 1 micron unit as the stock units let a lot of the fine stuff through.
-
Back to the original question. AutoCAD is a great program for mechanical and architectural work. It's not so good at fluid curves.
Rhinocerous does a great job of that. It can handle carvetops and neck shapes, but like any software product, the learning curve for 3D surfaces is going to be steep.
You could hand carve dozens of necks or bodies in the time it would take to program your first one. Then you still need to get the neck or body from the virtual on your screen to a physical part. That's the toughest part and will cost you several test necks and bodies to get it right.

Candy Apple Red
in Inlays and Finishing Chat
Posted
Thanks guys.
Paintit - yeaowch! That's amazing!
Is the logo debossed into the frame or is that an illusion done with paint?