


gpcustomguitars
-
Posts
757 -
Joined
-
Last visited
-
Days Won
23
Content Type
Profiles
News and Information
Tutorials
Product Reviews
Supplier Listings
Articles
Guitar Of The Month
Links and Resources
Forums
Gallery
Downloads
Everything posted by gpcustomguitars
-

Resized Jazz bass
gpcustomguitars replied to gpcustomguitars's topic in In Progress and Finished Work
Almost done! The color coats are far from perfect, but the best I can do with a rattlecan. I want to get rid of some more overspray and do a few clear coats when weather permits. The pickups and the torquise sheet came in the mail, I have designed the decal in Corel, so I think it will be done soon I've been working on this between the coats - I mentioned it earlier, cupped old piece of poplar I think, planed it down, cut out the shape freehand, sanded the sides to the line, and rounded with the biggest rounding bit I have. After quite a bit of sanding, it's kinda ready for the neck pocket and a MM hum route. All the cracks were saturated and filled. My builder EQ has been tweaked to bass side definitely


-
Resized Jazz bass
gpcustomguitars replied to gpcustomguitars's topic in In Progress and Finished Work
Hope you all had nice holidays!!! We finally have some snow this year, falling for 2 days now, but also melting partly. I had some luck to do a part of the spraying on the warm day just before, so here's some pics... Trimmed and dressed the fret ends, added the dots, sanded it all flush, and shaped the neck. I'm hunting for bumps now using my lamp, aiming for a C profile. still need to level the frets, probably before finishing and then tried to do a sunburst with rattle-cans, clear primer followed by yellow coat, sanded back, orange coat, sanding, red coat (3004), sanding. This was...challenging but I managed to get all the imperfections out with some 500 and top is ready for the black coat, and I'll lightly touch up the back with some red when the weather permits. Good news is that the irregular patch on the back is nowhere to be seen.


-
Resized Jazz bass
gpcustomguitars replied to gpcustomguitars's topic in In Progress and Finished Work
Finally managed to get some work done...cut the dots, and fixed them with some ca, radiused, re-cut the fret slots. then shaped the transitions on the neck, and cut and shaped the bone nut up to a point. and then set the frets, using some PVA in the slots. now I need to dress them, and cut the nut to size. The body I've already coated in sealer, so I can spray the sunburst on on a sunny day some time soon.


-
Resized Jazz bass
gpcustomguitars replied to gpcustomguitars's topic in In Progress and Finished Work
It's just the paper template curling up, I'll post a better pic. I print them out first to make sure they fit, before getting them laser cut. I did some more work, update tomorrow. -
Resized Jazz bass
gpcustomguitars replied to gpcustomguitars's topic in In Progress and Finished Work
Thank you for the offer! I have side dots, no problem, I just wanted to use some pearl 6mm dots for the fret markers. Actually, I would have preferred to go with the block inlays, I think it looks really good on a jazz, but they wanted just dots... I'll have to try your method some time soon. The neck is out of the clamps, trimmed a bit, and nut channel scored in place. Still need to route it flush... First real mockup (no tablecloth this time ) :

-
Resized Jazz bass
gpcustomguitars replied to gpcustomguitars's topic in In Progress and Finished Work
Some more progress yesterday - after some fiddling with templates, I drew the pickup dimensions on the template and cut it out, then routed to safe 19mm. After some cleanup in the corners with a rotary tool and a chisel, we have a fit! even the printed out pickguard fits from the first try Last but not the least, the fingerboard is glued on, I need to trim it next, take care of the transition and score the fret slots. I'm out of the dots again, and the local seller doesn't have any also, so I'll have to cut some more from ABS.


-
Resized Jazz bass
gpcustomguitars replied to gpcustomguitars's topic in In Progress and Finished Work
Got the truss rod re-welded and cut it to size, and routed the electronics cavity and the neck pocket, then fit the truss rod in the channel. Next stop is making the templates for the pickups (good thing I got 2 spare covers for fitting), and drilling the wiring channels. Also, I can glue the fretboard on.


-
Resized Jazz bass
gpcustomguitars replied to gpcustomguitars's topic in In Progress and Finished Work
btw got all the parts needed yesterday, minus pickguard and the pickups, those I just ordered. Went to have the truss rod welded 10cm to the end part, so that I can saw off 80mm and get the 520mm one. So, I might glue the fb on later today. -
Resized Jazz bass
gpcustomguitars replied to gpcustomguitars's topic in In Progress and Finished Work
Yes, I'm also a fan, but just not the 30'' ones, they lack a bit of clarity, at least the ones I tried. The warwicky one I made for my friend is 32'', I like it's playability a lot. -
Resized Jazz bass
gpcustomguitars replied to gpcustomguitars's topic in In Progress and Finished Work
After a few days break, some more progress - I tried to avoid making a full neck template, so I made the headstock and heel templates, and connected the dots with my straight edge routing template. Went fine. Prepared the fretboard and tried to a mockup, just to see if it balances right, it actually does. It's a relief and, finally, used the neck to correct the line on the neck pocket template prepared earlier, and after cutting and some sanding, it fits quite snugly. Also, precut an approx line and milled down the headstock thickness to 15mm. Now I can finish routing the body, while waiting on a truss rod.


-
Resized Jazz bass
gpcustomguitars replied to gpcustomguitars's topic in In Progress and Finished Work
Thanks Scott! It's acero parana, or so it says on the packaging. Net search came up as parana maple. Maple it is not, but it works for neck stock, I've built several guitars and basses with it. It's yellowish and has a slightly beechy smell when worked, but none of it's other properties, texture etc. Started the work on the neck. Planed the tongue part off the stock: I flipped a piece of cutoff to glue to make up the headstock width, Routed the tr channel in few passes sawed off the needed piece for the headstock to make clamping easier and jointed and glued so, I need a truss rod now...


-
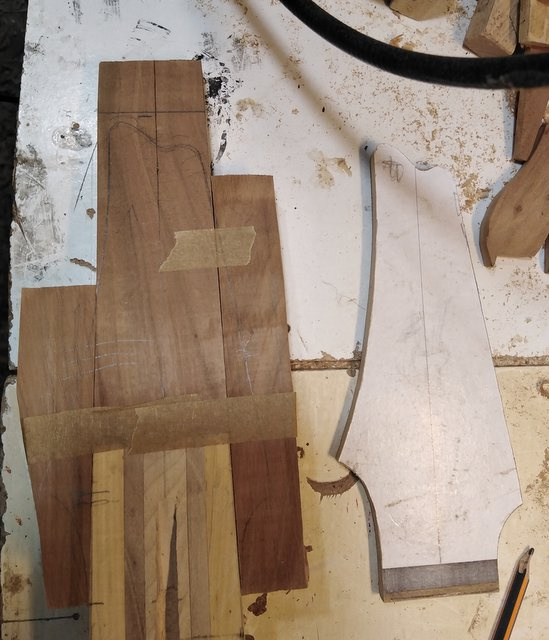
I have mentioned that I'm doing another build, so here's some progress. My friend from college has 2 talented kids 12 and 9. They both play guitar and some bass and drums. Recently we had a little jam session in my garage (not a garage really, just says so in the papers) and they were struggling with my bass, so their dad asked me to make a smallish jazz bass for the more-bass inclined one (9 years). So after some brainstorming on my part on how to make a bass that's: -small enough for a kid -big enough to be playable by a adult also -not shortscale -not neck-heavy -uses standard parts I decided to scale down the template to length of say a strat (cca45cm), enlarge the neck pocket area to keep the heel length and width, and shorten the scale to 32'', use smaller tuners for less weight. I will have to make the plates by hand, and have the pickguard cut on the laser, but that will not be a problem. So, started with making the templates, and routing out the shape. Had to flood some areas with CA, the burst should cover most of it... Planed the arm rest. and then the relief and picked the stock for the neck. Again, I need a 520mm truss rod, but I'll try to shorten a 600mm one this time. That's it for now.


-
Thanks Andy! I spent a part of the weekend routing - both wings are cut out, now they need some cleaning up of the joining surfaces and pre-cutting of a part of a binding ledge. Also, made a good start with the jazz bass project I mentioned a few days ago. Made most of the jigs needed, routed out the body, etc, I'm preparing to cut a neck from chosen stock. It will get it's own thread tomorrow or the day after. First mockups where it all actually looks like a guitar:


-
Thanks a lot both of you! Charlie, we had some trouble with the material, I brought a sheet that was melting at any power/speed, warping even, so we scrapped that and used some of their offcuts from a previous project. I can live with this, as I will turn them upside down as you said, clean them up with needle files, and the troublesome side gets sanded in leveling. I think it will be OK with some care. Bizman, the radius will be 17''. I'll set up the simulation in Corel to see do I have to pre-radius the fretboad a bit to get it to work. No worries, I don't expect much trouble aside from actually excavating the inlays I'm also starting a parallel build of a scaled down Jazz bass today or tomorrow, should be fun!
-
After the trip to the laser guy, we have some pieces to inlay: and a first real guitarlike mockup - no pics of the templates, but I did prepare and glue them to the wings, ready to rout. I scored the fret slots, still need to saw them, probably should start on the radius as the pieces are thin, 2mm, I could glue them in at least partially radiused fretboard.


-
We had a relatively warm winter's day yesterday, so I had some shop time. First, routed out the shape of the headstock. I thought I'll sand out the shape of the tip, but finished it all with a router with no problems. I left the small edge to be removed with the modeler's saw, and thicknesses the headstock to 15.5mm. The pattern bit has been with me for some time now, so I had to sand out some burn marks... I've chiseled the volute slope, and sanded the transition with some #80. and this is where I'm at now. I'll start scoring the fret slots now, and have to make a run to my laser guy, to prepare a whole bunch of bones, rabbit sculls and other stock materials to start inlaying after that. White acrylic all of it. I thought to actually make them from bone, but that would be really impractical.


-
Thanks! I wanted to also ensure proper clamping, as most of my guitars have headstock plates. PVA can also warp the thin wood some, so template serves as a clamp of sorts, and using the tuner pilot holes makes it repositionable.
-
A few more details sorted out - cut out the TR access hole, still need to refine it a bit more later, and sanded the final shape of the ears, 90deg to the fretboard surface, like they do at Gibson. ...and then repositioned the template to route the shape of the sides. I'll sand the tip on the sander, to avoid mistakes due to small footprint fot the router to balance on.


-
Removed the clamps and sawed off the excess, cleaned up with a file, and the result is a ledge for the locking nut. Also marked the opening for the truss rod, will cut it out later.


-
A small session yesterday - first, added a small plug with 2 drops of CA like I do on all my builds to the TR nut area, and glued the plate on the headstock using 8 screws in the tuner pilot holes and bunch of clamps. I use the backing of the double sided tape to mask the TR nut, also add a small lump of masking tape to the actual hex nut hole on the TR to be sure no glue whatsoever gets to the moving parts.


-
Did some work during the last few days... My bandsaw is in the old shop, no point driving there to do just 3-4 cuts, so a ghetto solution was to drill more holes than the aforementioned drive would last, and connect them with a jig saw. I'll be making routing templates so that'll be OK. Starting the fretboard - a piece of flooring I got as a sample some years back Planing the taper from both sides, quality inspector present: and now a fun part - resawing by hand........ 30-40mins non stop...I had to resaw the whole length as I was ordered a J-type bass for a friends super talented kid, so I might use the other half for that. Thicknessed the headstock plate to final thickness, and made the headstock dead flat prior to gluing. Just had to see what it looks like: Marked the exact positions for the wings and started on the transitions: and the heel is roughed in, started forming the volute also. The headstock base thickness will be taken down later.


-
A small update, working out the exact thickness of the headstock plate to accommodate the 15,5mm wide top lock on a ledge, route into the headstock plate...if that sentence makes any sense Also, printed the template for the tuner pilot holes. I'll use them as screw holes to position the headstock plate for the gluing. Removed some of the stock off the headstock area, less wood to flatten.

-
It's finally taking shape. Here's the truss rod I had made locally, the nut is a bit smaller, so some small amount of wood is left untouched when routing the channel. marked, then routed and fitted Since the untappered side is no longer needed, proceeded with planing it down, I definitely got better at it Starting on the headstock - cut and sanded the template, 55m locking nut, clamped to the stock to mark the lines on the other side, to pick the stock for the ears Cut, planed and taped in place, and glued Thicknessed the stock for the headstock plate, used the wedge offcut left of the top. and finally, something remotely guitarlike, the paper templates for the sides.


-
So, my friend is a metal player, and he asked can I make a rabbit look more...scary . Rabbit skull being the main idea, I went trough the net, found a bunch of bunny themed stuff, but most is a bit Hello Kitty... We saw something, and I tried to make a little sketch by hand and to work out some versions, so here goes... He does have a favourite, but that yet may change.

-
Thanks! It spent the summer on the sofa in my office Not enough time, even with this work-from-home mode. I've promised myself a lot of times I'll not start anything new until I've finish all the current projects, but then something fires up my imagination and ...


