


gpcustomguitars
-
Posts
757 -
Joined
-
Last visited
-
Days Won
23
Content Type
Profiles
News and Information
Tutorials
Product Reviews
Supplier Listings
Articles
Guitar Of The Month
Links and Resources
Forums
Gallery
Downloads
Posts posted by gpcustomguitars
-
-
Hi,
what's your current action hight? From the first pic it seems to bee too high over the fretboard. The guitar is carved, just how high are the saddles relative to the flat black surface?
-
Also an update on the SG - frets are in, still not leveled, first coat of nitro dye done. Still one coat of wine red to go, and then the lacquering.


-
 3
3
-
-
Finally an update on the blacktop LP - electronics done, 2 vol. 1 master tone and a master bass cut
Decided to use the B5 that I have, so that it's different to my other LP's.

-
1
-
-
Thanks, I hope it all goes well!
Here's a few more steps - glued up

headstock template printed and glued

and out of the clamps


I planed off some of the overhang on the sides, and milled off most of the top and the back material. Some more to remove in the next session, and then to route the truss rod channel.
-
2
-
-
Thanks, I hope it will be a fun build! Here's the dry fit test, glue-up is set for today:

As I said, there's some extra material on all dimensions, I'll plane and mill that off once the glue dries.
-
- Popular Post
- Popular Post
Hello!
Time for a new project - the proud owner of the recently finished Warwick styled bass has asked me to make him another instrument, 8string Iceman with a reversed head. He's already a 8string player. so he knows what he's looking for. We have decided on a slightly Warwick-y construction, spliced necktrough.
Some plans were drawn, and the previous logo (rabbit, his surname) will again be used.


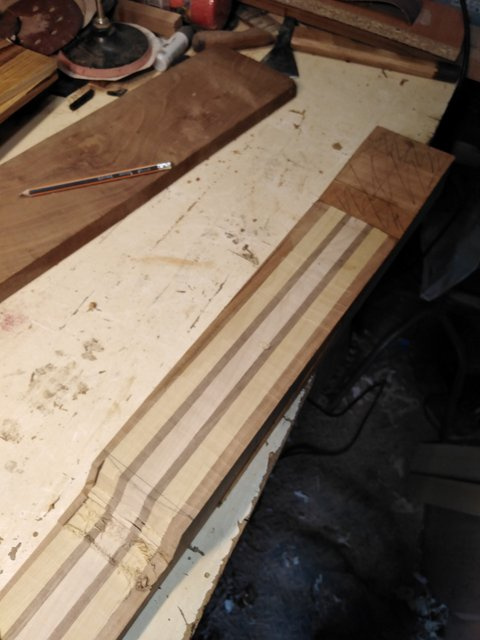
I started by cutting the rough profile of the center lam, maple.

Then. used that as a template to cut some more lams- 2x Canadian walnut and 2x acero parana.


and glued, some of the bulk removed, thicknessed.


final lams and the future splice:

and glued the final outer lams, cherry, no pic. found this nice piece of ??? for the fretboard, if I manage to cut it just so, I'll get 2 fretboards. Also not in the pics, glued the scarf for the headstock, and planed down one side of the tapper, still need the other one for the router guide.

The radius block arrived in the mail
")

Now, for the wedge - I chose a nice piece of cherry, left it slightly oversized, and cut it with a circular so in 4 cuts total. I don't like such setups, but it went really well.

after a bit of planing, milled to final surface using 2 pieces of PB


and used the same method to prepare the other surface.

Meanwhile, a local metalworker made me a 520mm dual truss rod, couldn't find a reasonably priced one in stock anywhere. So, the next step will be gluing the 2 main parts together and routing the truss rod channel.


-
5
-
Regarding the old unfinished projects, during the summer also managed to finally complete my own pedalboard/case. Pretty minimal rig, just a mild homemade fuzz, tube driven OD, octaver that I use sparingly, just to underline a few notes here and there and a flanger to add some modulation, also used lightly... still need to add some Velcro and connectors.


-
3
-
-
Well, after waiting for the parts for a quite a few months, they showed up in a span of a few days, and I was finally able to finish the assembly and give it to my friend. His son has celebrated his 1st birthday a few days ago
My friend seems to like the bass a lot, still looking for the perfect setup
We actually have started a new project, I've been building him a 8-string Iceman with a reverse head for a while now, some pics to follow soon. Never enough time...
Anyway, a few pics of the finished bass:


-
3
-
-
Looking forward to this very much!
-
1
-
-
-
I wanted to cover as little of the top as possible... And it's a bat wing

-
Yes, it's a really nice piece of walnut. I started that body a long time ago, I think I could have made a better ot more interesting shape, but that seemed OK then...
-
Another small update - made the pick guard. Rough sawn by hand, shaped to the line on the spindle, hand beweled by rotary tool and sanded a bit. I'll polish it before assembly.


-
1
-
-
A small update - drilled the pocket for the neck screws, and preparing to mark and cut the fret slots. It's a wrong way to do it, but this was originally supposed to be a fretless. Also, reduced the pick guard to cover less of the surface.


-
2
-
-
Thanks! I started out trying to remove the problematic parts of the body, but it kinda morphed to more carving than I had planned. For this guitar, I'm planing a aluminium top, 1mm thick, engraved with acid and current if I manage that. I have limited experience with that, I just engraved my signature on a knife I made a few years ago, but this would be significantly larger.
The oval shape in the bridge area could be a raised portion of the top, perhaps shaped quite differently, still toying with that idea, alternative being just plain flat top. Neck will have the usual 4.5 deg in any case.
Please chime in with any ideas for making a slight curve of the top other that an english wheel
-
Thanks! Did some more sanding and planed out the tenon, pup cavities etc...


-
1
-
-
Well roughed in the back carve last night, waiting on the bass body to cure. Added a bit more scoop to the back side of the cutout, pics later.


-
3
-
-
Some more progress on the old projects - one coat of homemade oil mix on the back of the bass neck. Masked the edges of the fboard to stop the seeping trough as I want to dye the fb black in the next steps. Also, final coat of lacquer on the body, this one a bit more diluted for better flow.
Also, another LP body out of the storage - this one had quite a few cracks, so I changed the back to get rid of most of them. The rest I have filled with CA, and started the carve. The neck for this is almost done, so shouldn't be a too long build.


-
I can't take credit for that - I've seen it done in a shop I was frequenting a long time ago - they did all their non-MOP dots that way. Even the punches were shop made. They actually were regularly making some of their tooling in-house, some of that must have seeped over to me.
Yes, lenses do funny things - I think I actually saw a guitar that was made like that, giant headstock shape for body and a small body shape for a headstock
-
Yesterday I spent some time sanding the joint, and drilled glued and leveled the side dots and the fb markers. Couldn't find any mop dots, I was sure I still had some in stock, so I used a 6mm leather punch to cut some from a strip of white binding. Looks nice to me. So, fretting is next.


-
2 shop sessions later, I have shaped and glued the neck in. Tenon needed some adjustment, but so far so good. Perhaps it would have been easier to install the side dots and fret it before gluing it in, but It shouldn't make that much difference...


-
1
-
-
Thanks!!! I started thicknessing the slope on the back of the neck when my router stopped working again... Decided to just go ahead and use chisel, saw and file. Also, managed to plane the taper of the neck on one side. Hope to manage the other side tomorrow, so I can start shaping it.


-
1
-
-
Here's where I'm at now - glued the fretboard last night, should saw off the taper of the neck next, and fine fit the tenon.


-
The router just had some wiring/switch problems, so it's back from the repair. I've managed to thickness the headstock plate to 1.5mm, I'll sand off the .5mm later. proceeded with gluing it to the headstock, and trimmed and sanded flush. More pics of that later, I'm getting ready to glue on the fretboard, hopefully later today.


My version if Ibanez 8 string Iceman, reverse head
in In Progress and Finished Work
Posted
Thanks")