


gpcustomguitars
-
Posts
757 -
Joined
-
Last visited
-
Days Won
23
Content Type
Profiles
News and Information
Tutorials
Product Reviews
Supplier Listings
Articles
Guitar Of The Month
Links and Resources
Forums
Gallery
Downloads
Posts posted by gpcustomguitars
-
-
Some more work done in the last few days - mostly sanding and filing, but also some routing:
roughing in some more facets with a file

and got to something like this

lower horn is still squareish, will get to that, and then some old school drawing, regular paper, transfered to thicker paper for better handling, and redrawing as needed to thin paper again, glued to some 8mm mdf stock. Pups were drawn directly from the master paper template.

Cut on the scroll saw, some adjustment with a file, and secured with the double layer of the double sided tape, and routed to -17mm. I'll have to get the sharper corners by hand a bit later

and then finally sanded the curve in the top, still keeping the bridge area flat (marked)


just some more pics and details I still have to carve/file/sand in - I think the top and the back curves are nicely visible now


-
 2
2
-
-
 I'm trying to believe, but...
It's getting warmer today, the snow is melting, I might find some time to finish the carve and start sanding in the shop. Also should glue the paper pickups template to some 8mm MDF. I have another bass that's been waiting to get finished for a long time that could benefit from the same template
-
We actually had 2 days of snow, some is still on the ground, so I have moved the carving operation indoors. Can't use the sander tho, she drew the line there... So, a bit slower and tidier than usual...


Just the multi-rasp and the tiny Ibex...

Made some cardboard templates, one follows the thickness I'm aiming at, and the other is the correct side radius.


Radiusing the bass-side wing, mostly Ibex (my fingers really hurt...)

...and it's almost done, some sanding with a beam will show the high/low spots.

...and this is where I'm at, some high spots found, a bit more rough rounding to do and then I'll fine tune the radius with a sander. The middle section is still flat, I'll also need to route the pickup cavities soon.
-
1
-
-
...some shaping later, the side is half-rounded all around the back, and the bulk of neck shaping is also done. The neck is still too thick, but I won't rush that part. Now I need to plane the top to follow the curve of the back.


This notch at the join is actually the needed radius of 38mm, shaped prior to gluing. It's now a marker for the correct radius when I start shaping the top sides after planing.
Andy, could you share any advice on routing of the electronics cavity? To just route a flat cavity or to try to get it to match the curve? I thought about just drilling 3 pot holes wit 25mm forstner, perpendicular to the curve and join them with regular routing?
-
1
-
-
I had some more shop time yesterday afternoon, so I did some more carving/sanding. My little sander was really a huge help in this. So, I'm still working on the back edges, almost done, and started carving the headstock transitions and the heel. I did a few passes with the palm plane on the first edge facets on the neck, but mostly for easier handling. Other than the 2 wormholes I had to fill, no problems so far.


-
-
Glueing went fine, so I started to rough in the other side of the curve. I used small palm plane, flat, and the Ibex, with some scraping at the end. One mishap was that a wormhole I thought was going to be completely planed off was a bit deeper, so I had to fill it with wood dust and CA. Should get less visible when I oil the bass. I've also cut off the excess length of the neck, as I will be shaping the roundover on all the back, and refining the curve some more. The middle part is still pretty flat.


-
I think it will get more visible with 2 wings on. I joined the sides using a sanding board, and managed to sand in a slight angle on both. That came in handy
") I had a moment for myself this morning and managed to glue the remaining wing on. After this, it's mostly about shaping!
I had a moment for myself this morning and managed to glue the remaining wing on. After this, it's mostly about shaping!

-
1
-
-
I went to the shop to joint and glue the other wing, but instead started the carve. Fun! Its not very visible in the pics, but the curve on the back is roughly dialed in. Started on the heel and rounding over the sides.


Just saw the dents, will have to steam them out prior to sanding... I wont carve the top until everything is glued together.
-
2
-
-
Then, some mockups, and also I tried to use PerlenPen to pour some faux MOP into the dot positions on a piece of scrap. Still don't know what I think of it. I have some pearl offcuts I could shape into dots...somehow. Drill bits and CA? I like the brass dot I made, but the customer wants MOP look.
I've drawn out the line for the body part of the line, but I'll cut that only when I have the neck ready, for the best alignment.


-
1
-
-
-
Well, it's too brittle to be machined into rings, but I might try. I think I'll definitely try pouring a body, with some pieces of wood and pebbles, but when temps go above 20C, this stuff polymerizes poorly when its cold. Definitively some LEDs
Knobs shouldn't be a problem, I have some cutters, and tapping it for screws should also go fairly easy.
Well, as I'm stuck at home, I get more shop time at least...the alu inlay went well, so I can tell I had fun


-
I hope I'll do it justice. It does help that I have an actual Thumb 5 at home.
Here's my current progress, I've sanded the joining surfaces flat, and glued the treble wing on first. Located in place with 2 8mmx8mm dowels (I've shortened stock ones). I hope to do some shaping on this and join and glue the bass side too later today.


-
2
-
-
A bit more work done yesterday! Sawn off the taper of the fretboard, and planed the sides. I still have about 1mm to spare, to be taken off in the actual neck shaping. Also, thicknessed to nice 6mm.


A bit off topic - I'm a consultant for a Polyester resin producing company, and we have little 1" disks from different batches all over the office...never acured to me to try to use them for something until now - tried to make some faux amber jewelry for my wife, this was really quick and rewarding:


I think I'll try to make some one-piece rings next, and perhaps, a guitar or a bass for the company's stand on exibitions, if they allow me to experiment with 5-10liters of the resin
-
Thanks!!!
-
1
-
-
Thanks!
It's good to be back!
-
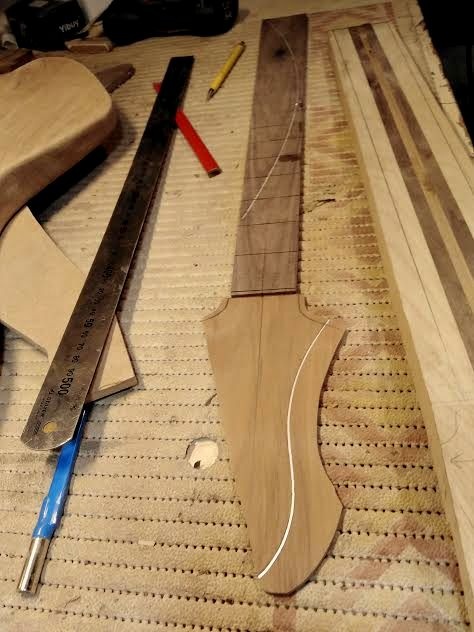
Most of my basses have a bit of a back story, so this one is no different. My very good friend became a dad for the first time a few months back. I'd like to present him with something kinda special and personal, so here goes
I'm kinda reinventing the wheel here as I go, as this will all be handmade, so the procedures are quite different to Warwick's... I have also ommited the first few steps, but I have basically spliced together a walnut necktrough blank with a shorter cherry piece to cover the face portion of the neck blank, dissappearing under the fretboard. Neck is not scarfed, but has a thick faceplate, 3.5mm to strenghten the short fibers there.
Fretboard is the heart of the canadian walnut, wings cherry.
So this is where I'm at now:


-
3
-
-
Well, after the usual winter hiatus, I'm getting ready to finish a few started projects. This has to be the first tho, as it's far along.
So, marked and cut starter lines with exacto knife, and then actually cut the slots with the fret saw. I'll trim, thickness and plane the sides of the fretboard next. I'll be making a jig to dremel out the line for inlaying a 3mm strip of 1mm thick aluminum. Dots will most likely be white acrylic, laser cut.

-
2
-
-
-
Didn't do much here - just a template being made to route the top, and to show what floyds I have available:
 IMG_20190605_175028 by Goran P, on Flickr
I think I prefer the closer one:
 IMG_20190605_175040 by Goran P, on Flickr
-
Finally, some updates! We decided to go with this headstock:
 054-ZS054 by Goran P, on Flickr
I've glued a printout to some mdf, and proceeded to thickness some cherry offcuts to 3mm:
 055-ZS055 by Goran P, on Flickr
and made the A/B sides to cut i on the scroll saw. Then, with tin snips, made a alu strip 3.5mm wide, bent it by hand and tried gluing it to the wood with CA, but I was not so sure it will hold properly, so
 057-ZS057 by Goran P, on Flickr
 058-ZS058 by Goran P, on Flickr
I cleaned it up and reglued with some epoxy and a few clamps
 059-ZS059 by Goran P, on Flickr
Then, roughly cut the mdf template, still have to sand it to line
 060-ZS060 by Goran P, on Flickr
Doesn't look like much out of the clamps, but
 061-ZS061 by Goran P, on Flickr
some sanding later it's looking a bit more interesting.
 062-ZS062 by Goran P, on Flickr
 063-ZS063 by Goran P, on Flickr
Then, used the recently made jig and started on the neck pocket. The route was actually finished on my router-press
 064-ZS064 by Goran P, on Flickr
 065-ZS065 by Goran P, on Flickr
and then routed the humbucker cavities:
 066-ZS066 by Goran P, on Flickr
Finished the yesterday's session by gluing the next needed template:
 067-ZS067 by Goran P, on Flickr
Now we have to finalize the fretboard inlay design...
-
1
-
-
Thanks a lot!
I've since glued the nut and installed the tuners, have to make a bridge insert and string it up! I wanted to use one of the spares I have, but they are a little too thin and tall. I'll instead make one from scratch. Also, installed the piezzo, just a simple one that goes direct to the amp. I doubt it will get much use anyway, but could be nice to have it sometime.
I discovered that the fret leveling file shapes the bone really quickly, leaving a nice finish also. After some light sanding, it polished nicely with one of those 4-sided nail buffers, pics to follow.
-
1
-
-
I have had 2 different ones for years in the parts box, both Korean-made I think. I'll have to chose one, some help might be needed as I have never really dealt with floyds before. I just got into using the vibrato on my recent goldtop PRS-like and Alvin Lee guitars, so I'd like to investigate that route more. I play electrics mostly without a pick, so I made a habit to hold the handle with my pinky while picking with other 4 fingers.
-
Time to finish this guitar! I was having second thoughts whether to use a floyd or not, but I have no floyd equipped guitars, so here goes... I've printed out the pickup routes jig, will glue to MDF and start cutting!
-
1
-


Warwick Thumb 4 string
in In Progress and Finished Work
Posted
...and now, the scary part for me in this build - drilling and routing the electronics cavity:
shallowly drilled the pot holes, 8mm
then from the other side, -5mm with the 35mm forstner, followed by 25mm forstner
then, making the template, forgot to take the finished pic - I might not even use it for routing, but did use it to draw out the contours of the cavity on the bass
carved the corners of the pups with dremel and the inlay bit
and chiseled the sides
the neck one fits, will have to chisel the bridge one some more.