


Boggs
-
Posts
586 -
Joined
-
Last visited
-
Days Won
1
Content Type
Profiles
News and Information
Tutorials
Product Reviews
Supplier Listings
Articles
Guitar Of The Month
Links and Resources
Forums
Gallery
Downloads
Posts posted by Boggs
-
-
I forgot to mention that the headstock is a "standard" Carvin Holdsworth headstock design with the exception that I provided Carvin with the padauk for the overlay. Under the padauk is a layer of maple (the second overlay) and that is all mated to the mahogany headstock/neck. It was sealed with lacquer sanding sealer and finished with multiple layers of nitrocellulose laquer and a final top coat of tung oil for feel.
My guitar body was shaped by cutting the outside near the actual design line with a big industrial band saw. I then used sanding drums and disk sanders as well as an orbital finishing sander and my hands to smooth and contour the outside. The inside chambers were cut using my little jigsaw and smoothed with a variety of drum sanders. This represents a helluva lot of work. The body has yet to see a router!
The prototype is just el-cheapo wood (pine planks glued together for the chambered skeleton and European hardwood plywood for the top and back totaling less than $10) used to test build processes but it sounded so good that I am reviving it! The neck on it is a standard issue Carvin maple neck with 6-inline headstock and ebony fingerboard. It has been sealed with Murdoch's hard oil. I will use ivory pickups and gold hardware on it (for the irony-effect... Very rustic finish with gold hardware...
 )
) I like the action shot too! I tried very hard to capture it...
 Boggs
Boggs -
Which ones are we talking about... There are 3 guitars being shown here!
-
Don't take it too personally. This board seems to have the highest percentage of lurkers of any board I am on...
Your guitar looks really good, man! Was it a kit or did you assemble it from parts or did you build it from scratch? Nice finish job! Boggs
-
Will do... Thanks for checking in! Three guitars at once all semi-hollow... What the hell were we thinking?!
Boggs -
Next, you will see the homemade router base plate and Tim using it on his guitar top...


The result was spectacular!!

-
I'll start you off with the latest shot of my prototype but without a little finishing touch on my headstock that occurred later in the day... It'll give you an idea of what it will look like finished though...

The next two shots show how I cut the electronics access panel of the padauk back by hand with Tim's coping saw. He questioned my technique with the tool, but came quickly to understand my method... He knows so much ablut tools and woodworking that it is a special treat for me to be able to show him something new...


The next three are of the neck I finished.


Next is gluing up the back of my guitar to the mahogany frame...


Look for next post to see the rest... Boggs
-
What I would do (and may as a "Thank You" to Tim) is make a guard to go over the entire belt and pulley and have an idler pulley come off of the top of it on the slack side to take up excess slack. The trick would be in that the motor has low start-up torque as the cap is a run cap, not a start cap. You have to pull the belt upon turning on the motor to get it started... What do you want for $2 for the motor and $15 for the saw?!
Boggs -
That is a spectacular work of art! Boggs
-
The belt is loose, but it doesn't seem to slip at all. Actually, I think it would be better to have the belt slip a bit than to bind up such a fine blade and have it break on ya... That could get painful!
The padauk darkens and richens like crazy when it is finished... Really spectacular stuff! We put a thin layer of maple between the padauk and the mahogany to enhance the contrast. When the sides are rounded, this should look spectacular with the padauk being framed by the maple which is in turn being framed by the mahogany... Boggs
-
Both padauk tops and backs for both guitars are now roughed out... Pictured here is the really cool old coping saw Tim has with he and I using it on our tops and backs... Also pictured is the padauk cut to shape sitting on Tim's guitar... Is that thing cool or what?!!


Boggs
-
The middle is there as a resonance chamber but I shaped it as a pickup rout so if one were ever to be desired to be added, it would be painfully easy. I have also added the conduit for it to provide an easy way to thread the wires from the pickup if the time ever came. Boggs
-
Tim and I only had a couple of hours on Saturday to get some work done on both guitars. We did manage to get the padauk tops and backs which Tim previously bookmatched trued up and sanded ready for gluing up to the now prepared mahogany. I also have completed the finish of my neck except for making a truss rod cover.
Here is my bookmatched top and back just wetted down with mineral spirits...

Here, you can see how close we cut it with the bodies material-wise. The sides will be rounded, so it should be about perfect...


We even got to screw around a bit with guitarhead photos... You can see that I am doing a "rustic finish" on my prototype body as I will be reviving it very soon. I got a maple/ebony Carvin standard neck for it which Tim is coating up now with hard oil. Here are the GuitarHead shots...


Enjoy!
-
Very nice work! I'd love to hear a clip or two of it to see how it sounds. I have been working on a padauk semi-hollow (chambered Cuban mahogany body with padauk top and back) guitar using a mahogany Carvin neck with stainless frets and Holdsworth head stock. I have the body core done and the two halves of the padauk tops and backs mirror imaged and glued together. Shouldn't be too much longer now. The finishing will take a while though as I intend to go with a French polish. Padauk is nice wood, for sure! Excellent choice! Boggs
-
Very nice!!
Boggs -
Has a strong Kubicki resemblence which is very cool. My friend is building a guitar based on Paul Kubicki's bass designs since he has two Kubicki basses. It is coming along very well and will look great when it is done. Boggs
-
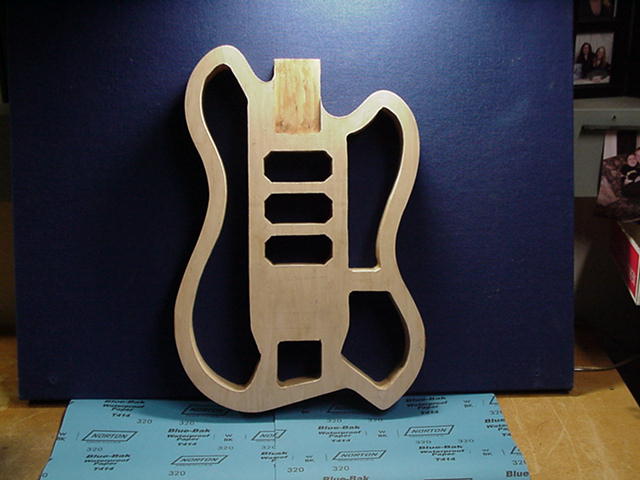
Here is where I am at to date. The inside chambers were cut by hand using the small jigsaw but I got the use of a band saw to do the outside. I have started the sanding process with various drum sanders mounted in a drill press and also an orbital/reciprocating finishing sander. I stood the new body up in front of the prototype to show how a big visual change was brought about by relatively minor design changes. I doubt you will see it in these photos, but later on when I get to the finishing, you will see how swirl in the grain particularly at the sides just fell in the coolest places! Got lucky there, for sure... Actually, I have just noticed that the pine prototype did essentially the very same thing!! What are the chances of THAT happening?!! That's awesome! Next time I get the use of the camera, I will have to get a shot of that... Anyway, here are the photos... Enjoy and feel free to ask any questions you may have.


-
WOW! That is one spectacular work of art!! Simply amazing... You ought to be some kind of proud of that... Any chance you could post a few sound clips of her? Boggs
-
The neck fits the routed pocket beautifully!
Next, I will work on finishing the neck and Monday or Tuesday I may actually have access to a huge industrial band saw to do the outside shape cuts! That'll be a bit easier on my hands which are so swollen from all the work that I don't think I could play a single string at this point... Haven't been able to pick up a guitar to play for a couple of weeks now. That's the bad part of this project... Takes every bit of what little time I had before to play to build the guitar... Boggs -
Thanks! For the record, I did the test with the small diameter drum tool in the router in a closely encapsulated hole and very thick piece in case of the very thing you were concerned about would happen. I did not leave it turned on for long at all. Thank you all for your concern. Boggs
-
I thought I'd give it a try with a small diameter drum on a scrap piece with a light touch and it is still too fast. Just did it the old-fashioned way instead chucking it in a hand drill... Not the perfect solution, but it is the inside chambering anyway so it is not as though it will be seen. Boggs
-
You could have sculpted my kleenex with a chainsaw...
I was just thinking that it is a good thing I didn't title this thread, "Snorted some great Cuban last night..." Might have been taken the wrong way! Boggs -
Here's a new add... http://projectguitar.ibforums.com/index.php?showtopic=7799 Boggs
-
Thanks. It was freehand just following the outline. Now, I will attach a small drum sanding tool to the router and clean it up a touch. I will then finish the neck pocket fit and then I can work on the outside shaping...
. My hands are getting so heavily muscled again that I won't be able to play it by the time I'm done... Boggs -
Brown lung?
Here are some pics of progress on the maple veneered mahogany first cut rough chambering... The second shot with flash shows the maple veneer reflectivity better. The little jigsaw worked its A$$ off!!! Remember, padauk will go on top and in back of the guitar bound to the maple and edges rounded so the mahogany will frame the maple which will in turn frame the padauk.


Boggs
 )
)  Boggs
Boggs
Lots of padauk/mahogany build progress to 6/14
in In Progress and Finished Work
Posted
That is my buddy Tim's guitar body. He has a couple of Kubicki basses so he modeled his guitar after them so he can have more-or-less matching bass and guitar body styles... Here is his new guitar body next to his Kubicki bass...
The headstock and neck shown are for my guitar.
Here, you can see our projects kind of side-by-side. He is doing a 4+2 headstock of his own design. Mine is a Holdsworth design. Cheers! Boggs