


gonzosc1
-
Posts
73 -
Joined
-
Last visited
Content Type
Profiles
News and Information
Tutorials
Product Reviews
Supplier Listings
Articles
Guitar Of The Month
Links and Resources
Forums
Gallery
Downloads
Posts posted by gonzosc1
-
-
Short of replacing all the electronics in each bass so that they match (expensive I would guess, and still no guarantees that the tonality would remain comparable between each bass), or buying some special programmable preamp (also expensive), if you don't mind a bit of DIY you could make a bass switching box.
I made one years ago for my singer/guitarist, and although his only selected between 2 inputs, there's no reason why you couldn't expand it to four. Think it only cost $40 or so in parts.
You could have 1 input for each bass, each with it's own fixed level attenuator (or volume pot if you wanted to get fancy) and 1 output. Set the volume balance for each bass beforehand, say in rehearsal, and then when you need to change basses, sling the new one on and select the appropriate input on the selector. You could even do the whole thing in a floor box with a bit of ingenuity.
hell yeah, sometimes the simple things don't come to mind.. thats a good idea as I can still run the bass guitars output wide open and not lose pickup tones. I will investigate this closer. cool thanks
-
I would like to add, to anyone that did make suggestions, thank you! it did not fall on deaf ears. maybe not have been what I was looking for but thanks all the same for the input..
-
This is why I play an 8-string bass. You want to drop tune? You're going to have to tune your guitar down two octaves to cause me to detune.

LOL, thats awesome. I've never seen anyone play an 8'er like that... I checked out the extended site. I bet those cost 2 arms and 4 legs
-
good luck, the last real one i saw sold for 18 grand.
wasn't there only like a hundred or so of the real one made!!!!!!!!!!
-
Yep, if you can't play the music, blame it on a mechanical problem.
Edit: Ain't got a mechanical problem? Create one.
I rest my case by the evidence of this post,,,LOL
-
In my opinion, if you insist on having 3 or 4 basses, just make them identical in every way except the tuning. You could even color code them to tell them apart.
There is a way around your problem and just have one instrument tuned to one key. Pick a single tuning and adapt. What's the lowest note you need? Use that tuning and play up the neck for the others. Hands too small/weak? Exercise and build up strength. If you can't do that, try a capo. How about a Whammy pedal?
Also, in my most humble opinion, if you can't adapt and play the music the band wants to play, maybe you're in the wrong band. Just sayin'.
#1,making all my basses the same setup was one way I thought of also, looks like it might be the way to go..
#2, this has been answered I think.. the lowest note needed is "A" which would require a 6 string bass to avoid on stage tuning. people don't pay to see bands tune!!
small hands weak???? this I just don't understand, I suppose we can lay equal blame on guitarist when they can't play a certain solo! for whatever reason..
exercise and strenght,, never said I had a propblem with that.
adapt, I'll admit it, no shame here,, I can't adapt to a 6 string runway for a bass neck. I can barely handle the 5 string.
play! well I can do that, been doing it for 25 years and theres nothing that my band can throw at me that I can't play.
-
theres no reason to be like that to members here they're trying to help u, if ur not going to atleast try the suggestions that people are giving here dont post ur topic
agreed. he decided not to make any suggestions(if you go back and look) and went right for the cheap shot. its very common to find people like this on all chat boards. it was returned in kind +1. but no worries I'm done with him...
I have looked at 6 string basses in the past as suggested and didn't care for them. thats why I'm looking for an electronic answer.
-
Let me be the first to point out that you ain't paying attention. There is no need to change tunings with your guitar player. Say that second sentence out loud until it really sinks in, then to tell your guitar player to **** himself.
And "small hands"? Give me a break. That is the wimpiest excuse anyone could ever use. Look up Carol Kaye and learn that you don't have a problem.
well let me be the 2nd to point that you ain't paying attention.. you mentioned a 5 string if I needed a lower note, well I mentioned I have a 5 string and I also mentioned that I needed to go lower, down to A at the lowest. but I guess you just decided to over look that little fact. PAY ATTENTION!!
with respect to Carol Kaye,,, no need to look that up ,but please give me a break!!!!!! please show the last time she had to rip out some iron maiden on a 6 string bass or contend with a drummer firing off at 150-160 bpm. not so easy on a big bass neck. or perhaps you could be so kind as to post a vid for all of us to see that you can do it on a 6 string bass, with your fingers I might add...but you won't do that as your too caught up in your greatest I'm sure!!!!!!!
theres a difference between an excuse and a reason, which you have no idea about judging from your lamo answer to me.
I realize what is being said about using one bass to cover everything and I answered, it won't work for whatever reason. small hands, the stars aren't alined, the suns magnetic pull, pick one and lets get back on thread topic. if you have nothing useful to add then fine, read along and enjoy. otherwise you just make the board look bad with useless comments meant to hold you in such high regards. sorry no passes given here!!!!!!!!!
now lets try this again JoeAArthur, do you have anything of use to add to this topic????? if you need to go back and read the opening,,,I'll wait, , , , , , , , , , , , , I'll even help. here it is again
my problem is that my band uses 3-4 different tunings. so I have to lug around 3-4 basses. all with different electronics and pickups. my guitar player can't understand why I'm having problems with keeping the volumes the same between basses. I tryed to tell him basses are different then guitars, they don't react the same way. the difference between passive and active is night and day on bass as far as output goes. he can which guitars at will and not touch anything while I go from passive to active and damn near cause a blood vessel to shoot out of everyones brain,,,LOL
so my options are as far as I can see, #1 setup all my basses with the same electronics and pickups or, #2 find a front end setup to handle all the different basses and then go to power amp.....
I'm thinking cost would be about the same either way,,alot $$$$$
I tryed a boss GT6-B programable pedal, but it really is just crap is the sound department where bass is concerned.
I don't have the money for a Roland v-bass system, besides I would be paying for a lot of stuff on that and would never use half of it. so the last thing I can think of would be a small rack mount mixer. I looked at a few but all of them lack good preamps that would do justice to my basses!!!!!!!!!!!! HELP!!!!!!!!!!!!!!!!!!!!!!!!!!!
now, in the context of the above paragraph what do you have to offer?????
-
Why do you need more than one bass? OK the guitar guys are futzing around with different tunings, that doesn't mean YOU have to. Just choose the instrument that covers the range of keys you're working in, and learn to use the whole fretboard.
It's a heckuva lot cheaper than buying a programmable compressor with separate presets for each bass (which is probably what you need otherwise).
agreed it would be cheaper to do it that way. but we try to limit the tuning time while on stage. the tunings we use are as follows.
my main bass is E with hipshot for drop D
2nd bass is D with hipshot for drop C
3rd bass is 5 string B with hipshot for drop A.
now here I could just get a 6 string bass and cover everything. but I can barely stand to play the 5 string(small hands). I'm basicly a 4 string kinda guy. we play old metal style so its kind of hard to make one bass do it all when I need to generate alot of speed finger wise on both hands.
-
Another possible solution would be to try twisting the volume knob on your amp anti-clockwise if the output seems a little loud, and vice-versa if its too soft. Saves having to spend $300 on a pedal you don't really want. I understand this sort of output reguation is quite common in music amplifiers.
well yeah in the jam room it can be done that way cuz you have the time to test it and make sure the input gain and volume is right. but on stage in the middle of the show it doesn't work so good. plus the fact that you have DI to the board and if the house sound man isn't on top of thing then your either to loud or no one hears you at all..
-
my problem is that my band uses 3-4 different tunings. so I have to lug around 3-4 basses. all with different electronics and pickups. my guitar player can't understand why I'm having problems with keeping the volumes the same between basses. I tryed to tell him basses are different then guitars, they don't react the same way. the difference between passive and active is night and day on bass as far as output goes. he can which guitars at will and not touch anything while I go from passive to active and damn near cause a blood vessel to shoot out of everyones brain,,,LOL
so my options are as far as I can see, #1 setup all my basses with the same electronics and pickups or, #2 find a front end setup to handle all the different basses and then go to power amp.....
I'm thinking cost would be about the same either way,,alot $$$$$
I tryed a boss GT6-B programable pedal, but it really is just crap is the sound department where bass is concerned.
I don't have the money for a Roland v-bass system, besides I would be paying for a lot of stuff on that and would never use half of it. so the last thing I can think of would be a small rack mount mixer. I looked at a few but all of them lack good preamps that would do justice to my basses!!!!!!!!!!!! HELP!!!!!!!!!!!!!!!!!!!!!!!!!!!
-
question,, when I strip the head I'm sure that the veneer top on it will come off as it has already started to pull up in a small area. would I have to replace this small top or could I leave it with just the bare maple????????
Have you tried lifting up the piece of veneer? If it comes off easily you could remove the whole piece then glue it back on or replace it. If it is stuck fast apart from the lift you could just glue that bit back.
With the buckle rash stain does it still look pronounced when you wipe the wood with turps?
well my concern is the stripping. either by chem or heat gun, I think it will pull up alot as I take the paint off.
I don't know the history of how this bass got into such bad condition. but from what I see it looks like it went through many climate changes with no protection maybe sitting in a damp garage or something. the truss rod, pickup mags and machines have a good bit of rust. so I'm think that the veneer will pop off no matter what I use to strip it.
the buckle rash still shows when wet. its not bad but its there
-
It would be nice if you had a 4' straight edge around, you have to be careful of the orbital sanders on a body that has as many pointed ends as that, you can find yourself getting the body as a whole 'out of flat' after sanding awhile, laying a 4' straight edge across the body will let you know if you have any humps or dips to worry about.
You might want to switch to a Large piece of flat wood with sandpaper taped to it to help you get back to flat and level if you need it.
I think it's going to be nice!
Hey, exactly what is going on with that neck?
I can't quite see what the neck story is from the pics...
good point on the 4" straight edge. I'll get one before going to the next flat sand. I was thinking about the larger sanding blocks myself. just had to get that first sand out done. the sides and bevels will prove to take alot of time.
as for the stain on the back ,what do you think on that???? I wiped it down with a damp rag and it still shows.
do you think this will lighten more as I sand down with finer grit??
the neck is maple. I have the fingerboard removed. need to replace truss rod as it is rusted badly. the paint was sanded off by the first owner but still has sealer coat on it. I haven't done anything to the neck yet. looking at hand sanding neck and head then dye and oil it and try to match up the color as best I can.
question,, when I strip the head I'm sure that the veneer top on it will come off as it has already started to pull up in a small area. would I have to replace this small top or could I leave it with just the bare maple????????
-
had time today to sand down front ,back and sides. 60 grit with palm sander
before pics
after...

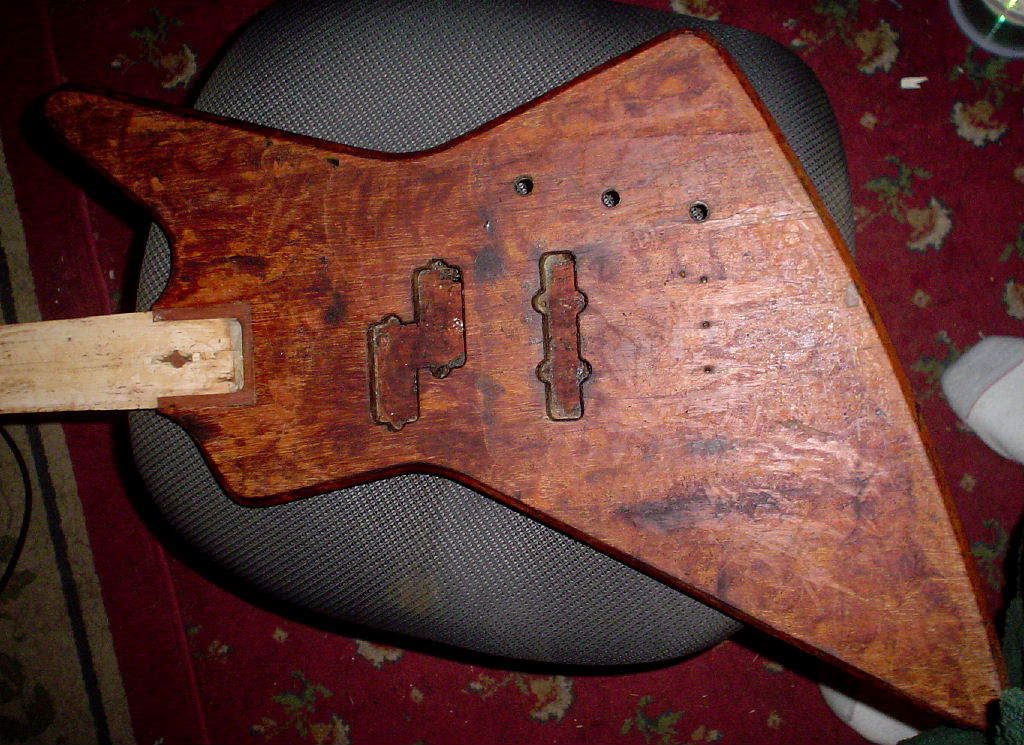
first discovery! its not a one piece body, its a three piece...... the big upper wing and lower 1/4
as you can see that buckle rash stain on the back is still showing even after going over the back three times. don't know how much more it will come out as I sand with finer grains.
what would be a good way to hide this while trying to keep as much of the natural color as possible?????????
still have a lot of hand sanding to do on the bevels and corners
-
There is some nice wood hiding in there.
I'd first try finish sanding it then wet with some mineral spirits to see what you got.
yeah, I'll sand it out this weekend and post some pics.....
-
I really dig the crazy looking grain/oil/water patterns all over the backside. : )
The front looks a little bit more like a finishing wreck of some, but the back is pretty sweet.
it does almost have a pattern to it.
-
I'm also getting ready to start on a 2nd restore. it a 84 Ibanez DestroyerII. basicly in better shape then this hamer. just needs neck and neck pocket work and a finish on it. its not a bad finish on it now, its just ugly as hell in orange!!
-
That looks like a great rebuild project.
When I used to haunt pawn shops, I loved finding guitars like that...beat to hell, not working, but with quality 1-piece bodies hiding out underneath waiting to be re-birthed into their former glory.
Are you -really- prepared to mill the top of that thing down to install a quilted Maple top on it?
That's a lot of work when you could have a beautiful 1-piece Mahogany guitar with a LOT less effort involved...
...just sayin'...
LOL,,,,, I get that alot from playing buddies, are you really gonna try and do that...........LOL
I agree it would be easier to just take it down to bare wood and leave it at that. and seeing that this is my first project, I am maybe aiming high!!!!!!! LOL..... the reason I wanted to go with a top on it was that maple neck. it sticks out like a sore thumb on the dark wood grain body. it didn't look half bad with the black paint but I don't how it will be with the wood grain...
if I could get the neck to match up with dye and oil, I might think about not putting a top on it. I do like the look of wood.
I would really like to keep the whole thing a natural grain with a rubbed out finish like my Warwick. it has a very thin finish where you can still feel the grain with your fingers, but it is finished..... hell,, I don't know. you got me thinkin' about it now,, LOL I got the fingerboard off to night. those last 5 frets just didn't want to let go, it took about an hour!!!
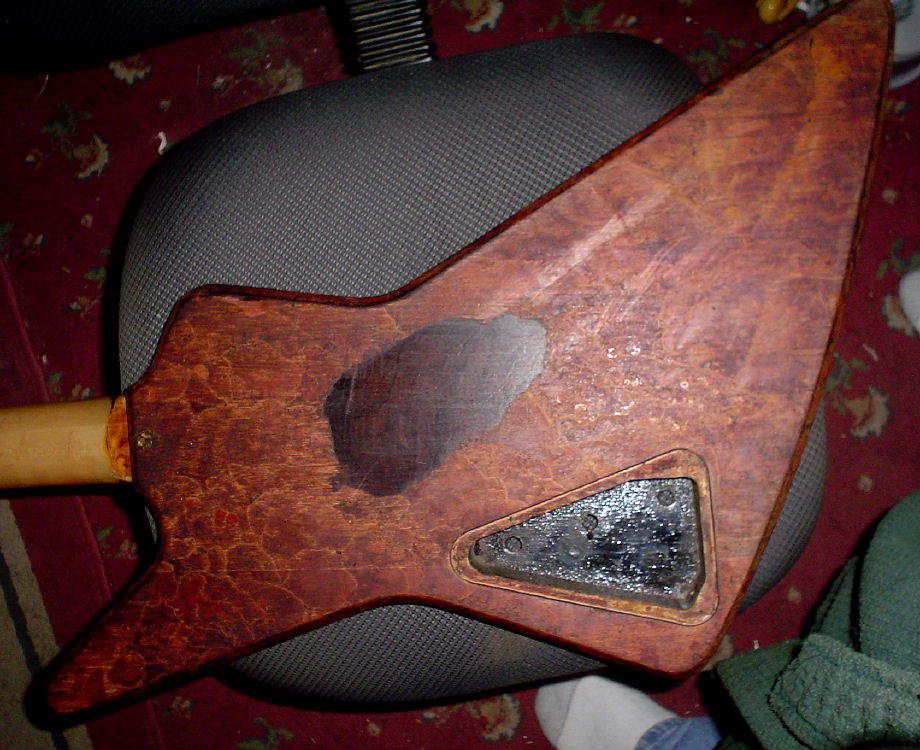
well here it is with the black stripped off. see the big spot of dark grain on the back where the buckle rash was.
it looks real good up close...on the back side pic you can just make out that small hole we talked about. if you look at the bottom left of the buckle rash, there a scratch going down and left. the hole is at the end of that scratch in a small dark spot.
I just realizes I need to repair the strap button hole as well. that will be a little more work then the pinhole!!!!!!
-
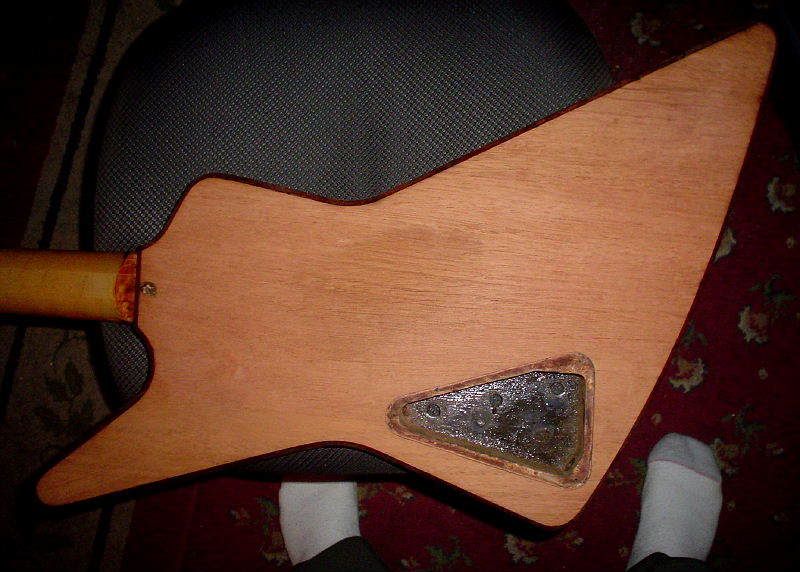
if you look real hard at the last pic at full size you can see the fingerboard pulling up from the neck.. I can't see how someone can let a guitar get like this...its totaled. the electronics don't even work............
-
Once you get it sanded down to raw bare wood, save some sanding dust, mix it with a tiny bit of medium viscosity CYA glue, and do a drop fill in your hole.
Do NOT use the thin viscosity CYA glue, it will dry up on you before you get a chance to get it in the hole, more than likely, confuse you, and maybe make a mess of things.
It will also seep into the surrounding pores easier, which you don't really want.
The medium viscosity will stay wet longer, and will not try to penetrate the surrounding pores as easily as the thin.
You're trying to do a strategic strike on the hole and the hole only, you don't want your 'fix' to be any bigger than the hole itself, period.
Use something like a sewing needle to drop fill, you don't want CYA glue in the pores surrounding that spot if you can help it.
Just a tiny bit.
Take the needle with some CYA/dust on it and 'pump' the hole a bit, to make sure your dust/glue mixture fills up the hole all the way to the bottom.
If you just stick a dab in there, you will more than likely be trapping an air bubble underneath it.
Pump the needle until you see the air bubble come out and the glue mixture fill in the hole all the way.
Keep an eye on it for a few minutes, and level it off with your fingertip before it dries all the way.
CYA glue is harder than the wood, and will not level out as easy as the wood does, better to let a bit of finish fill the shallow depression (if there is one) than have your hole fix standing proud of the wood.
Post some pics!
great, sounds good on the hole repair. I just put the cam batteries in the charger. shouldn't take too long. I'll try to put some up to date pics on here tonight, but heres some of the bass when I first got it..its a mess!!!!!!!!


-
If its just the top you want to dye and sand back, then I would just sand the sealer off the top. That may not be too bad if you have a decent sander.
As for the hole. I would fill it, is it on the top or the back/sides?
well I wish it could be that easy and just strip the top but its not. this bass has been totaled out, the only thing it is good for at the moment is a boat paddle,, lol,, it was black, on the back of it there is a huge buckle rash 5"-6" circle and its down to the bare wood but has not ate into the wood. the wood in this rash area is a nice super dark red/brown but the filler coat was not dyed so the rest of the guitar is a brown/tan color. so it has to be totally stripped to get the color even.
the sanding will take some time. I have a 1/4 sheet size sander to use on the top, back and sides. I will have to spend some time on the huge bevels that surround the body on the front and back. most likely those will have to be done by hand I think so I don't change the shape of them. will also have to stream out a few dings. its not as bad as I first thought, the messed up finish just made it look like it had a bunch of dings.. i will get the fingerboard off tonight as I got a new iron today, old one died on me last night at the 7th fret.
has for the hole, it is on the back side of the guitar. when you say fill it, do you mean with a puddy or just drop some sealer in there to fill it up. like I said you can not see the hole from about 4-5 feet away..
-
Lots of work, either with the gun or sandpaper.
Or if you can level sand it and work with it go from there.
If you want a color you can put a transparent color over it then clear.
ok, I guess i'm heading the store for a heavy supply of sand paper LOL, as I can't take the smell of burning wood anymore. I will level sand it down to bare wood and see what it looks like.
I want to keep the natural wood color on the sides and back. the quilted maple top will be dyed black and sanded back and then dyed again with a lighter mahogany color. maple neck also will be dyed the same as the top. then just clear the whole thing.
another quick question, on the back theres a small hole in the wood. it looks like a dart was stuck in it.
its thats small but deep. should I fill it in with some dyed wood puddy? would that work? or just over look it and fill it with sealer? I don't think you would even see it from 4-5 feet away
-
that was good. I'm just starting out so any info is good. I checked the one about veneering but it wasn't that good...
-
striped body with heat gun. I'm down to the sealer or filler coat I guess. its a mahogany body, I want to go with a natural finish on the back and sides and a quilted maple top. how or what can I use to remove this coat of filler and open up the grain?? or will I just have to sand the hell out of it to get past it?

Looking For Idea Here On Bass Rig Setup
in Electronics Chat
Posted
good tip for sure,, thanks