


RGGR
-
Posts
1,292 -
Joined
-
Last visited
Content Type
Profiles
News and Information
Tutorials
Product Reviews
Supplier Listings
Articles
Guitar Of The Month
Links and Resources
Forums
Gallery
Downloads
Posts posted by RGGR
-
-
$200 for Kahler 8 stringer is not a bad deal..........not bad at all.
Would mean normal frets, instead of fanned.
-
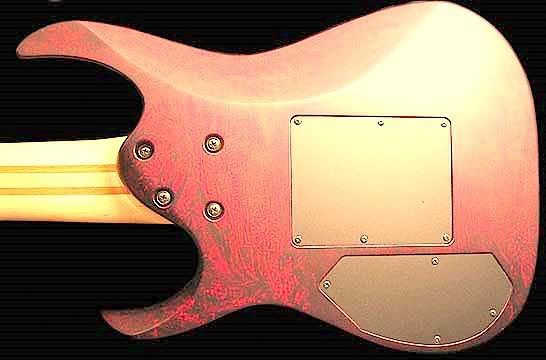
Here with Picaso I adjusted Nuno's pics a bit and adjusted lower horn on Ibanez RG-8 prototype is better visible.
-
Template shown is stock RG6/7 shape. The reason the wenge laminates are in the body, cause I wanted to have the option to go wider if necessary. On top of that I think it looks more interesting this way then just mearly two pieces of Zebrano joined together.Did you make the body a little wider for 8? Or is it stock RG 6 size?I would make it stock 6 size...no reason to make it more uncomfortable than necessaryBefore digging into body blank I first will lay out a neck template and see how much room I have on lower horn side. If more room needed there are few options.
1. Go with 10mm (or so) wider body layout
2. Angle lower horn at slight angle, so tid bit more room appears on lower cut out.
3. Shave off sides of lower horn. See here.

The Zebrano is heavy as doodoo. Have to come up with some oversized control cavities, or some other clever idea.....because without the neck, it's already a backbreaker. Specially compared with my light weight Limba and super light weight Swamp Ash bodies I have laying around the house. The 540Pvii Swamp Ash body almost floats in the air....so light it is.and the zebrano is already heavy enough to counter the extra neck weightHow are you going to have the pickups held together? thats the bit im most interested and concerned with if you want to stick with the "floating" idea of the design i can imagine it getting quite awkward.Not sure how everything will pend out. First step will be creating those free standing coils. If that works the first battle is won.
next step will be creating some molds. There are multiple ways to do that, and I have to figure out a the smartest way. Closely combined with the making of the molds is the casting of the Epoxy or something like this.
Some tests have to be done to see if it's smartest to set M3 type bolds in resin while it's hardening and later replace those with SSX-M03-06 type hex socket screws, or leave M3 bolds out and drill & tap holes later in process.
Again, this is uptill now just a mental excersize, and life fire test have to prove what works and what doesn't.
For now first step is ordering some AWG #42 copperwire. Someone suggested for Europe www.wires.co.uk might be a good source. See here.
-
I'm skeptical with harbor freight tools. Recieved some real junk from them in the past.
+1. Bought $150 simple compressor from them recently, it broke down faster then it took to take it out of the box.
Was not happy about that.
Then again.,.....buying cheap tools that's risk you run.
Is StewMac only source for this 3/8" bit, cause I use it a lot for tight radius corners.......but no one else seems to carry it. Strangely.
-
Mock up of Zebrano body blank with RG template.
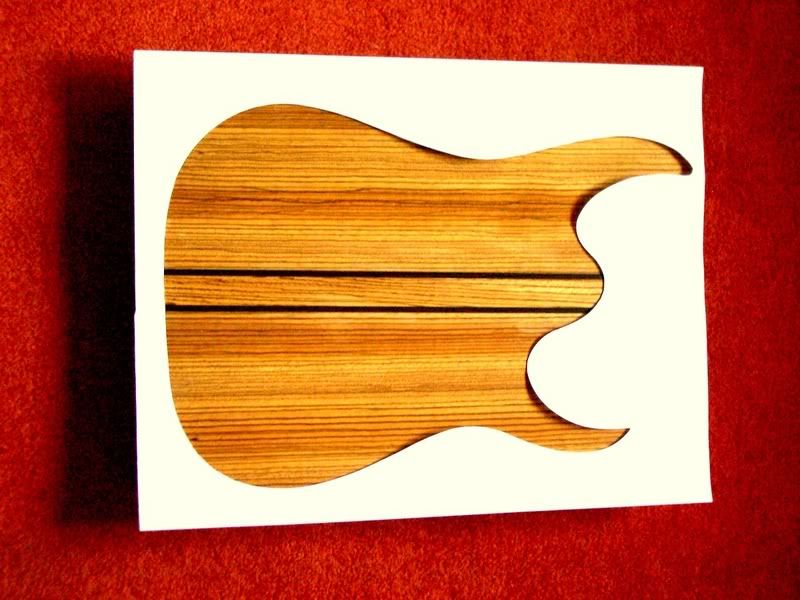
Zebrano body blank made up out of Zebrano and two thin stripes of Wenge.
For Kodak purposes I wiped the body blank with damp rag. Will go for oily finish and hope it brings out same color.
-
-
I'm chewing on that one. In pic, you can clearly see how pups is build up.or just use the same design if your making your own, but i dont know how feasable that is.
There is copper coil with magnet inside, all set in some kinda epoxy resin with hex sockets at the sides.
(Not sure I understand the relation between number of hex screws and strings yet.)
Here side view:

If you take away all the marketing mumbo-jumbo, it makes sense to roll my own.
Our proprietary computer aided guidance system allows for perfect side-by-side alignment of the windings creating physically as well as electrically identical coils. These coils are then baked, permanently "thermofusing" the wires producing two solid self-carrying "air" coils.I'm thinking copying this design and making cheap pup winding machine, and wind copper over some sort of removable bobin. While winding with clear laquer I think securing the wire in the process. Spray, wind, spray wind, etc. Hopefully this will yield a self-carrying "air" coils. With coil done, and with right size neodymium magnets, it's a matter of assembling the parts and set everything in some sort of set up (couple of different shaped molds) and build up the epoxy so coils and magnext are covered.
Next up will be drilling the holes for the hex socket screws. At least that's the metal process....will see how easy this all will be.
Step one for me will be ordering some AWG #42 copper wire and work on those self-carrying "air" coils.
-
Something similar happen to my 540Pvii build. Happily routing away till desired 10mm thickness.
Checking up thickness of headstock with other guitar.
F%*^#!@+!.....
Should have been 15mm.
Hmmmm.....
So got out a piece of Wenge and Maple.......Hubba, hubba....
And finally it looked all hunky-dory again.
Guitar building is all about fixing-up mistakes. When guitar is done I of course never will admit to this mistake. It was suppose to look like this to begin with.

-
no i am not painting over it...what i said was this was going to be the last natural finish i do.i did not buy $300 worth of flamed bubinga to paint over it.
I would paint it anyhow......can't stand the look of flamed bubinga......specially if it's not sitting in my garage.
-
It's an acrylic body......
i don't think those are "colors"...i think they are most likely phosphorous (glow in the dark) ribbons set into the epoxy resin...i think they are what makes it glow green when the lights go outI think it's the other way around. There is some kinda color streaks in the acrylics......that when the led light are out, show up as all these colors......then when the led lights are switched on, one of these colors shows up. Green led, green streaks, while rest become invicible.
But how excatly it's done......I'm no light/led expert.
Thing is, for 20th JEM I think it's a very stupid guitar. I would never pay $6000-7000 for Acrylic guitar. Unless........
-
I'm 16 and making my first ( yes, first wink.gif ) guitar as a school project - I don't have the experience that you guys have so I'm going to make mistakes.
Tegro - For a first guitar your design is excellent. No critique there.
And don't be taken by our comments.....it's not to throw rocks at your greenhouse......it's just that we would like you to make an awesome first guitar.
My advice really would be to call around and see it you can score a different body blank.
Where are you located? Guys here might be able to point you in the right direction concerning another body blank. Maybe someone still has unused slab of alder or mahogany available.
Strange advice........Sometimes great Mahogany body blanks are hidden in old Church benches, tables......Try a goodwill store or otehr second hand store nearby and see what kinda cool tables they might have. Sometimes you have to be creative.
-
Just spend some hours reading up on pickups and how to roll my own. Interesting stuff I must say.
My eyes popped open when I saw this pic:

From this link:
http://www.q-tuner.com/gl.shtml
A Dutch guy rolling these amazing looking pups.
From what I can see, the way these pups are designed, it eliminates the necessarity for a 8 string bobin, but instead he uses a two free standing coils.
I still have to chew on this some more.......but the little voice in my head says it's do-able.
-
As for the wood, it was the only maple I could get my hands on. There was nothing thicker / wider - it was pretty hard to get hold of in the first place.
Out of curiosity.......why maple?
Alder, Mahogany, Ash (swamp or hard), Basswood......are mostly used to built guitars. Maple is said to have to bright of a tone.
If your maple was so hard (and expensive to get) and even in the wrong dimensions....why on earth settle for maple.
Rule #1 in relation to finding cheap and good tonewood is use the yellow pages. Spend afternoon ringing up woodwork companies. Explain what you want and see if they can point you in direction of good supplier. Cause suprisingly the best suppliers are mostly only a stone throw away from you.......if you just only take the time to scope them out.
On this site there is a great reference with good suppliers (anywhere in the world).
Not raining on your project. Think you take the critizism very well.........but questions stay:
1. Why Maple?
2. If going for maple, why settle for this strange dimensions?
3. When having to deal with wood you got....why lay out guitar design like you did?
I think it makes lots of sense to take up the phone book, do some more research on suppliers and get the right body blank.
Ask you mom/dad/sister/grandma for the $40 it takes to buy the new body blank, and in return wash their car for the next coming month.
The maple you got will warm you on a cold winter day.
-
First of all I see you using thin sheets of maple. Wouldn't have been my choice. But for school project.......well......
Second, when cutting out top and bottom you used the same shape, (top and bottom). This will create two week joining areas.
If going this route.....I would have opted for half brick type design....

Where one piece of maple would be off set by the other. So top and bottom shape would not be the same, but glueing them together would create a very strong body blank.
Your opted option is the least intelligent one.
Darn- Setch you beat me to it.
-
Be little more patient.....when I'm done with glueing and squaring up the body blank, all will become clear.RGGR, are you gonna put the ebony strip between the zebrano on your body blank? i can relate to having a day job but building guitars for peace of mind, i´m a dentist, and i´m really happy when i´m building guitars
You must be good with inlaywork, then?
The gospel, hey? Still haven't got a clue how this pends out. Still don't understand half the issues I have to deal with. But yeah, will take tons of pictures.......specially from my crappy "low tech" building methods.take LOADS of pics! I will treat this thread along with matt's and canuck brians s the gospel when im readyI really respect your work.Thanks.......will see how this thing comes together. Don't expect a quick build though.
-Metalmatt.......is that strips of ebony veneer in your neck???
-
For some reason I`d rather carve the body by hand than route
Hmmm.......I'm pretty comfortable with my €39 cheap Chinese hand router. I guess the trick with routing is some good router bits and lots and lots of templates.
Building guitars is more about making templates then anything else.
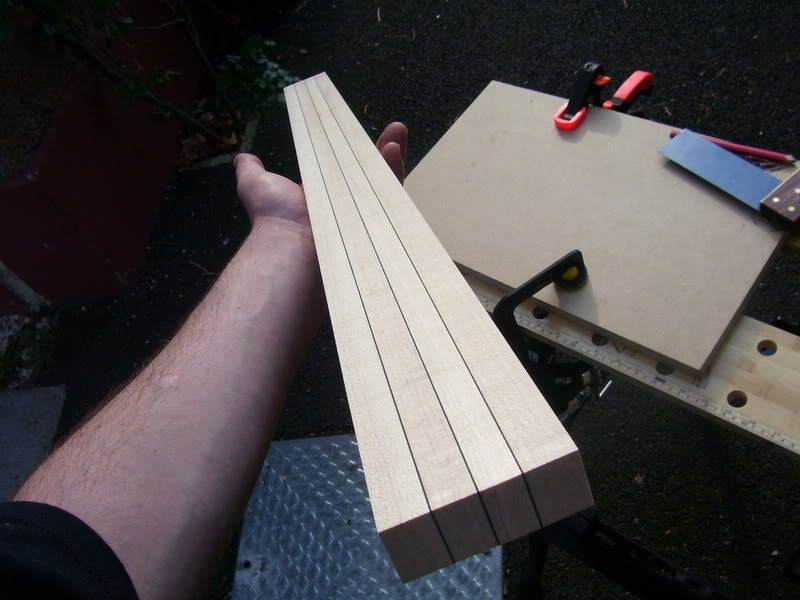
Although today I spend a couple of hours planing the body blanks down from 50mm to 46mm (rest I sand by hand), but gosh would it have been nice to have thickness sander there, cause boy, oh, boy......what is that cumbersome with the set-up I got going. (I will shoot pic tomorrow of my set-up for routing body to thickness.) It's simply sickning.
The again it does the business. (Sortof)
-
Well.....eh!.......not really actually. Still HAVE TO FINISH my first actual guitar - the JS-7. But my JS-7 project is currently at the painters, so delays are not caused by me. Just waiting in anticipation for it to be back in my hands.I hear ya Rggr. Seems you have the building bug. I saw your axxion project...nice work. Your beltin em out.But yeah, knocking out a new body or a neck is not that difficult any more. Comfortable with those stages. Now coming into fretting and electronics soldering stages. Will see how that goes.
And I find this guitar building to be very relaxing. After busy job and other BS taking up my time,....it's a nice escape. Just making some wood dust......doing my thing.
I once heard story of lady Violin builder........someone asked her if she had to be very patient to do stuff like that. Well, she answered.....in real life I am an extremely busy person (read: ADHD), and this building of Violins brings me peace of mind.
And I can relate to that. I just enjoy building a guitar, and that's all that matters.
Don't alot of people just use the emg 707 or 81/7?I see lot's of people putting 707's in their Ibanez 7 strings, for this guitar I think I go the Lundgren M8 route.
-
Why on earth I need 8 strings when I'm not even comfortable with 6
Reminds me of an article I read years ago by dimebag Darryl....."If ya can't play 6 why play 7". Think he was poking at the new wave of metal..7 strings pumpin power chords minus the shred.
It's probably more the building and learning experience then the instrument itself. To go the 8 string route I have to start studying and comprehend all kinds of stuff I haven't been exposed to before. So that process itself will help me learning to play the guitar.....6-er, 7-er, 8-er........
It's a matter of going out of your comfort zone.
See I could also build another strat copy........but why?.......I don't see much challenge in that. And it's that challenge of conquering a 8 stringer and all it's magic behind it (because it's a rediculous concept of course)....that makes it's such a fun experience.
Oh, for Richard Fay.....check out: http://www.richardfayguitars.co.uk/
Here are some more pics:
http://uk.pg.photos.yahoo.com/ph/faymarine...823&.src=ph
Here are some quotes on guitar off Jemsite:
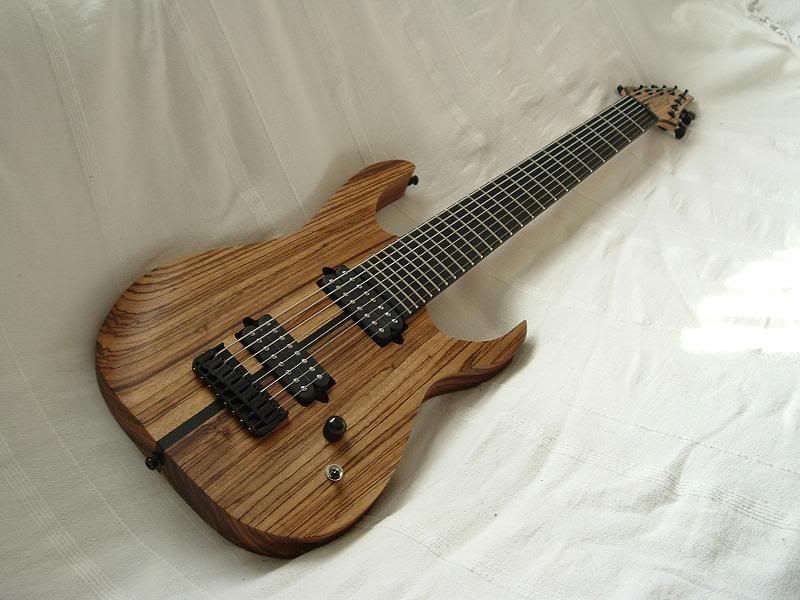
Probably the biggest project I've done as I built everything, including winding my own pickups. I am really, really happy with this one.Specs:
3 piece Zebrano/ebony body with oiled finish,
Rock maple neck (perfectly quartar-sawn so it's hard as nails), 14 degree scarf joint, with Zebrano veneer on bound headstock,
Ebony fingerboard with no inlay,
28.5" scale, 24 frets, eight strings 9-68, tuned high E to low F#,
Pickups wounds by me - two humbuckers with 3-way switch and volume,
Hipshot eight string bridge,
Angled jack input.
It plays really nicely, action at the moment is very low which helps picked runs down onto the low strings! Pickups sounds great, which I was a bit worried about seeing as they're the first I've built - the bridge is suitably toppy while the neck is very smooth and hollow, and it has a very useful sound with both pickups on. Usually I find this position to be a bit non-descript, but in this it has the smoothness of the neck pickup with some of the bass rolled off. The guitar balances perfectly, despite the long scale and bigger neck, although I did move the bridge back into the body when I designed it in order to help the balance (so the 12th fret is in the same place relative to the body as a UV; the head is 1.5" further away from the body; and the bridge 1.5" further into the body - hope that made sense). The balance is probably also helped by the fact that this thing is really heavy!! I didn't know much about zebrano before I bought the body blank, so I have found out that it is very hard, and heavy.
It's huge fun to play - having two extra strings actually makes more sense than one, I think. I say this because alot of our usual guitar scales resolve on the sixth string, and with an eight string I have a whole extra octave that I can extend these scales with, before I have to start to go down the neck. With only one extra string you can only go half way down a scale from the sixth string before you have to go down the neck. Hope that made some sense lol!!
Winding the pickups was the biggest gamble with this project, having not done it before. I did some research online about number of windings and usual resistance, etc. Then I bought all the pickup components from Stewmac and just went for it (lots of educated guesswork involved). Looking back, I think rather than making my own bobbins I would have bought their six string ones, and cut and joined two to make 8 string ones - would have been much quicker and easier. The neck had 5000 turns per coil to make a DC resistance of about 11K (I think), and the bridge 5500 with DC of 13K. I made a winder out of technical lego (honestly) with a 25:1 reduction, so 200 turns of the handle turned the bobbin 5000 times. So they are scatterwound, by hand, and then wax potted.It was fun, but a bit nerve-wracking actually plugging it in for the first time. Sounds great though.
With router I planed the body blanks this afternoon. I will try to have body cut out before the end of the week. After the rough shape is out, I will park the project for a while, to finish some of my other projects and do some more studying on 8 stringers.
Also digging into the pick-up anatomy tp see if it makes sence rolling my own.
-
Not huge fan of acrylic guitars. IMHO best way to cut acrylic is with a laser. Nice clean lines, no finishing work needed.
-
For quilted maple check out www.3dhardwoods.com. His thin bookmatched sets are very reasonable priced.
-
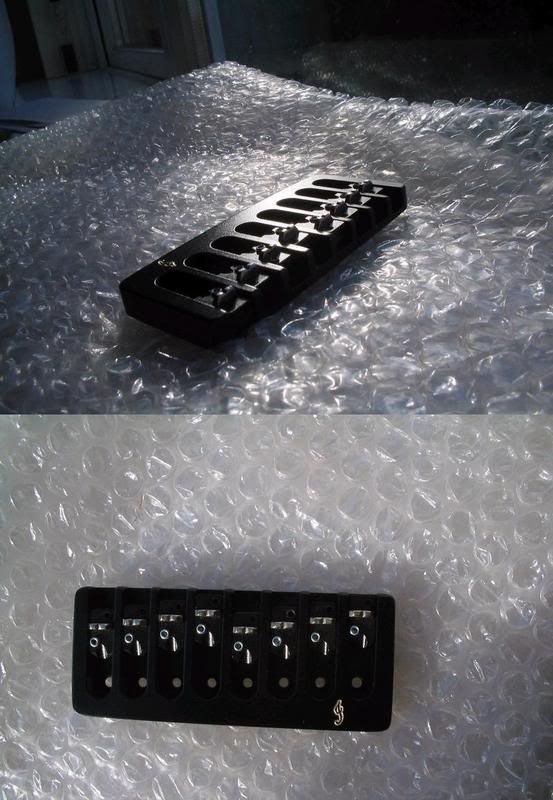
MetalMatt, any word on which type of ETS bridge this is, and what you paid for it. Looking at their website I'm bit lost in which type is which and which are suitable for an 8 stringer guitar.
but let me run something by you...if i WAS to build one myself,i would most definately use a 26.188" scale,use a set of 009-011-016-024-032-042-054-065,tune the 7th string to C,and go from there...,having the #8 string tuned for bar chords and the rest standard.i think that would give the most useable range...See, this is why this whole 8 string guitar stuff is so darn interesting.......there are so many opinions and ideas that it's all highly confusing. Not that this scares me away though. Stuff like this makes me have to
and in process I might pick something up. -
Glueing up the Zebrano and cutting out the RG body will be the easy part........the trick in this project is in the planning.
Going the fanned frets route is like opening up a can of interesting wurms.
It needs some more studying on my side. String tension, scale length, type of tuning.......all this stuff is very new to me.
An easy way out is a hipshot or ETS type bridge, lmii 30", 29 fret, fretboard......Lundgren bridge pup.
For now I'm first trying to understand this Fretfind program.
-
With other projects coming to the finishing and set-up stage, it's time to dream up the next project.
Some how my car found it's way to my wood supplier and without much protest from me, misteriously some pieces of Zebrano found it's way in the booth of my car.
This is the plan......
RG-8 string.....
Why on earth I need 8 strings when I'm not even comfortable with 6, I don't know.....but with all the 7s coming to fruition and Ibanez bringing out it's own 8 string this year, I thought it would be a cool idea. Reading about 8 strings you inmediately run into the problems of scale length. Tons of threads with discussions about the "right" scale length for an 8 stringer. Some say 27", some say 28.5", some say 30". Others say fanned frets.
And the more thinking about it, fanned frets seemed to make sense to me. Would also be nice challenge to have first go at cutting fretslots in fretboard, and as no fanned fretboards can be bought of the shelves.......I think it's a nice challenge. Something like 25.5" for the high strings and 30" for the low strings. (some say 30" with create to frets too angled to play confortably, so we will see).
It's to cold outside to do any guitar work anyway.....so next few days I will use to AutoCad out different fanned fret designs, and see what makes most sense.
Guitar that set this all off is a great looking RG-8 by Richard Fay: www.richardfay.co.uk
First step will be glueing up the body blank. (pics will follow when glued up).
Anyone with comments on use and unuse of fanned frets are welcome.
-
Why not make whole guitar out of a McDonalds countertop???


Rg-8 Fanned
in In Progress and Finished Work
Posted
Here some write-up I copied from sevenstrings.org.