


RGGR
-
Posts
1,292 -
Joined
-
Last visited
Content Type
Profiles
News and Information
Tutorials
Product Reviews
Supplier Listings
Articles
Guitar Of The Month
Links and Resources
Forums
Gallery
Downloads
Posts posted by RGGR
-
-
That said, I'm glad for the links. Thanks RGGR! My observations are similar to yours - bass builders are more inventive and bass players much more open to change. I've been starting to look at bass designs for fresh perspectives on guitar design.
It's all about inspiration. Getting out of your confort zone. Original thinking, not bound by unwriten laws.
And when I see a guy building a bass out of a McDonalds counter top.....then I go.......darn, why didn't I think of that.
Why am I in my thinking bound by......your any other RG, with a touch of exotic woods and your cool neck laminates.
-
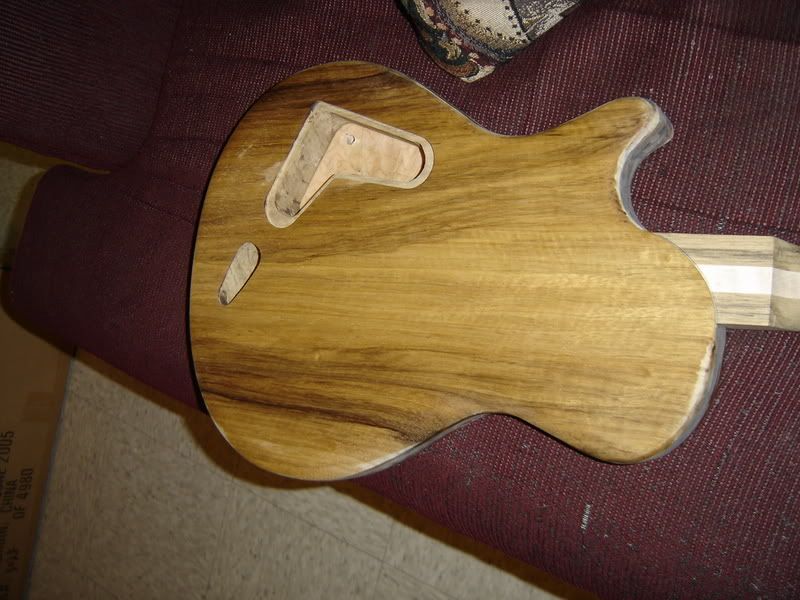
Drilled string ferrules holes in back of guitar today.

For a first try at this, I couldn't be more pleased. Now I will do some more sanding and re-priming and use my 3/8" router bit to equal out the depth in all of them.....but things are looking good.
Gosh, was I not looking forward to doing this......but in the end it was a walk in the park.

-
Otherwise, you end up with something that looks like a coffee table with strings.
Not to be confused with a hot babe in a string.
-
RGGR, how do you check the volume or tone whilst adjusting the controls? I know that you could play an open string or hammer-on with one hand while holding the guitar away from you & adjusting the level with the other hand...but how awkward is that going to be?...& aren't the controls normally tweaked during performance so that you can get the sound right straight away? If the volume is a bit too loud or if the tone is a bit too sharp do you stop mid-song & tweak it or carry on until the end & then tweak it & hope that you've got it right?
The way I see it is that you might gain a little in the look of the guitar but lose a lot in practicality....but that's just how I see it.
It shape over function, I fully agree.......but sometimes that's the sacrifice you have to make to be able to achieve the look you're after.
-
I really don't get why anyone would hide the controls on the back of a guitar. If you don't need them accessable then you obviously don't really need them so just get rid of them....
I disagree with you completely.
Sometimes visible controls may ruin the look of the guitar. At same time you want to be able to switch between pups, or do other controls (volume/tone). This doesn't mean you want to do this during a song (accessable controls)....but maybe between songs, or at other moments. So to me it makes perfect sense to hide the controls because of aesthetic reasons, but still have functionality over them.
-
Lately (with other projects coming along nicely) I have been toying with idea of doing a bass. All still on drawing board and first want to finish other projects (gotta finish projects now end then, hey?)
So.....toying with idea of bass.......and knowing that bass builders are bit more experimental in their body shape's in general, I have been eyeing "cool" basses these last few weeks.
Also been toying with hiding controls. On 540Pvii build I want to hide the pupswitches (in back of guitar). Have seen Maiden69 hide input (output?) jack to back of the guitar in very clever way.....
So imagine these ideas......floating in my brain.
And then surfing the net....
via: http://www.bas-extravaganza.nl/?page=bassen
I bump into.
http://www.ritter-basses.com/ritter-basses...ses-jupiter.htm
And I be darned. An amazing bass shape.......with hidden control. (almost similar as I dreamed up few days ago.)

Now I'm telling you......if the devil played with it. Both these sites I have never seen in my life before....but giving such a burst of inspiration. Just wanted to share.
And yeah, finishing other ones first.....I know!!!!!!
-
-

Plywood???
-
-
Browsing your gallery (some cool stuff)...I bumped into this body. It reminded me of a Kiwi.

-
After a couple of primer/sanding cycles the body is almost ready for it's final black gloss paint.
Only thing left to do on body (besides some more sanding) is drilling the ferrulle holes in the back of the body.
-
With that nicely rounded body, that one square corner on that control cover cavity seems to clash a bit. I would have designed that differently.
-
It's just easiest to measure in 1/4, 1/8, 1/16, 1/32 etc. because that is what's on our rulers.
Easy for Americans that is......for rest of the world on the metric system it's a pain in the behind to grasp.
-
On topic, why did you stain the test piece and went for burst on actual guitar??? I think stain looks very good, while acual guitar needs some work?
-
Have you thought about lamination and adding nice contrasting wood in between the Limba pieces. Lmii sells these nice black stained veneers. Adding two sheets in between the Limba gives this nice custom look.
See here:
http://www.ibanez.co.jp/japan/products/eg/...estige_neck.jpg
-
I do see an issue with the dilling of the holes, though. I understand the "stress relief on jigsaw blade" part, and that it's easier to make the jigsaw go around the corner, but when it comes to routing final shape down....I see an issue with tear-outs. These big blobs of wood (in between the holes) are prone to creating tear-outs. That would keep me from using this method.
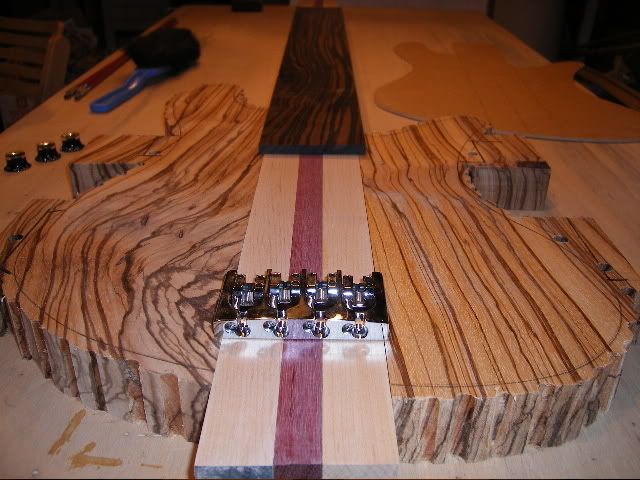
Would love to see how the Zebrano looks like when sanded into shape.
Seen that Zebrano is quarter sawn,.....flat sawn would have created an awesome pattern.....curious how this quarter-sawn wood will end up looking.
-
There is also break angle on the strings that if the guitar was tipped slightly would make them look a little askew. Kinda sets up an illusion if what I said makes sense.
After what you said, I dug into google images to find some other shots of guitar......and maybe what you're saying is right......(looking at this pic at least!)

-
I couldn't find a template bit that was shorter than 1/2" for my cavity recesses. I had to make my templates thicker to use it
When it's the case you need a shallow cavity, just copy your proper "shallow" template, over to 18mm MDF, and this way, you still can use the 1/2" length router bit. I use this method all the time when routing the control and trem back covers. This way I don't have to deal with putting things under the template....to raise the height.
-
I have to attend the pores before tooling it.
So you glued pieces together and with whiping the glue, you whiped it into some of the pores. Now some of the pores show glue instead of being just a pore. I see your problem.
My guess would be that taking 1/16" or so off the body (or even maybe less) will cure most of your problem. Most pores aren't straight down.....so most of the glue will be sanded off this way.
Still playing guitar like that would seriously brake your back. pffffff!
-
I simply love Wenge. The chocolaty dark streaks in it......the strange hard and soft bits when sanding it. (Yeah, it's a b*tch!!!), the open pores that sometimes drive you insane.it's funny you mention wenge! I have a blank already to go....I posted some probs with it however. Dummy me wiped my glue joints and I have some glue way down in the pores. Tried every solvent out there.also tried steaming it out. I'll have to pick at the pores with a magnifying glass and pin.........or lose a 1/16 of an inch running it through a drum sander.I still don't know how you can deal with a full Wenge body. It must absolutely weigh a ton. I'm playing with the idea of a Wenge neck on .... simply fell in love with this picture from nuno on www.ibanez87.it

-
I'm just starting out building, but I'm sure as hell not going to post anything on here, even if it was
four star work; because if I say something wrong I may be flamed to no end, and that's just not helpful
to anybody but the 'flamers' ego.
I disagree with you. Any newbie on this site will be overloaded with good advice, and tips, when asked for. Newbies, pro's, goodwilling amatures.......that's why we are here, to show our work, and to learn from others.....because we simply love building guitars.
Being flamed has not so much to do with type of work you show on the net, but more with the attitude given when people challenge your design, or built choices.
-
it's not factory,it's autocad.
It IS factory......these are pics from an actual ESP Axxion.
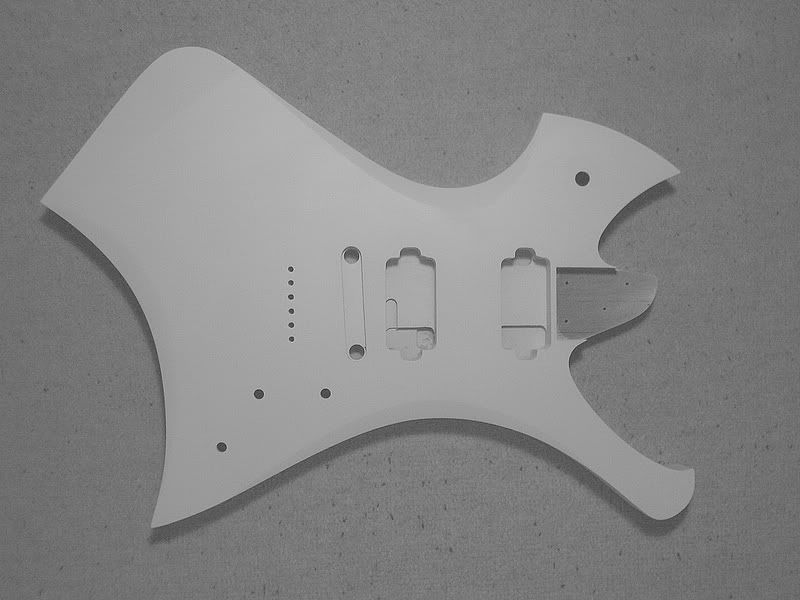
See, I'm new to the hole TOM bridge thing. On this guitar I actually will recess the TOM. (everything routed and drilled out,and looking good.) Next stage is drilling the string ferrule holes, and as I know there are plenty of ways of screwing up here....I had drawn everything out in Autocad (based on the 10.4mm string spread on this particular TOM). I did notice the 9.5mm ferrules on the back of the body are almost touching...Something like this would make more sense.
http://www.tdpri.com/build_gifs/BIG/1359053.jpg
When studying the actual Axxion pics I noticed the strange off-set ferrules. I was of the assumption that the strings off the TOM had to follow a parallel path....I guess I can cheat a little by waving out the ferrules a bit, have more room for sunken ferrules in the back of the body.
http://www.callahamguitars.com/ferul_g1.jpg
Will draw me Autocad design and spread them out a little. Thanks for the quick replies.
-
In process of drawing-up the string ferrule holes in Autocad. Looking at pic below (of actual ESP Axxion):

I noticed that the ferrules on the left side (bass side) are sightly out of line. Meaning looking from treble side across the TOM the strings follow a parallel path to the ferrules, on the bass side the go slightly in an angle.
Why is this?
And it's not an optical illusion, cause I have more pics from different angles showing same issue.
-
That is cutting it close. My confort zone isn't anything less then 1/4" with the jigsaw. I rather do some more Robo/hand sanding then screwing up such a nice piece of wood..I used a marker for the outline and cut slightly outside of that. However I ran into the wander factor when I cut out the horns. My goal was to leave a 1/16 to 1/8 of wood outside my actual line.On my RGT-7 build, I was even affraid using template bit on final route. I did everything by hand. Call me chicken, but with some builds you just don't want to take any risks.
I like the look of the rosewood. Have thought of doing an all wenge (body) guitar....but just testing the body wood at the woodsupplier just nearly broke my back.
Do you have a separate template for those? That's what I had to do on my jem project.Isn't that the fun of guitar building.....all those darn templates. If you take shape/type you already have templates completed, you sometimes wonder why things are moving along so fast......oh, right.....not spending 80% of time building those darn templates.


Been Away For A While But Look What I Have
in In Progress and Finished Work
Posted
A story without pictures, is just a boring story!!!