


aidlook
-
Posts
584 -
Joined
-
Last visited
-
Days Won
3
Content Type
Profiles
News and Information
Tutorials
Product Reviews
Supplier Listings
Articles
Guitar Of The Month
Links and Resources
Forums
Gallery
Downloads
Posts posted by aidlook
-
-
You would want to run all grounds to the back of a pot, including the copper foil one, then run a cable from the back of the pot to the bridge.
-
Ok, from you replies it seems like there is really some really really basic understanding of guitar amps that is lacking. Start by just reading up on what guitar amps are, what they do, and what the different types do. It's a pretty good idea to know exactly what it is you're building if you want to build something.
-
One mans garbage, another mans gold. '66 Mustang neck mated to a Mighty Mite mahogany Strat body. Got them in pices from a guy about 25 years ago in exchange for an old Goya (SUCKER).
If that was a Goya as in the Hagstroms sold in the US, I wouldn't really call the guy a sucker...
-
Herman Li doesn't incorperate, Jazz and blues in solos like other players from progressive bands do,
So progressive means doing what all the other dudes are doing?
anyway only thing I ever heard from dragonforce where the already mentioned parody videos from youtube
-
you already mentioned a fishman bridge, why don't you try one of them
-
Am I the only one who sees Jabba the Hutt's face on the bottom half of the guitar?
-
I think you have a lot of reading to do. If you ask what kind of amp you could build based on a speaker you have, there is some fundamentals that are clearly missing.
Do a couple of weeks hard studying and you'll probably find your answer, google is your friend. There are also better forums than this one for tube-amp related questions.
-
..but then if everyone used epoxy he wouldn't have been able to get them off in the first place

-
1. I will admit that Stockholm is far superior to Gothenburg
2. well....I like the design and will hopefully start my first acoustic in a not too distant future.
-
The main difference is the gauge
-
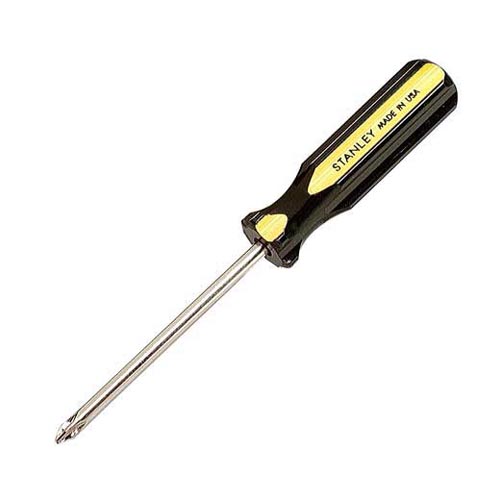
Ok guide:
First thing you will need is a couple of screwdrivers, they generally look something like this:
Now get an overview of your pickguard, do you see any screws? Screws are what hold the pickguard tight against the body. These need to be "unscrewed" to remove the pickguard from the body.
The screws are most likely phillips type screws, so make shure your screwdriver is of the same type. The screwdriver also needs to be the right size, and since there are probably at least two types of screws on your pickguard (the pickups are also fastened with screws, but of a different type). Screws are the little metal things with slots on the heads, these correspond to the tip of the screwdriver wich will enable you to unscrew them. Here is a picture of a screw:

Step 0: Remove the strings
This step is not necessary, but will save you and the guitar a lot of pain. If you do not know how to take the strings off, google it or have a proffesional do it for you.
Step 1: Loosening of the pickguard
To loosen a screw, hold the tip of the screwdriver firmly pressed against the slots on the top of the screw's head. Then, while pressing firmly, rotate the screwdriver in a counter-clockwise motion. When the screw is unscrewed it can safely be removed from the guitar by hand. Put the screw away in a safe place where it won't be lost. Now repeat this step for all the screws holding the pickguard down around it's perimeter.
When all screws have been safely removed, you can feel that the pickguard has come loose.
CAUTION Do not remove pickguard before completing step 2 CAUTION
Step 2: Loosening of the pickups
If you do not want to damage your electronics you have to remove the pickups from the pickguard before fully removing the pickguard. Here's a picture of a pick-up:

The pickup is also held down by a set of screws and some springs. Here is a picture of some springs:

When the pickup is fully unscrewed the springs will come loose, so you have to keep an eye on these buggars because you don't want to lose them.
Step 3: Removing the pickups from the pickguard
When the screws are fully unscrewed the pickups can be removed from the pickguard.
Step 4: Removing the pickguard from the body
You are now probably holding the pickguard in your hand, put it away.
Step 5: Putting the new pickguard on the body
Take the new pickguard and place it on the front of the guitars body, making shure the screw holes match up, if they don't bring out the drill or slap yourself and buy a pickguard that fits.
When you've checked that it matches the body or put a couple of extra holes in it, it's time to put the pickups on the new pickguard. Do this just like taking them off the old one, except this time turn the screwdriver clockwise. After the pickups are fitted it's time to screw the pickguard to the body of the guitar. This is done exactly like unscrewing them, except this time also in a clockwise motion.
Step 6: Put the strings back on and play
-
...and even if it was, it's easy enough for anyone to do.
-
My original plan was to build a body and buy a neck to go with it. Everybody on here encouraged me to build my own neck, and I'm very glad that I did! It has been the most rewarding part of the build, and not nearly as difficult as I expected. I say build the whole thing yourself!
+1
Also very happy I went ahead and built a neck on the first build. I actually bougth one of the saga kits first because I thought It'd be a great start. Turned out to not be very pleasing at all, you don't really do anything. I you want to learn how to assemble a guitar, just unscrew every screw on one you already own and put it back together again, much cheaper.
I was only gonna build a body for my first guitar, but then I didn't plan very well when cutting the body and realised I had to make a set neck as well. Turned out to be so much easier than I originally thought, and 10x as rewarding.
-
Is the reason you want it simpler to make it simpler to wire?...because it's pretty straight forward once you see the actual switches, just lay them out and connect all the wires as shown in the picture...piss easy
-
What supplier did you get that piece of wenge from btw?
-
...insulate against what? If it's for a wire, just stick a wire (already coated with, y'know, insulation) in it.
Unfortunately, it's not that simple. The inside of the actual tube has to be insulated. Like I said it is difficult to explain.
Well opposite heat shrink is not likely to happen, so if you could at least try to explain the dilemma you might get some alternative ideas.
Heat shrink is basically a polymer (like PVC) being cold drawn to a bigger size. When this is later heated up it can shrink 80-90% of the original deformation. It only works one way, and it works because of the great deformations the polymer can return from.
The solution you're looking for doesn't most likely exist, so the quickest way of solving the problem is to just let it go and find an alternative route.
-
What are you going to use it for?
-
I'd reccomend you to try and do it yourself first. It's quite simple and if you mess up, you can always spend the money to get the pro to do it for you if you don't manage it.
-
Perry...maybe there's a business opportunity for you to make bolt on replacement headstocks, or headstocks for headless guitars
-
Not to be a smart a$$, but there is doing your homework, and doing your homework correctly. The methods on installing truss rods and how to make fretboards are some of the basic principles. While routing the truss rod channel is not overly simple, it is not overly difficult either. You just need to know what style truss rod you have and what type of channel it needs. If your homework has revealed that information to you, then you need to find better sources. Like said before, get Melvyn Hiscock's book. It will tell you everything you need to know.
ok?
I think what everyone's really trying to tell you is that you probably haven't really studied enough (even if you seem to want to think you have, it's obvious to the people who have "done their homework" that you haven't) . You've made the decision to build your own guitar wich is a great step into a very rewarding hobby. Now it takes a lot of studying to get the concepts right. The information you're seeking is definitely on the main site (we all know this because most of us have built our first guitars at some point, and most of us got the information there). Now read all the tutorials on neck making and use the search function to look up threads where it is also explained. The easiest way is probably to just get Hiscocks book for 20 bucks (not a very big invesment in money, but a huge investment in knowledge). In there all your questions will be answered. If you don't wanna get the book, fine you can do without it, I completed my first two builds with information only found on this site.
Welcome to the forum btw
-
I did a finish pretty similar to that on ash, but red. Mixed in black/dark brown with the pore filler and shot a couple of red tinted layers of clear after sanding sealer, turned out great (but my photos never do).
-
Soldering irons are pretty cheap. If you buy one, you can fix it yourself AND you can do mods to guitars, amps, etc!
Hmmmm, I'd be just a little more careful with that statement, Geo. There's a long way from getting a soldering iron to being able to mod a guitar or an amp.
Besides, without enough knowledge modding a guitar can maybe ruin it, but modding an amp can potentially ruin your health....
I'd say modding the guitar is easy enough that pretty much anyone could do it without previous knowledge, íf they had the wiring diagram and took 10 seconds to figure out where the wires go...
-
still would have reccomended doing it yourself for pretty much the same cost, and you get to keep the tools!
-
Definately solidworks out of those alternatives. Always made the most sense to me and has a very nice graphic layout. It's real easy to learn as well.

Started Building Some Pedals
in In Progress and Finished Work
Posted
I've spent christmas in Australia and too keep myself busy I've started building stompboxes. I've built a byoc tube screamer earlier, but this time I'm doing it from scratch etching the pcb's and all.
This is the first one I built, it's a simple treble booster, haven't tried it out with a tube amp here, but it makes the cheap practise amp I have over here sound surprisingly good.
Finished it really simple with a beat-up kinda look, but the most important part is that it goes to 11!
After that I got working on a compressor wich is pretty much finished, except for an IC wich I'm waiting for to arrive.
Also need to put it in a box but if someone's interested I have a shot of the populated pcb.
Compressor
The latest project is a phaser wich is completely finished except for some IC's I'm waiting for for this one as well.
I'm just gonna have to come up with a paint scheme for the box as well but here it is as it looks now.
Inside