


Neven
-
Posts
105 -
Joined
-
Last visited
-
Days Won
1
Content Type
Profiles
News and Information
Tutorials
Product Reviews
Supplier Listings
Articles
Guitar Of The Month
Links and Resources
Forums
Gallery
Downloads
Posts posted by Neven
-
-
Hey Steve,
here's how I do it. By using 3M pinstripe masking tape (3mm width) I mask of the edge of the top that I'm gonna dye, the tape goes ON the top, not on the bevel/binding/whatever. I'm using pinstripe tape because it's flexible when doing curves, it's not made of paper but od some sort of plastic. When I finish with 3mm tape, I put at least one more round with 3M blue masking tape (20-22mm or so) so I can be more relaxed when using lacquer in the next stage.
So, when the top is masked off nicely with precise edge and curves, I take a clean cotton rag and damp it a little into my 2K lacquer, and wipe it over the plain wood (binding, or in your case bevels) in 2-3 thin layers. Lacquer soaks in the wood and dries quickly, leaving the fine, precise line between the bevels and the untouched top. Then I do dhe dyeing. If some dye goes on the lacquer, I clean it in no time with a clean rag slightly dampened with acetone or nitro thinner. The dye doesn't soak the wood that is lacquered because the pores are sealed.
By using this method, I get a nice crisp line without a problem. Here's the latest example - dyed top and sides, and a natural maple faux binding.
I hope it helps.

-
44 minutes ago, Liquorice said:
I was planning to use in next gluejoint some kind of bolts that go through the whole thing and then just lift them out after clamping.
imho, no need for bolts and stuff, you don't need that much, and they can get in the way for clamping. As I wrote, I use just 4 nails, in equally sized holes (it is mportant, because if the holes are a bit larger, it would be enough for a joint to slip, and if you are using laminates which you want aligned, a little slip means a lot). 2 nails are not enough, 4 is ok if they are placed strategically (not to close to one another)
QuoteAbout fretboard gluing, I haven´t done that yet at all. I was thinking about it ofcourse and planned to pin fretboard from locking nut screwholes and from body end, there is extra wood that I can cut off.
.For fingerboards, in my practice, it's quite ok to do it the same way as for scarf joints. I put 4 nails through the fretslots, close to the truss rod (watch out for the depth, not to go through the neck. 4-5 mm in neck is enough to hold it from moving, and it won't show off when you finally shape the neck. The frets will hide the holes for nails later on. Example on the picture, 18th fret, and also 2 nails around frets 2-3.

Also, very important to me, for having a seamless glue line as a result, is to spread the clamp pressure evenly. I use 2 flat maple pieces (the nails come between them), set to the neck outline. If I would use just clamps without additional boards, I could get glue pockets between fingerboard and neck, which would end up showing with untidy glue line.
 Quote
QuoteNeven you seem to have worked a lot with ash, I have few ash bodies also. I´m not totally sure what kind of scratches will show in finished guitar body, because I haven´t finished that kind of wood yet. It seems that specially endgrain parts are showing those scratches pretty easily. Finish is going to be some kind of clearcoat, I have a bottle of truoil so maybe start with that.
Ofcourse advice from anyone willing to share is taken with gratitude.
I have sanded and then scraped to see what it looks like and then sanded again and so on... Is this method going to take me anywhere ? Can I finish on scraped surface or does it have to be a little coarse from sanding ?
I did work with ash. If scratches show in finished body (no matter what wood it is), it means it wasn't sanded right. You should sand gradually from coarser to finer paper grits. I have a small wood planer/thicknesser, so I don't need to do a lot of sanding to board faces (guitar front/back). For sides, I used a sanding drum on a drill press; and recently I acquired a spindle sander with different size drums, which should help me a lot. I start with 100 grit until I remove bandsaw trails and get to shape, and then switch to 150/180/220/280 or so by hand, until I remove marks from coarser drum sanding. I rarely use scraper at all, somewhat on neck shaping.
If by "scratches" in ash you also mean wood pores, sanding alone won't get you anywhere. Ash has pretty wide pores, and if you don't want them to show in the finish, you have to use some kind of pore filling process. No bare wood sanding will ever take them away.
This is what ash without pore filler would look like after painting (perfectly sanded):
-
29 minutes ago, Liquorice said:
When rotating tunerline do you redraw the whole headstock ?
Yes, you have to make adjustments to it also, because you "have to" follow the angle of tuners in regards to centerline. But with using computer it is not hard to do, I'm using CorelDraw, and it is pretty easy to adjust curves, and you can use the original photo as a background image, so you don't wander to far off. Sometimes it is enough to just move the tip of the headstock a few mm, end it ends up hardly noticable in overall design, but it suits the purpose.
QuoteWhen I was glueing scarf joints on my necks everything went well but at some point those headstocks shifted a little and had to be separated. I was affraid of reglueing those necks and sure did learn a lot about glueing wood.
Been there... When gluing scarf joints, I use a bit wider blanks for neck and headstock. I set them up dry first (without glue, using clamps). Then I drill a few 2mm holes in the waste area (that would be cut off as excess later) and put 2mm nails in them to keep the wood from shifting in gluing process. Just as you would use pins when gluing fingerboard to neck. 4 pins is enough to keep the wood from shifting, just be careful to put them outside of the lines, and to take the nails out before proceeding to bandsaw or whatever tool you are going to use after. I tried lots of different methods so far, but this one works quick, and I don't have to worry about shifting anymore, if I plan carefully. I, as many, learned a lot from mistakes I have done before, and learned to (more or less) foresee what might happen if I do things one way or another. And that goes mostly because I spend a lot of time thinking and imagining the building process in my spare time (for example, when I go to sleep, instead of counting sheeps, I'm imagining the routing, or sawing or whatever step I'm planning to do next, and thinking of ways I could use to do it).
Don't let mistakes throw you off. We all made them, and still do. They are a big and important part of learning process. The bigger mistake, the better lesson learned.
-
Hard to tell exactly from the photos, and probably because it misses a part between the nut and a retainer bar, but the one one left should have the tuners rotated clockwise more than they are now.
Looks like the string pull on thickest strings would end up getting inwards, to the centerline. I once threw away a nice flamed maple neck (finished and fretted) because I didn't consider that doing the wider nut would do that. It was functional, but looked too weird to me, and I couldn't accept keeping it like that. You should always draw the outer strings also (at least), to know what would it look like in the end, the centerline is not enough if you are gonna experiment with photos, nut width, etc.
Here's one of my blueprints, (based on Ibanez, not exact replica) but keep in mind that the nut is a bit wider, and the tuners measurements are for the ones I used in a project.
If the nut was narrower, the tuners would be rotated a bit clockwise in the drawing (or counterclockwise for non-reverse headstock). Also, if tuners had larger knobs, you would need more space between tuner holes, which would also end up with rotating them clockwise (or counterclockwise for non-reverse headstock), and a few mm longer headstock.
In the end, small alterations in design doesn't have to mean in wouldn't be functional. I lost probably hours tweaking this one to my liking, and it probably could be even more precise, but it works great for me.
If you want, I can help you with your blueprint, just send me your neck-to-be specs.
Mods, if the picture is inappropriate, please delete, thank you.

-
 1
1
-
-
If you guys think I should upload better res photos, just say... I hate to waste others space, so I always lower the quality for faster download, but I think it shouldn't be that much of a problem anymore for most users? I see now they are really poor in a browser...
-
A few more details:


-
3
-
-
Hi everyone!
I have a few minutes today for a quick update.
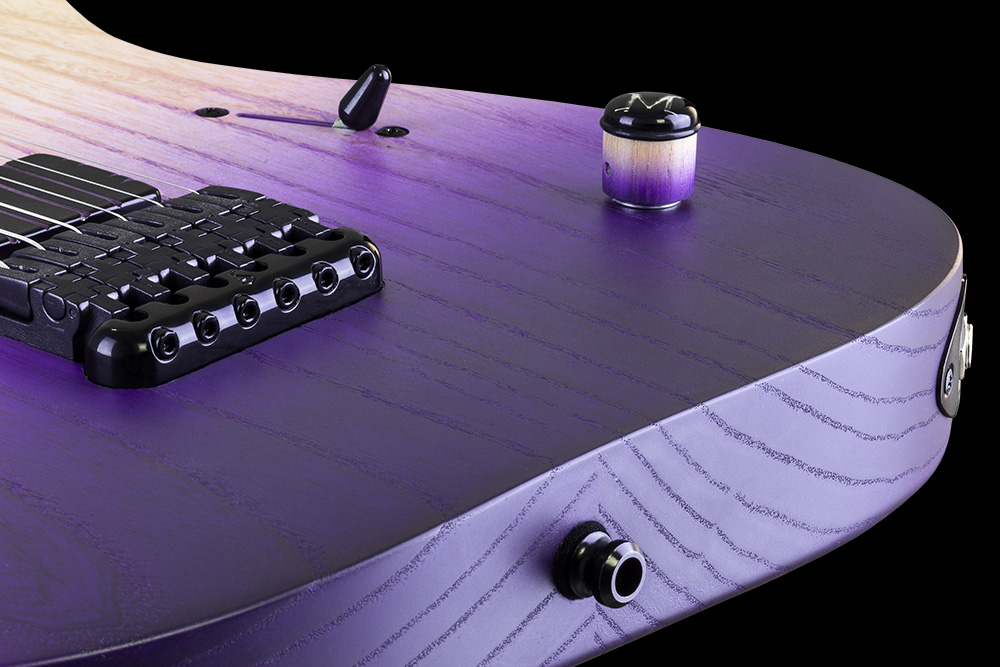
Didn't have time to waste last few months, so again I wasn't concentrated on taking pics much, so I'll just put up a finished guitar.
I like this one a lot, it's so easy to play on it, it's effortless. It doesn't seem them most ergonomic guitar, but the design really impressed me with how it rests while in sitting position.
The woods used are, ash for body, and maple/wenge for neck/fingerboard. Orange ABS for inlays and binding, vinyl decals on body and headstock underneath 2k matte poly. Seymour Duncan Blackout on bridge, extra jumbo frets, Grover tuners.
This one took me 2 months, start to finish, so I guess I'm improving

So, here it is, sorry again for the lack of progress photos. Will try better next time..


-
I have a few more, but it's late now, and school begins tomorrow for my son, so gotta go for tonight...
I hope to upload tomorrow..
cheers
-
And here's one of my older builds, I've refinished this one countless times, made a new neck for it last year...
Also my build from scratch, sapele body/maple & sapele neck/wenge fingerboard; EMG 707s, 26,5'' scale...
Always loved JPM Ibby, so after not knowing anymore how to finish this one, it just appeared to me one day - so here it is.
Build pics got lost somewhere these years


-
1
-
-
You can probably notice all the differences made, so I guess I don't have to point them out more.
But if anyone likes to discuss anything or have any questions, I'll be happy to answer.


Here it is prior to finishing


And for finishing, I masked off natural maple top as a binding, dyed the top with a rag, and shot layers of matte 2K poly until I had a nice flat finsih with closed pores on mahogany. With sanding between layers, of course.
First I put in it some v7/V8 humbuckers with plastic covers, but soon acquired EMGs 60/85. I still plan to change knobs (those speed knobs are really sticking high from the body) and plastic swith plate (to cream); and also have to relocate the high e tuner 2mm closer to the edge (accidentaly hit the back button when drawing tuner locations in CorelDraw, so my tuner hole moved, and I didn't notice it until something seemed off when I was mounting tuners).


-
Hey guys,
been a while since my last update...
Been really busy with my regular job, some work at home etc, but I didn't forget to make a mess at my workshop
I started a few builds at a time, so they are all in different stages now, I switch between builds when I get bored, to keep interest in building. I also gave some attention to some older builds and brought them near completion. Altogether, I did a lot of work while I wasn't updating...
I was lazy only at documenting my builds, so my topic still cannot really help as a tutorial to anything, but I still believe a few of you might like to see some photos.
I'll begin with the one I started building last, and finished first, really quickly (if I may say so myself, considering my builds usually go on for few years - but hey, no one's waiting for them anyway).
It is based on a familiar design, but it wouldn't be me if I didn't change some specs to my appeal...
So, I'll call it a LesPaul, even though purist would probably hang me for that.
I did it as a 25,5" scale, 24 frets, a lot gentler curvature of the top, wider nut, laminated and bolted on neck, scarf joint, and so on...
I got a board (for at least 4 bodies) of mahogany from my friend after his dad passed, the board was laying in his workshop for some 30 years at least.
I cut a 1 piece for the body, and weight relieved it, and then glued 2 piece bookmatched maple top with some really shy flames.


Then, of course, missed taking photos for a while


-
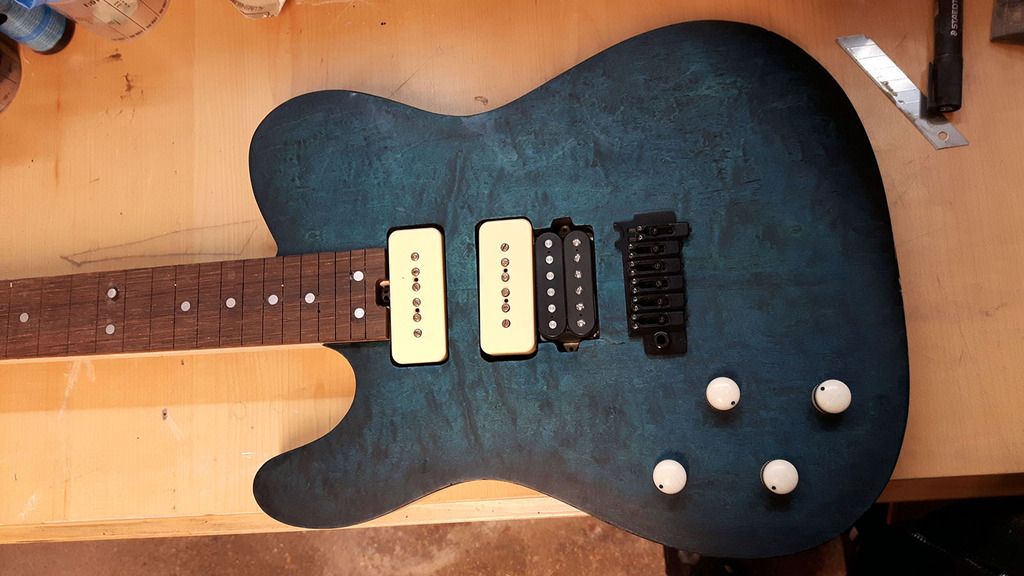
Well, the Tele is not wired yet, we're waiting for both of us to have the same day off from work, to do some adjustments and wiring.
The basic idea was to have P90s as an independent system, classic LP wiring scheme, except the bridge pickup is moved more towards neck to make place for bridge humbucker, which is wired directly to output jack, no pots or whatever (but we might use one volume for it though, we'll see). Switching between the two circuits will be selected using mini switch, and the big 3way toggle is for the P90s.
It looks simple but building this one was really a challenge, and even though I prepared myself with all kinds of drawings and blueprints, it still gave me a lot of hard times, and I had to do so much tweaking on the way. That's why there were changes of veneers, colors etc. That's why there was veneer in the first place. But it all ended ok, I guess. It is (sort of) a prototype after all, and time will tell if we got it right or not. There's always an option to start a new one
-
And here is the one I made for my friend Goran. It still needs sime fine adjustments, wiring, and cavity covers, but here it is put together for a tryout
You'll probably notice I've put different veneer on the body and headstock, and a different color scheme. I would like it better if we did a burst on the sides, because I had a few spots where stain got sunk deep in the endgrain, but Goran didn't mind it, so we left it like this.


-
3
-
-
-
The blue RG on the last photo is the one I made a new neck for...
Finally I have finished it, but I'm still deciding should I refinish it. Maple top is so nicely figured, but the finish got darker and the flame is showing ok on daylight, but when inside, it so dark it almost doesn't show... I'm thinking about lighter shade of blue.
Here are some photos.


-
-
Hey guys!
Sorry for such a long break from posting here; I'm so busy at my daily job and I've been working for weekends and almost every holiday since January, so I didn't have much spare time. But the time I had, I rather spent working on guitars then siting at computer.
Not much progress photos to share, but I have better ones - finished guitars
")
I'll start with my favorite ever, my Regius...


-
1
-
-
if you have spare wood, why don't you just glue one more headstock plate over this one?
That way, the piece that is now a headstock, would become scarf laminate layer, and it would give you more than enough neck length.
No need for heel extensions. You have more than enough neck with, so I would just move the scarf a little further this way.
You already have the neck angle, so just glue one more flat piece to your headstock and there you go. Easy Fix. It just has to be long enough to compensate for the angle.
If it's hard to understand what I mean, I'll draw it, no problem.
-
Again, missing a pic of neck pocket routing setup.
But, I've got a nice tight fit. I drilled the holes through neck and body, for neck bolts and inserts


And finally, I drilled most of electronics cavity using forstner bit on a pillar drill, and I carved the back using rasps and sandpaper.
I left spare ferrules and bolts in the holes, so I dont cut to deep while rasping. I tried to get them flush with the carve.
Before I started doing that, I have to route a few ferrules deeper (various depths)


-
Ok, next we have a neck blank made of wenge and maple strips.
I 've cut a scarf joint, and glued wenge headstock with a 6mm maple in between for a visual contrast


I used maple top leftovers to make a headstock cap


Then I thinned the headstock back to 15mm, and drilled holes for tuners i'm quite happy with how the headstock back grain looks, because I glued ears on both sides. Grain matched quite nicely..


-
Here's also another project I've been working on at the same time.
Obviously, it is highly influenced by Mayones regius, but still I have changed enough details to make it different.
The biggest diferences are: bolt on instead of neck thru, no bindings, different top shape, different electronics cavity, and so on.
But the outlines are there, and i tried to make the back contours as similar as I could, keeping in mind that I never have seen one in person, and that countours are hard to duplicate by just looking at the photos on internet.
Here are my drawings


I have Ash stock enough for 10 bodies maybe, so it was an obvios choice. I picked two blanks that would look nice on the back, and glued them together, and cut to shape afterwards. Front side ain't so pretty, but it will be covered with a top, so it doesn't matter really..


I had some 12mm thick bookmatched flame maple for top,


Centerlines got nicely lined up at the neck end, but sadly got a bit off a the rear while clamping.


And here's back with rounded edges

-
Where were we...?
I didn't post updates in a while, but I wasn't lazy. I waited until I had something to show, didn't bother to post small steps after each occasion.
So, I started the back contour... I'm still gonna make it a bit larger.

I started making neck profile. I'm not sure why i don't see more people use this method, because I find it quickest and easiest to get consistent profile. Basically, i take most of the wood away with router on a thicknessing jig, using a 45 degree bit, ending with a profile like this:

Then I shim the neck under the nut end, with a 2-3mm shim, and take off the thickness to roughly 21-22 mm at the first fret, and 23-24mm around 17th fret. Picture missing here, but I believe you can visualise it
Then I take the rest off using sharp rasps ant finishing on a belt sander.
Roughly sanded neck looks like this (also showing inserts for neck bolts here)


Then I installed frets, cut them to rough size first, pressed them in using my corian radiusing block and a clamp. Again missing mid-process pics here, I just shoot photos here and there to send updates to the next owner, sorry...


I just ground the frets on a stationary disc sander, it allows a lot of control and it takes just 1-2 minutes to ground them to the wood nicely... then I do the bevel freehanded on a belt sander, and then quickly soften the ends up with a 500grit sanding sponge.
Of course there is a lot of sanding and touch-ups left to do, but this is my method to quickly come close to the finish.
Here's also headstock shot, with drilled tuner holes. I'll have to repair the stain a bit after I fine sand the edges...


And finally, here's a pickguard I came up with...
Since P90 cavities ended up slightly larger than goran likes, and especially because he decided to take off the p90 covers, we had to make a pickguard to make the gaps little less eye-catching. Don't have a mockup shot at the moment, but here's the design:

We still might end up doing something about the p90's, because they have a hairline crack in plastic between the poles.
I'm thing about thin wooden bobbin toppers, or something like that. We'll see..
-
15 minutes ago, Prostheta said:
Well I'm really sick right now so hey! Your marking up is awesome. One of my favourite things to do.
I don't mind getting sick once in a while
I get to sleep on the couch, away from my wife and my kid, so it usually means a lot of Playstation4 and watching tv shows I usually don't have time for. I watched third season of the Vikings and started Metal Gear Solid: Phantom Pain on my PS4, so adding that to guitar building in my spare time, I'm quite happy with how Year 2016 started. I feel like i felt 15-20 years ago, so I guess all is well
-
And the last post for today...
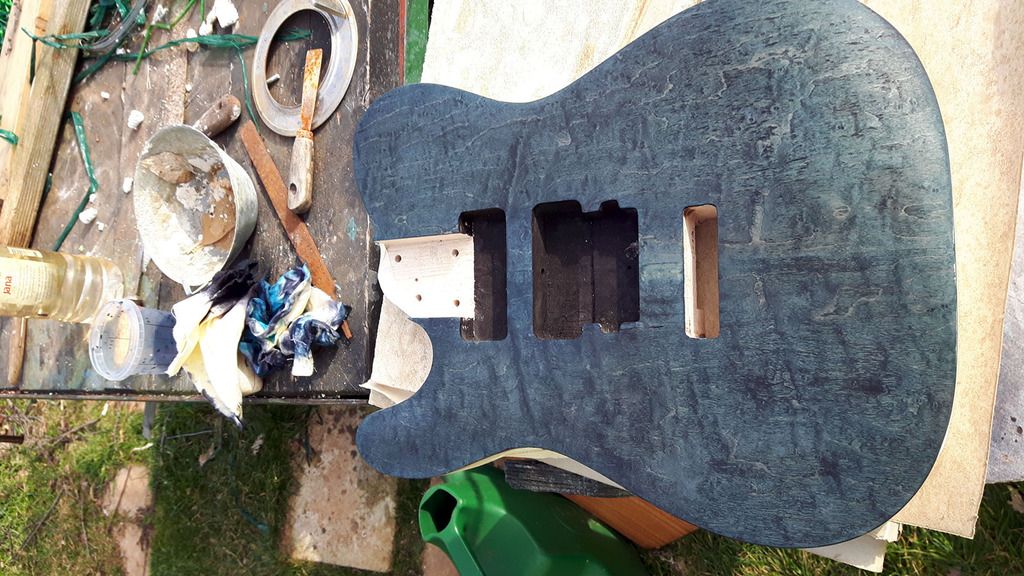
I started staining wit a mixture of black and a bit of cyan, and washed that away with a rag soaked in homemade alcohol brew
I don't use guitar building dyes, instead I bought a few bottles of Epson printer refill inks. I figured if it stayes on paper, which is made of wood, it will stain the wood itself. And it works quite well.
I then added more of cyan, and also did a slight burst
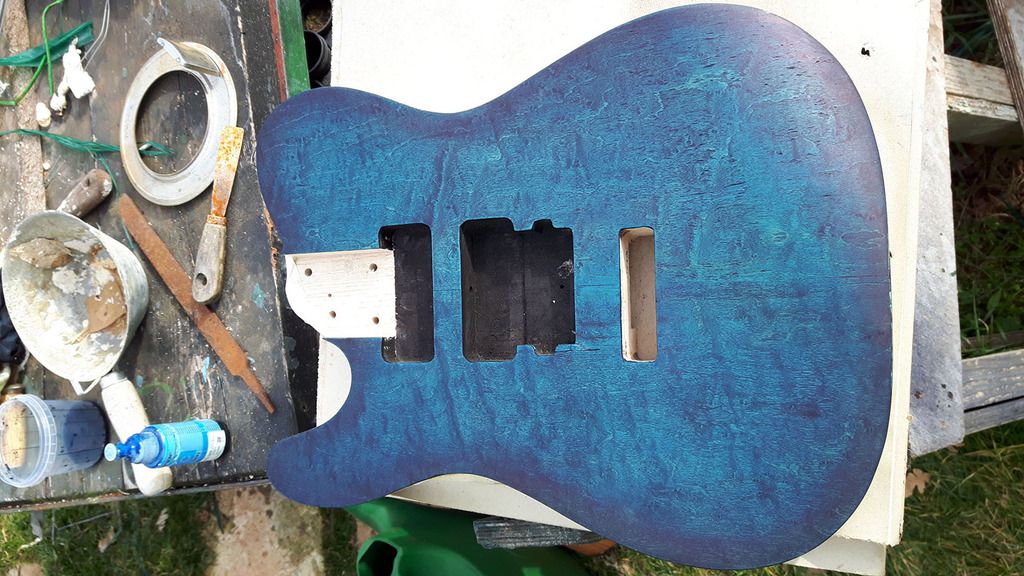
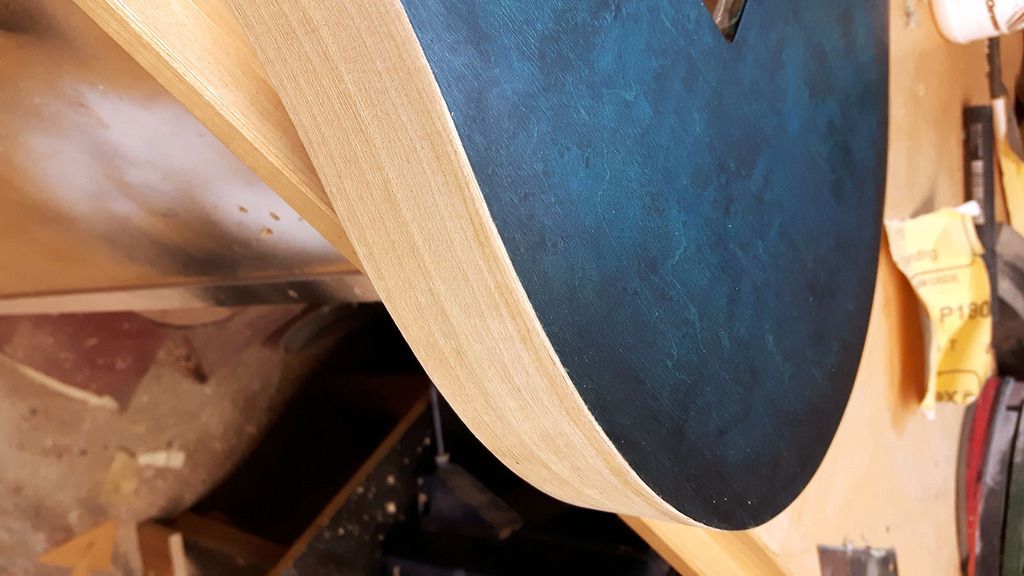
And when everything was dry, I soaked a rag in 2K poly (matte) and wiped it on the front, to seal everything, so I can continue to work on the guitar. The darker part on the butt is my reflection in wet lacquer.
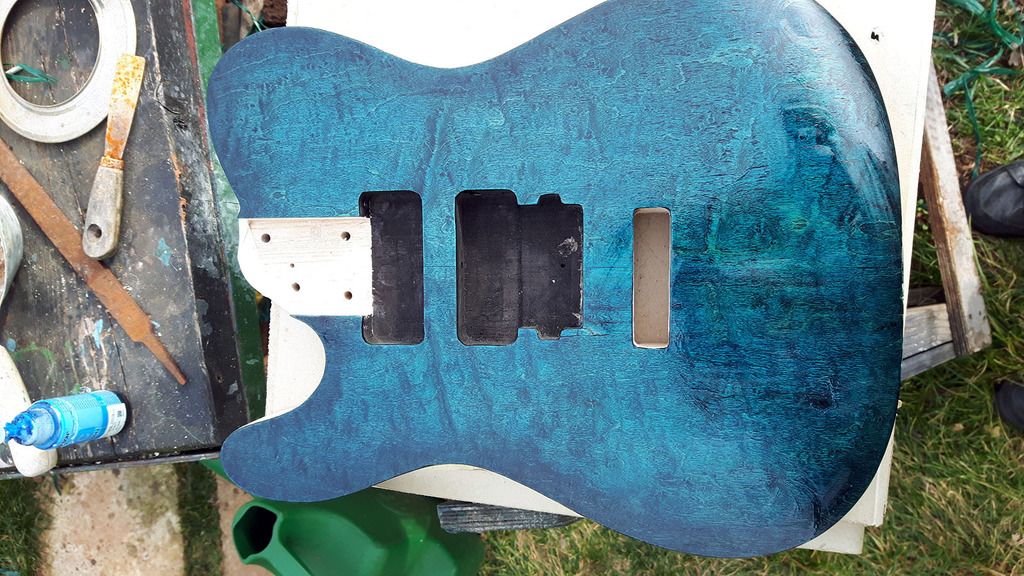
Here's mockup photo
And also one photo of the cleaned edge. Body edge and tha back is not yet going to be lacquered, I still have to do some work on it.
The plan is to leave it natural (if nothing else goes wrong). I'd like to do glossy front and thin satin back/sides, without any grainfilling, but will see how it wil all go from here.
-
3
-


Lumberjack’s first build on Project Guitar
in In Progress and Finished Work
Posted
About the wormhole, I believe I had the same worm a few times myself.. I believe that's the hole you drilled too deep for fingerboard locating pin. You had a nice save, it is not that noticeable any more. I screwed up a few necks trying to hide those holes, but fubared them and had to do complete new necks because of it
You have a great build going on, good luck to you finishing it up