


Narcissism
-
Posts
672 -
Joined
-
Last visited
Content Type
Profiles
News and Information
Tutorials
Product Reviews
Supplier Listings
Articles
Guitar Of The Month
Links and Resources
Forums
Gallery
Downloads
Posts posted by Narcissism
-
-
did you manage to get that bubble to go away? I couldnt see it in the pix or video.
-
If the rest of the cavity is on target, then i'd say go ahead and fill the post holes with a dowel and drill new ones. If the alignment is off on the entire route, then i'm just going to wait for someone else to answer, because I don't have experience with correcting larger mistakes.
-
Sweet, i can just watch you instead of going through test pieces!
:popcorn:
-
I like the idea with the rubber bands. Having no actual fretting experience, he explained something that I didn't even think about which is the back-bow from driving the frets in. I also like how he used one mallet to hit the other mallet. Obviously different techniques will work with different situations, but I really did enjoy watching that. Old people rock at explaining things.
-
Poly really shouldn't be sanded until after at least a day... If it doesn't feel like an expensive glossed over table, then chances are that it isn't dry yet. I normally do 2 days between coats, just to make sure. Even if the coats are thin and your poly says (cures in under 2 hours) you should still give it at least 24 hours before treating it like its solid. I stood mine up verticle after 4-8 hours, and a few hours later i noticed it was developing waves on it. Turns out it was very slowly running.
-
If you look at the part on my bass thread where I started finishing it, you can see a definate difference between when I dyed it, and when I put clear over it. The mahogany went from a light brown to a deep red, and all the crap brown burst turned into whatever it is you see after (sorry i'm colorblind). My dye is water based, so when I initially prepped the surface with water, and then started adding the dye, I could see roughly what it was going to look like once I added clear. After I let it dry, I prepped the surface with water again and added more dye accordingly to darken up all the light spots. Sooooooooooo I think the pink will turn red after you clear it (if you clear it)
-
...and I'm sure people who aren't on the PG boards or "in the know" about the Australian luthierie (sp?) scene will attribute it to someone else anyways

@Narcissism: Perry mentioned the offset scalloping in a thread a while ago, as well as in one of his video tutorials. It basically boiled down to why put scallops on parts of the fretboard that you're not going to need it on anyways? A take-away-as-little-wood-as-necessary thing.
I never really saw any of Perry's stuff outside of PG, so that's probably why I missed it.
Narcissism: The scalloping allows smoother and easier bending in the upper register without the fingers fouling on the fingerboard. Less power has to be put behind the bends, and they're more consistent since you're not compensating for the fingerboard getting in the way by pushing harder. This also promotes light touch.Actually, I have a scalloped guitar, and I scalloped it for the reasons you posted. What I was confused about was why you were carving them out at different lengths across the fretboard. It makes sense now that Xanthus explained that part, but the other advantage I noticed is that it'll probably be a lot easier to refret if you need to.
Thank you both for the explination!
-
How about those Nicholson rasp/chisel combos? Those are weird tools. The rasp gets in the way of chiseling, and you can't hold both ends of the rasp because one ends a chisel, and you only have a couple of inches of rasp... I can actually see them being useful for rough framing or something like that; but for 90% of the jobs I use either of those tools for, it'd be just so much more useful to have a dedicated tool...
lol, i have that thing. I used it for a lot of the contouring work with quite a bit of success. The rasp part of it for me was pretty useless though.
I use a sewing needle to pop any bubbles that show up when I brush on a coat of poly. I'm sure a propane torch is a better idea for that, but I don't have one, and after I set snow on fire while using a propane torch during my snowmaking years, I'm afraid of setting my porch on fire.
-
I dont think its fair that EVERYONE gives credit to Mr. Ormsby for that "idea". Ive know luthiers who did that WAY before Perry became popular. It just wasnt thought of or known as well.
True, but Jake Carpenter didn't invent the snowboard, and Shakespeare didn't write Hamlet. I think its a case of whoever made it popular. In this case, Mr. Ormsby has copyrighted the word "multiscale" which leads most of us into pointing the idea at him.
I've never seen the offset scalloping though. I don't really see any use for it other than cosmetic. It does look nice.
-
I used a drum stick wrapped in sand paper to do most of my contouring. Its not really strange as much as it is ironic.
-
Today I decided "Hey, 5 coats of poly is enough to start sanding away that grain texture that's on the poly!"
So now I've sanded through in a few spots. The dye fixed it, but let it be known that 5 coats of brushed on poly is not enough
I would have used grain filler, but I really want it to be clean and clear, and I like the natural black mahogany grain. I guess epoxy would have worked, but at least the spot I sanded is nice and smooth now. I'll try again at 8 coats. -
Well now I know
Thanks everyone! -
This is NOT an epiphany- most of us already knew this. (I would hope) I dont know if it's really worthy of the "mistakes to avoid thread- Havent you ever seen a catalog with a guitar with an angled Tunomatic and wonder *WHY*? Now you know.
*shrugs* I've never really looked at or played a guitar with a tune-o-matic bridge. I'm also building a bass... cuz I'm a bassist... not a guitarist...
I'm assuming there's someone (perhaps several) out there who are probably in the same situation I'm in.
-
I like your threads Drak! And the woods are just beautiful. I think I read earlier that you just look for potential in all woods with any kind of figure. I can see where you can find some pretty stuff for cheap if its only partially figured, and how you can work that partial figure to your advantage.
btw, what kind of camera are you using? Its getting some pretty sweet low light shots, and I noticed you're not using a flash in most of your pics... unless you are using a bounce flash or something like that....
-
The scale length is always a measurement of the string lenght before intonation
Someone should like... write that down somewhere... I'm assuming its in that book that everyone here keeps talking about that I should buy and read.
I'm going to paste that in the "what mistakes to avoid" thread if you don't mind.
-
I just went to the fret calculator, and the 12th fret is exactly 17" away from the nutface, and the 24th fret is in fact 25.5". These results are from a 34" scale with 24 frets entered in.
I use 11s on my guitars, so I'll check up on that, assuming you're using something like 8s or 9s... Actually scratch that. My guitar's got floyd bridge post issues, so it wouldn't be accurate... and those bridge post issues may have something to do with the 5 springs on the spring claw and the heavy guage strings...
Aside from floyd rose issues, I'm assuming what you're saying is fact, rather than experience, since I know you (wes) don't say anything unless you know something; which I appreciate!
-
Hi
I'm posting to help others avoid my mistake. 34" doesn't actually mean 34". In actuality it means just a little over 34", or roughly 34". What I did was I measured to +-34". So now while i'm intonating my bridge on the new bass, i'm finding that it doesn't want to intonate properly because the strings aren't long enough. The neck I have is most definately a 34" scale, and same goes for all of my other 34" scale basses that I have. However, while measuring those same basses, i've come up with results that are beyond 34"
On my Ibanez GSR100 with proper intonation:
From Nutface to bridge saddle on my high G, the length of the string is 34 1/8"
From Nutface to bridge saddle on my low E, the scale length of the string is 34 3/8"
Just thought I'd let everyone know in case you're working with prefabricated necks. I'm gonna go move my bridge 3/8" back now.
Lesson learned
*note* this may not apply to all guitars. If you're building a true 34" scale and you're using the stewmac fret calculator, it may turn out right. This post is covering prefabricated necks from Carvin, Rogue, Yamaha, and two Ibanez basses.
For those who know more about this, feel free to add your input as I'm very interested.
-
I see an upside down molar with a somewhat sad/blank expression on its face in the first picture of the top burl.
-
Hmm, I didn't know anyone else here was from Burlington. I heard that there were a few people in town that build guitars, and I was wondering if they were on the forum. Cool!
Currently, my applicator of choice is a brush. I'd get a spray system, but there's no room here, I'll probably never use it, its not cheap, and overall the brush is working pretty well.
I do like my little redneck ways of doing things for now. Sure, a grinder would speed up that whole contouring process, a band saw would allow me to make a body without blade drift marks, and a table saw would allow me to make my own neck; but you know what? The fact that I've been doing this entire project with hand tools gives me a pretty good feeling of accomplishment.
-
The corvus makes me think of a Les Paul with a few triangles cut out of it.
Same goes for the katana, which makes me think of a Rhoads or standard V without the points
That last one looks like someone tried to make the Iceman more bluesy or something... with that weird looking bridge... what the hell is that? The only guitar I can see that bridge looking good on is the one that Ted Nugent plays.
Remember Alex Skolnick's Ibanez: Deamon guitars? They were just regular RG shapes flipped upside down. I thought they were hideous.
-
Someone should make one and call it... that thing that's on the end of your elbo... what's it called? Ah yes
The Weenus
So that's your vision of it and you're in, right?
If I had a band saw and a table saw, you can bet your first born I'd be in this! However, space is limited, and I'd have to use a prefab neck, which I think would give me a lot of flack if I complete it and win.
In a few years, I'll have a house and I'll give it a shot
-
Seeing the corvus turned upside down almost gives me an appreciateion for the body design lol.
-
Its been warm enough, and there's been plenty of progress on the color of this thing, so I feel like I can show you some of what I've done. They're bad pictures because they're all taken at night and the lighting is from a CFL bulb. So yeah, these pics don't do the bass any justice. I'll have nice ones when its all done.
I used some dye from stewmac to get my results. When the body was initially prepped with water, it was a lot easier to see what my results were going to look like. I started out by using the balled up t-shirt method, but ended up just going with a paintbrush. I gotta say, I'm a lot happier with the paint brush method. using sandpaper helped clean it up and look like a better fade.
Here's the body with some of the dye on it after it dried out:

I started adding poly later on. I did the first coat when it was about 35F out, so it came out pretty cloudy. Unfortunately I didn't take a picture of it, but I was pretty unhappy with the result anyway. Since it was the first coat, I wasn't too worried about sanding through with the 600 grit, as long as the dyed areas didn't get affected, which they didn't. Here's the 2nd coat done at 45F:
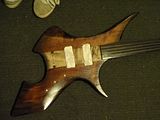
As you can kinda see, there's no cloudiness at all, but the importance of a dust free environment shows. When I sand with 600 grit, any particles of dust get swept away, but when I do my final coat, Its going to be in a dust free atmosphere, as the final coat will be pretty thick. I'm planning on putting 7 coats of poly on this thing. There are 4 right now. after about the 3rd one, I noticed that it was really starting to look like there was a piece of glass covering it. I'm pretty excited about the results!
The headstock and neck each have one coat of poly over them. The headstock is looking ugly, so I'm going to hold off for a bit until I figure out what I want to do with it. The neck came out pretty sweet though. I'd like to put one or two more coats of poly on it before I show off any pics though.
When I do this, btw, I do about a week between coats. The reasoning behind that isn't because of the timing. Heck, i'd do it every 3 days if i could. Unfortunately New England weather likes to change daily. So the following week after it was 50F, it would be down to -9F or some crap like that. Its a long process, but I'm glad I'm taking my time!
-
Someone should make one and call it... that thing that's on the end of your elbo... what's it called? Ah yes
The Weenus


Redwood 6 String Bass
in In Progress and Finished Work
Posted
Its like a million eyes staring at me! I didn't know redwood made burls. that's cool!