


Narcissism
-
Posts
672 -
Joined
-
Last visited
Content Type
Profiles
News and Information
Tutorials
Product Reviews
Supplier Listings
Articles
Guitar Of The Month
Links and Resources
Forums
Gallery
Downloads
Posts posted by Narcissism
-
-
That's freaking sweet lookin! I really like the back, but at the same time, the front holds some mystery that keeps my attention. How's she/he/it sound/play?
-
Reminds me of a mushroom stamp... Maybe after more work is done to it and tunors are on and a logo is in effect lol, but right now, that's what I see.
-
wow, i never knew how they did that. I'm totally going to practice come spring! Right now my bass is just sealed with lemon oil lol
-
lmao i was waiting for a situation to use NotYou's name, but go psw for snaggage of the jokeage
-
That is QUITE an interesting shape...very modern and It looks as if it may be comfy...
You need to get it ready to play and twaek the concept a bit for playability...if it is neck heavy use a heavier body wood on the next one,etc...
Then trace it out on posterboard and make the lines flow a bit more...you might be surprised how you may be able to tweak that into a great design...sometimes it takes me days to tweak a design...even weeks...then you have to build the new prototype every time you think you have it...then when your prototype works...you are there...make a bunch.
This is definately a prototype. It becomes more and more of a "this is definately a prototype" situation every time i get further into it. I keep finding little things here and there that i could have done better and i should do better, etc. The biggest thing i noticed when i first picked it up and put it into playing position was its size. This thing is ****ing huge! completely balanced and comfortable to play though (for me anyway). I'll definitely be making a custom case for the final version. Like i said earlier, its covered in pencle marks right now which mark out where contours are to be carved out, and just a bunch of other stuff. This build will definately be in the works for a while.
hahaha, i just found the original version that i pasted onto my old Rogue 5 string to see if it would be weird to play on or not

-
Well, here's part of the control cavity as posted in the thread i have linked in my signiature
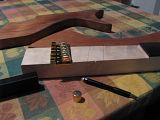
As you can see, its curved, and very thin. The control cavity isn't actually routed out as i don't have a routing table set up at this house. Actually, the one i was going to use as a routing table ended up getting sold by the Fiencee
 But that's okay, i'll just use her desk!
Here's a top pic of the body itself with both pickups out.
You can see the little tiny hole i was hoping to use located in the bridge pickup cavity between the maple and mahogany join on the bottom join. As you can see in the previous ic, its curved, so chances are that I won't make it through with a heated wire, unless i have enough patients and work teediously enough. Even then, i have to get into the control cavity, which is going to be located on the back just behind the 3 holes (they're faint in the above linked picture). I'm trying to conserve as much wood as possible here as well so i can keep a nice thick sound. This thing sounds amazing unplugged (not that i can plug it in right now lol)!
The glue is Titebond II
As far as setting the bass on fire, my finish may or may not include the use of fire lol. I'm probably going to go against it and just use a black stain instead though, as i hear fire raises grain and can cause cracks and a lot of other unpleasentness. Altering the chemical properties of the wood is one of them.
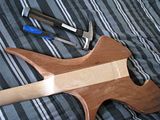
As far as the end pin goes, i'll be placing my strap pins after the body is done being contoured. I'm still penciling in contour lines right now, because i think this thing needs a bit more curve in it to bring out its true sexyness. Right now it looks like a fat chick with potential.
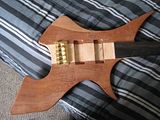
As it turns out, i've taken a picture of the back of the bass and posted it in the other thread as well. So here's that so you can all have a reference of where the control cavity is going to be, as well as the horrible tools i'm using for contouring work lol.
-
I once saw an attachment for a hand drill that allowed drilling at different angles to the drill (It was a long metal tube that could bend with a turning wire inside) at a hardware store. When I saw it I thought of using it to drill holes between cavities, but I had no use for it as I haven't forgot to put a straw in the routed channel to prevent it from filling with glue.
Best of Luck!
I saw that. Its a dremel/rotozip attachment. I almost picked one up the other day for my problem, but what happens is the head of it is too big to fit in the cavity... (that's what she said)
Seriously though, i like what i'm hearing so far! I like the V drill cavity the most. I actually thought about the strap pin one, but as it is right now, i have no strap pin locations planned out at the moment. I could always make a maple/mahogany plug and do what you were suggesting though.
Good ideas everyone! Anything else? I'll make my decision at the end of the week.
-
So how's this thing coming along? Any more progress?
-
No, i don't, but its a dream job. I'm in college majoring in Robotics and minoring in IT, right now. The only CNC mill i work with is a crappy little Spectralight thing. Its a good thing to learn on though, because the program that it uses shows a little 3d preview of your stock and what your program will do. You can speed it up and slow it down too, so you can see if your spindle is going to crash or whatever. Its a handy little thing. But for me, CNC is probably the best thing in the world for making a neck. What other way is there to get a .001 tolerance, other than really careful eyeballing and maybe a thickness planer... okay bad example, but i love how exact they are, and i love writing programs and making robots do things.
Your guitar totally gives me inspiration to make perfect things!
-
So here's my neckthrough bass:
I need to make a channel that goes from one pickup cavity to the next, and to the control cavity. I made a channel before i glued the body wings onto the neckthrough, but it got full of glue and is now useless.
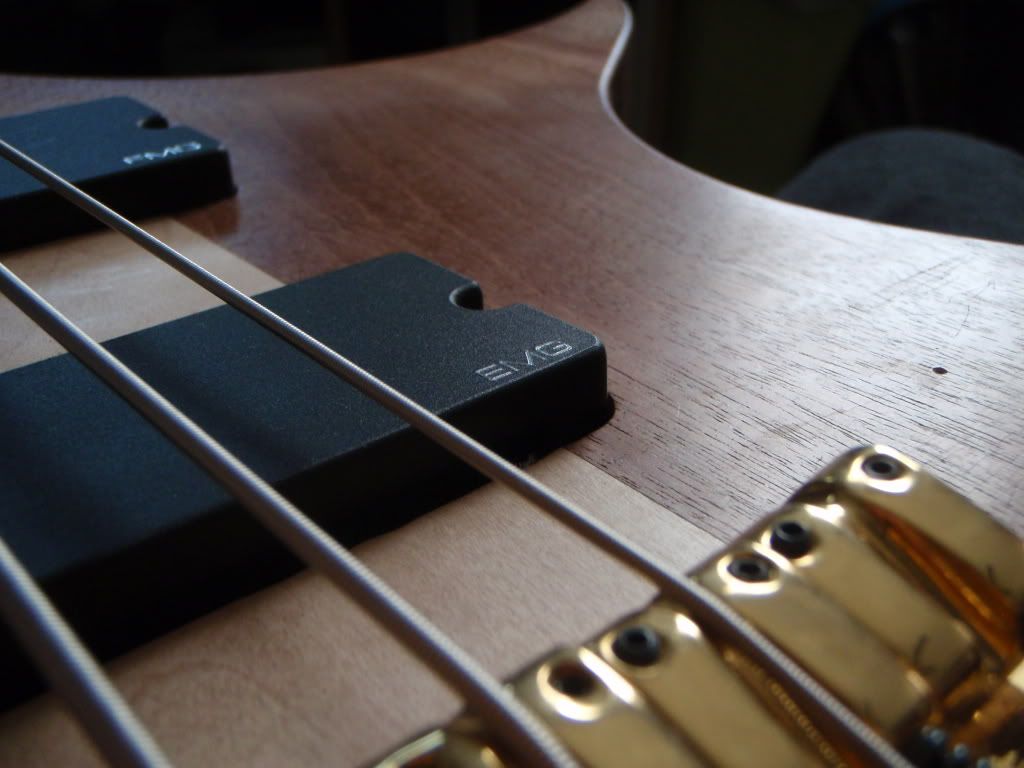
Basically, i need to get from the neck pickup, to the bridge pickup, to that first drill hole (first volume knob)
How does everyone else do this? I saw another picture where someone had completely hollowed out the space between the pickups, only it cracked due to drying conditions. I'd like to just somehow get a little hole in there that won't leave any raw wood behind to expand.
p.s.
excuse the routing. everything on this bass was done either by hand and/or without routing templates. The body is also not entirely sanded or finished. What you're looking at is something to play while i get up the ambition to finish it. It feels awesome to play something i've built btw!
-
Teehee, i can see the cutting lines in the earlier pictures. This really makes me want to get back into it! Nice color and shape too. Can you get any shots of it in natural lighting so we can get the full effect of the finish and grain? Natural lighting will help the colors show up a lot better, and you won't have that blurring effect from not having a flash. Natural light will also eliminate the blinding effect of a flash should you decide to use one.
Not sure what cutting lines you are referring to? I will try to get some outdoor pics. The weather here has been suck lately!
Sorry, i'm a big CNC fanatic. I made a 1/16 scale guitar out of aircraft aluminum (decorational purposes only, totally not playable or to scale, or even stringable for that matter), and the bit left these nice swirly marks all around the guitar. Most things done with CNC mills leave those "cutting lines" behind, and they looked beautiful on that aluminum body. it gave it almost a holographic look!
The cutting lines in your guitar are gone now, because you sanded it, so don't worry about it
I just got excited because i noticed them in the contours in the early pics. -
:DIf that's a graphite nut, and your strings are going to be going in those directions, then i believe you're running the risk of snapping your nut in half, or breaking the pole points. Just make sure you string one string at a time. Other than that, that's a pretty sweet lookin' bass!
And Snapping Nuts in half is never a good thing
 ( sorry man had to)
I agree that is a nice bass
I like it!
*smacks forhead* yeah i walked into that one, lol
-
I like my ZW set, because out of the 3 guitars i've had them in, it made them all sound "better" to my ears. I've had them in a NJ Beast, an Ibanez GRX20, and an Ibanez RG250DX
-
If that's a graphite nut, and your strings are going to be going in those directions, then i believe you're running the risk of snapping your nut in half, or breaking the pole points. Just make sure you string one string at a time. Other than that, that's a pretty sweet lookin' bass!
-
different pickups sound different on different guitars. I have two pickups that look exactly the same on my new bass that i'm building, but they sound completely different in each other's positions. I'm sure an EMG 81 would sound different on different instruments as well. Same with putting a P style pickup in a solid body guitar.
I think you should just use the EMG electronics and get gibson original parts (knobs, bridge, switch covers, pick guards etc.) That way it'll look right, and sound right.
-
Teehee, i can see the cutting lines in the earlier pictures. This really makes me want to get back into it! Nice color and shape too. Can you get any shots of it in natural lighting so we can get the full effect of the finish and grain? Natural lighting will help the colors show up a lot better, and you won't have that blurring effect from not having a flash. Natural light will also eliminate the blinding effect of a flash should you decide to use one.
-
Damnit, that makes me want to build an explorer. *stick with the V, stick with the V, stick with the V*
-
omg that neck! *drool*
-
Gotta love it! Unfortunately (well, more fortunately than not) i don't have any pictures of dirty wiring from me. I always try to wire clean with properly colored wires with like gauges. However, if you would like to see things I've fixed, you can look inside any low end Ibanez RG or GRX models. I wish I'd taken a picture of the Ibanez from the 70's that i fixed up. Little teeny tiny wires that were all rusted up and all nice and folded up inside a rats nest of heat shrink!
-
Anyway, I was wondering if i should route out the neck pocket or not. By routing out the neck pocket, i lose the ability to change back to my fretted neck. Buying another bass, is an option too, but small apartments don't have much room in them.
This is more confusing than cutting off an inch??? All in all it sounds like it would be best to build another body for the fretless neck and put your fretted neck on this body?????????????????
Well, its true that i could start a whole new project with the materials and issues i have in front of me. However, having another guitar in my tiny apartment would only upset the wife, whereas having a spare neck hidden behind an amp doesn't seem to phase her at all.
So routing the neck out for the fretless neck and then not having the ability to go back to my fretted neck doesn't appeal to me. I'm building a 5 string fretless right now though, so maybe a future body project is in order for the 4 string fretless... when we move into a house
-
On all of Iommi's guitars, he has it on the point. However, another option which i've seen a few times is to put the strap button where the top left screw would be on a bolt on neck. I've seen that on Vs anyway... Not too sure about SGs. My favorite spot is definately on the horn though, either on the end, or on the back of the guitar where Ripthorn mentioned.
-
Well now that you mention it j. Pierce, the option of keeping the overhang on the fingerboard sounds like a pretty nice idea! I think I'll do that. This way if I'm unsatisfied with the end, the Carvin factory carved ebony will still be there to cover up whatever ugliness will be lurking inside of the neck cavity after I'm done.
Stud finder results = safe to remove an inch BTW
-
I like how your carve gives the illusion of binding. This is really nice work, and I'd be proud to own it! Hell, if i could build it with the skill you had, i'd be bragging lol
-
Hey
I really like your "poor man's plainer" that you have there! I never thought of that! That helps out with my projects so much. Smart thinking dude!


 But that's okay, i'll just use her desk!

 ( sorry man had to)
Bass Pickups
in Electronics Chat
Posted
I use an EMG p/j setup. I have 2 volumes (one for each pickup), one tone(over both pickups). I have an alder body with a maple neck and ebony fingerboard. The bridge is a stock ibanez bridge, and the bass is a four string. With the proper amp, i can get pleanty of lows out of it, and now that i've gotten the tone knob fixed, i can get pleanty of highs out of it if i want. "clipping my amp during slapping" is absolutely no problem. If you listen to Grip Inc.'s Vindicate, that's a pretty close likeness to the sound that I get. It may not be the rounded killing low that you're looking for, but that's what I get out of it. I'm going for more clarity, low end and fullness in my next bass, and its a 5 string fretless (all my basses are fretless, and i get a flatter sound by using pinstriping over the ebony, which also protects the ebony from my pressurewounds), and i'll be using the EMG40DC and 40CS. The Mahogany and birdseye maple should (keyword "should") give me the sound i want.