


Supernova9
-
Posts
505 -
Joined
-
Last visited
Content Type
Profiles
News and Information
Tutorials
Product Reviews
Supplier Listings
Articles
Guitar Of The Month
Links and Resources
Forums
Gallery
Downloads
Posts posted by Supernova9
-
-
As for flatsawn for a neck you are fine. Cut severla pieces and glue them together to make a laminate neck. Then just turn it on it's side and it will be close to flatsawn and have plenty of strength.
Flatsawn necks are fine, Gibson have been making Les Pauls out of flat sawn mahogany for years, I think you'll be fine

-
Body wise i have carved the top and preped it for finish as far as i can at this point. To carve it i used a 40grt sanding wheel in my angle grinder, it took next to no effort with quite good results. I was very pleased with how this turned out.
Heres pics of the body. (again, click to enlarge)
The hardware i got from another member of these forums.
I like the heel, I'm a big fan of that more comfortable joint.
Just a couple of questions regarding the body carve, in the second body pic you posted, (the shot from the side), it looks really uneven on the edge, is it really that off? And are you sure you've left enough space for the TOM/Stoptail bridge between the bridge pickup and where you've started the carve?
-
Thanks everyone,
I tried to measure the crack size when I flex it open [as much as I dare to], and the 0.002"/0.05mm feeler gauge just fits in it. I doubt that PVA would penetrate into it much without thinning, and the epoxy I have is quite thick (can you get thinner epoxy?), so thats what led me to think CA may work. The CA I have has a needle on the end too that with a bit of force may fit into the crack.
The scarf joint is still quite rigid, it takes a fair amount of force to flex the crack open. I would guess that it would hold up to string tension as it is (I have an acoustic with much thinner wood at the headstock, which [with no strings on] flexes more than this one does)
I tried taking a photo, but the size of the crack is too small, and my camera is poor at taking close ups. The photos show nothing at all.
Once dry I would put reinforcement strips. That might be a problem if it will be a clear finish and you have fancy wood for the neck stock.Not a problem, I'm pretty new to building and it has plenty of visual imperfections already, however considering the size of the crack, the reiforcement may be more trouble than its worth. My wood is from an old table, so its definitely not fancy.
Would that extra info change anybody's advice? do you still think I could get the PVA / epoxy to penetrate into such a narrow space?
Thanks again
Use Titebond or similar aliphatic resin glue, flex the neck to work it in.
-
I saw a article quick stop drill press table in the recent Popular Woodworking showing a drill press with what looks to be a router bit in the chuck. Would this work in place of a router if I can't find someone with a router?
I swear this has already been answered in this very thread, but the answer is NO.
Router bits are for routers, drill bits are for drills. Don't use one in the other, you're asking to lose fingers or not be able to cut what you're trying to do.
If your budget is so low you can't afford a router (even the cheap porter-cable routers), then you should not be building. You can do instruments on low budgets, but a non-existent budget, you can't.
-
Anybody know what size(length) should the neck pocket be on an S101?? Should it be the same length as the heel of the S101 neck??
The length of the neck pocket should be approximately the same length as the flat portion of the bottom of the heel, yes. But that's not really important - the important measurement is the distance from the nut on the neck to the twelfth fret on the neck, and then the 12th fret on the neck to where you put the bridge on the body. These two dimensions should be equal, which makes the scale length of the guitar. As long as you join the neck to the body so that it looks clean and you can place the bridge that far back on the body to match the distance between the nut and the 12th fret, you'll be alright.
Though might I recommend, that a better investment than buying necks from random model guitars and trying to build with them, would be to by Melvin Hiscock's Build Your Own Electric Guitar, which covers these points and more.
-
I am stuck yet with another problem! Does anybody know where I could get a ppicture or something that tells me the debt of the telecasters bridge cavities and neck and control cavities? Also which tools should I use to dig them up, and what tools woulld I need to make a tunnel to connect all the cavities together? Also another minor problem is what color hardware would you use for a solid white telecaster? chrome or black? Oh ya does anyone know where there is a place that sells pre made fretboards? so I can just attach it to a neck I would make?
To cut the cavities, use a router + template to make it clean and consistent. To join the cavities, if you're using a one-piece body, get a long drill bit, and drill from the edge of the neck pocket straight down centre line of the guitar, connecting the neck and bridge cavities. Then, connect the bridge cavity to the control cavity using the drill bit slanted to get the angle right.
For pre-made fretboards, LMII or StewMac sell various options.
As for the colour choices, it's your decision to make, either would work. To check though, why not try Kisekae, (click the link), where you can make a mock-up of your chosen design to see what it would look like, helpful before you get started buying.
-
Hey also, what is a recomended wood for a telecaster? I might be able to get a really good price lol. Isnt it kind of ironic that I can't find wood up here in canada
Telecasters are usually made from alder, northern ash or swamp ash. If you're looking for parts, you can get them online at StewMac or try guitarfetish (he's a seller on ebay, with good deals on hardware/pickups etc).
And good luck! I'm just putting the finishing coats on my first guitar, which was a telecaster, it's a great project to start yourself off with - just measure 3x, cut once!
-
I've found the people asking for fast neck profiles are usually asking for thin profiles, maybe like the Wizard necks from Ibanez?
If you're looking for the thinnest neck profile possible, and you're a newbie, I'd suggest getting a Hot Rod truss rod from StewMac, adding 1/8"-3/16" thickness on the bottom of that and then making that the neck depth at the nut (not including fingerboard). Then add maybe 1/16"-1/8" onto that measurement, and have that be the depth at the 12th fret.
That's just a bit of speculation on my part though - why not just find a neck you like the feel of and take some measurements from that? E.g. depth at the nut, depth at 12th fret, width at nut and use that to make up your profile?
-
-
hi there my second post here !! my name is Marcel, and i live in sunny brazil ! i love this forum as much as i love guitars, so i think i should post some of my tests !
first its a strat ! i just bought the body and neck, and im painting and mounting ! will look cool at the end !
second its a reaaaly cheap guitar, with that nice plywood body ! im just making some fancy guitar ! i need to cut a bit more the flames ! any ideas, feel free to draw over my picture ! the thing will be actually more filler than wood, but i really dont care ! if it looks good at the end, i can just rebuild one with some nice wood !
thats it for the moment ! thanks for looking, and i will post updtaes ASAP !
PS: hope that linking thing works
http://img209.imageshack.us/img209/5002/flameoguitar5do.jpg
http://img209.imageshack.us/img209/5093/strat9vx.jpg
I'd suggest, if you're looking to make it look like flames, try carving the contours of the flames into the face of the guitar, so they look 3D, that just looks a few really hefty dings at the moment
-
you sure seem like ur on a hurry with this project...I sure know I am...I have 4 days to finish off routing, paint, dye top, clear, wait patiently and then polishing by hand my "rokeros AT1" to hand in .
Not to derail this guy's thread. But 4 days to do your entire finishing of the guitar?!?!? All I'm saying is "Good Luck".
-
The premise of the site is good, but I think some of the forums are unnecessary and a bit unclear. For example - Cabinet Design - if it's about people designing and building cabinets, it's "In Progress Builds", if it's a tutorial on what to think about, it's already covered in "Amp Building Tutorials", and if it's related to the cabinet design of production/already made amps, it's covered in one of the first 4 forums.
Could do with a general chat forum up the top?
Guitar Setups - if it's for electric it could go into 'electric guitar', if for acoustic, similar. Just feels like it's un-needed with those two already there.
And as for songwriting - you only really need one forum to discuss all aspects of songwriting, same for homerecording.
All the really successful forums I've ever seen develop small 'sub-communities', (take Harmony Central's Effects forum or Amps forum for example), of members that post on the board most suited to their interest.
If you have too many categories, people thin out amongst those other forums, and those sub-communities don't develop, which keeps the board as a whole thin at a certain number of members.
I think the forum's a great idea, just needs a bit of refining to make it clearer - so people know exactly where to post whatever they have, you know?
-
I'm positive that I did calculate the angle correctly taking into account bridge height and position, etc. I used Hiscock's book. My question was more along the lines of "Will it look like the neck is bent backwards with an angle at 4.25 because the ones I've heard of are in the 2 or 3 degree range." If averages are from 2-5 then I am reassured. Thank you.
Gibson guitars range from 3-4 degrees if I'm not mistaken, I've got a set of plans here that say 4.5 for a carved top style guitar.
Give us the scale length, thickness of fretboard and bridge height and I'll double check it for you if you'd like.
-
I'm thinking about starting work on another guitar, and something occurred to me that I hadn't thought of; I don't know how much it actually matters, but how far back do you position your trussrod in the neck? I use the LMI flat-topped double-action trussrods The last two builds I did, I simply moved it back enough that that hex-key nut on the end would lie under the plane of the headplate so it could be easily covered by a truss rod cover. This ended up putting the end of the flat rod under the guitar's nut on one of them, and just before it on the other one. Should I be backing these more down the neck towards the bridge? Should the end of that hex-key nut be under the guitar nut? That would put the end of the flat rod towards the first or second fret. Does this even matter, as long as the thing is in there?
Also, on the subject of neck-reinforcement, I'm looking at putting those carbon fiber rod things in there - looking at the stewmac diagrams, I'm assuming you space them out evenly on either side of the rod, but do you follow a straight path equi-distant from the trussrod their whole length, or do you follow the taper of the neck?
-
I swear I've seen this before.....
Do you post on the Thorn forums? Either way, sweet Tele, that limba should give it some great rock tones!
-
You ignore the fret positioning, and the effects that would have on the guitar. You'd hit open notes fine, but other notes would be a bit of a challenge
No, think about it. He's using a neck from a Mustang --the neck is 24" scale, presumably the frets are properly spaced for that scale. He's NOT trying to convert the neck from 24.75, he's trying to convert the body (i.e., either the placement of the bridge or the depth of the neck pocket) to match the neck.
And the award for most gormless looking forum user goes to........... yours truly
-
Hold on a sec...
Moving the bridge is exactly what you'd need to do in order to make this work. Although it might be easier to route the neck pocket deeper into the body, if the guitar has a trem. You can also move both. Or depending on how much travel you have in the saddles, you might be able to get away with moving the neck or bridge just part of the way, and use the saddles to make up the difference.
Kind of a cool-looking guitar, actually.
You can easily figure out how much you'd need to move things using Stew Mac's Fret Scale calculator
A strat-style bridge should be set at 23.765" (±0.030") from the nut for a 24" scale neck.
That compares to 24.507" (±0.030") for a 24.75" scale neck. We're talking a move of about 0.7 an inch --that's not a whole lot.
From my own build, I found that StewMac's calculator is so accurate that the guitar was already pretty intonated before I even started adjusting the bridge. Pretty cool really.
Mickguard,
You ignore the fret positioning, and the effects that would have on the guitar. You'd hit open notes fine, but other notes would be a bit of a challenge
-
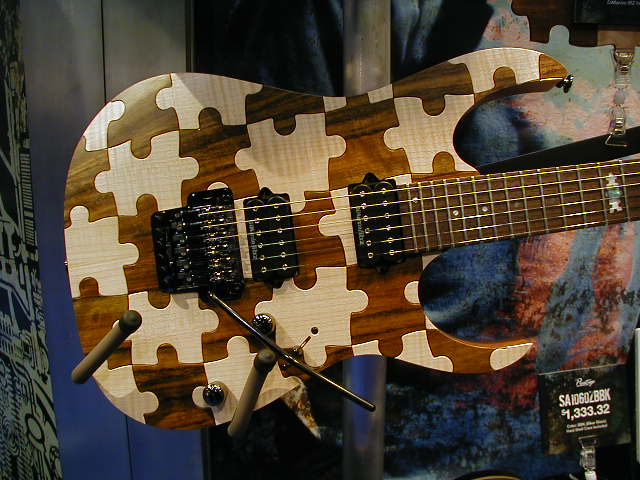
I was looking through the new stuff showed at winter namm and i saw the new RG ibanez has coming out. http://www.ibanezrules.com/namm/images/2006/P1010062.JPG
How would u go about doing a puzzle board top? Cutting each piece with a jewelers saw so they fit exact?
Here is the side view, they are actually individuall pieces.
Design the pattern, glue the dark wood onto the top of the guitar, then inlay the lighter wood pieces? Done right would give the gapless match
-
Sweet! I used to hang out at antonelli's all the time. Since I am a Charvel-idiot I have to ask what you mean by "pre-Fender Charvel"?
R-
Charvel got bought by Fender. People say quality may have suffered.
-
I've taken a swag at some new f-hole designs. This one simply tweaks the standard f-hole with a bit of a modern edge to it.
Feedback welcome
-- cj
I think they need to be repositioned or reshaped. They just don't flow with the curves of the body in my eyes (specially the one on the lower bout). The thing that's great about standard f-holes is the way they move with the curve of the body.
The first f-holes you designed on your site (the ones that are more like slits in the wood) are much more sleek, elegant, and frankly look better to my eye.
Just my $0.02 though, other than that I really like your design.
-
Whoa, whoa, whoa. I didn't route the outside of those puppies. I cut them on a bandsaw close to the final shape, then hand sanded on a level surface. If I had routed those, they would have got torn appart, most likely. I think something that's going to be critical here is bit sharpness and the correct speed for said bit.
My bad. Well, I'll let you all know how I get on.
-
Yes, Ron uses a CNC machine to do this, but I see any reason you can't do it with multiple templates and patience (like others have suggested). My biggest concern would be how much wood is a safe amount of body wood to leave on the top edges when routing. If I'm not mistaken, he uses the small strips of inlay material to hide the joining of the two woods. That would help hide any small imperfections you'd have. But the key words are "small imperfections".. lol But it definitely can be done!!
Well, I think it's kinda like those P90 rings that thegarehanman made for his last project - rout the inside then the outside, and it's not too bad.
We're only talking a lip of about 1/4" high, bit wider. Provided the cavity rout goes ok and I take small passes when I get close to final thickness, I hope it shouldn't be too close to collapsing on me. Though test runs will abound before final attempt
I could use purfling between the top and body to hide a join, but I'd really like to get it flush perfect if at all possible. I'm not a big fan of abalone on bodies, though I suppose wood strips like Koa/Rosewood may look pretty cool.
-
I think I'll do some test runs, and then try actually inlaying the top. If nothing else it'll be a fun test!
-
Seen them before.
Disturbingly expensive.
I mean, $15,000 base price? And a $250 upcharge just for a bevel on the front and back of a headstock? $1350 upcharge for ebony laminates instead of purpleheart? Wow. I'm in the wrong busines.


Newest Project
in In Progress and Finished Work
Posted · Edited by Supernova9
Godin, how thick's that maple? I love the figuring on it, and I really like your previous work, so I'm looking forward to seeing this one develop.
I'm about to start my own carved top Maple on Limba singlecut, so this is my kind of project!