


Ripthorn
-
Posts
604 -
Joined
-
Last visited
-
Days Won
7
Content Type
Profiles
News and Information
Tutorials
Product Reviews
Supplier Listings
Articles
Guitar Of The Month
Links and Resources
Forums
Gallery
Downloads
Posts posted by Ripthorn
-
-
I use rods similar to what Mender posted, but they have the blue pvc jacket on the outside. I find them incredibly easy to install (just did one night before last). I have used them in fender and gibson style necks, as well as in mini guitars. I quite like them. Just use a 1/4" route for the main portion and a 3/8" route for the nut end.
-
From what I understand, all flats/satins will gloss up with body parts rubbing on it. However, the flatteners will help keep it from becoming an uber glossy gloss. I would never expect a flat lacquer or poly to stay flat forever, but that is just my expectation and I may be wrong.
-
What do you mean by taper? Do you mean the width across the neck? If so, it's normal. Do you mean an angle on the heel to work with a tune-o-matic bridge? If so, then you will likely need it for proper action. If neither of those, then what are you defining as a taper?
-
You could have had a ground loop going on. Grounds can be tricky, as just slapping wires together may not get the result you are looking for. What kind of grounding scheme do you have going on? Have you made sure that all other grounds are properly connected? If you reverse ground and signal of a pickup, it can sometimes cause hum issues depending on the grounding scheme.
-
That would probably work fine, though I am not responsible if it blows up
 (by the way, that is nigh unto impossible).
 -
Look up a diagram for "true bypass" wiring. This will be just like wiring up a stomp box with true bypass, where the ABQ is your effect.
-
The one problem I can foresee with this style of sander is that there is no way to guarantee that opposing sides will be parallel (like they are with a planer). Also, removing certain defects could be much more difficult with one of those. Of course, building one of those types of sanders is dead easy. You can make the top of MDF, use an old 1725 RPM motor, and make the drum out of a bunch of circles cut from MDF. If it were me, I would probably go with a planer and save my pennies for a drum sander with a conveyor to maintain parallel top and bottom. Of course, whichever route you go, I am sure to be envious
-
I have a chambered solidbody nylong string build on my list. My plan is to do an under saddle piezo. They are almost entirely aftermarket types of items, but are not that difficult to install from what I have read. If anyone does make one, it would either be Schaller or Graphtec.
-
I have to ask.. Was it bigger?
Haha no, actually none of the hammers I had are designed to do fretwork with. I bought a hammer that was "shock free" it's pretty big but then I found a rusty old hammer, just a regular one and it worked better, probably because it's harder(?) Or because it's smaller(?)
The hammer I bought is made of urethane with steel balls in it that makes it stable when you hit, thats why I thought it would be good, but apparently it wasn't.
The problem with the deadblow hammers is that they typically have a soft face and that soft face absorbs a lot of the impact force (not to mention the larger face means that each square inch gets less force, thus less pressure on your insert). You will notice that StewMac's deadblow fret hammer has a brass face to be able to transfer the force more effectively while minimizing bounceback. I use a brass insert in a hardwood block and I whack the hardwood block with a regular old claw hammer.
As a side note, if the fret wire is not bent to quite the right radius, the ends are typically the problem, not the middle (as the middle can be bashed down easily).
-
Headstock angle is purely preference. A neck angle is based on hardware, but the headstock angle is whatever you want to do. I think Fender did flat headstocks because they were faster and cheaper to produce (which is really what Fender was all about back in the day). If you don't like the look of string trees, then go with a scarf.
-
Usuall for the pup routes I use a 3/8 Forstner bit to drill out the corners, then just use my 1/2 pattern bit as usual. The stew mac one is a custom job, so you likely won't find it anywhere else. Your other alternative is to buy one of those bearing sets and put a 3/8 bearing on a 3/8 straight bit.
As for the chrome knobs, you need to look for push on knobs (for knurled shaft pots). There are tons of places on ebay, though some of them can be of lower quality if not careful.
-
I think it depends on if you are going to have a pickguard. If so, I would go #3 or #1, so as not to cover up the cool features.
-
I actually use something like a socket placed right over the insert. Then I use a washer and a bolt of the right size and thread pitch to thread into the insert. As you keep turning it, it will pull the insert out. The advantage to this is that it will always pull straight up and minimize damage to the wood and finish around the inserts.
-
Just don't use brass screws...those things will kill your tone.I also don't like plastic inlay dots because they make me play funny.
And whatever you do make sure you have the wood blessed by a priest...bad spirits can invade your guitar and then it will only play Silverchair...and one band playing Silverchair is enough.
But remember that you have to have the right kind of priest for the music you are playing. If you use the wrong priest all you solos will come off like the do re mi song from the sounds of music.
This is true, unless it is blessed by Judas Priest, then it will rock, but only after midnight.
-
I personally would probably recommend a gloss black with a flat or satin clear, as you won't notice the gloss from the black, but the black color will look deeper. Duplicolor gets rave reviews, I've never personally used it.
-
Am I correct in thinking that this will be more for the people who appreciate such items and not necessarily those who build them? Of course those who build will go there, just want to make sure I have the right perspective on the place.
-
I have no problem with the design being different. I admit that both Avenger and Our Souls have created some stuff that I have looked at and thought "Nope, not my favorite", and I admire both for thinking outside the box. Apparently I was thinking out the other side of the box, but at the end of the day, I spent a lot of time working on this and I quite like it just the way it is. Does that mean I don't want other people's feedback? No. Will I likely try some related stuff? Sure. I will probably go with a streamlined headstock for some kind of SS body shape in the future, but for this body shape, I like how it is. I like how the bevels on the headstock echo the bevels on the body, and how the upper horn, TR cover, and headstock have a familiar theme.
-
Someone's own shape is something that can't be wrong. It can be disliked, but it isn't wrong unless the person creating the design says so. I think this design is well done. With guitars having been around for so long, just coming up with something original is tough. I just finished a prototype of my own design, and working out the finer points in a design is something that one spends a lot of time on, so saying it's wrong is to assume that the individual didn't invest much time in the design. Saying you don't like it only means it's not your cup of tea.
I must admit that I like slightly wacky control layouts (not symmetric or whatever)
-
IMO - if the 'bevels' were removed ie; the HS shape mimic'd the TRC/horn it would look better all the way around.
I like the fact that its made of a 2x4. I build 'em out of shipping pallets, so why not a 2x4??
I tried a mockup without the bottom bevel and I like it as well. I may make a mockup without the bevels just to see how it all looks in real material before I do my second one. There are a couple other minor things with it I want to work out as well, such as the fact that I don't have quite straight string pull on the three higher strings. But I think some people maybe misunderstood the purpose of this build. The whole purpose was to try new things and decide them in the moment, which was really new to me. If this thing doesn't play well, it's not a big deal to me, these were all parts that I wasn't going to put on a "serious" build, except for perhaps the pickup rings.
As for the switches, there are bridge on/off, neck on/off, series/parallel, and neck phase. I placed the volume where I did mostl for aesthetics, as I rarely do volume swells on the guitar during a song.
-
Our Souls, I know what you are saying. The outline is a little odd, but from the front, the bevels create kind of a faux silhouette that carries the theme from the top horn and truss rod cover. I don't mind if people aren't wild about it. I like it. I know that there have been a couple of projects by other forum members where I have thought "nope, not a fan", but if they like, it's cool.
As for the evening out with the paint prep, I found that it took the shellac fairly even, but I did put on quite a bit to ensure the resins in the wood wouldn't affect anything. Once the shellac was down, everything else went on perfectly.
-
I know the neck is overly chunky. The whole purpose of this build was to test some things out. I never intended to come away with an amazing instrument, just more knowledge. I am going to be doing a new build of this body style and headstock shape with nicer woods and a much better neck profile, this guy was more the proof of concept before going all out.
Avenger: I found that it routed relatively well, but I did use some super glue and epoxy on what little tearout there was. I used a good sharp bit at max RPM for the roundovers. The bevels were a royal pain, as a scraper would dig in to the soft rings, so I ended up using a sanding sponge since it would conform, but still keep smooth lines. As for prep for the wood, I sprayed it with several coats of shellac (fretboard included) to seal in all the pitch and resin in the wood. I also used epoxy for knots. And I did go for a 12' board so that I could get around as many knots and such as possible.
-
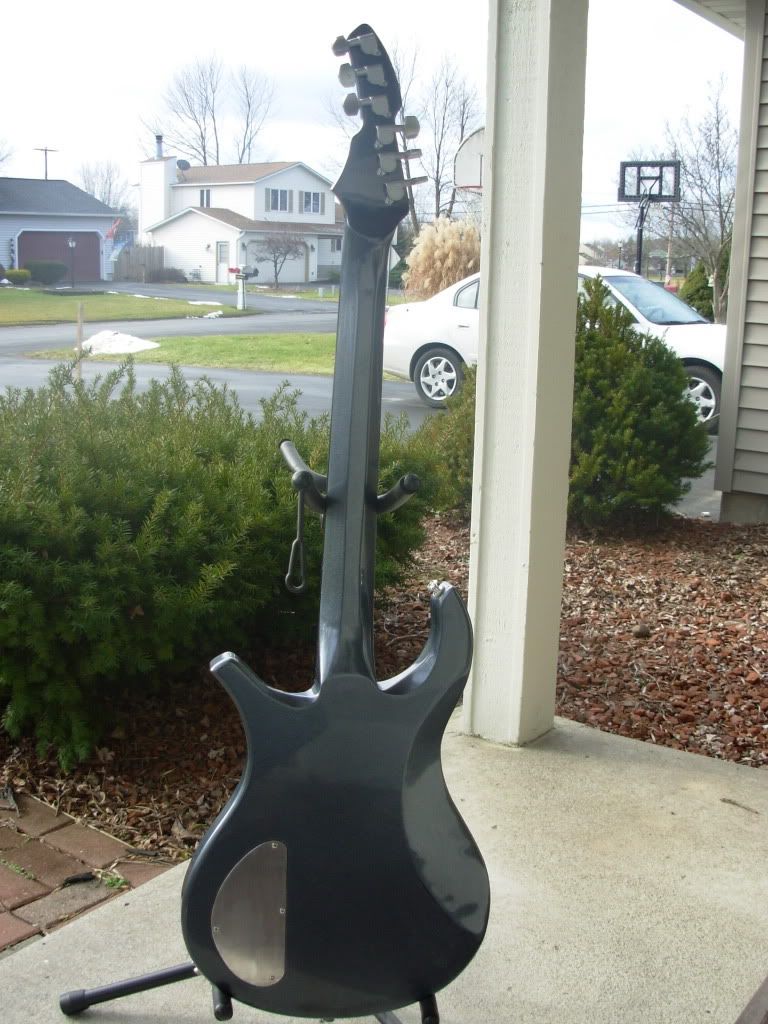
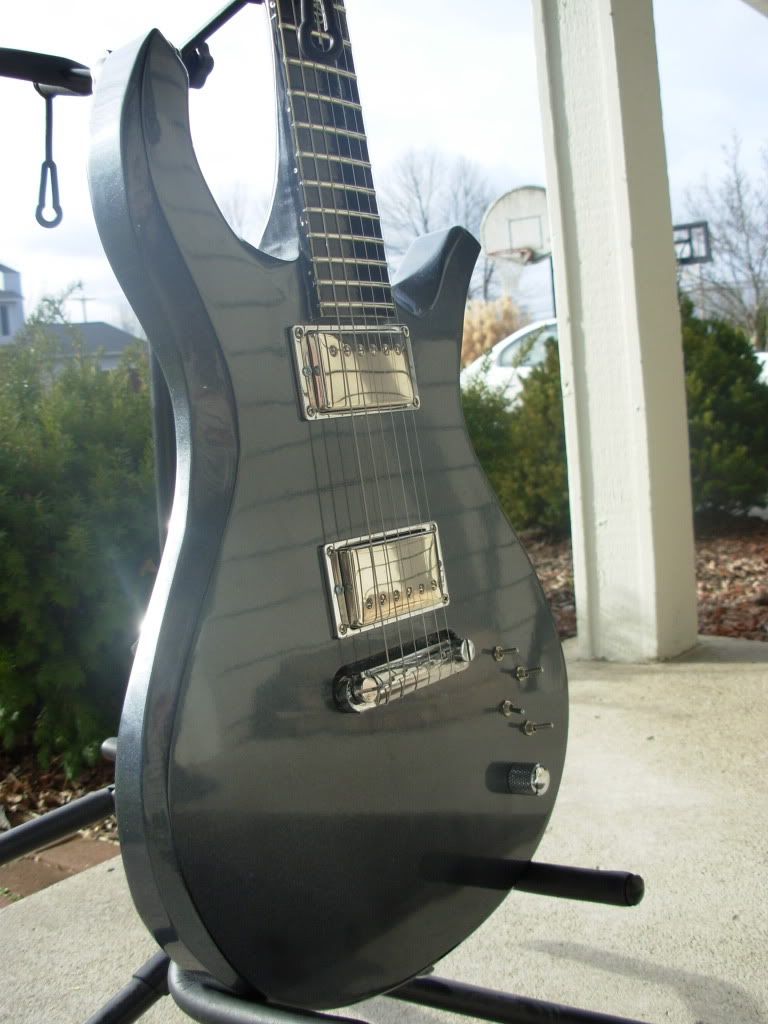
Let's do this a little backward, so time for glamour shots:
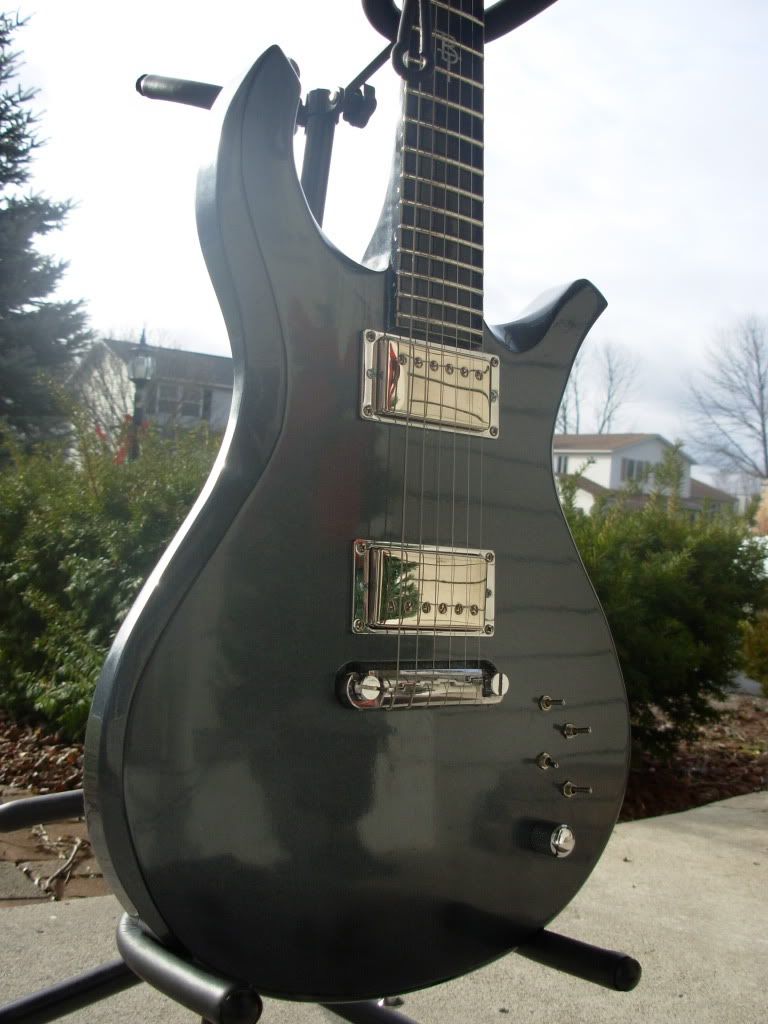
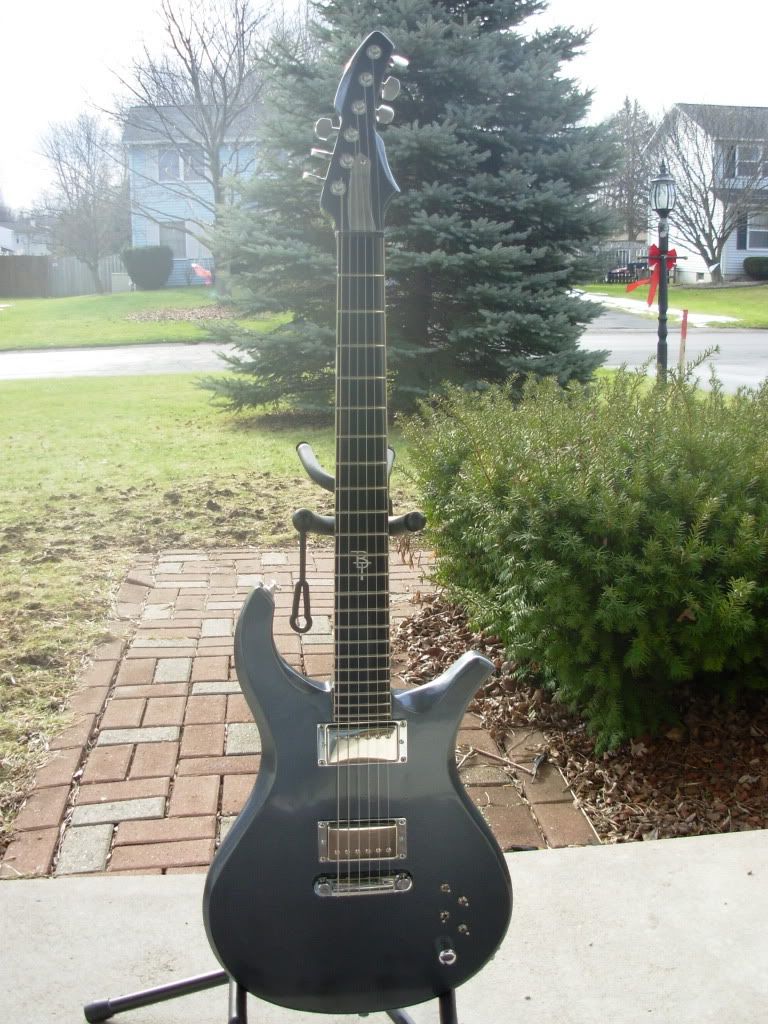
Alright, time for some specs and back story.
Body: Pine
Neck: Pine
Fretboard: Pine
Hardware: Whatever I had on hand
Now for the story: On the woodworking forum I frequent, there was a challenge posted asking what the members could do with a single 2x4. I started thinking it would be cool to build an entire guitar from a single 2x4. Now, I am not necessarily advocating it, I know pine is not stiff nor terribly stable, but I wanted to challenge myself on these points:
- Wood choice (I'm a total wood snob)
- Design method; I usually am a meticulous planner and on this one I went wherever the wind blew me and didn't make any big decisions until I had to
- Design a new headstock
- Design a new body style
- Test a new finish that I wouldn't just "test" on a "real" guitar
- Dissect my techniques so that I can do better on future builds
- Mini toggles for electronics and no tone knob
Before you burn me at the stake, let me explain a couple of choices. I made the neck and fretboard extra thick (about 1.25" at the first fret). I also ripped the neck-thru section length wise and flipped one side. There is a double action truss rod in case the neck flexes, and I have 8's on it to keep the tension a little low.
The finish is silver pearl over a black base coat. Fretboard has faux binding (which was by accident). I made the truss rod cover, jack plate, and cavity cover from aluminum. I also placed on myself the constraint that I could only use hardware I had on hand. That helped drive the headstock design, as I wanted the 6 in line look but I only had 3x3 tuners.
Anyway, I call this model the Event Horizon. For those of you who aren't total nerds (like me), the event horizon is the area around a black hole past which, if something passes, it does not return. I named it this because now that I have built it, I am going to be using this design as my go-to for most every guitar from here on out unless trying to duplicate something specific. I am extremely please, despite the many mistakes. People have been asking me all along how it will sound. Well, it sounds like a guitar
. It sounds pretty good, but won't be the first one I reach for when recording.Any comments or feedback is welcome. Keep in mind this whole thing was basically a full-size mock up.
-
 1
1
-
-
Sack off the headstock adjustment option and adjust at the heel end instead
.Now that's problably a better idea.
-
I would treat it like a fender headstock where you drill a hole out. Now, with an angled headstock, you will need a jig to keep it straight, but those are easy to make. Just drill a straight hole through a piece of scrap, cut the scrap at the same angle as your headstock (so that when your jig is on your headstock, the hole is right in line with your truss rod) and drill with a 12" long 1/4" bit.
 (by the way, that is nigh unto impossible).
I Don't Post Here Enough
in In Progress and Finished Work
Posted
Is the neck just dyed curly maple? The figuring looks too much like maple for that to be the wood's natural color, but that may just be me.