


Buter
-
Posts
216 -
Joined
-
Last visited
-
Days Won
3
Content Type
Profiles
News and Information
Tutorials
Product Reviews
Supplier Listings
Articles
Guitar Of The Month
Links and Resources
Forums
Gallery
Downloads
Posts posted by Buter
-
-
So you don't just, like, do nice finishes then?
Saved to hard drive.
Thanx D
-
-
You've forgotten the spoke wheel version.
It all depends on the design of your guitar, dude. The rods all work the same, there's just different ways to crank the buggers.
For me, a peghead adjusted TR is the 4mm allen, a body end adjusted TR gets the spoke wheel.
Cheers
Buter
-
Bom Dia
I usually go to Lisbon two or three times a month. Let me know if there is something specific you need and I may be able to save you a bit of money on shipping.
As the bannannaman said, I would be really surprised if you could not get most or all of your woods right there in Lisboa. Worry about exotic woods after building a couple of guitars, no reason to ruin expensive woods on your first couple of guitars.
Cheers
Buter
-
Thanks for the input everyone.
Only an idiot would ask for advice and then ignore it, so I'll probably widen the profile of the hs a bit and try not to expose the ebony when I finish shape the damn thing.
I'm still considering cutting the peghead ears off, planing down the ebony and re-joining them. It's just laziness that's making me hesitate, I guess.
So the side view of the headstock shows the construction method- is that so bad?Not at all, Wez. I just don't think that it would look right. My guitars have an 'Omega' style cutout on the bottom that shows off the construction quite nicely!
 This is a gratuitous post
Nonsense, Scott. It was advice from a top notch builder (in fact, the builder of the guitar that I've already said is my favorite to ever appear on this forum) and it just adds more weight to the others' comments.
Veneer the sides of the headstock with flamed maple? I'm sure you could do it with just tape since it's such a small area.No idea what you're saying Chris. I do know that I have some very thin, flexible off cuts from the neck pieces that would have no objection to being used as a binding on the sides of the hs. I doubt that I'll take this road, but the option is there if I make any more cock-ups.
Not in the shop again until Monday morning so if anyone else has other ideas....
Cheers
Buter
-
I had originally intended for this hs to show it's outstanding flame on the side. At some point I also thought that it might be cool to use the ebony as a contrast layer between the maple sections; plus I just like ebony
It was no extra work as the ebony and maple were off-cuts from the neck/core.As the pics show, I didn't actually look to see where my normal headstock was going to fall, I just joined away.
When I got around to offering up my template I nearly kicked myself as the template cuts into the ebony, not too much on the bass side, but considerably on the treble side.
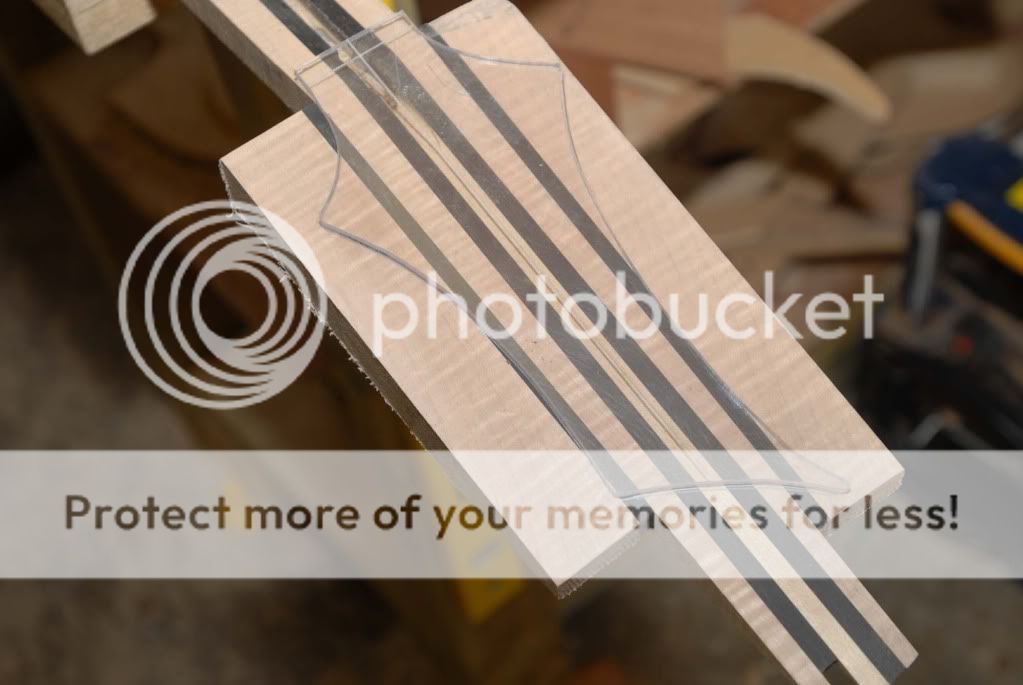

Options as I see them are to cut the headstock a bit over size, cut it a bit under size and bind it with some flame maple or just live with it.
The front is getting a headplate, so that's not an issue. I was going to leave the back unveneered, but I'm considering doing a walnut/maple/walnut veneer job on it now (the guitar has a stunning walnut top, nice walnut back and the headplate is a nice bit of walnut as well, all with contrast veneers.
See what happens when you deviate from your plan without due consideration!
Thoughts? Advice? Suggestions?
Have a good weekend ya'll.
Buter
-
Don't buy any tool that you do not feel that you already have a need for. If you envision shaping your neck using a drawknife, give it, or a practice piece, a go. While you're doing it if you think to yourself 'I bet this would be easier/better with a spokeshave', there's your answer.
At the end of the day, a spokeshave is not an expensive tool if you want to buy one to play with.
FWIW, I've built 20 guitars now and have yet to use a spokeshave.
No idea what you're asking re the router bits. My builds spend more time on the router table than anywhere else so I personally can't imagine building a guitar without, as a minimum, flush trimming bits with the follower bearings on top and bits with the follower bearings on the bottom. My main bit has a top and bottom bearing - when used on a router table this bit will save you a considerable amount of time and grief (however, as Chris said on another thread, this bit is not for a beginner or the faint of heart).
Best of luck
Cheers
Buter
-
A clear, concise smart-ar$e?
I think it may be the way forward.
B
-
You've been a member for 3 years and haven't seen this link?
Start with these links then ask again if you still can't find what you want.
Cheers
Buter
-
I really dig the body shape, although I have my doubts about playing it whilst sitting.
I also think that the color works well with the body.
I would, however, have gone with a slightly wider neck!
Cheers
Buter
-
Hi guys
Building a 34-ish bass at the moment and will be using DIMARZIO DP149BK pups.
I was just going about my build as normal and then looked at where I had planned on putting the neck pup, right below the fb like a guitar, and think it might be a bit too 'bassy' there. I have never played bass before (but am stoked to have a go, cue the Rush songbook) so I don't have anthing to compare it with.
Other longer scale basses I've seen have the neck pup a considerable way past the the end of the fb, I assume there is a good reason for this.
Any thoughts, guidelines (without opening the harmonic points discussion) on where to place the pups.
Thanks as always.
Cheers
Buter
-
OMG!
You are an evil genius!
Geetar looks great, Muzz.
Buter
-
From the picture your pickup template looks a bit rough. If you wll be using a mounting ring, nobody will know but you.
Bedause you're using a template, I'm assuming that you have a router with a top mounted bearing - why not clean up the template by using some strcight edges and your flush trimming bit?
Just a thought.
I kinda dig your body shape. The unusual horns kinda makes me think of an Alembic tribute.
Cheers
Buter
-
Hiya
It is pretty much accepted that most home printers won't print to scale with the accuracy required to make perfect templates from.
You can increase/decrease the scale of your print until your drawing exactly matches your fb.
There's a tutorial in the tutorials section that deals with making accurate scale templates from pictures, there's probably something in that thread that might help.
Nail your scale length, everything else is just icing!
Good luck
Buter
-
Great stuff to see, guys.
I've got a section of fire hose for just such a thing, but not a compressor big enough to use it yet. I've got a spray booth built and when I finally start using it, I'll have a compressor to run the hose press.
At the moment I use vacuum for most things - laminating necks, attaching fretboards and pressing tops onto bodies. The one drawback with vacuum is that you are limited to atmospheric pressure, approx 15 psi. During times of low pressure, you obviously have even less pressure to work with.
I don't use clamps too much for the actual building process anymore. Gluing up body blanks is about it, I guess.
I asked the small engineering shop I worked at when I was between careers to knock up a great top/body gluing jig/press for me. This thing would make gluing a top or body so quick and easy you'd get bored building guitars. Of course, the cost of turning my drawings into a single unit could buy you a guitar built personally by Mr. Smith himself quickly sent me back to more traditional ways!
Cheers
Buter
-
-
Rings and watches not allowed on big-game (sport fishing) boats either.
Use your imagination.
B
-
Hi George
Not sure if you are misunderstanding me or just being a pompus ass.
I was simply trying to point out that if you are going through the hassle of doing a compound radiused fb, you are probably doing it to get the lowest possible action so you might as well find out what bridge radius will work best with your camber or which camber will work best with your selected bridge.
If you are running a 9-12" camber, a 12" radius bridge is not ideal, a 14 or 16" radius would be preferable to gain maximum advantage of the cone shaped fb.
It is easy enough to work out the radius anywhere on a cone and from that, knowing your desired nut radius and your bridge radius, you can find the perfect radius for the last fret on your board. On the other hand, if you are using a pre cambered board with a compound radius, you can find which bridge radius is the closest to ideal.
The constant string height thing was one of those things that made sense in my head but looks like utter shite to anyone not stuck inside my head with me. By constant I was thinking of the lowest action possible for every fret (which, of course, is nothing like a constant distance). Fall away is something that has only just been pointed out to me and was just one of the factors that would make my 'constant' string height unrealistic.
Compound radius fb's are indeed a refinement and are ideal for anyone looking for the lowest possible action. The ability to make a cone shaped fb is also a great trick to have up your sleeve. Super low actions don't suit all styles or all players and I've found that a 12" radius works great for me and I don't really want the action any lower than it is on a 12-incher.
TTFN
Buter
-
And...
If your nut end is 7.25" and your bridge is 12", that is not the radius you put in your fretboard.
If you already know this just tell me to Foxtrot Oscar - what you are aiming to achieve is a constant cone shape with the strings and have the fretboard a constant distance from the strings (not taking into account relief, higher action required near the middle of the strings and fretboard fallaway...). I'm not gonna do the math but if you have a 7.25" nut and a 12" bridge radius, the radius at the end of the fretboard will be something like 10-10.5". If you put a 7.25-12" radius into the fretboard, your bridge will not be flat enough to benefit, in full, from the compound radii and the outer strings will be the ones that the action is based upon, making the middle strings require a higher action than needed (but still lower than a cylindrical shaped fb).
There's a formula in Dan Erleweine's setup book that will tell you how to figure out the radius of a cone at any given point on the cone. The book is well worth the money.
I spent a lot of time making various jigs and trying different ways of doing coumpound radius' and I've gone back to a single radius. What I've found is that, for me, it was a lot of extra work without any perceived benefit. Perhaps others with super sensitive fingers could tell you the exact radius of any given fb, but it didn't really make too much a difference to me. In fact, I had one where I could get the action really low, and ended up raising the action more than needed just because I liked the feel better. Go figure.
Good luck
Buter
-
Dude, screw the stoptail!
Get some string ferrules and run the strings through the body. You can drill your holes to follow the curve of the bottom cutout.
That will look a lot better than putting a straight stoptail very close to a curvy edge. I am a big fan of having the extra string length as well.
Nice job for a first time, mate.
I look forward to more on this one.
Cheers
Buter
-
Yeah, it's lookin good, but you might wanna get your jointer looked at...
There's a bit of a gap in the middle, there...
B
-
It's funny that Matt said that. Out of all the things to like about the build so far, I was think that the 12 string neck has one crackin' headstock!
Look forward to more progress on this one.
Thanx for the help on the 12 string question, Wez. Your thoughts echo'd mine. 12 string bridge arrived about an hour ago so I can finally lay this thing out after going to London and doing battle with militant poofs.
Cheers
B
-
I don't know what them other bits of stained wood on your desk look like but you ain't gonna go wrong with a guitar the color of that chunk above...
B
-
A couple of things to keep in mind when using bamboo
1. Bamboo is very strong along it's grain but it is beyond useless across the grain

This is one of the skateboards I've done. Even at 12mm thick without reinforcing the grain somehow, it would snap. The first one I did on comission snapped on the first day the new owner had it, I was more than a bit embarassed. I had thought that with 4 layers of boo, no two grain lines would match up... fail! The black lines you see between the layers is carbon fibre; that bitch ain't a gonna break no mo.
2. Bamboo is a pain in the ass to work with. It will just as happily split down the grain as it will rout out the pretty pattern you had planned for it. To minimize breakage you can stick some ply to your bamboo workpiece anytime you are cutting or routing it and that should do the trick.
3. Bamboo splinters f'ing hurt!
Good luck
Buter

Full Tops On Neck Through Construction
in Solidbody Guitar and Bass Chat
Posted
Hiya
I'm not exactly sure what you're asking (I don't know what you mean by the 'lowered area') but, by far, the easieast way to get your head around doing a top on a neck through is have a look at one of the opening pages of Metalhead28's stunning orange doublecut build. he even carved the top before joining it to the body/core.
I am doing a 12-string neck through at the moment with a full width top. The easiest way for me to explain it would be to treat it like routing a pocket for a set neck (using a template). If you leave the top slightly oversized, you can actually slide the top towards the bottom of the guitar and, as long as you have cut the correct taper in the neck 'pocket' area, the sides of the top will snug right up against the sides of the neck looking very tidy.
Both MH28 and I were using neck pickups that abut the bottom of the neck which made the job considerably easier; if you were not to use a neck pup, or one with any kind of a gap after the neck, I think you will find the job very difficult indeed.
I can post a pic later if you like, but I'm not sure how much it would help.
I look forward to seeing a guitar built to your lap steel standards.
Cheers
Buter