


Our Souls inc.
-
Posts
1,094 -
Joined
-
Last visited
-
Days Won
3
Content Type
Profiles
News and Information
Tutorials
Product Reviews
Supplier Listings
Articles
Guitar Of The Month
Links and Resources
Forums
Gallery
Downloads
Posts posted by Our Souls inc.
-
-
I'd sand off the bottom portion ( that stain aint that deep ) and maybe inside the sails. Try doing anothe coat of the green just around the ship ... maybe do some white inside the sails ... or even black like the Black Pearl . Arrrgh. You could stain some of the bottom spots darker brown , leave some lighter , like sand along the "shore" and then clear it all in once you're done.
Take that side-project and make it rock!

Edit:
the grains even look like waves in the ocean ......
-
I'm actually a little surprised you didn't put the animals on the front as well, but the point is moot now.
I'd go with a mahogany neck and a dark fretboard, maybe some of your padouk. You could work a little of the carving (if you have any usable scrap left) into a backstrap for the headstock or a trussfod cover to balance it out. And I'd finish it with clear with a translucent black burst which would tie into the finish on the back art.
SR
Solid advice. Thanks. I will definitely stew on that...........
I do have all the scrap left. That's one nice thing about using a jigsaw. You only lose 1/8" of product all the way around.
-
That aint lost.
I'd leave the "ocean" color around the ship to make it look like its in the water.... maybe use a mahogany stain to do the bottom ala "land" and then re-burn your graphics to bring em back out. Maybe even relic the finish like an old ship board look or something.
It aint over till the round lady sings.
lookin again , that nice strip of dark wood looks like the horizon - roll with it.
-
I personally would have cut it the other way around and had the animals on the front. Then again I love weird **** like that.
+1 to that. Id have done the same thing.
Maby Our souls isint as messed in the head as we all think he is ?
DUDE !! YOUR NOT GETTING ALL UN-WEIRD-AFIED ON US ARE YOU
Ha ha ! only for long enough to "prove that I can" to myself as well as others ......
I'm tired of people implying that I only build odd stuff because I "can't" build normal guitars ...
I just build what comes to me and shy away from making things I could buy elsewhere.
This piece of wood is probably a couple of decades old and has a nice high pitched "Biiiing" to it when tapped. It really deserves a traditional build IMO , so I'll do my best on this one. Heck I might even make / use templates to rout it.

So - willow, maple/mahog lam ala John or K.I.S.S. the thing and go with mahogany neck / maple board? and set neck or bolt ? I'm still undecided.
How do we feel about a camo swirl???????? - JK . That would be awesome tho -
Oh - and the aminals on the front would've been great , but trying to mount/rout the bridge and pups would've been a bear ! and it would've put the animals on display and I like them 'hidden' back there ..... Like Mr. Natural says " SHAKA ZULU" lol
-
If thats Home depot stain - you'll hide all the artwork before you see any color ............
Edit : Arrrrrgh!
oh and maybe you could draw some inspiration from this :
-
Bridge height / neck angle can be manipulated in many ways. I work by instinct and lessons learned , but here's what I do know :
You can use a standard thickness FB with no neck angle and make a hard tail bridge work fine. Also a Floyd Rose. You'll end up recessing a TOM to make it work though.
You can create neck angle by using a tapered FB on a flat neck. You won't gain huge amounts of height , but if you take a FB thats a 16th of an inch thinner at the neck and 3/32" thicker at the heel , you can gain almost 3/8" +/- depending on your scale length which really helps to get a TOM to the right location without much recessing.
Don't forget to account for the fret height when planing along the FB , then the actual height of the string above that fret. That'll gain you some string height on the body too.
Hope I didn't con-foose you worser.
-
Laminate over the refrigerator art.
Ha ! this thing was 2+" thick and 22"X30" .........it weighed around 25lbs.
Definitely NOT fridge art , lol
-
Wow - the crowd is split on the wildlife .......
It's stayin' .
I'll list my reasons for it :
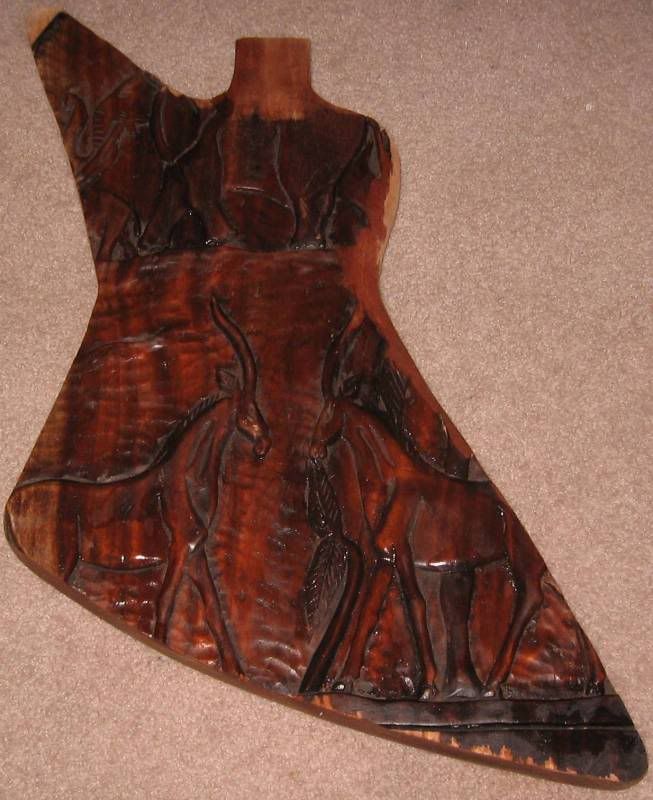
1: I wanted to preserve the original artists work in SOME caliber.
2: The front would've been awkward for routing/etc with the 3d aminals , so the back it is. not to worry , I have a lot of sanding/smoothing / rounding to do back there.
3: Thats what I want.
Since its plain-jane on the grain , I may paint it black. Defiitely doing a front rout / PG ( good call B ) and it will be a Stop bar /TOM / 2 Hummers , 3 way - "traditional" Explorer .
I still haven't decided on a set neck or a bolt on - or what material I should go with -
I have : Padauk , Willow, Maple and Mahogany. I'll probably lam a Maple/ Mahogany or a Maple / Padauk neck for it -
What would you do ?
-
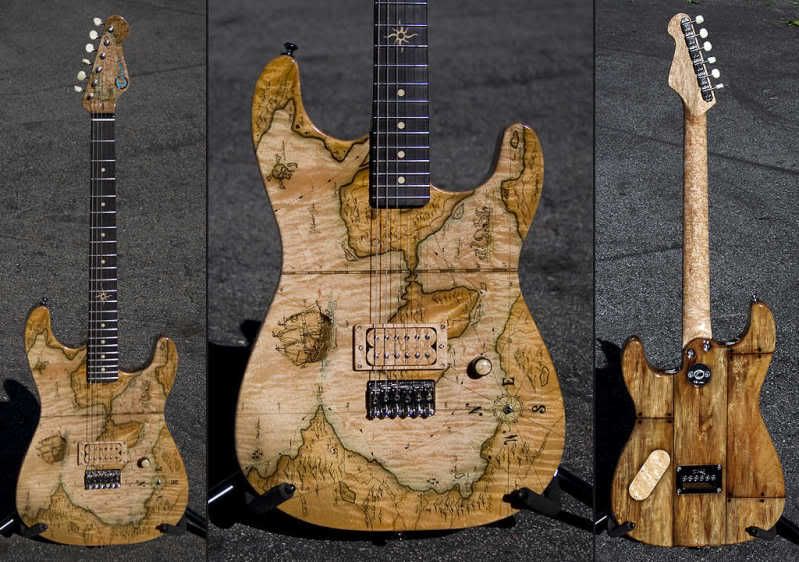
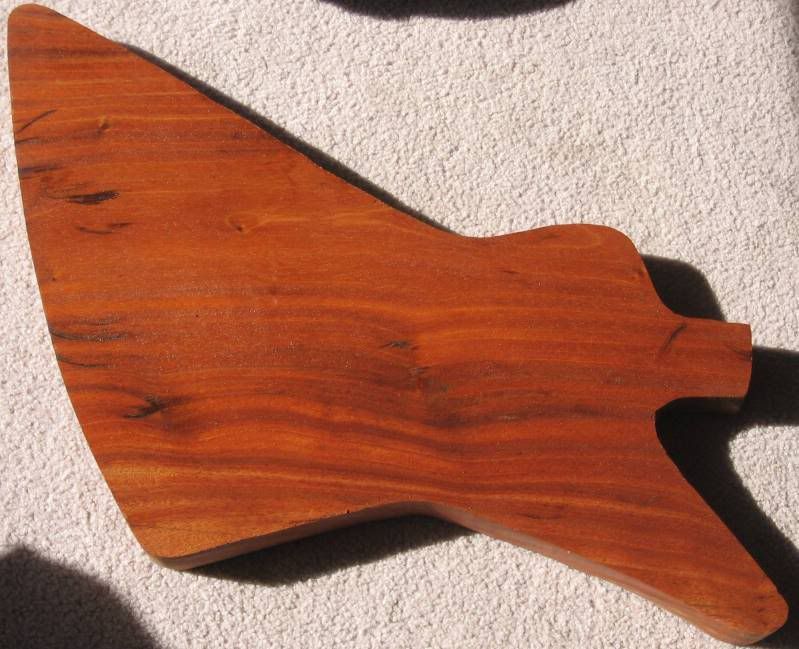
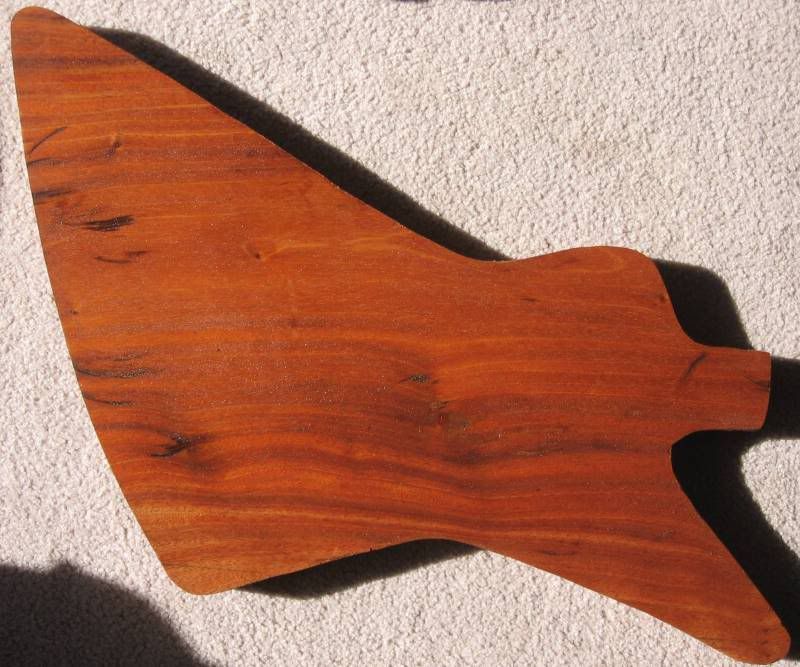
In this thread : http://projectguitar.ibforums.com/index.ph...t=0&start=0 I was looking for opinions as to what type of wood I may have found at the local flea market. It appears to be African Mahogany and I had planned to make a proper Telecaster out of it , but then the Tele went Pine and I cutted out an Explorer from this one piece slab. The only other Explorer I have done is the pine / pallet one so I figured WTHN , you know?
Here it is so far , jigsawed out and hit with 50 and then 80 grit. I rubbed the top with some 120 and wet it for the pics.
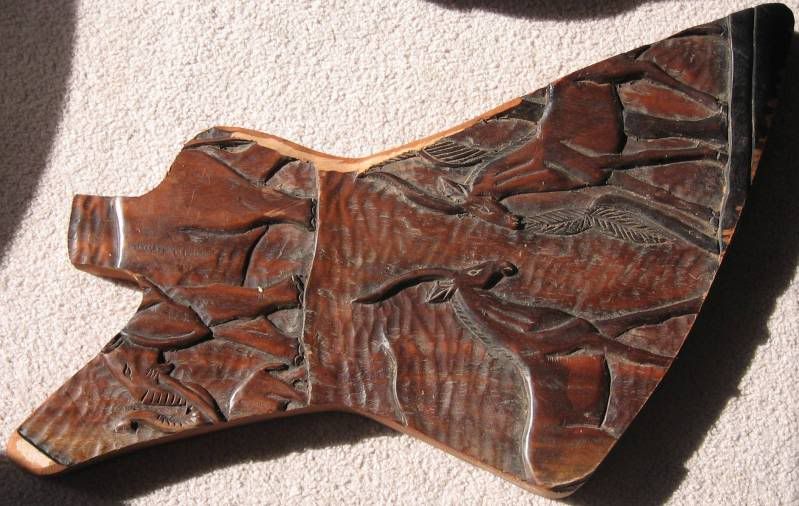
I decided to leave the carving on the back cuz aminals are tasty.
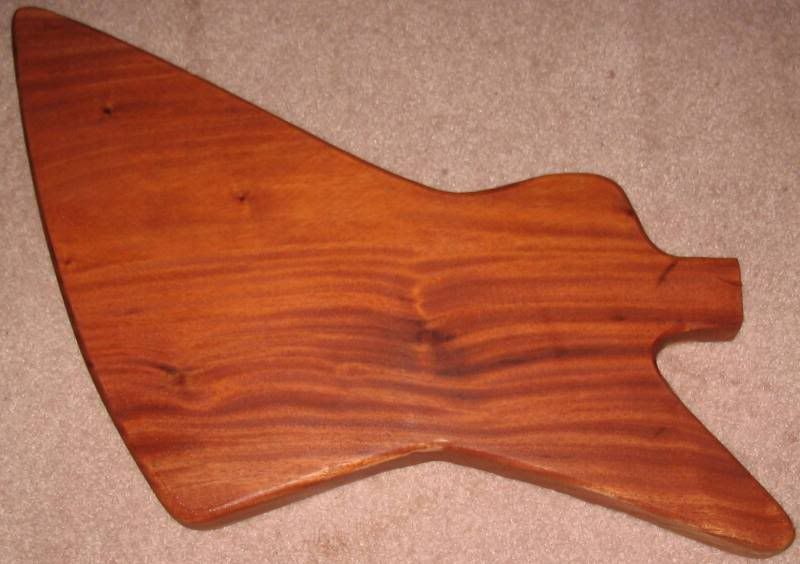
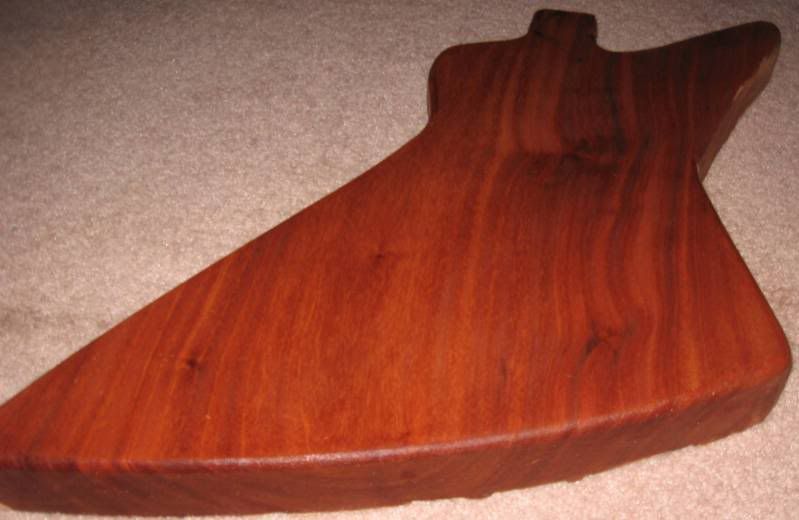
Still got a lot of work to do , but here she is so far....
Thoughts ?
-
Hows this for a "relic" ?????
-
how are you planning on treating the edges.
im thinking a black burst clost to the edge so it doesn't cover very much of the graphics but covers the sides of the guitar.
You got it - sand n fill the edges smooth then black em out. A little overspray/mist on the edges would look good or just do a nice clean line to transition it.
Pauliemc - that vinyl application is in use on guitars already , I remember seeing some of those George Lynch graphics on the 'bay a while back. This method only rocks for the " keep it under $10 " crowd . I think those vinyl ones cost more than I paid for the body.
-
What are you able to use as a finish without dorking up the poster?
BTW: I'm a comic book junkie, so you just went REALLY high up in my rankings.
Cool... I knew somebody would dig it. I tried to go for a neutral pic that would probably sell and I ended up with this.
The laquer I use ( rattlecan ) has never given me a problem. As long as you have no air bubbles under your picture , the clear will last at least 2 years and 120 shows. Ask me how I know that....
- heres how the front went down.
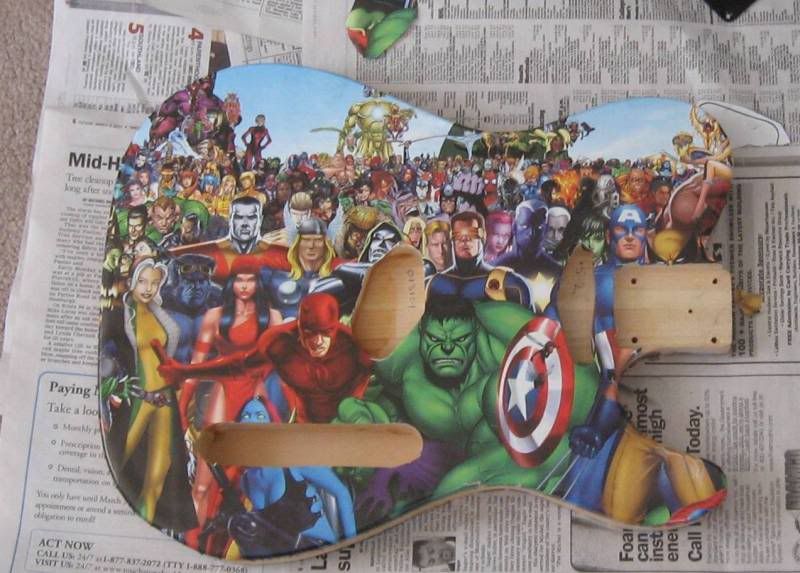

the clear is drying as I type , probably won't see anymore of this one for a week or so.
-
Love your builds ! Do you make any other shapes or stick to Tele's ?
Hi. Thanks! These are my first builds and the Tele was one guitar I didn't own or know much about. It was something new to explore while getting my feet wet.
I have plans for LP. LP Jr, PRS 22 fret, Wolfgang, Strat and a few custom designs I'm developing. I'll be moving on to these in the next month or so.
Peace,
Mark
*looks at bolded statement with mouth open ....*
Dang man - I thought you were a pro. Your builds are ridiculously pro-looking ! Good stuff.
-
here's the body fresh off the jigsaw and wetted .
Thoughts ?
-
Mark - don't hate me - but I don't dig the F-hole on this one. The colors look so 'classic' that the hole just looks off to me. ( Reminds me of the San Diego Chargers logo : http://www.google.com/search?hl=en&saf...mp;aql=&oq= )
Absolutely beautiful build , 100% craftsmanship ~~ not knockin it ~~ , just pointing out the 'oddities' in my warped vision.
I think its the natural wood w/ black looks so traditional that the modded hole throws it off in my brain ........
Keep on truckin though - your guitars are beautiful.
-
Love your builds ! Do you make any other shapes or stick to Tele's ?
-
-
Love the effect , love the colors - I don't know about the random black , but its a killer looking finish and THANKS for sharing your techniques. I might never even use them , but I have that option now , thanks to you.
Rock on.
-
I've always wanted to do one of these! They look like so much fun! There's got to be some way to do it without using contact cement though? For some reason I just couldn't bring myself to use it on a guitar (don't ask why, just internal prejudice since I used it in pre-school lol). I'd love to find a way to do it with epoxy or something, but so that it doesn't leak through the paper... so I could do it on a carved top in my vacuum system or something!
Chris
Actually , after experimenting with a couple of glues : elmers , titebond and the contact cement , The cement wins hands down. I had the elmers and the titebond soak the paper to the point where it rips/bleeds or otherwise makes you start over ! and don't put sealer on top of it either - soaks through in random locations leaving spots behind.
The carved top vaccuum thing has me goin
I don't think the paper would stretch as much as wrinkle. Although stretchy fabric would be do-able .
The Pirates of the Carribean guitar would be easy to do this way - and wayyyy cheap compared to airbrushing. Just gotta consider the edges and hiding them.
Good luck experimenting if you do ! feel free to ask questions.
-
No need for a compressor
http://www.stewmac.com/shop/Finishing_supp...amp;tgtiid=3881
SM has nitrocellulose laquer in spray cans.
Looking good- keep it rollin' .
-
O.K. , I'm wiring up a "middle position pickup" that I made out of 3 single coils. I managed to hook it up so I have my choice of 7.5 , 15.5 or 23.6 ohms . The 4 wire conductor is set up like this : Black and bare = ground / White lead = 7.5 /green lead = 15.5/ and the red lead = 23.6 . I plan on hooking it up to a normal 5 way switch .
Anyone ever done this ?
I have no idea ~
A: what I'm doing
B: what it's going to sound like
C: Why the heck I did it
4: If I'll do it again.
Any thoughts ?
FWIW - Its the 3 SC's from a Squier strat. I'll post a diagram of how I hooked it up in a bit.......
Edit:
Thar she blows!

-
@ our souls inc: How do you go about making your speed knobs? Ive been meaning to make some for my current project but i dont have a lathe.
p.s sorry for hijaking the thread
My knobs on my old cory zenox measure 15/16 on top and 1" on bottom
Well the thread has already had a few answers to the OP's question so I don't feel bad about the threadjack now
I'll do a proper tutorial on these if there is any interest.
I take a 3/16" drill bit and insert it into a 1" hole saw blade. The 3/16" bit makes the hole for the Pot shaft and guides the hole-saw into the wood.
Clamp your wood down good ( safety first ) and make your initial "plunge" with the drill bit / hole saw .
* Important * Make sure the drill bit is only sticking out of the hole saw blade about 1/4" or so.
Once you make the initial plunge , you should have a 3/8" deep pot shaft hole and a 1/8" deep "ring" in the wood where you're going to get the knob from.
REMOVE the drill bit from the hole saw and finish going through the wood with just the hole saw .
Pop out the knob from the hole saw bit and sand/shape/paint/finish to taste .
They come out a hair smaller than a regular speed knob , but you can change the outcome of the size by changing hole saw blades.
Best of luck if you try it out !
-
No idea what it may sound like but my gut reaction is feedback. If you get it loud enough for 'you' to hear , it'll ( possibly )be loud enough for the mic to hear and that = feedback.
Tim "pigpen" , our old drummer used to use a pair of headphones as a bass drum mic. He had these big hi-fi headphones from the heyday of cheesy hi-fi and he put them on the drum like it was a human head and ran it to the PA. Very clear ,deep precise bass drum sound. No feedback ever. Maybe incorporate that 'technology' into your build. Use a pair of headphones as a mic , make sure they have foam surrounds that block out external noise to fight feedback.
Best of luck and let us know how it goes !
-
9" at the first fret to 12" at the 22nd/24th fret ? That would be a 9" nut radius and a 12" bridge radius.


Five-string Chambered Warwick Infinity Bass
in In Progress and Finished Work
Posted
Far be it from me to offer you advice ( You > me ) but I'd use a rasp to knock the edges of that top to its final shape. Routers are just so unpredictable and the extra little time would be worth it to be able to really control how much meat is coming off of where.
Looking good - Love the idea of the swirly epoxy in the holes.