


guitarnut
-
Posts
518 -
Joined
-
Last visited
-
Days Won
1
Content Type
Profiles
News and Information
Tutorials
Product Reviews
Supplier Listings
Articles
Guitar Of The Month
Links and Resources
Forums
Gallery
Downloads
Posts posted by guitarnut
-
-
I must say dude, when you update, you dont mess around!! Love the binding jig too, awesome to see the build of that as well.
Thanks, Bob!
Yeah, I had the thread started over at TDPRI so I copied and pasted it over here...went much faster than the build has.

-
Love the ingenuity and thinking each part through. Great build thread.
That binding laminator is FREAKING AWESOME! Good to see you back on this site. Enjoying the build and details- great work as always.
What he said. ^^
Thanks, guys! I really appreciate the comments. It's good to be back on PG.
Peace,
Mark
-
That is a NICE hunk of wood!!! How much did that freakin cost? O.o
I bought it as part of a lot so I don't know exactly but the lot, with several other not so impressive billets, was around $300.
Peace,
Mark
-
After a steady diet of Strats over the last 4 months, it's time for something completely different. Let's see if anyone is still following this one. I have a way of losing my audience thru laziness and short attention span. :oops:
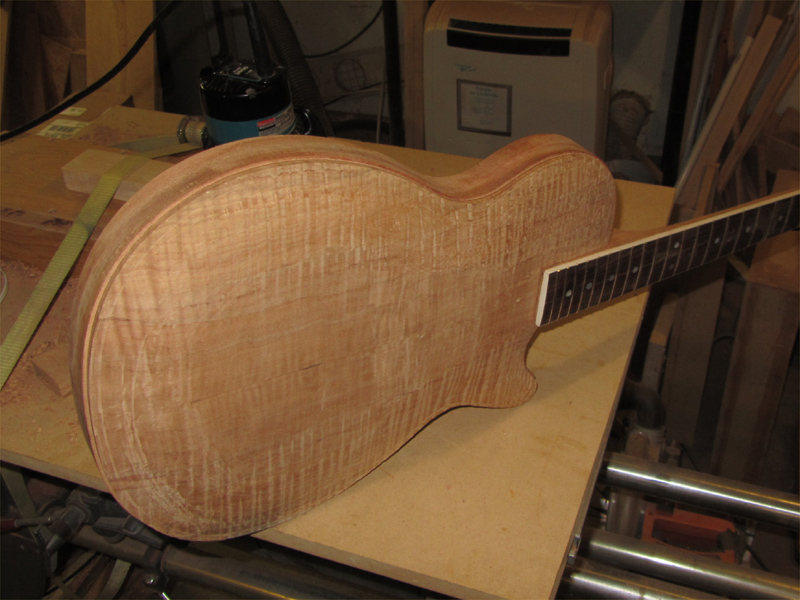
I didn't make a lot of progress but sometimes a little is all it takes to get back in the game. I was going to start the cavity routes this evening but I decided to take some time and review the build thread...it's been a while since I glued down the top.
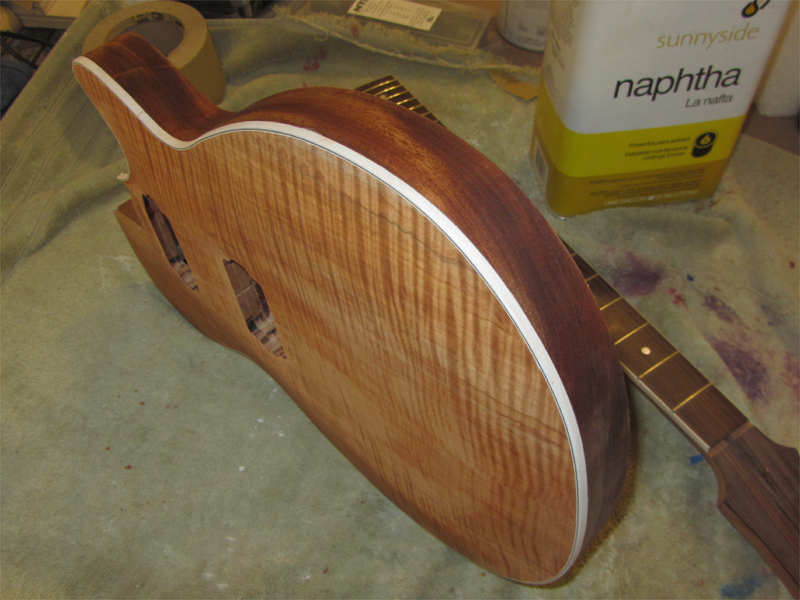
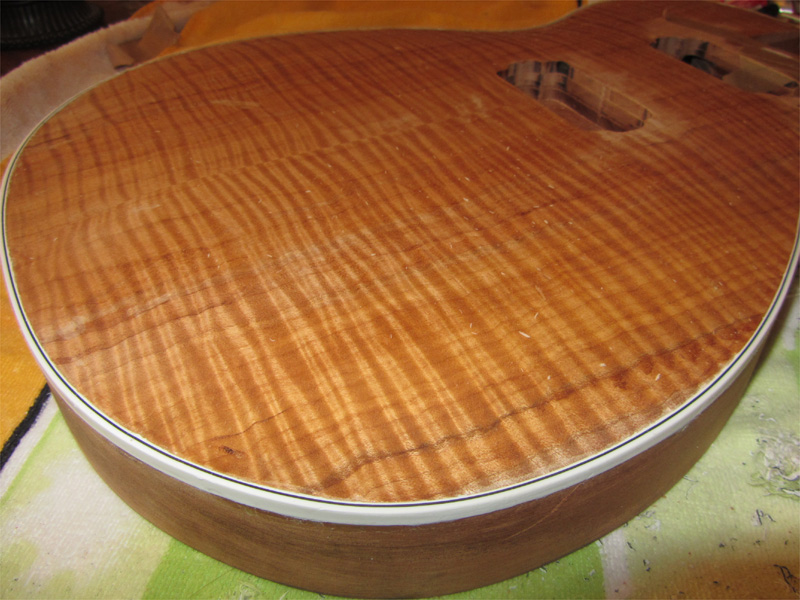
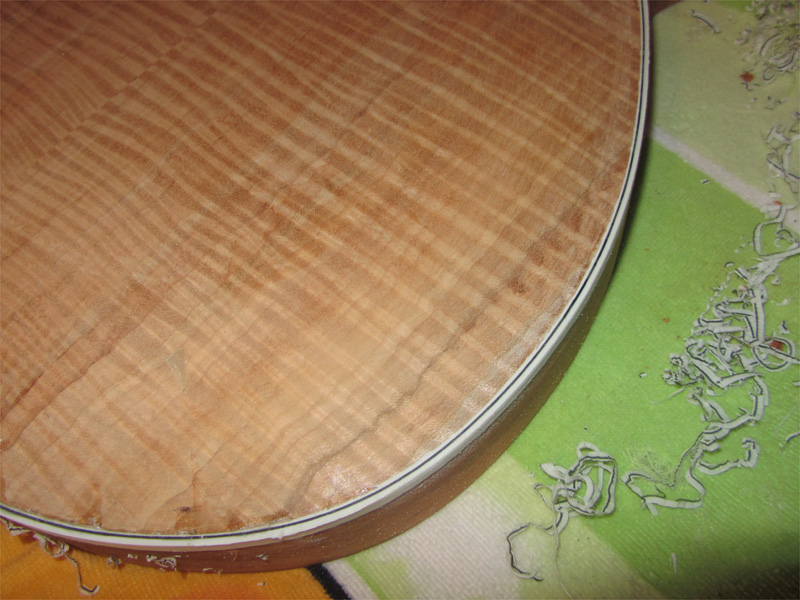
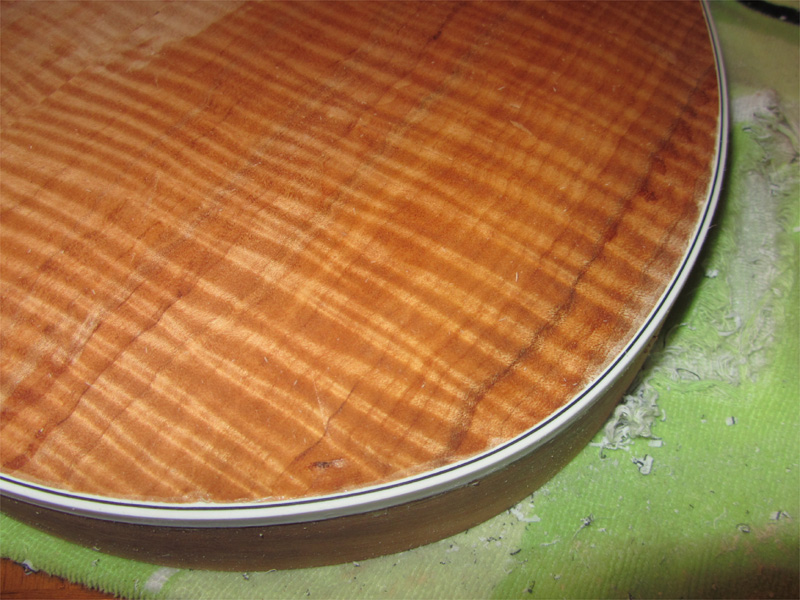
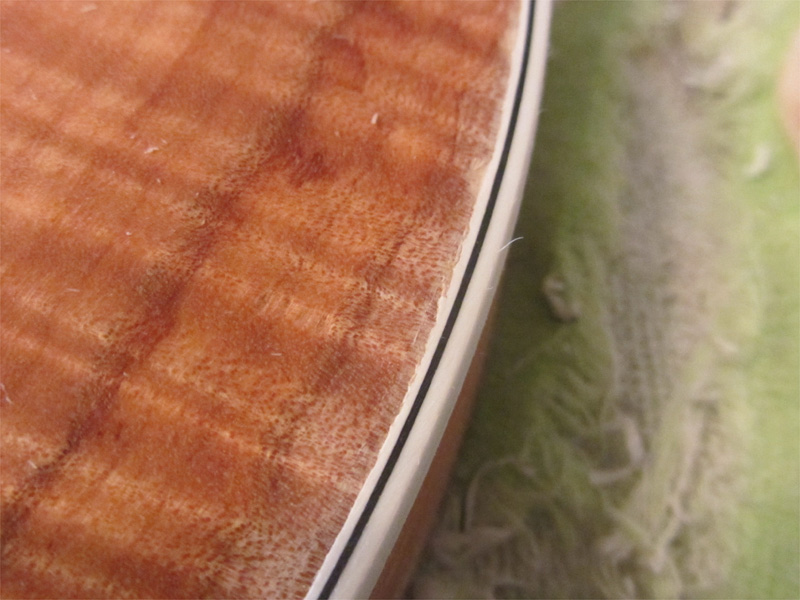
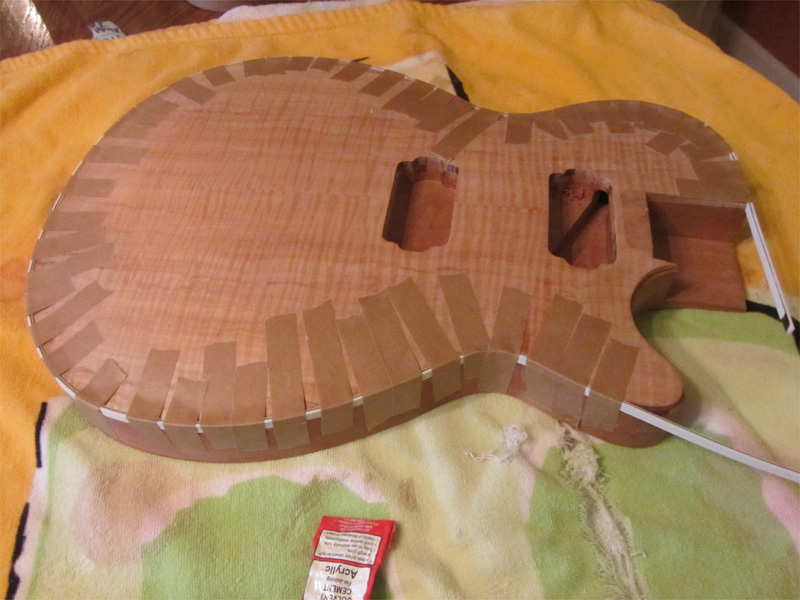
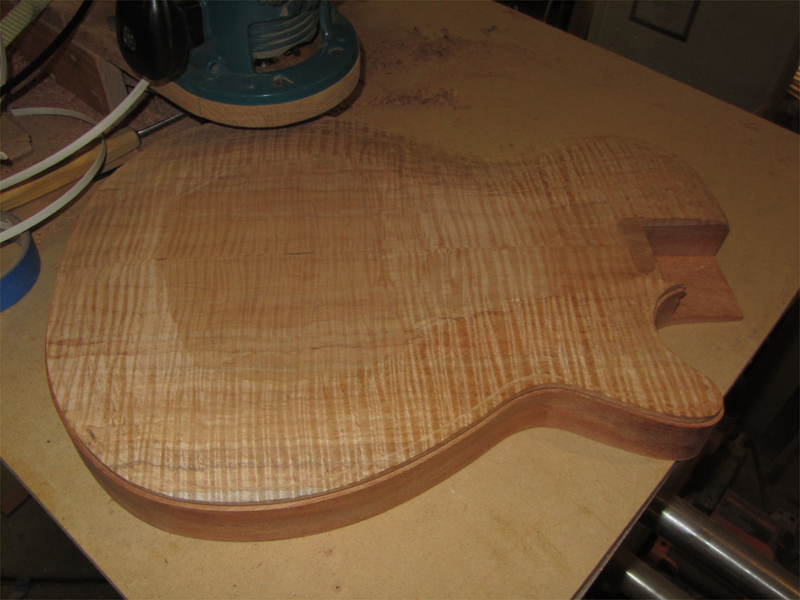
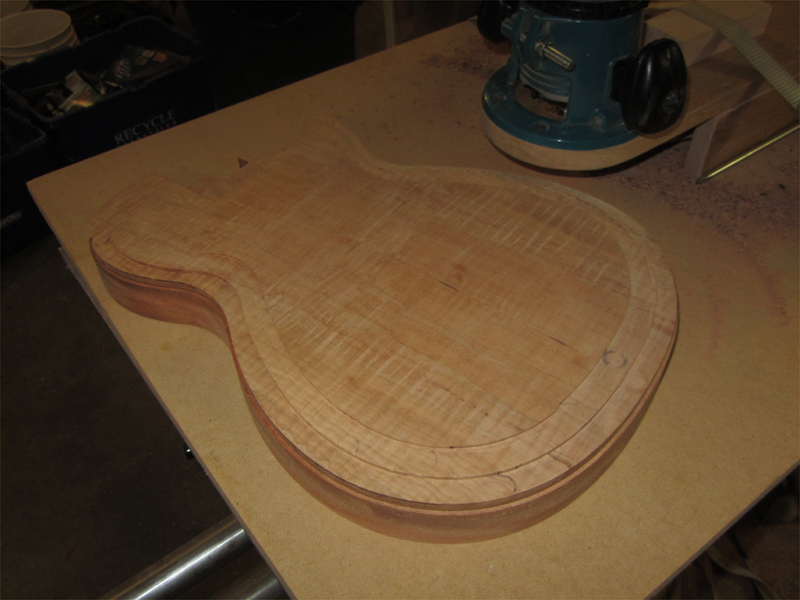
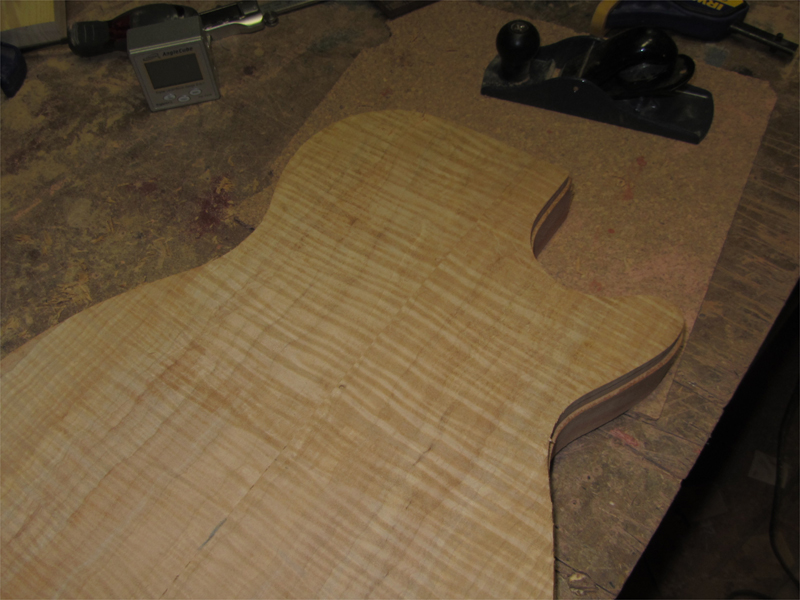
Here it is as I left it. The binding is done and scraped. It just needs to be sanded flush and the glue cleaned up.
Just a little work with 180 grit and she's looking pretty good. A wipe down with naptha makes the top pop. The laminated binding is a nice touch for sure. I'll be doing more of it in the future.

-
 1
1
-
-
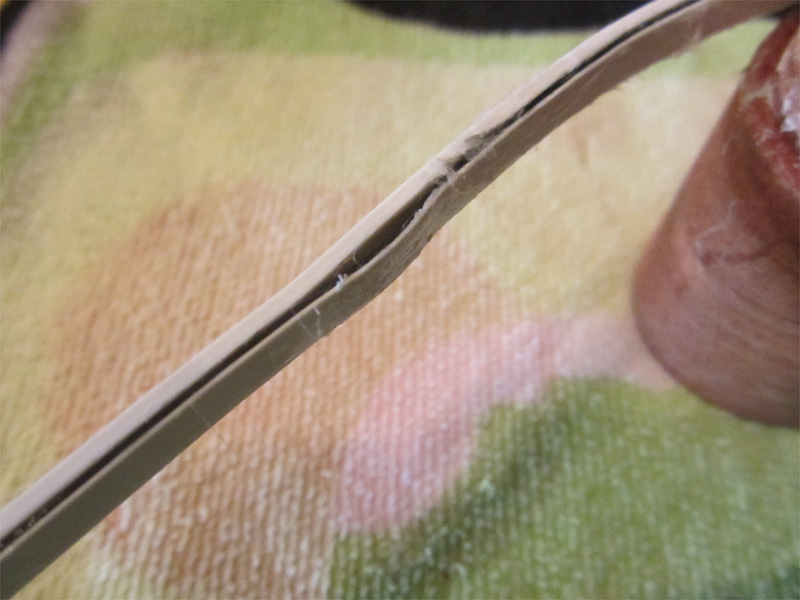
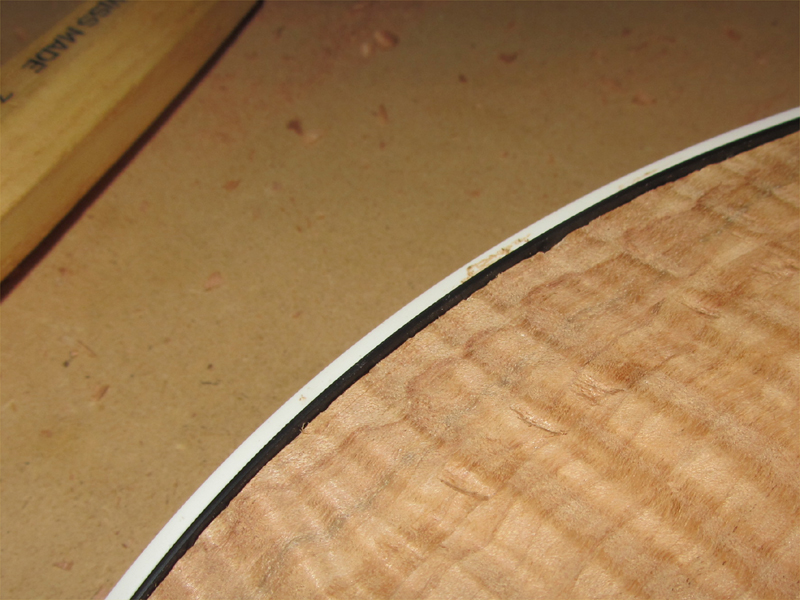
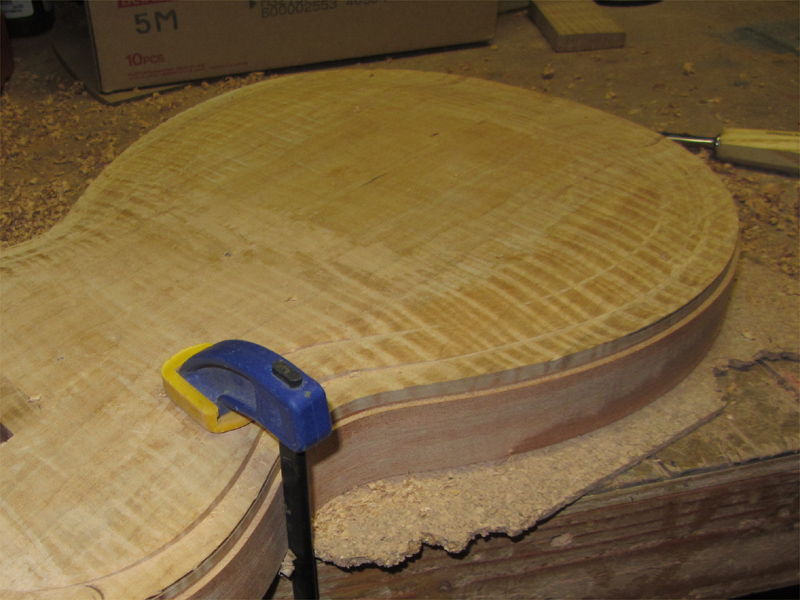
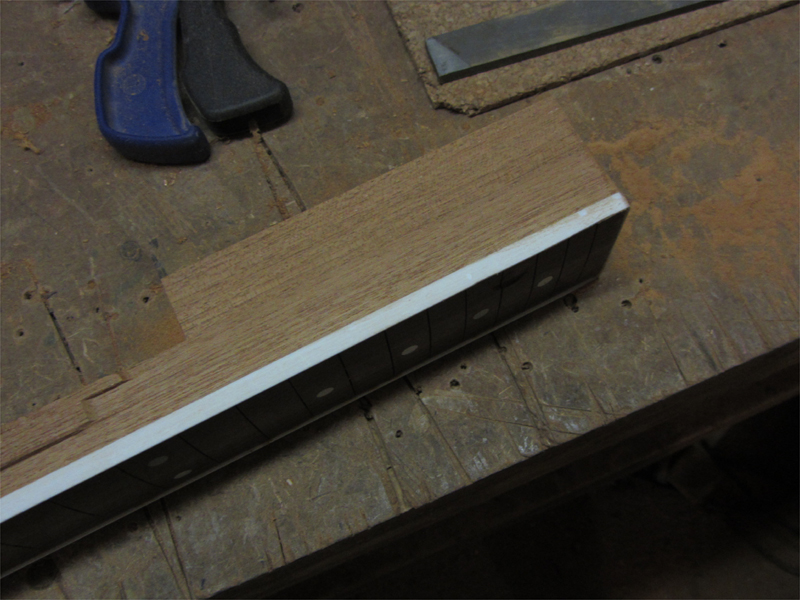
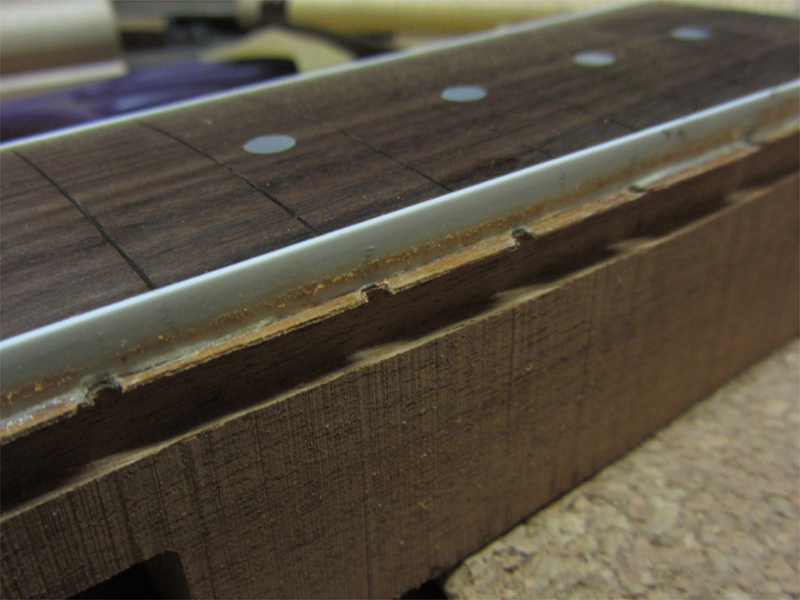
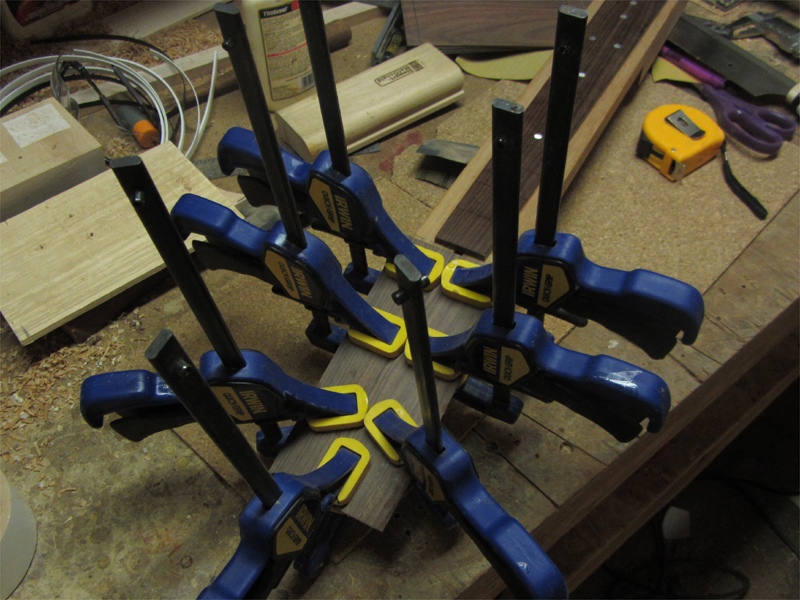
The binding splice worked out well. Actually, the first attempt wasn't too good. I ended up cutting the binding back a bit further and re splicing. The issue wasn't the splice but a thinning of the inner white layer on the spliced piece that was very obvious...maybe too much acetone during lamination.
Anyway, here's the result. A little bit of binding goop and it should be good to go.
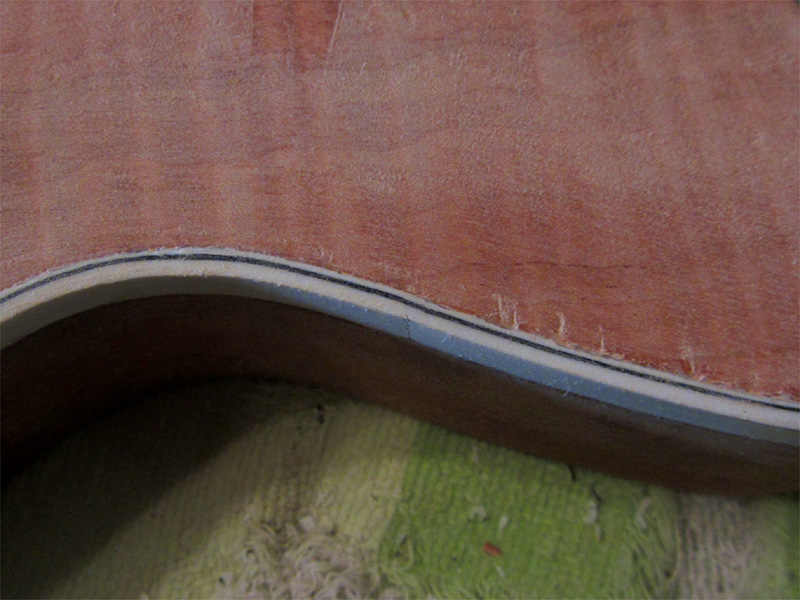
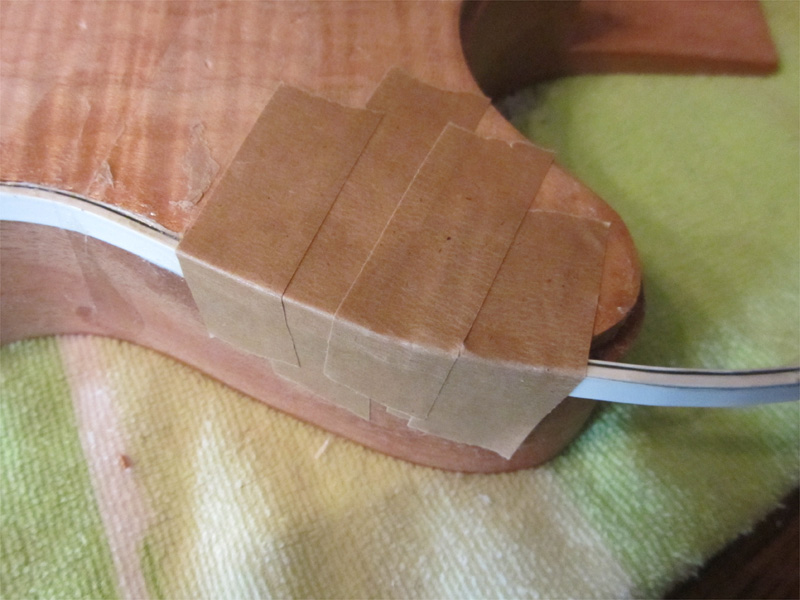
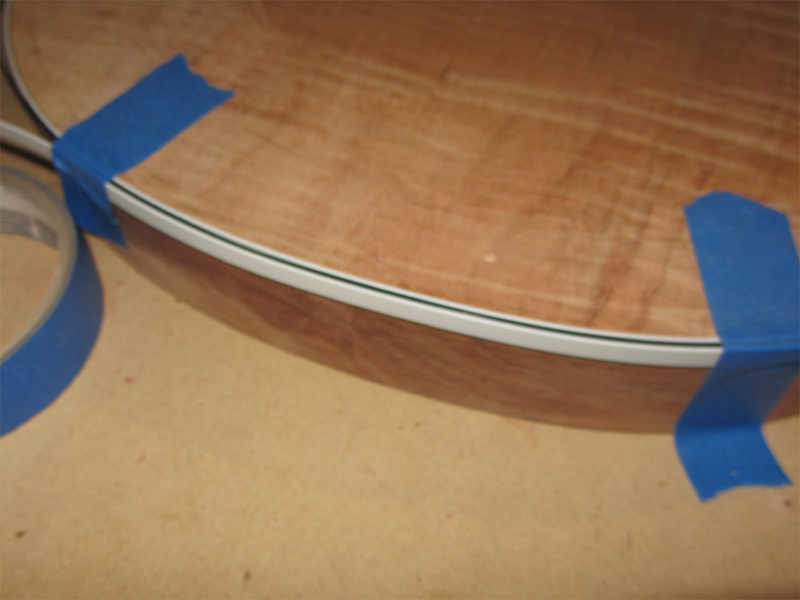
I taped down the last of the binding. It went in very easily...didn't even need to heat it.
Then I finished up the scraping.

-
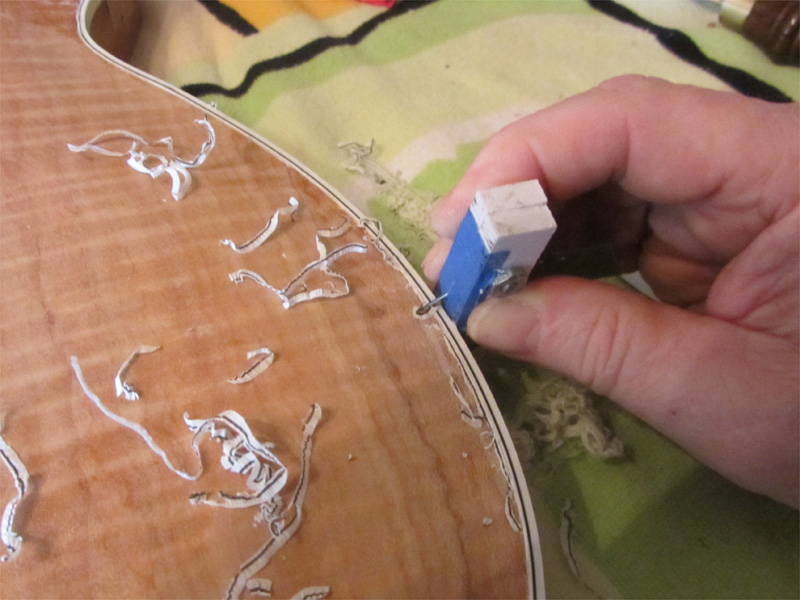
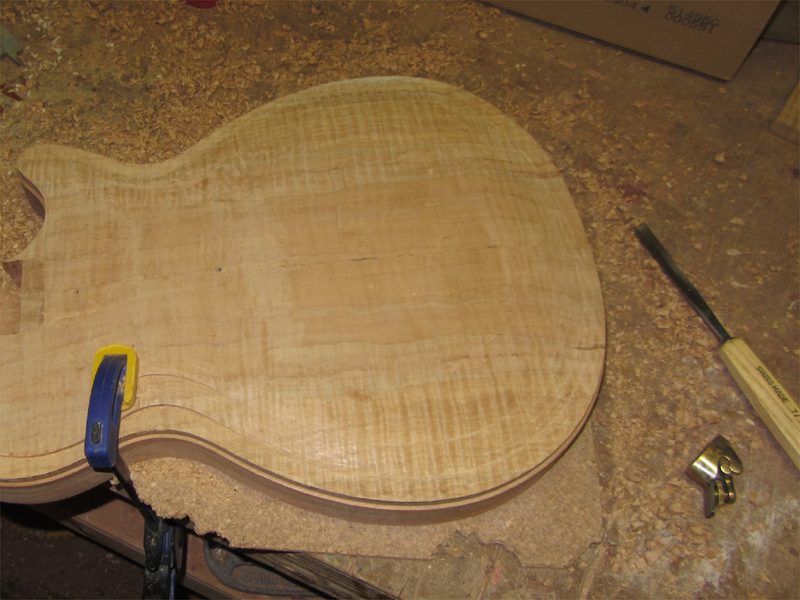
While the splice was setting up, I decided to do some scraping. I used the scraping tool I made for scraping paint from bindings. it worked pretty well. A little slower going than a cabinet scraper but far more accurate. I took them down to just a hair above the top.
-
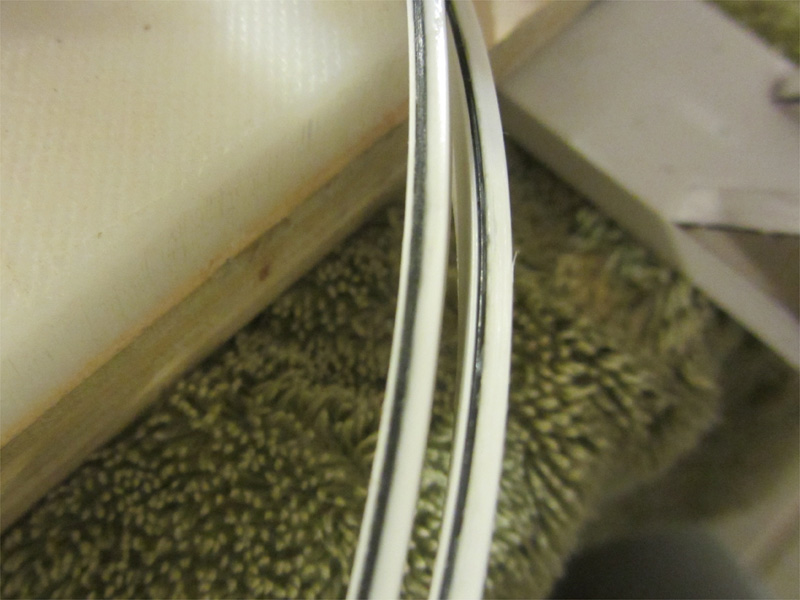
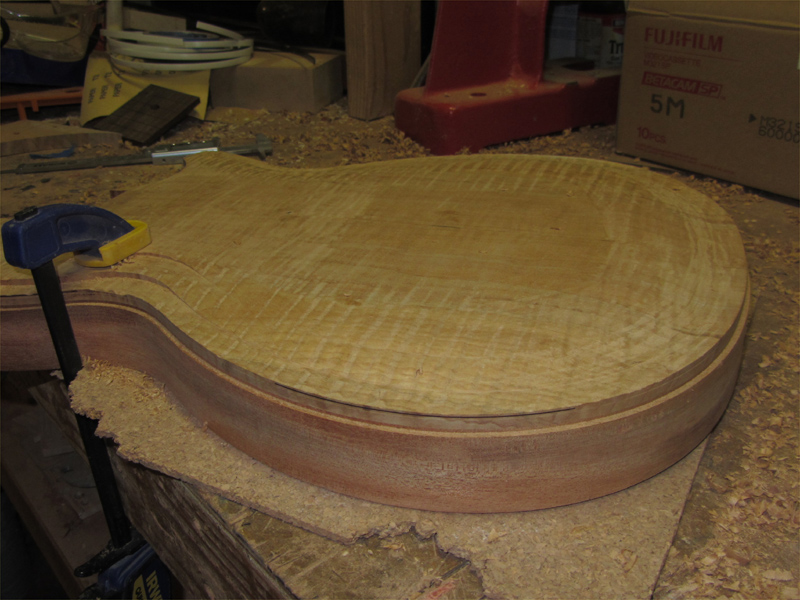
Last night. I made the first run of the binding laminator. But for one small buckle...see below, it couldn't have gone smoother. If I had realized from the beginning that I needed the thickest piece of binding on the bottom of the stack, it would have been a perfect run. I started with the .020" pieces on bottom and one slipped under the adjuster and got in a bind...no pun intended. Still a usable lamination but I'll have to splice it at some point.
The edges are uneven and need to be smoothed and squared.
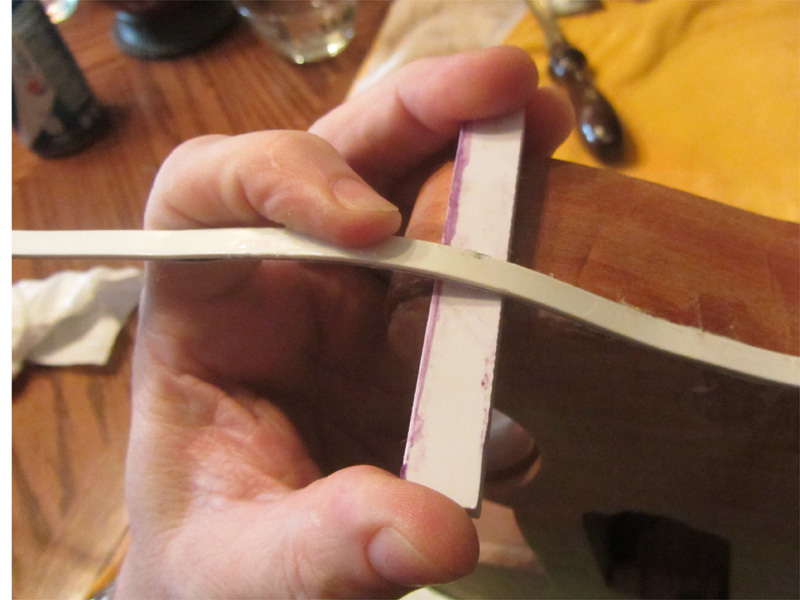
I put a narrow strip of 220 in the gap and closed the adjuster to lock the binding in place. Then i drew it thru the gap and it squared and cleaned the edge.
Then, it was the usual dance with glue and tape. Nothing out of the ordinary here. Until...
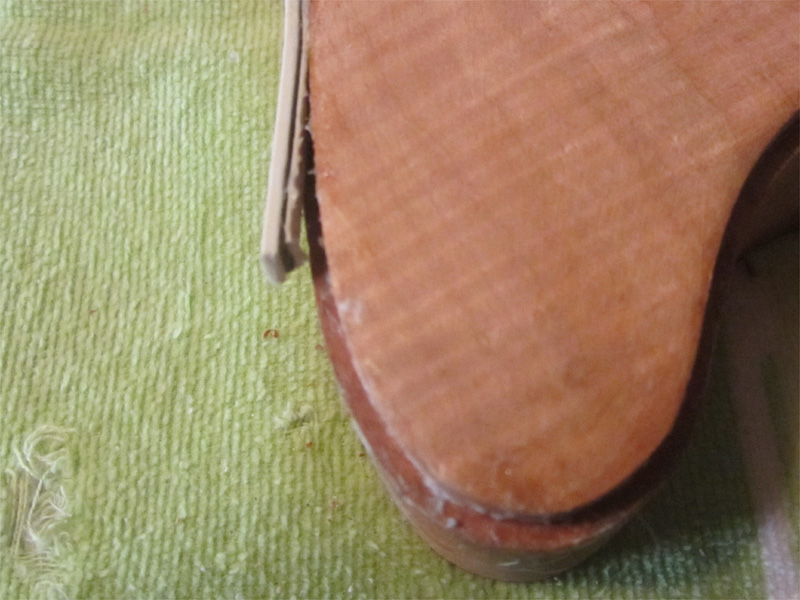
...the buckle. I'll deal with that in the morning. I let the binding set up over night.
This morning. Since it was far enough into the binding that I couldn't cut it off at the end, the only option was to cut and splice. I chose a spot the was fairly flat...to avoid having to splice on a curve. I placed a small scrap of PVC under the binding and cut back at an angle...appox. 45°. I flipped the cutoff over and cut the opposite angle on it. I cleaned up the cuts to get a snug fit and I glued each piece in place leaving the joint visible. When I was confident I had the best alignment I was going to get, I taped over the joint last.
-
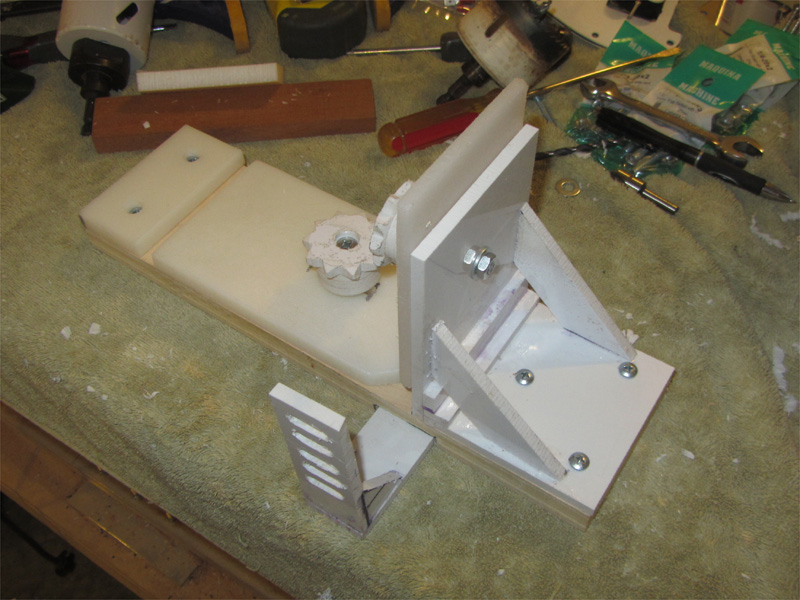
I finished up the jig. It got so hot out there I was done for the day. I need to pick up some cheap art brushes to use with the acetone anyway.
I added a couple of braces. The joint was strong enough but there was some flex over the length of the PVC.
Then I marked and cut a dado for the loom.
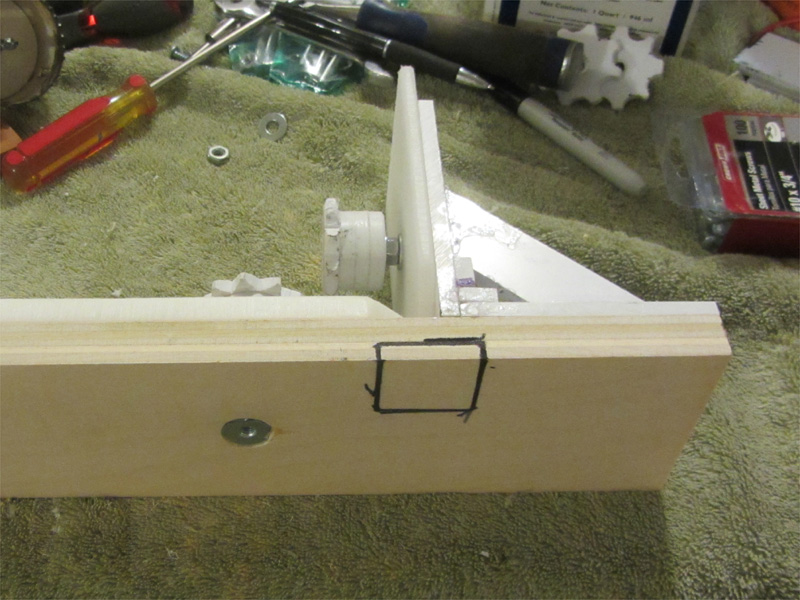
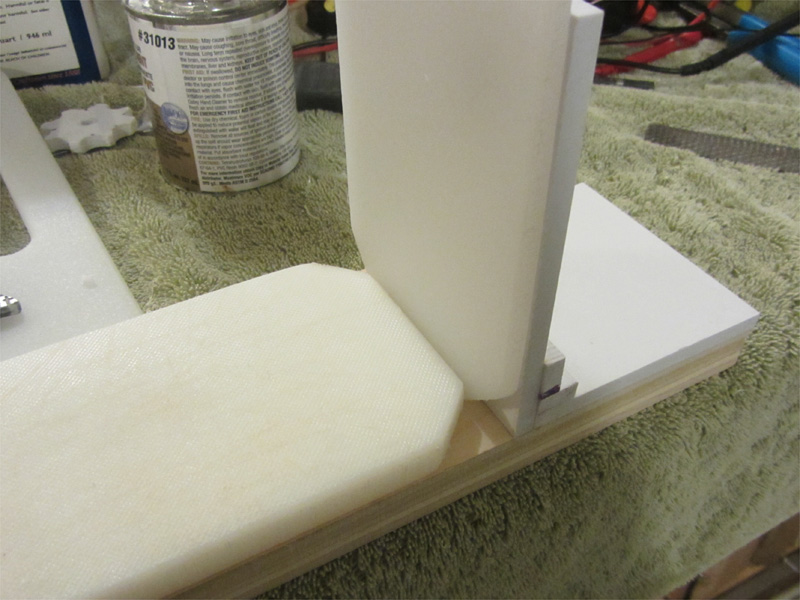
I screwed a piece of PVC to the bottom of the base and made the upright portion of the loom. I braced it with a few gussets...
...then glued it in place.
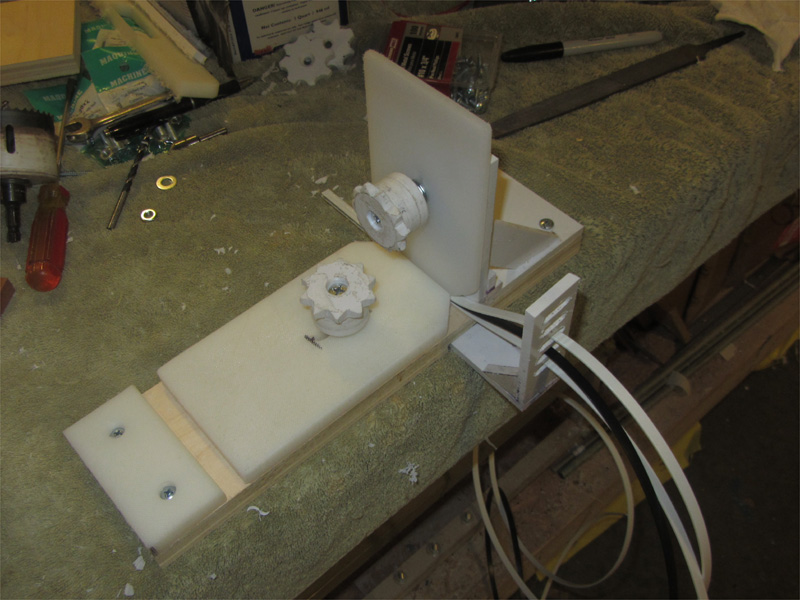
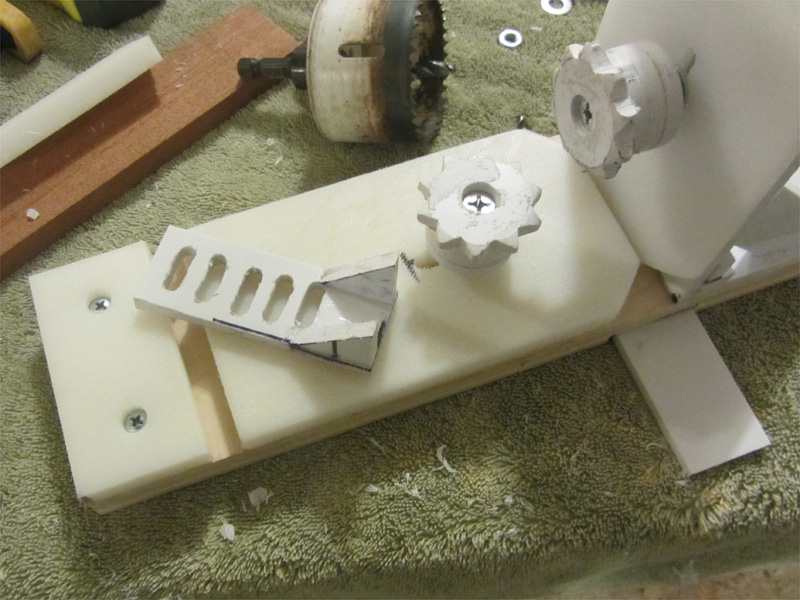
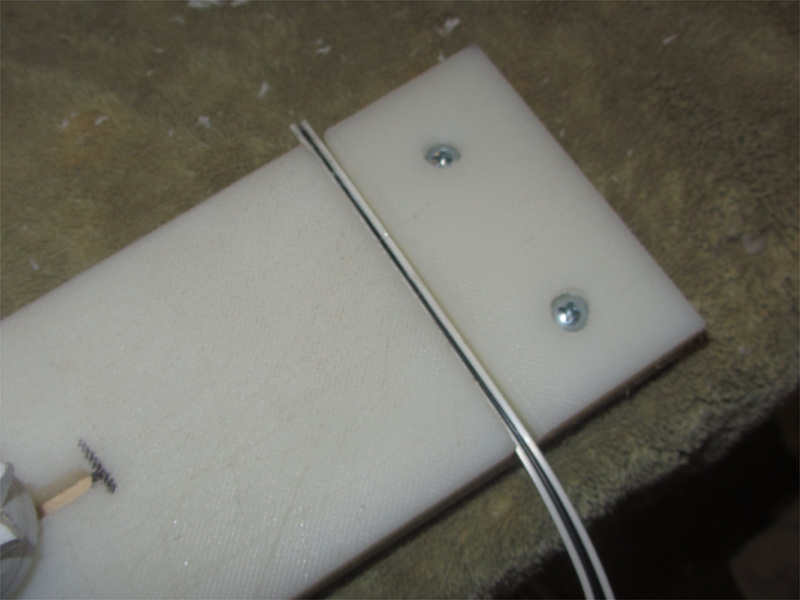
I also added another piece of cutting board to the far end of the base. You can see it open in the pics above. The horizontal adjuster will slide back against it. I plan to put a thin strip of abrasive in the opening and use it to dress the edge of the laminated binding. I'll probably notch the underside of the adjuster so it will clear the abrasive.
-
1
-
-
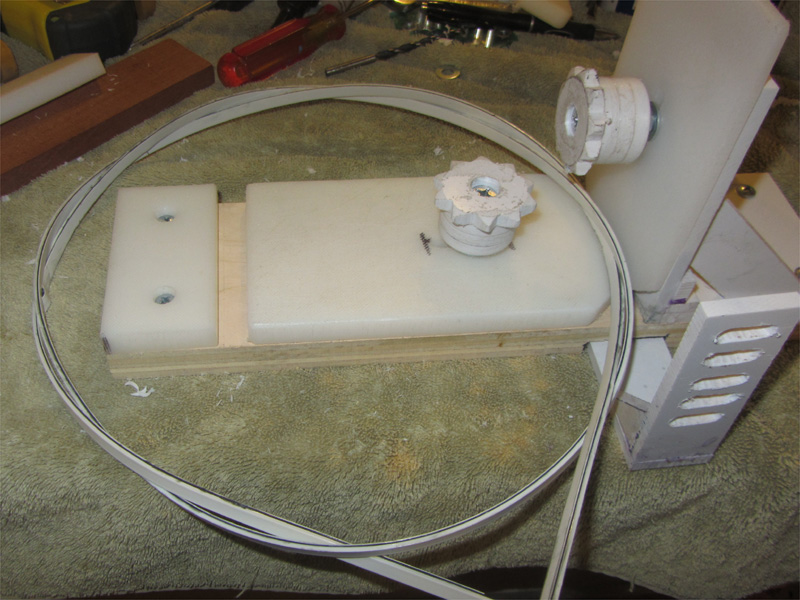
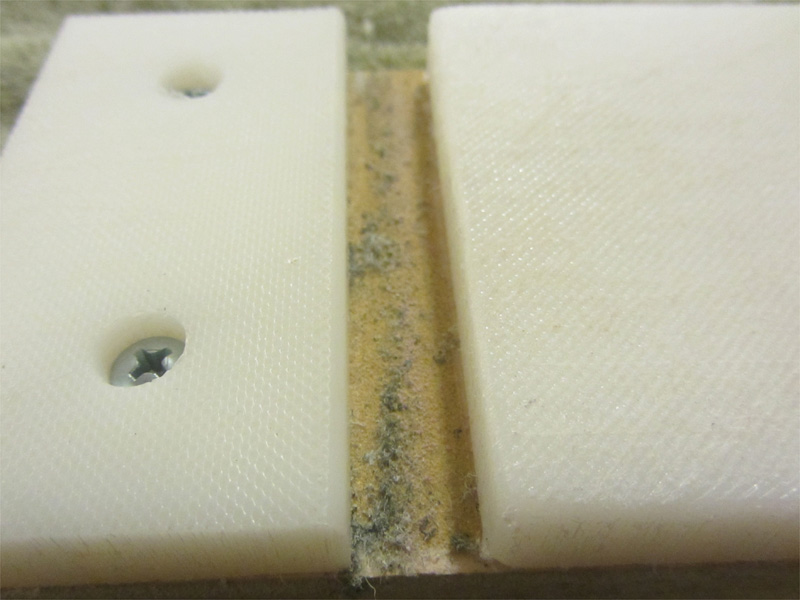
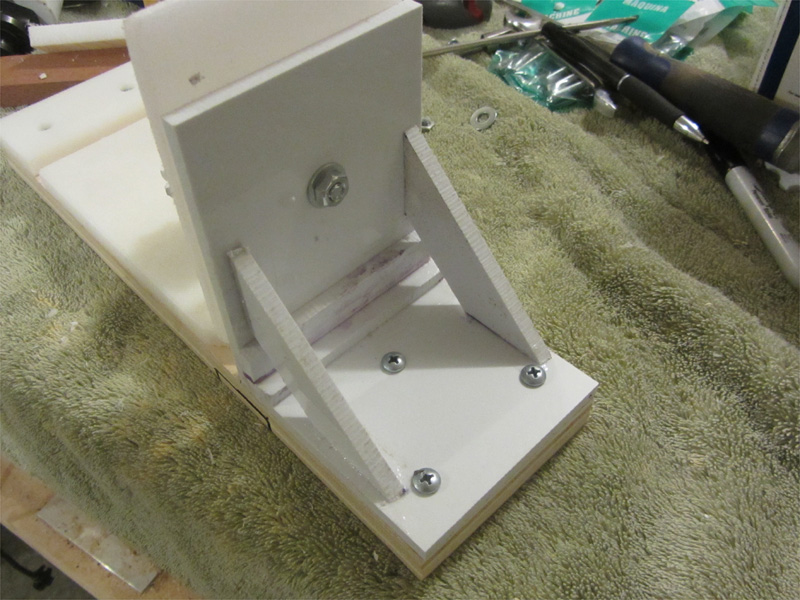
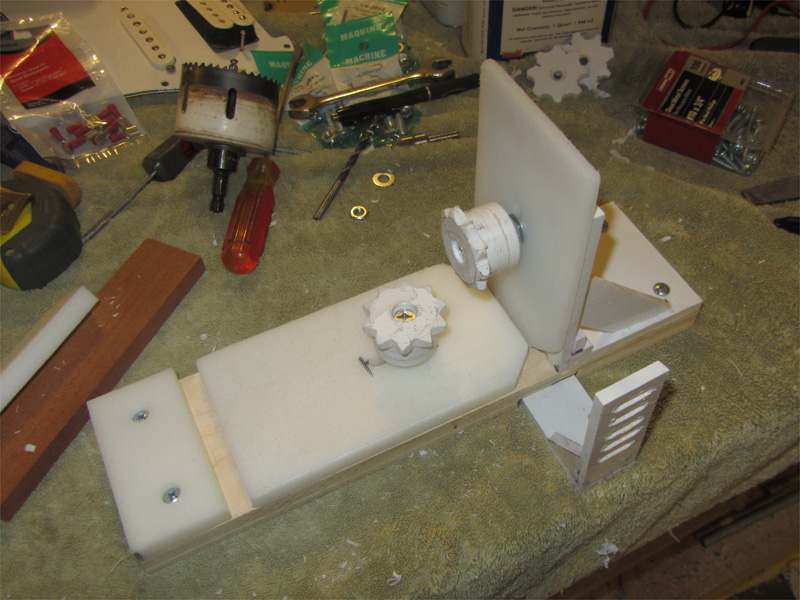
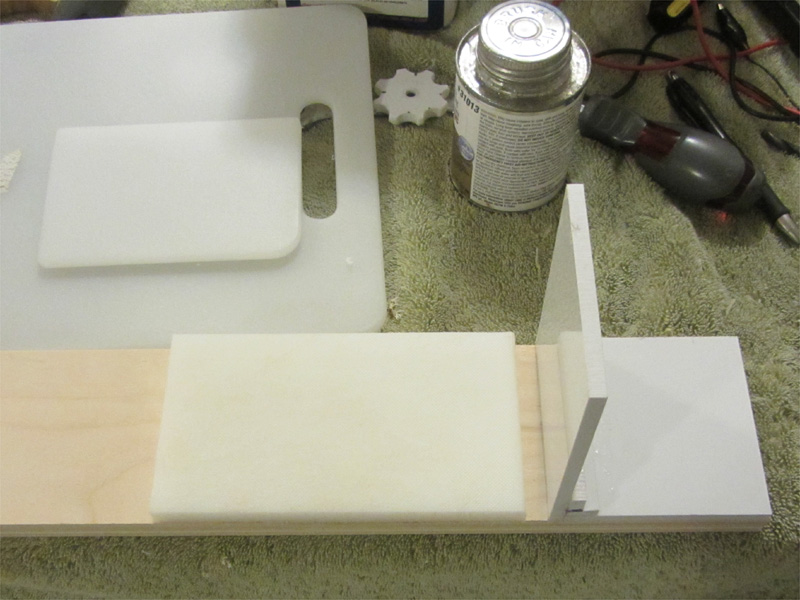
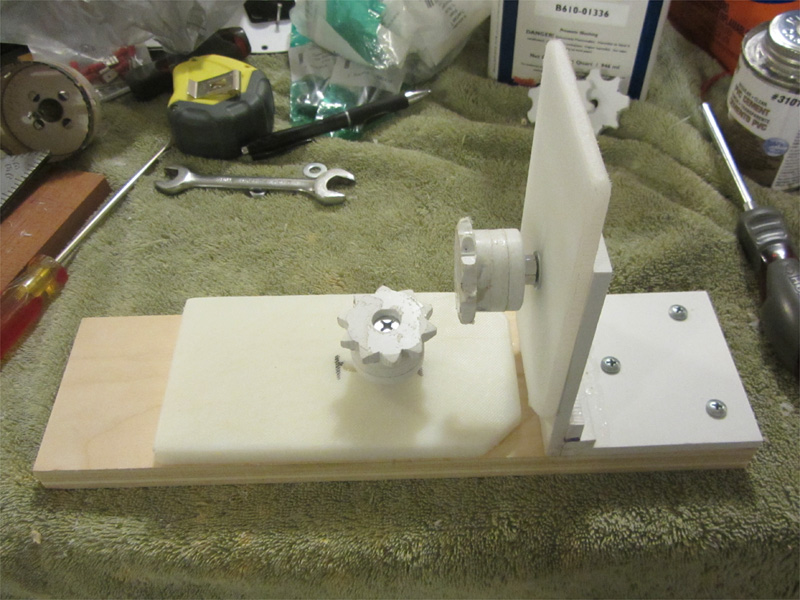
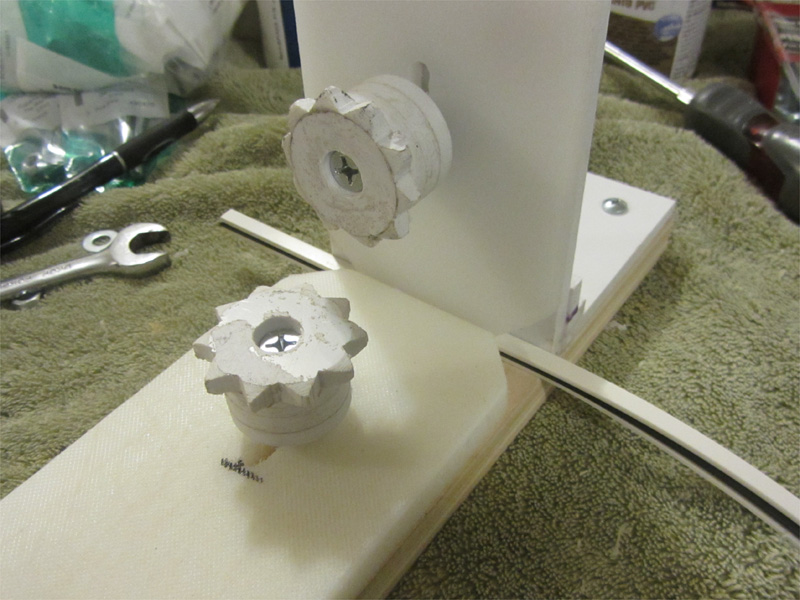
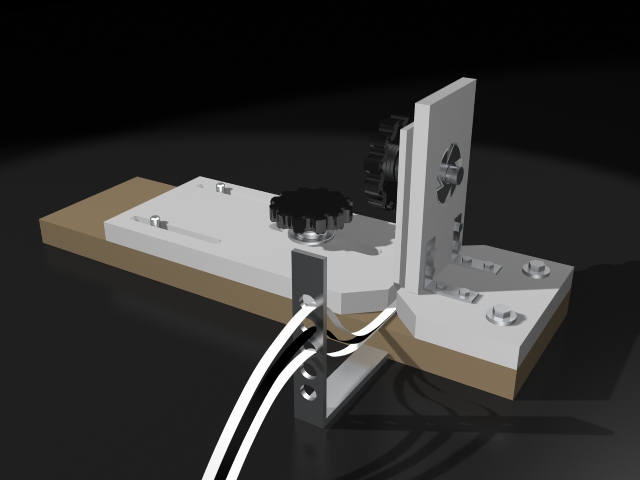
I made the support for the vertical adjuster out of PVC sheet. The base is 3/4" birch ply. The sliding pieces were cut from 2 different thicknesses of plastic cutting board. The knobs are actually gears that I made to test a chain drive for my sander project. The teeth need to be rounded over a bit but they work great as knobs. 1/4" hardware all around. A 1/4" tee nut is countersunk on the bottom of the base for the horizontal adjuster to tighten into. The 2 cutting board pieces have 1/4" slots cut in them.
I still need to cut and mount the loom if I'm staying true to the design but I'm not sure I need it. The strips stay aligned, feed in nicely and are held firmly. It's not as pretty as the rendering, but it looks to be just what I wanted. After consuming mass quantities off the grill this afternoon, I'll give it a test run.
-
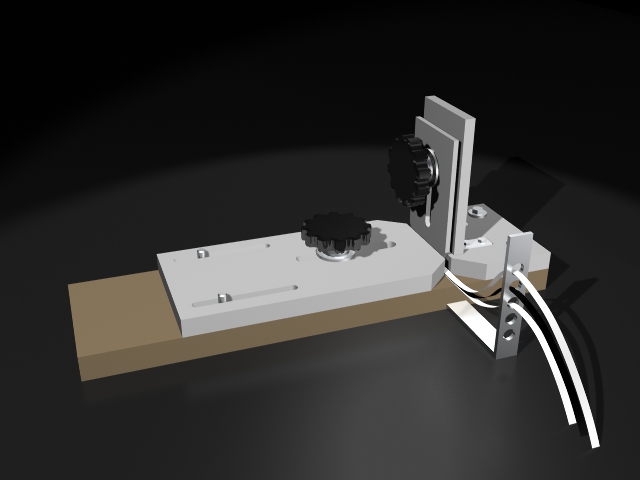
I'm planning a w/b/w binding for this build. I need to get the bindings laminated before gluing them in. I came up with this idea. It should keep things lined up and pressed together. I know I could do it by hand but I always try to look down the road and make a jig or template that will serve me many times vs just stumbling thru it...which I tend to do when i get in a hurry. :roll:
Here's my idea. It's a variation on the Stew Mac lamination jig. Adjustable width and thickness guides as well as a loom for feeding and aligning the individual bindings. It can be adjusted for any reasonable width or thickness of lamination. I plan to make most of it out of plastic cutting board...nothing sticks to that stuff. With it clamped to the bench and the loom holding the bindings, that leaves both hands free for brushing on acetone and feeding thru the jig.
-
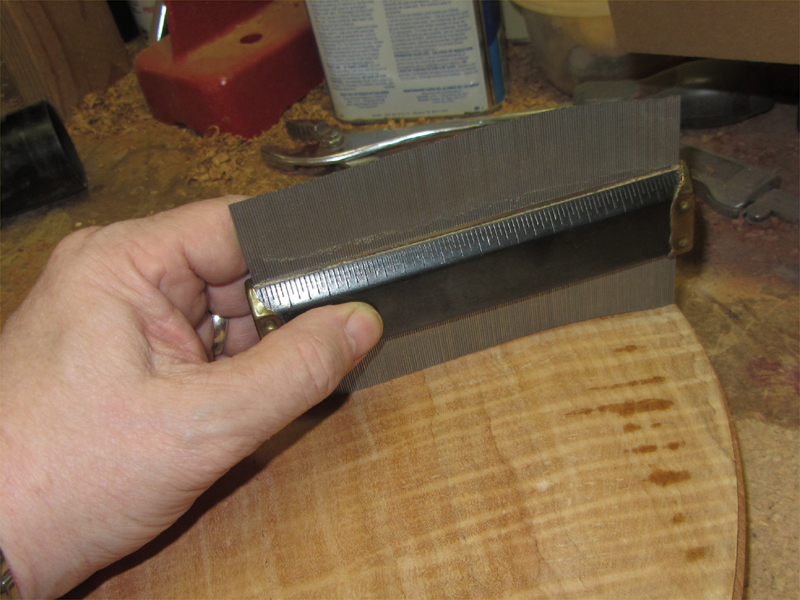
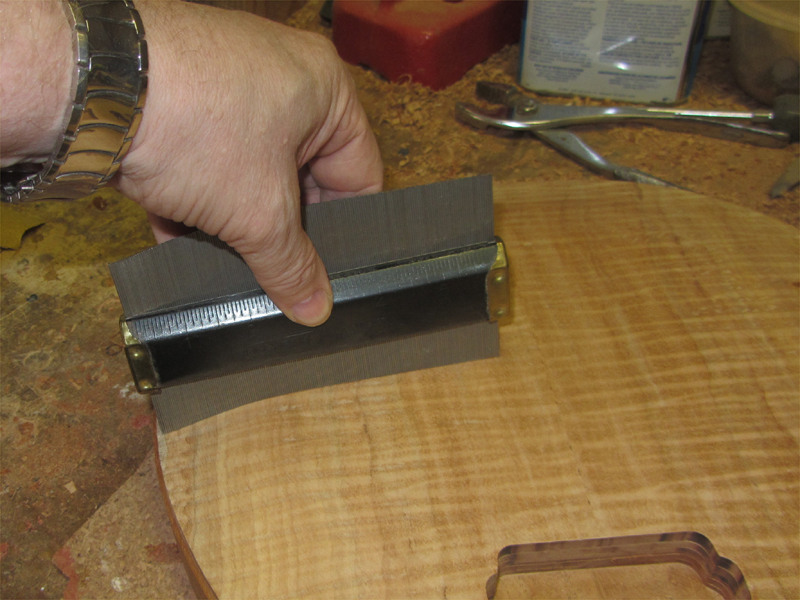
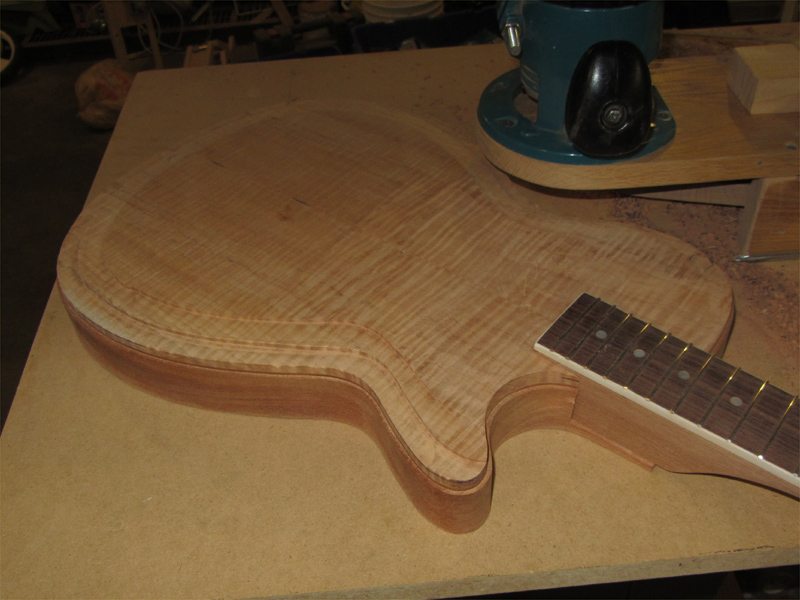
A little bit if hand sanding with 80 grit took care of some problem areas from the carve.
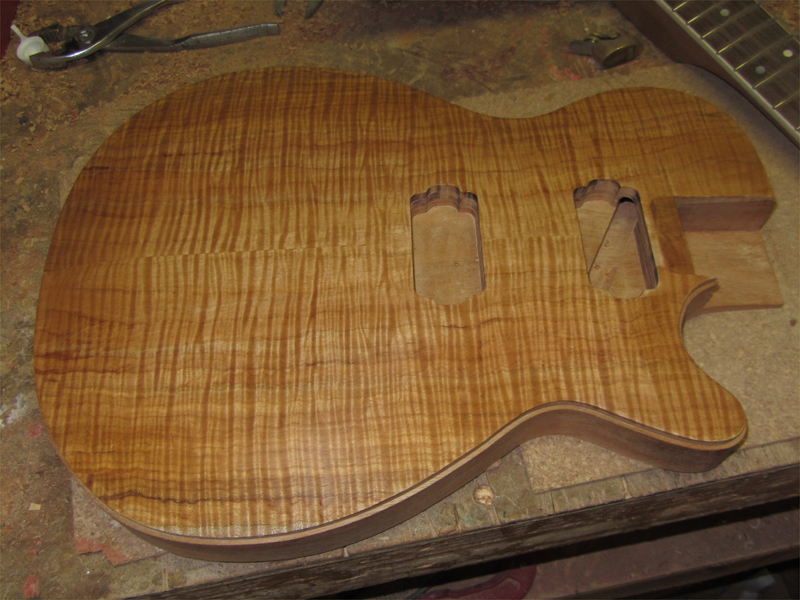
Then I dug out the contour gauge that I bought for carving necks...never used it. I wanted to check the symmetry of the carve. I felt like it was pretty close since I did the pre carve from a fixed point but I tend to obsess in certain areas while carving, so a check was in order.
I set the gauge on the butt of the guitar...
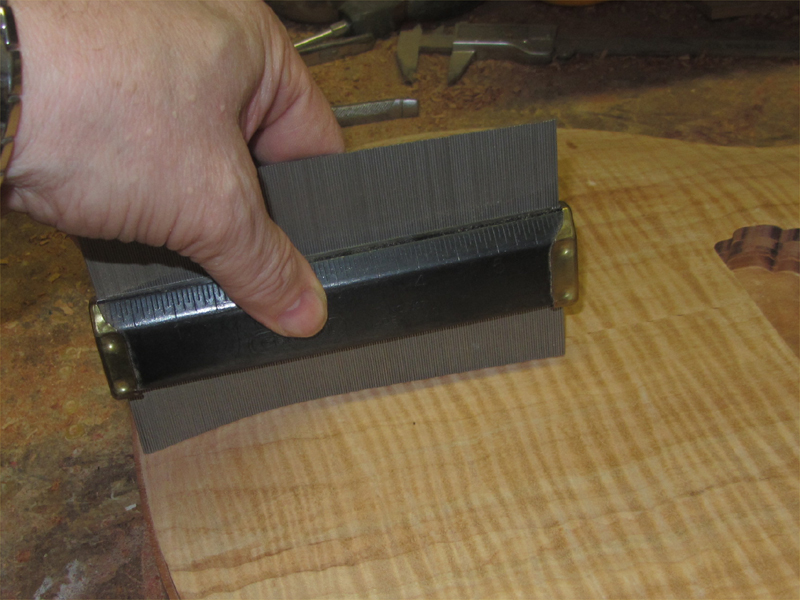
Then compared it to each side in the area of the bridge. The center where the bridge will be mounted is a bit flatter than I planned but it looks good overall. I'm not concerned with symmetry beyond the bridge...the carve, top to bottom, is vastly different from that point forward.
So, on to the binding. It turns out I worked the edges a bit more than I planned and now the binding is a bit taller than the channel...more than needed for scraping. I'm considering chucking up a router on the Saw Dust Generator with my binding bit and lowering the bottom of the channel just a hair. The bearing on the bit will keep it from cutting any deeper and the fixed router overhead will give me a controlled cut that takes the carve out of the equation.
Not sure I want chance it so I came in to post this update while I think about it. My goal is to get the binding on today so I'll have to make the call soon.
-
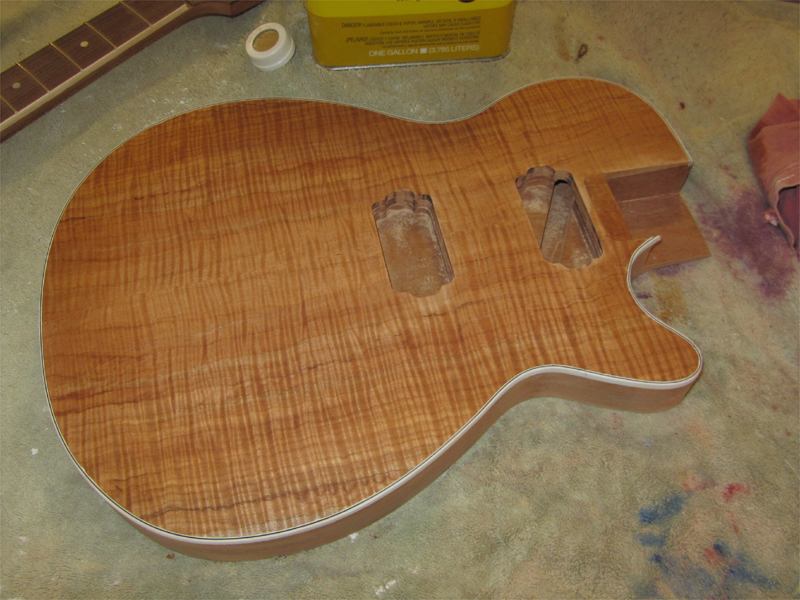
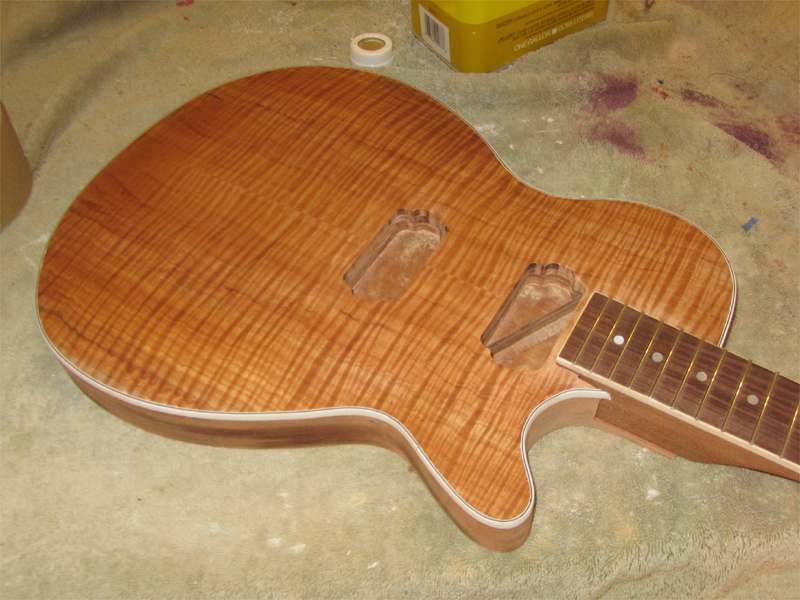
Next was a little detail work on the top. I sanded the entire carve and worked the edge at the binding channel to make sure it was consistent all the way around. Then I scraped it to unclog the grain after sanding.
A little bit of naptha to clean it off and it's starting to look like a guitar. I think it may be the best top I done. I think it's going to take the orange dye beautifully.
-
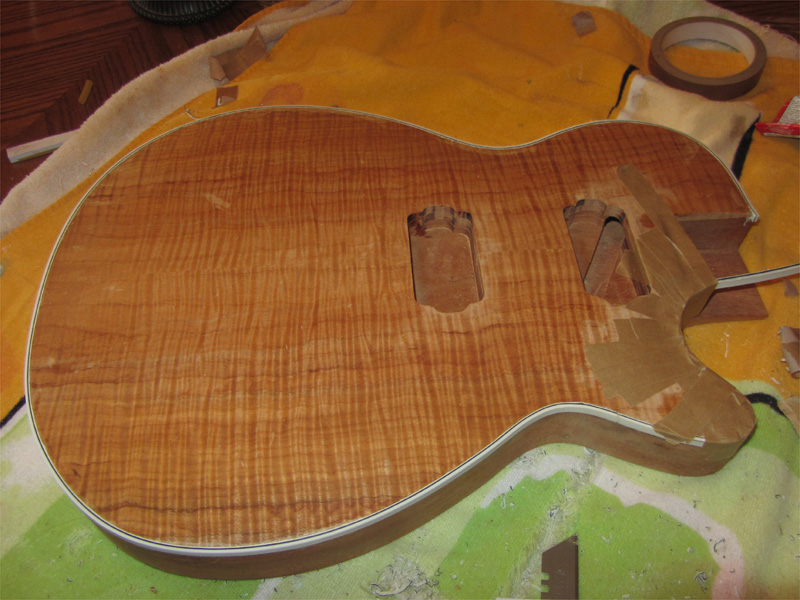
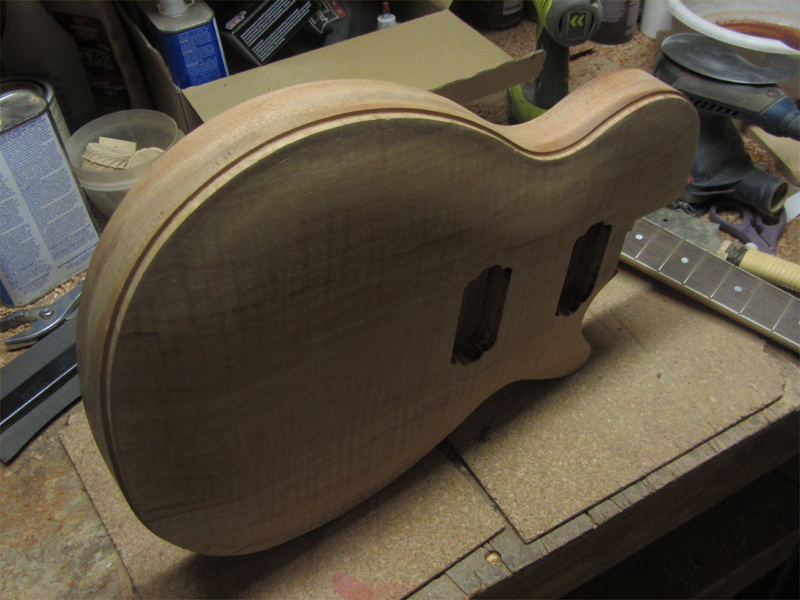
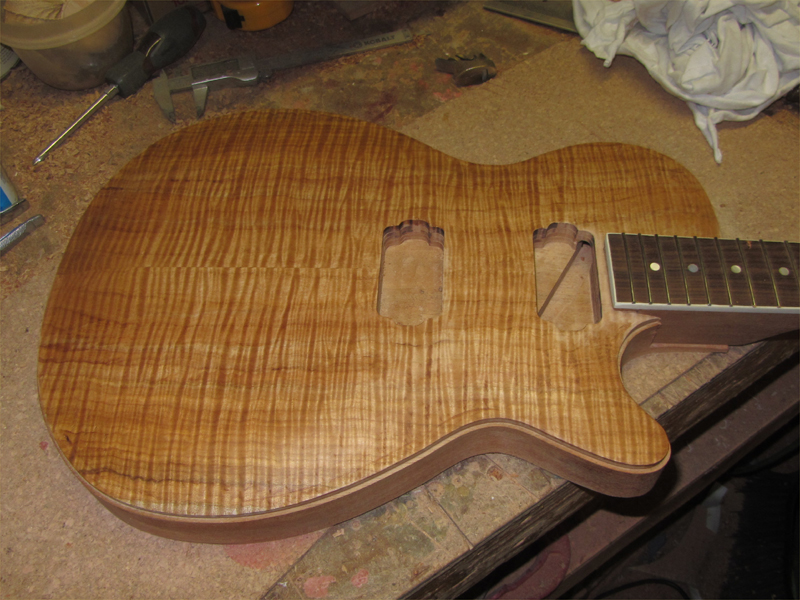
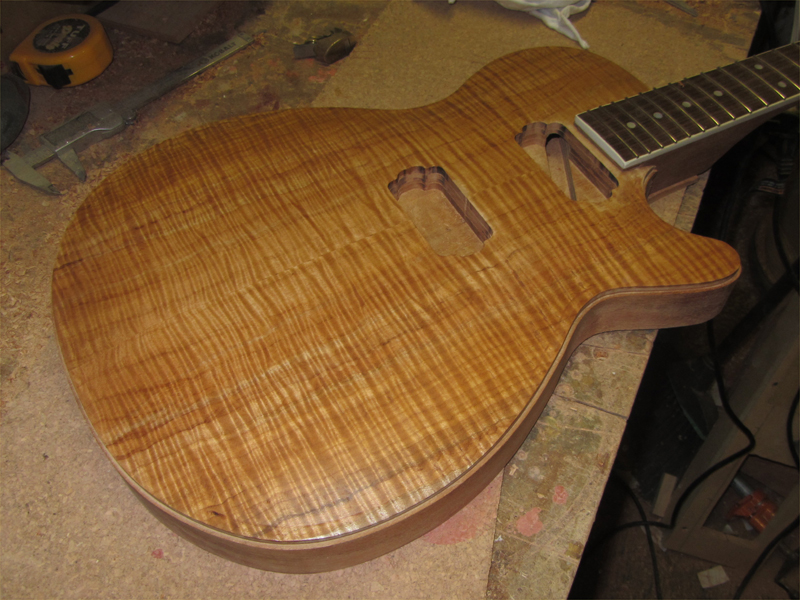
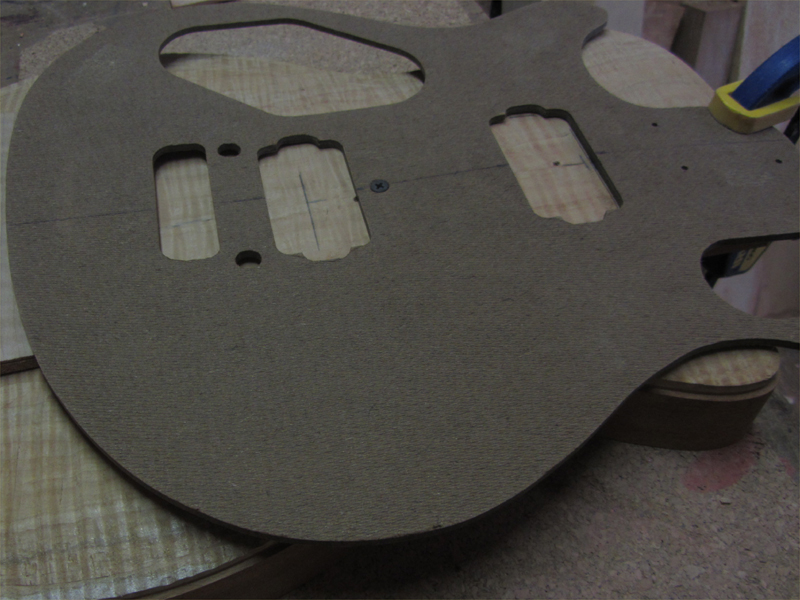
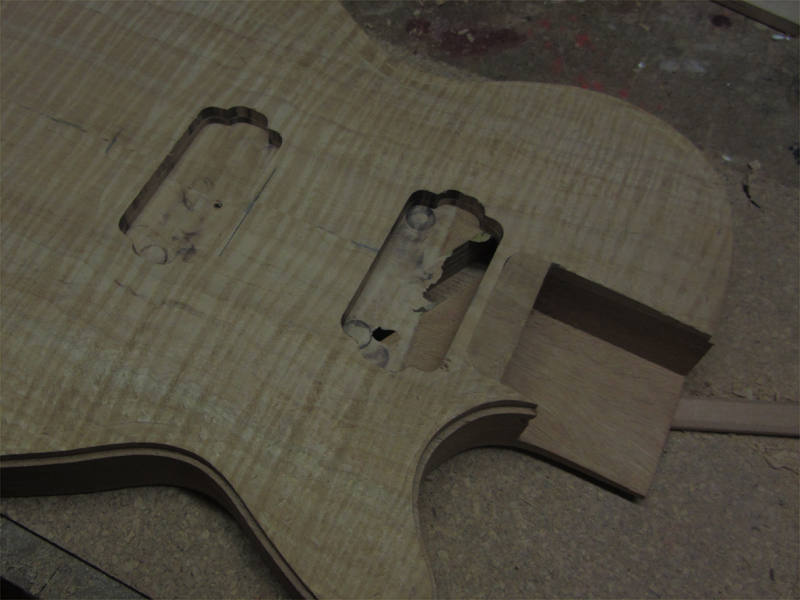
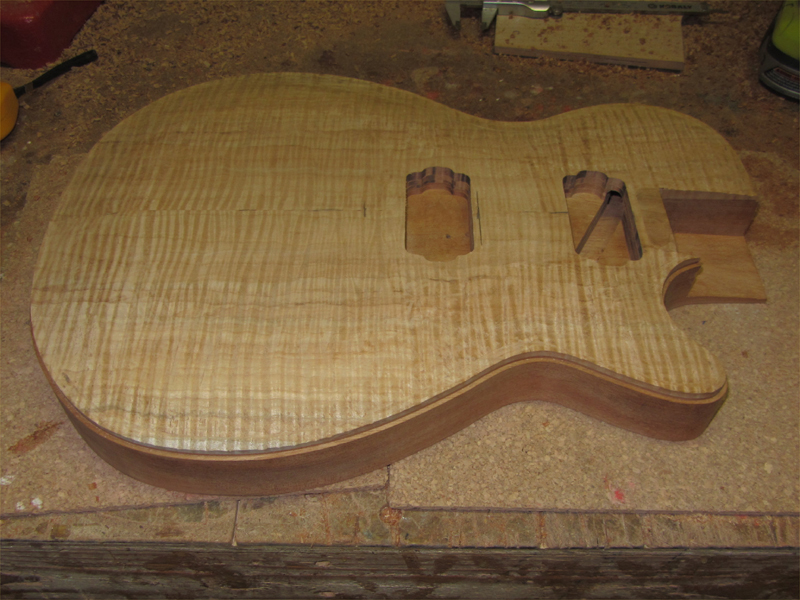
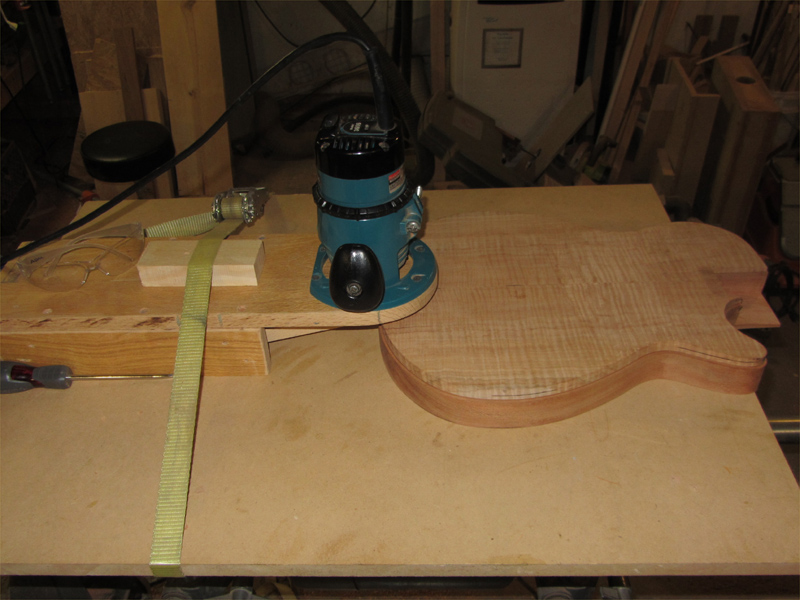
Well, it's been awhile since my last post. I had some time to work on several builds today. Next up for this one was the PU routes. Pretty straight forward except that I had to work in two different planes...one for each PU.
The first was the toughest. I used double stick around the edges of the PU route and set a screw into the are that would be the bridge PU route. I braced the template with a small piece of scrap at the tail end. The bridge PU was largely on a flat area so no trickery there.
Even though I knew the wiring route was under there, my heart still skipped a beat when I lifter the router and saw this. It's all good though.
Both PU routes to depth.
-
Just a bit of tidying up on the carve this morning while I'm waiting for it to warm up.
I had a small section around the lower horn that I didn't tier with the SDG because I wasn't sure how the carve would work out there. I roughed in the carve with the finger plane and then, using the same setting as my last pass on the body, I ran that area under the SDG.
Then, I just need to clean it up and blend it in.
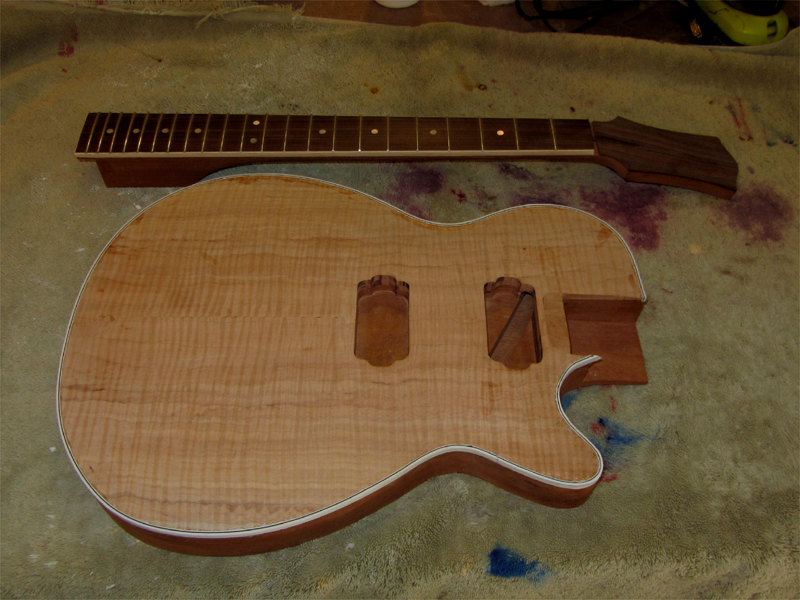
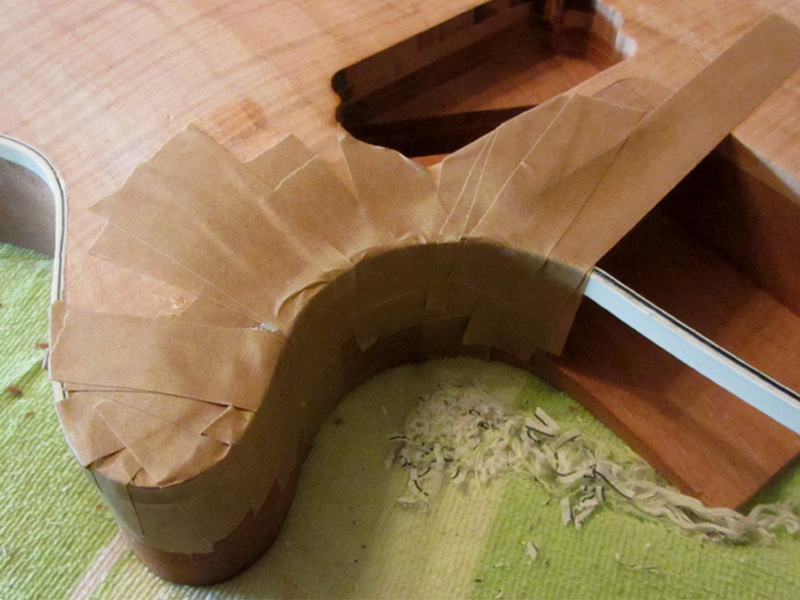
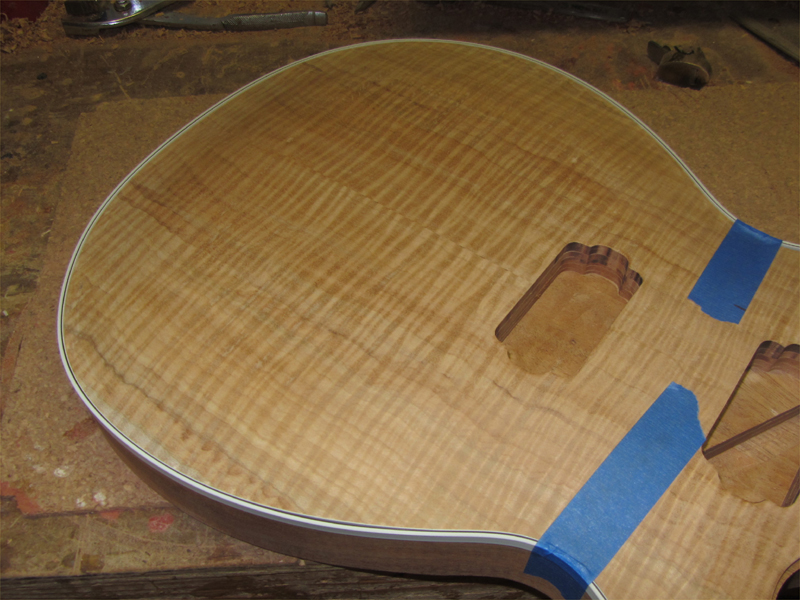
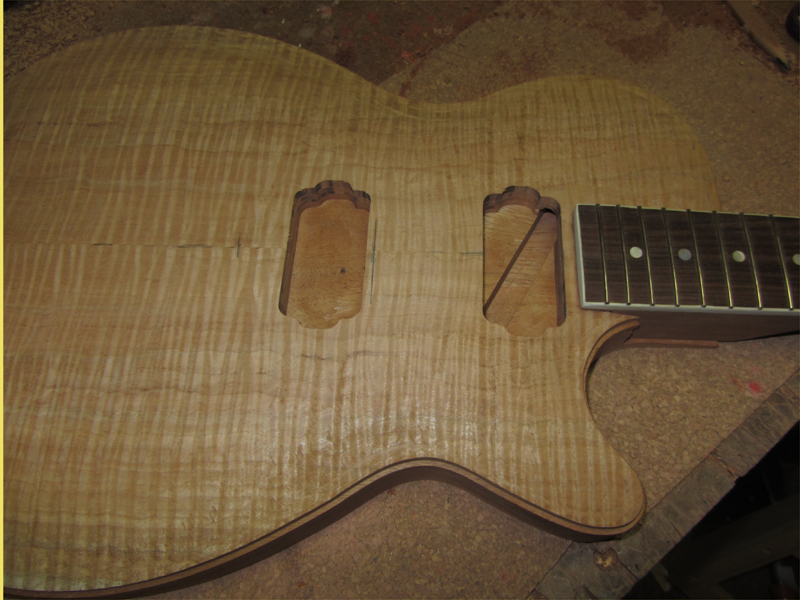
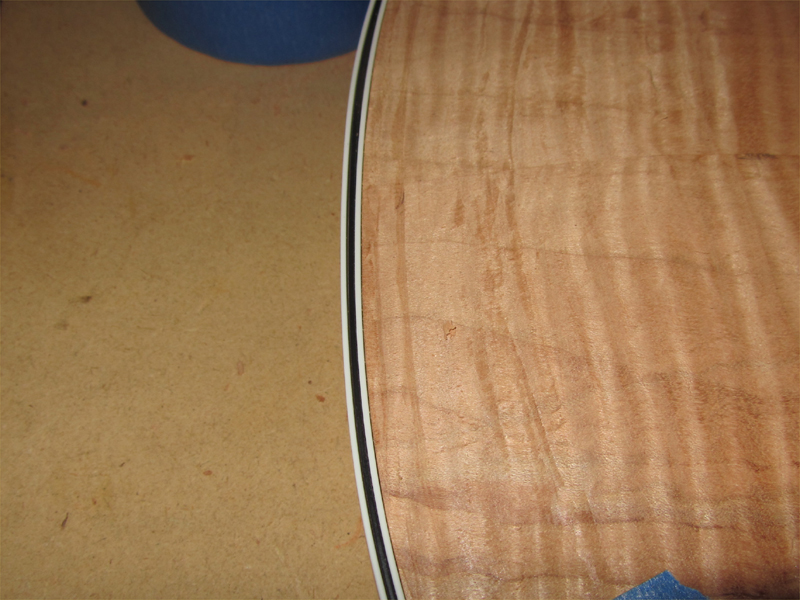
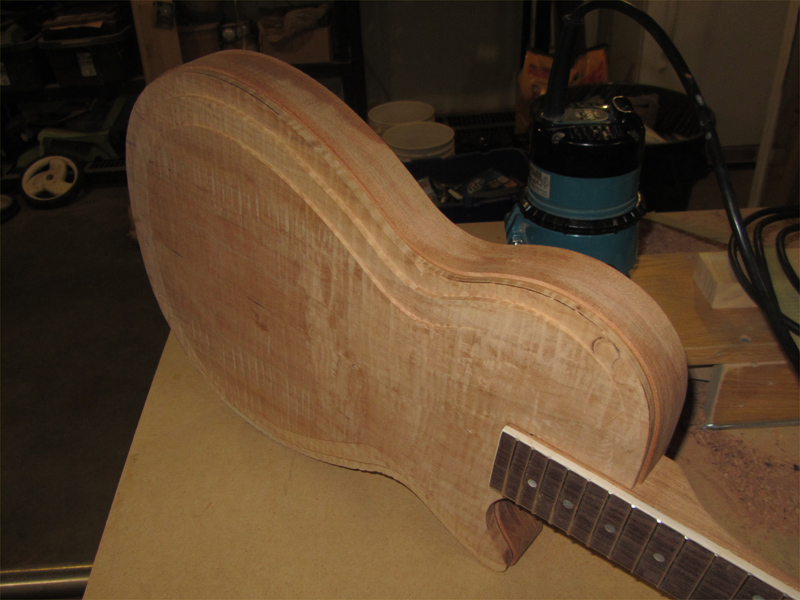
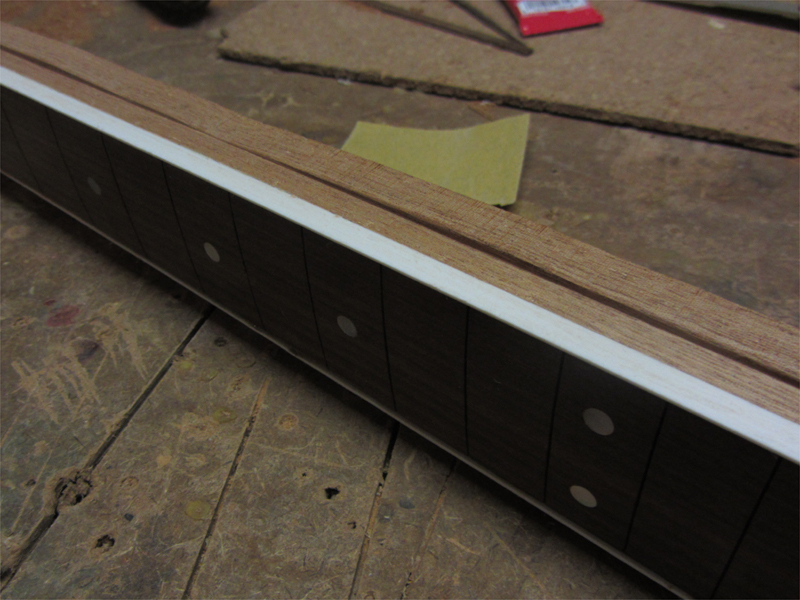
Thii is the first time I could look at my binding choice in place, I originally wanted to go with b/w but seeing it on the body, I'm not in love with it.
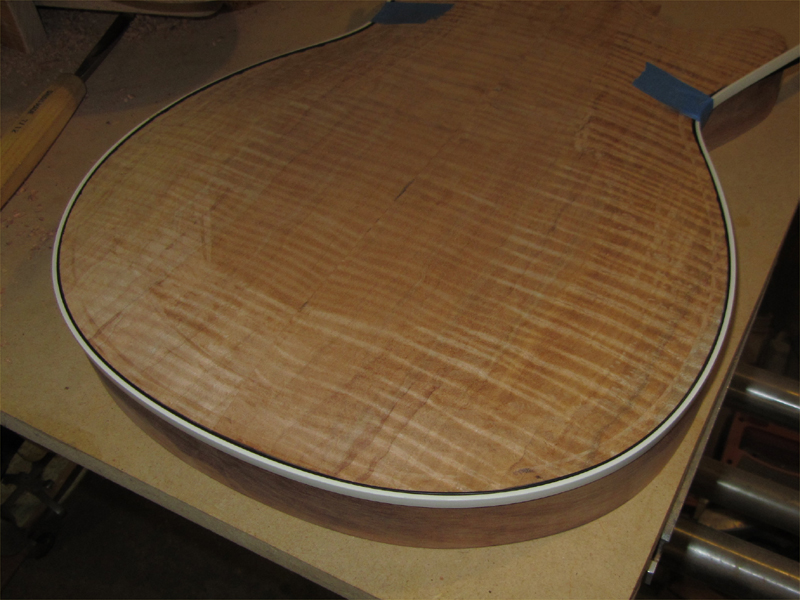
So, I'll add a white layer on the inside and go w/b/w instead. It's going to mean adjusting the channel depth but I should be able to do it on the SDG without too much trouble...won't even need another bearing. The SDG's tongue will set the depth. I'll probably cut a shorter purfling at the top so I don't have to risk the height I already set with the top carve.
I think this will be a cleaner look since the neck has white binding...it will flow better.
-
I made more progress on the carve this evening. My plan to carve with a gouge this time hit a snag. I just don't find it as relaxing as using a plane. The control I get with a 12mm curved sole plane is just beyond anything I can do with a gouge. So, back to the Ibex plane.
-
I got started on the carve this evening. I love, love, love me some top carving. :twisted:
You can still see some of the lines from the tiers. One thing I learned in previous carves is not to try and do it all with cutting tools. That last bit needs to be finessed or you end up over cutting and dealing with gouges during scraping.
-
I set up the SDG last night so I could do the pre-carve this morning. It went pretty smoothly. I don't use that thing enough to have a good technique with it so it's like learning all over again each time. I'll get started on the carve this week.
-
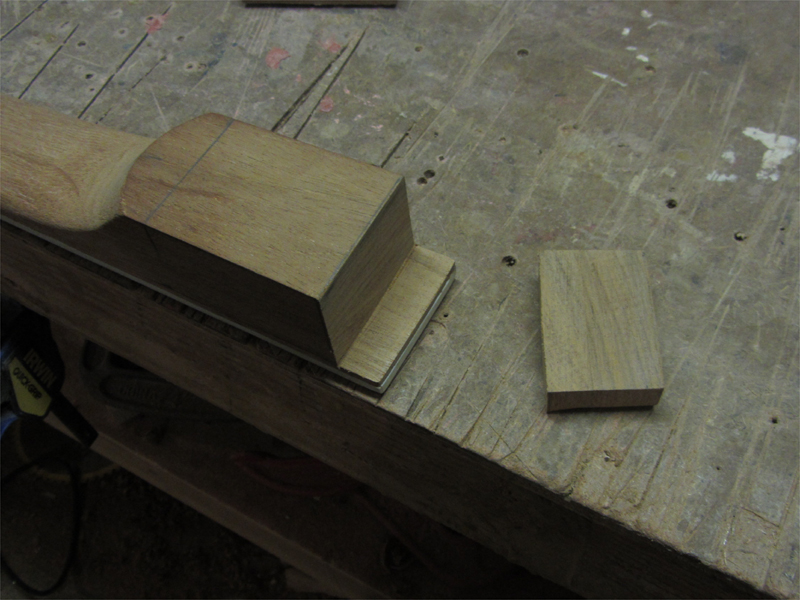
After spending the day spraying my Strat builds, I had a little time to work on this one. I checked around for a longer bit that would reach the depth of the pocket but I wasn't in the market for a $50 router bit. It's always good to buy the right tool, it's not always in the budget.
So, I decided to make a thinner template to get the reach out of my current bit inventory. I found an old Tele neck pocket template that I screwed up years ago...I never throw this stuff out. It will be repurposed at some point.
My goal was to make a template that was slightly wider all the way around the current pocket route. The template is going to serve as support for the router and the pocket route will be the "routing template".
I used the thicker template as a routing guide, then widened the opening with a rasp. The alder block on bottom is just to give me some clearance and sandwich everything together.
Here it is screwed in place with the same holes as the thicker template..
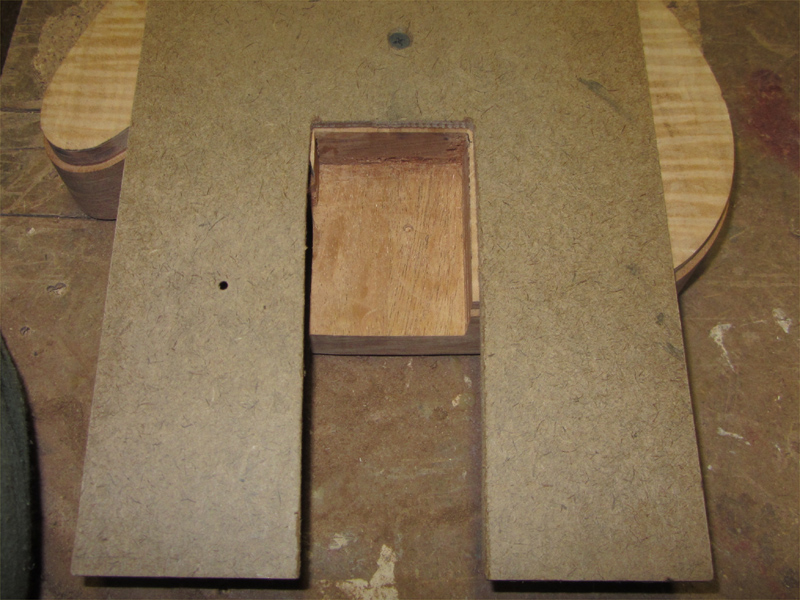
And after a few passes with the router and squaring off the corners with a chisel.
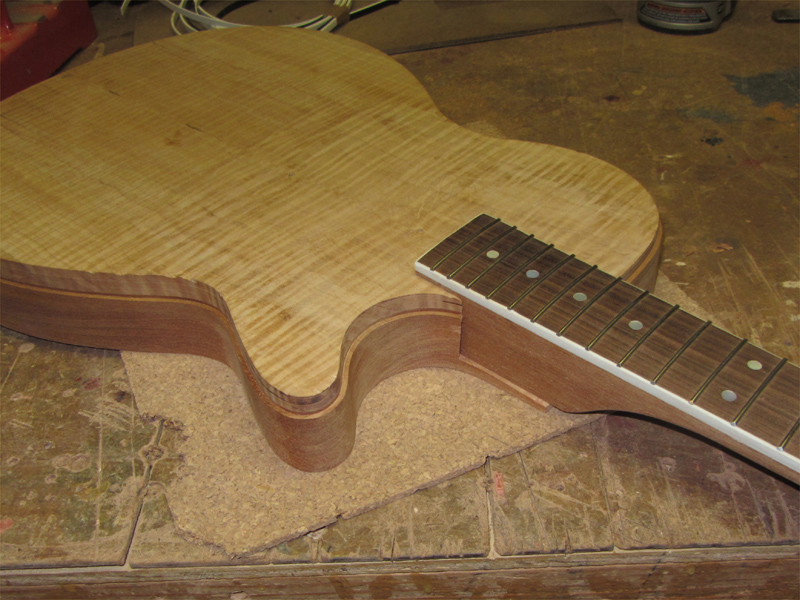
It's a nice, snug fit and I have plenty of overhang for carving. The top will come down a bit more during the carve so I'll have to bring the tenon down as well. I'll bring it down enough that the fretboard extension is just kissing the top. I'll do this on a flat sanding block, last thing before gluing it in. The extra meat on the tenon will also let me adjust the angle if needed.
-
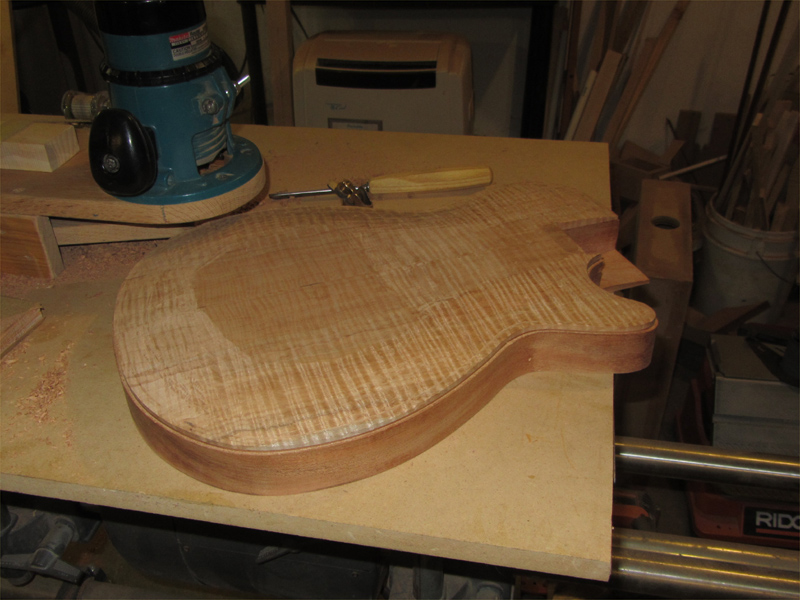
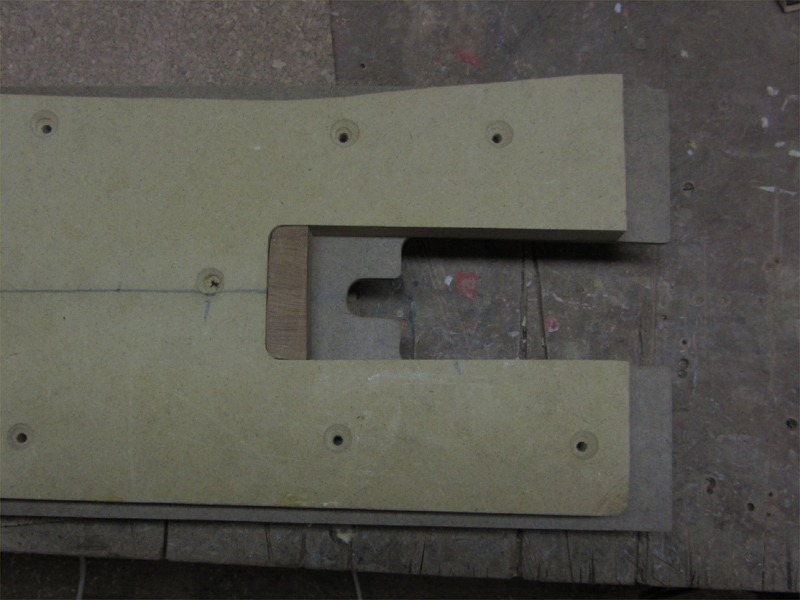
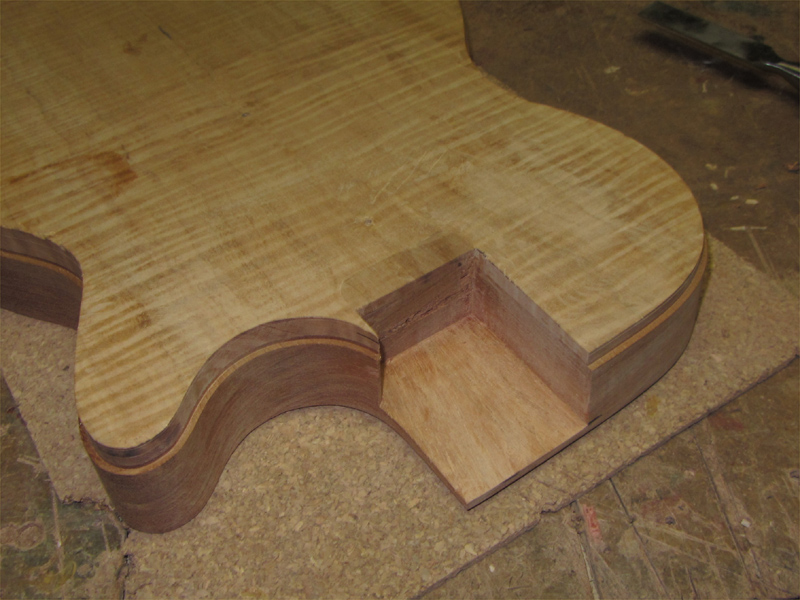
Getting back to the body. I set up a router sled to cut the ski slope. This time around, instead of angling the body on the table, I angled the rails. I didn't get the reach that I did the other way around so I'll have to finish up the slope by hand plane. Currently, it starts about half way between the PUs. But, I'll take care of that after I rough in the carve.
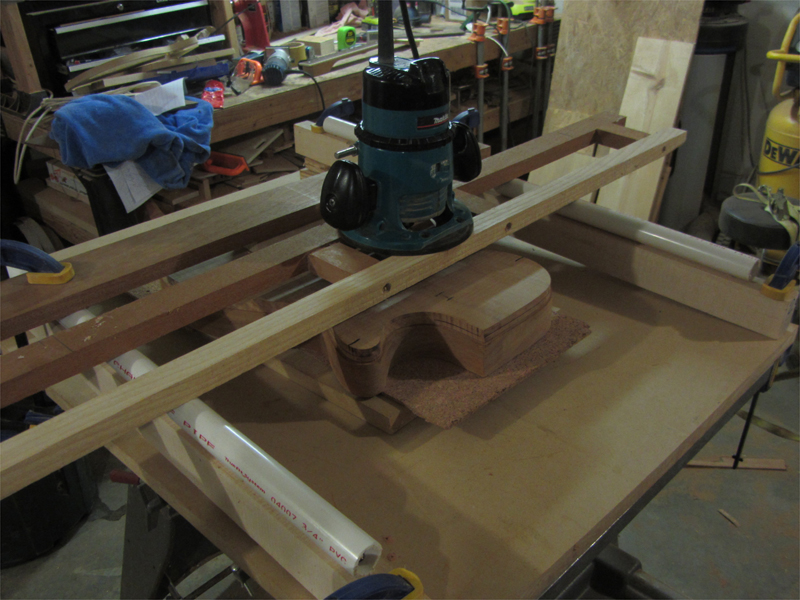
Cut to just above the binding channel at the end of the body.
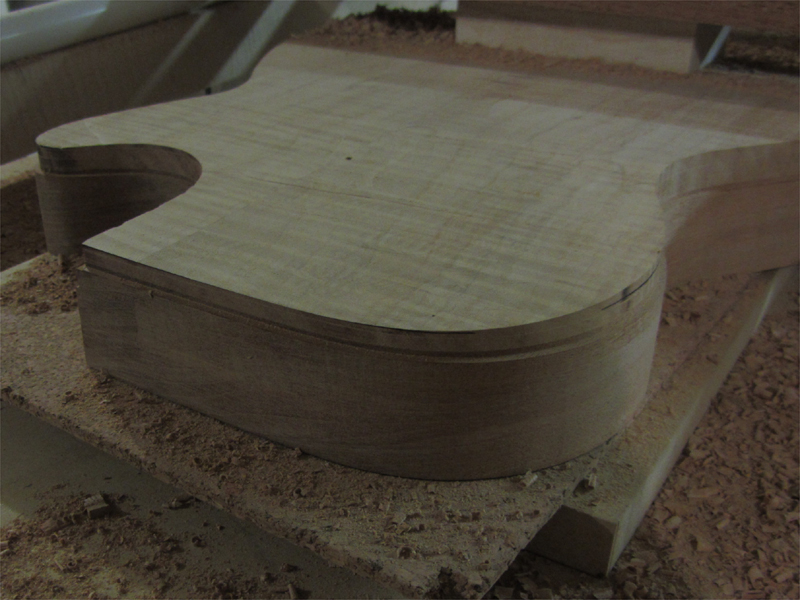
After some clean up with a block plane. This sets a flat plane for the next step...the neck pocket.
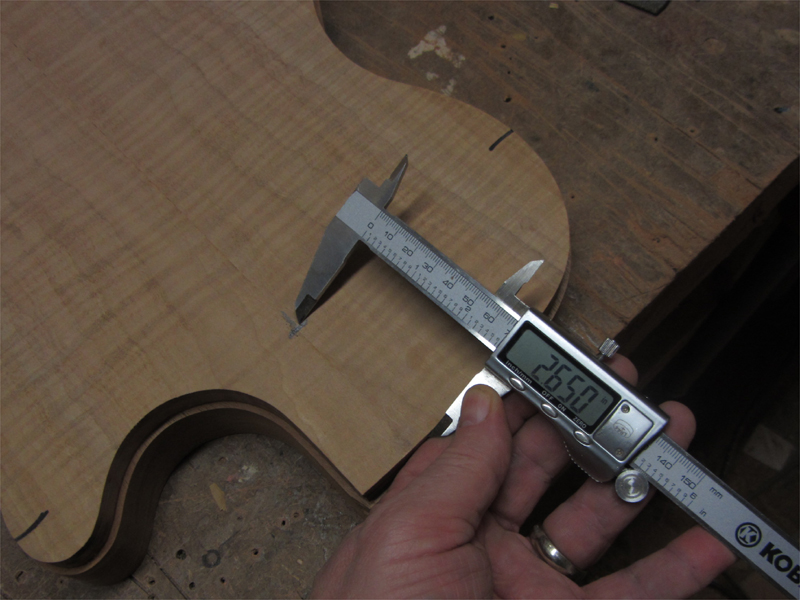
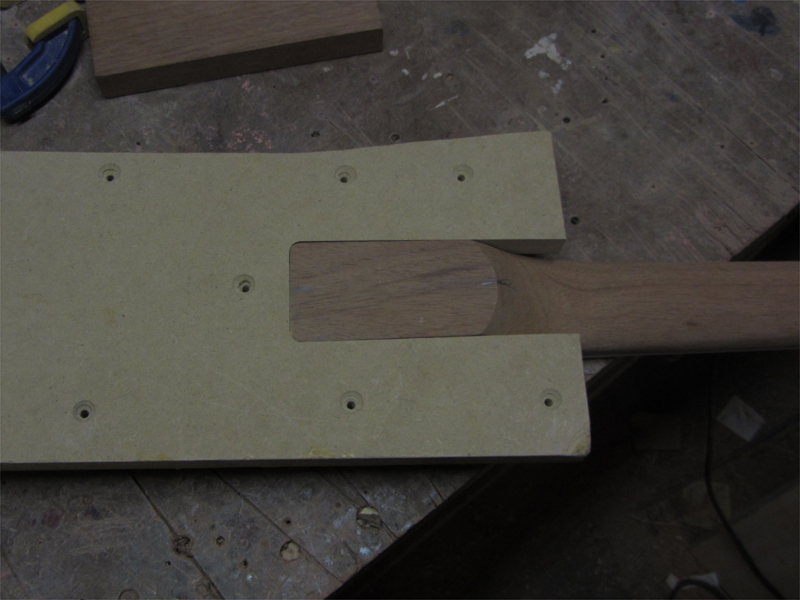
I used calipers to set a mark for the back of the pocket. My neck tenon is 2.750" and the binding channel is .100"...so, to measure from the edge of the channel, I set the caliper at 2.650".
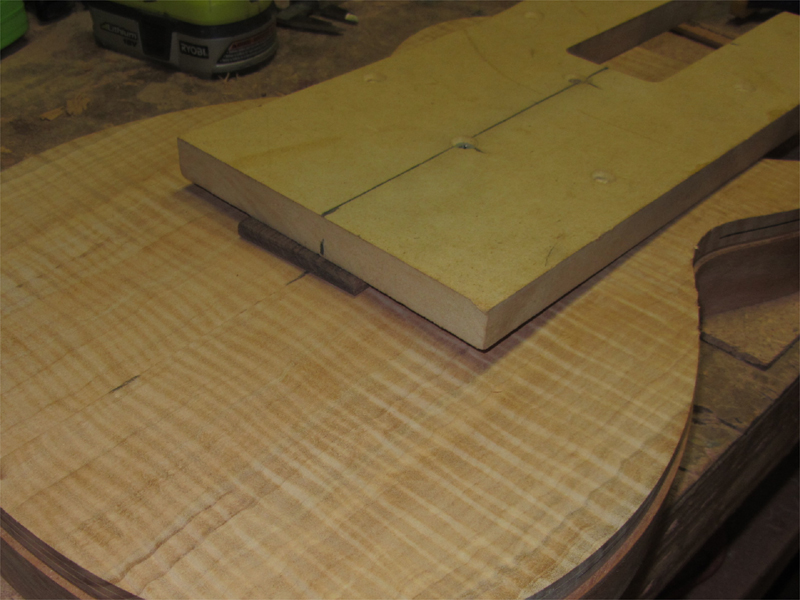
I measured and found the PU route locations so I could screw the template flat to the ski slope. I started with the screw closest to the neck. This sets the template flat on the slope. Then I set a small scrap of wood under the template for support and screwed down the back of the template.
I need a longer router bit so I'll have to wait on actually routing the pocket. Hopefully I'll get it done this evening.

-
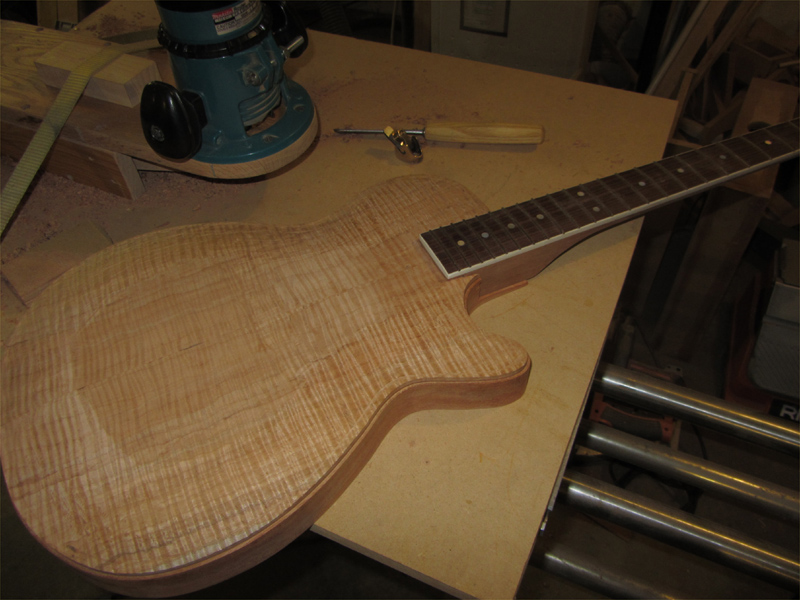
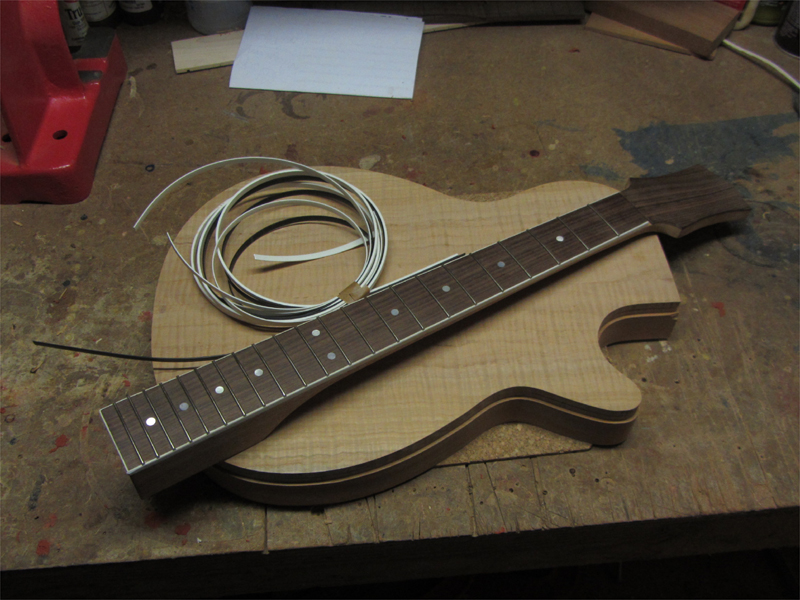
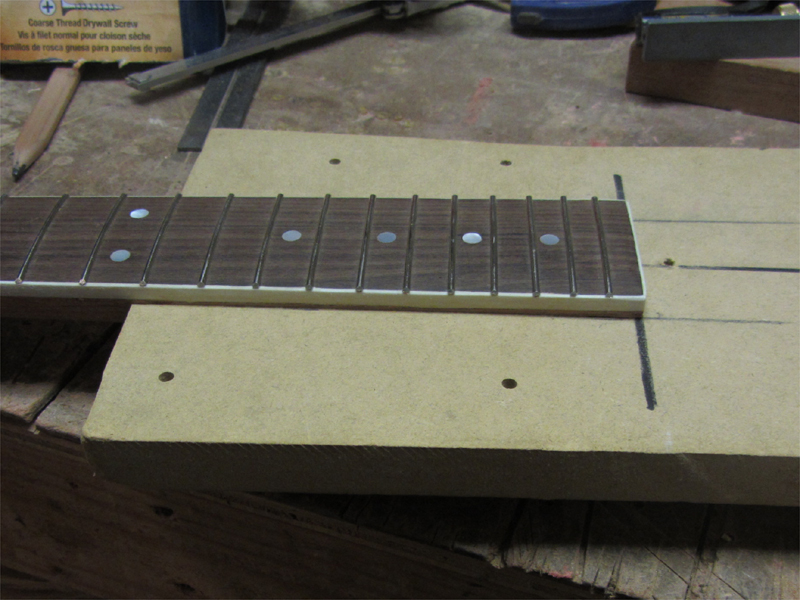
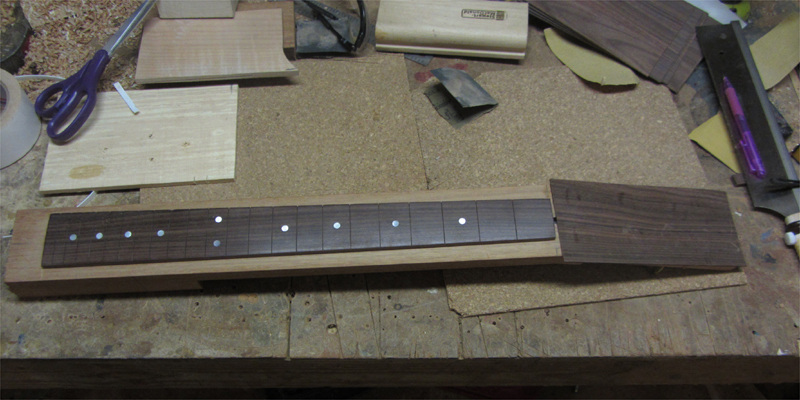
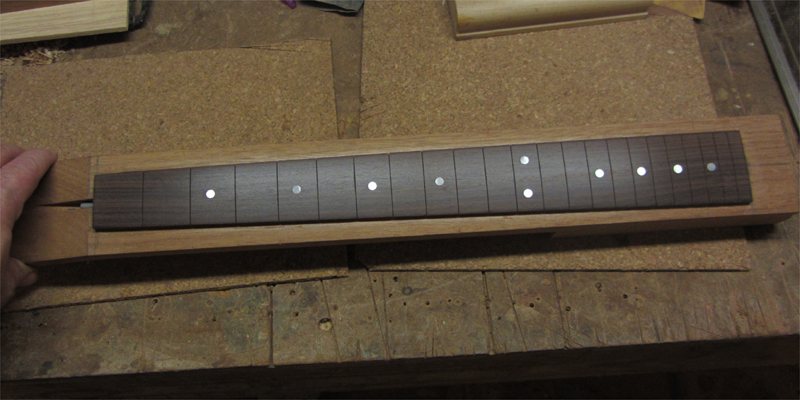
Frets installed. All that's left on them is a level/crown and dress the ends.
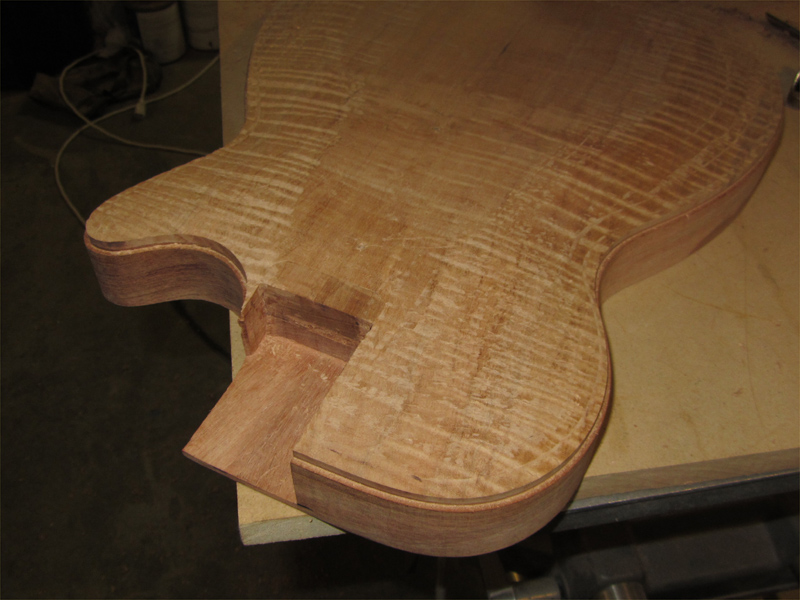
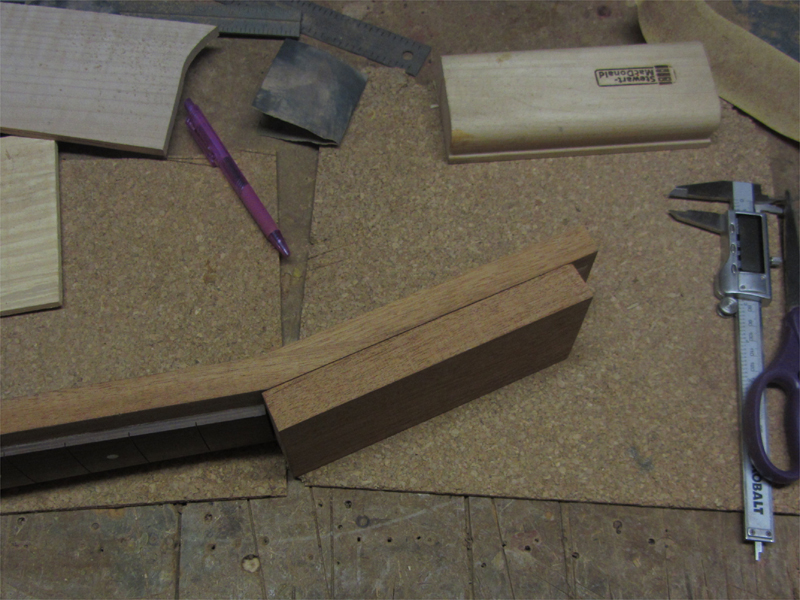
I've been doing the chicken or the egg thing on the neck/pocket for about a week now. Do I cut the pocket first? Trim the tenon first? Maybe carve the top, cut the pocket then trim the tenon. It started to become spiraling thoughts so I had to jump in.
I figured a neck pocket template would be in order so I started there. Simple process using straight edges around the neck to mark the template, route it out, done. Note that I made the template full length of the tenon even though it will be trimmed back. It was just easier than working under a fretboard extension.
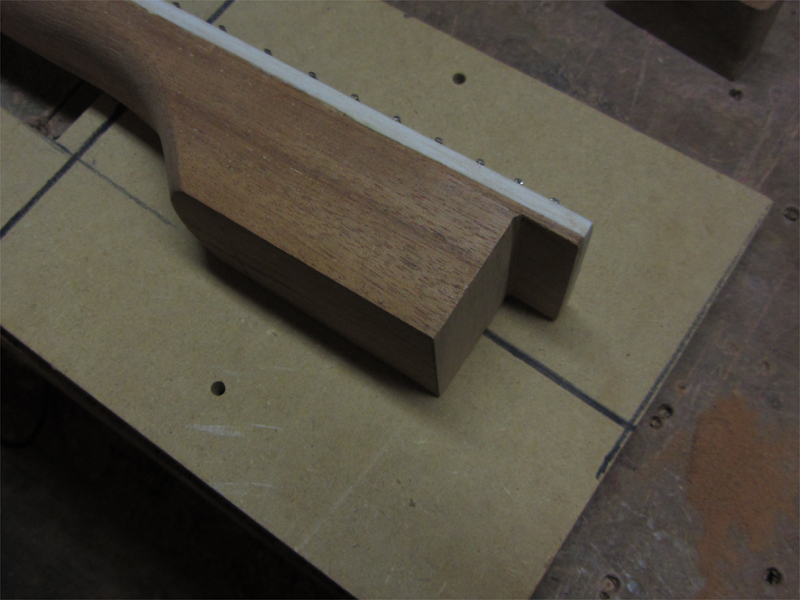
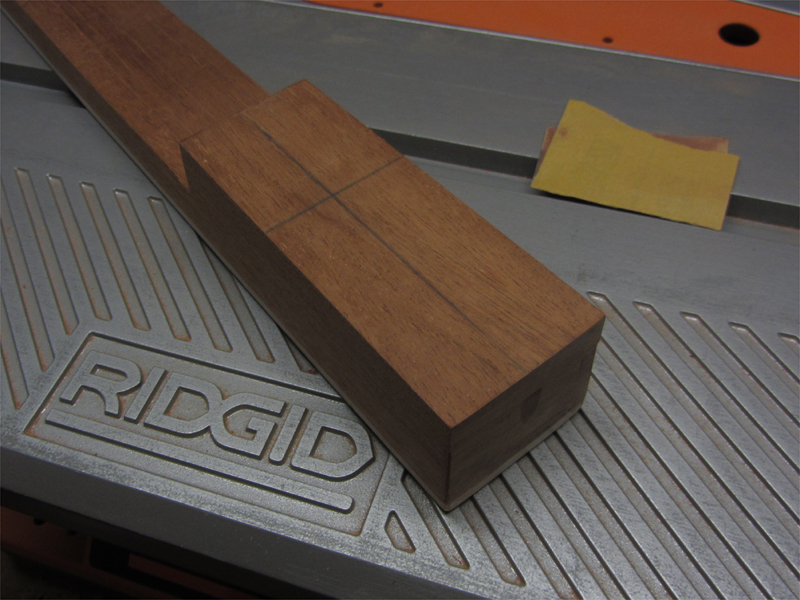
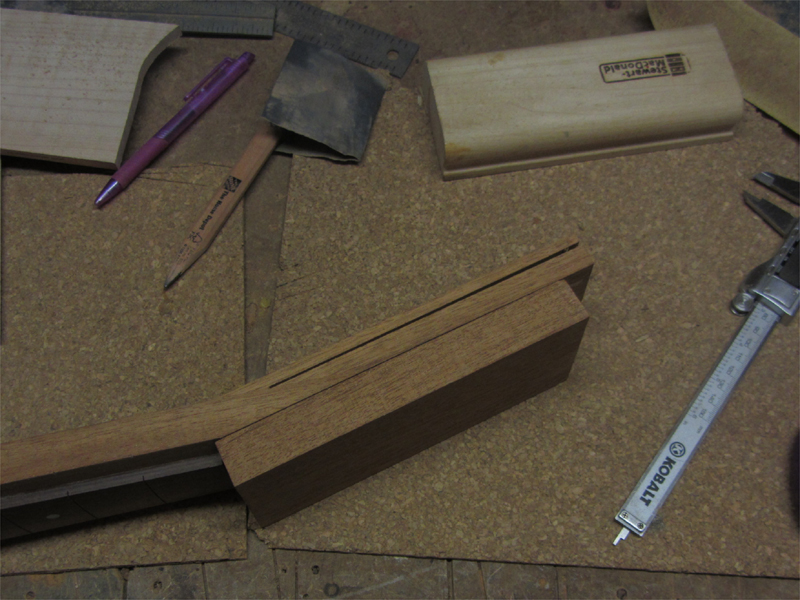
I knew the neck tenon was going to be trimmed one way or the other so that was next.
I marked lines from the 16th fret down each side of the tenon and connected them across the bottom. Then went forward 2.750" as I laid out in the plan. I set the reveal between the top and fretboard at just over .125". Then connected the dots with a fret saw. The cut off will be used to shim the pocket template during routing.
It fits nicely. I'm thinking I'll angle the neck pocket instead of the tenon...that way, but for a little clean up on the end of the tenon, I'm done with the neck! We'll see. I may change my mind later.
-
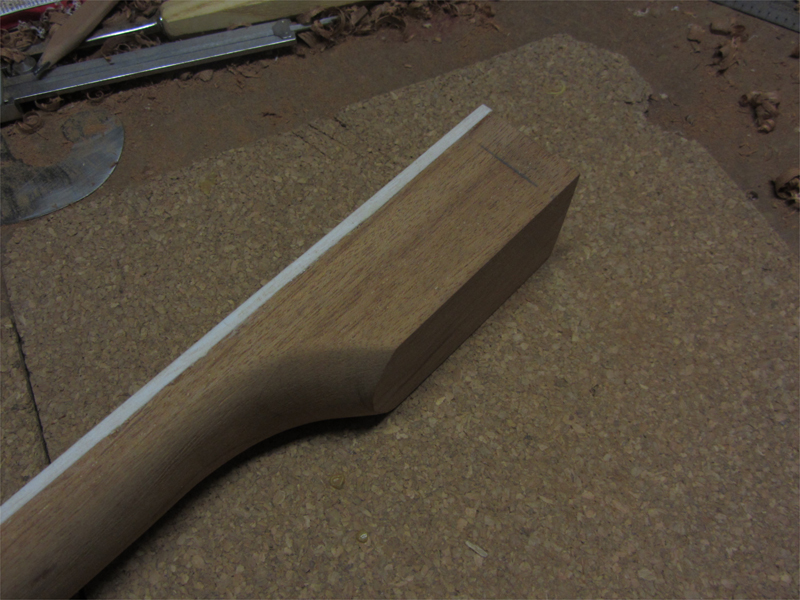
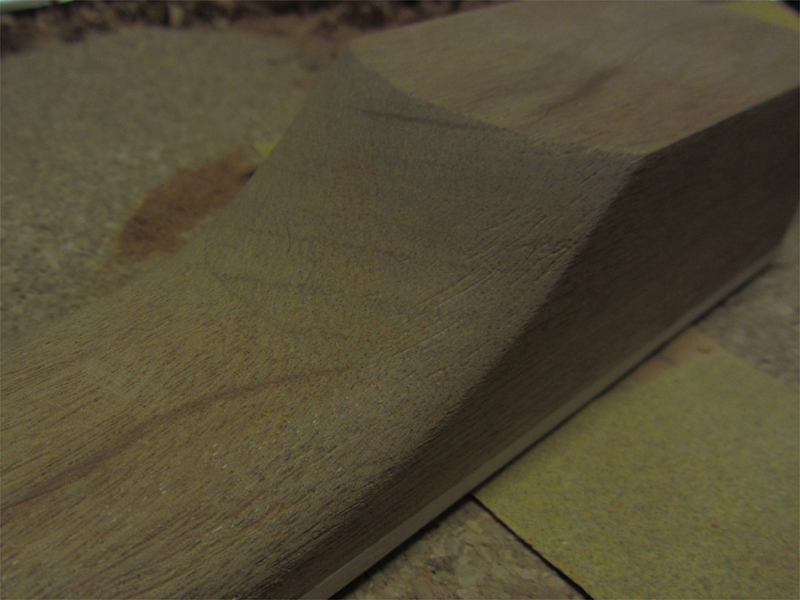
I moved on to something I enjoy very much...carving. Nothing special here just roughed out with a gouge, cleaned up with a rasp and filed & sanded to shape.
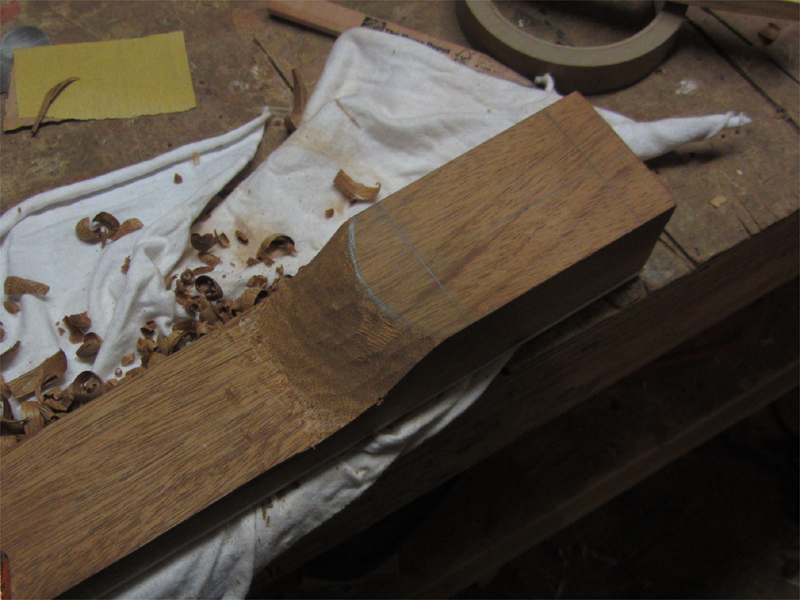
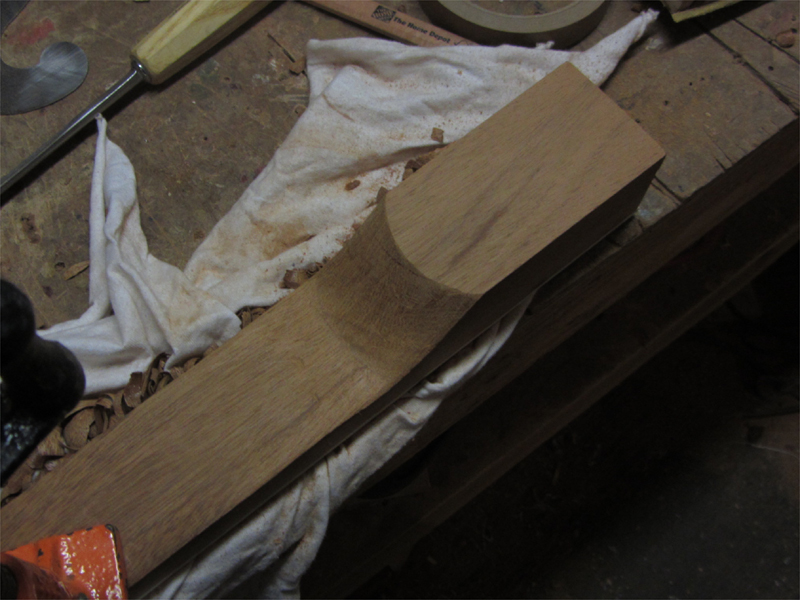
Then I set the thickness at the nut and heel and rough carved it with an Ibex plane.
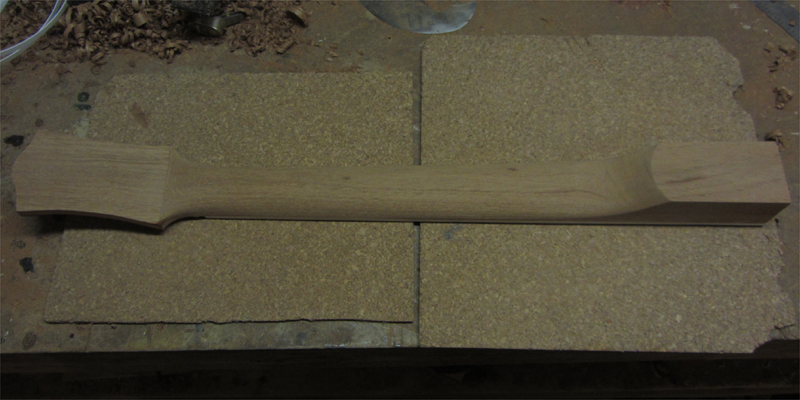
Sanded to 120 grit. I still have some final shaping to do but it's close.
I'm in a happy place again.
-
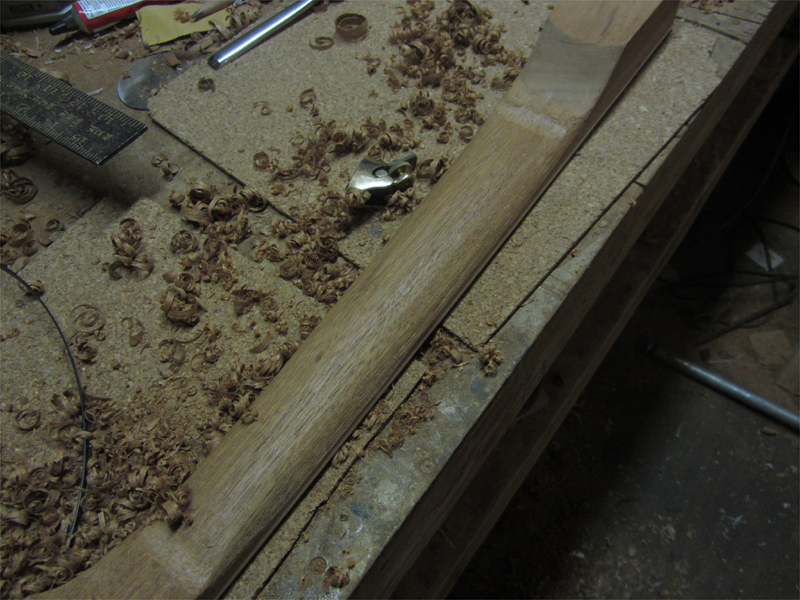
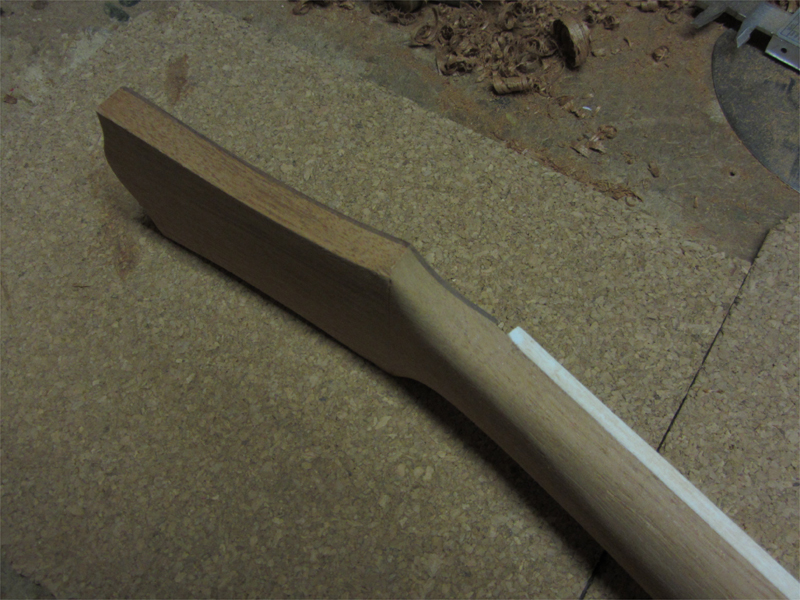
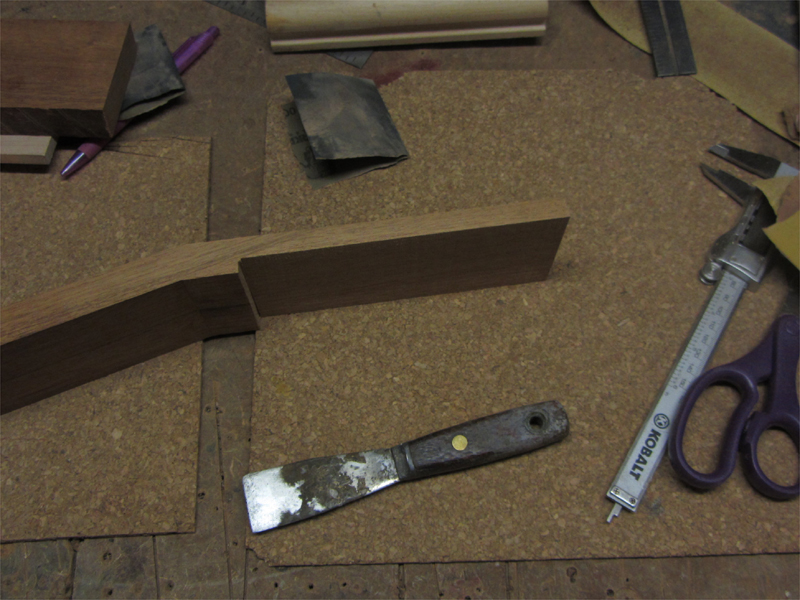
I decide to go ahead and flush trim the rest of the tenon with the router to ensure it would have straight sides.
So, while I thought about it, I flush trimmed the rest of the neck and did some clean up work on the ROSS.
-
Some of the steps may seem a bit backwards but bear with me. It should make sense in the end.
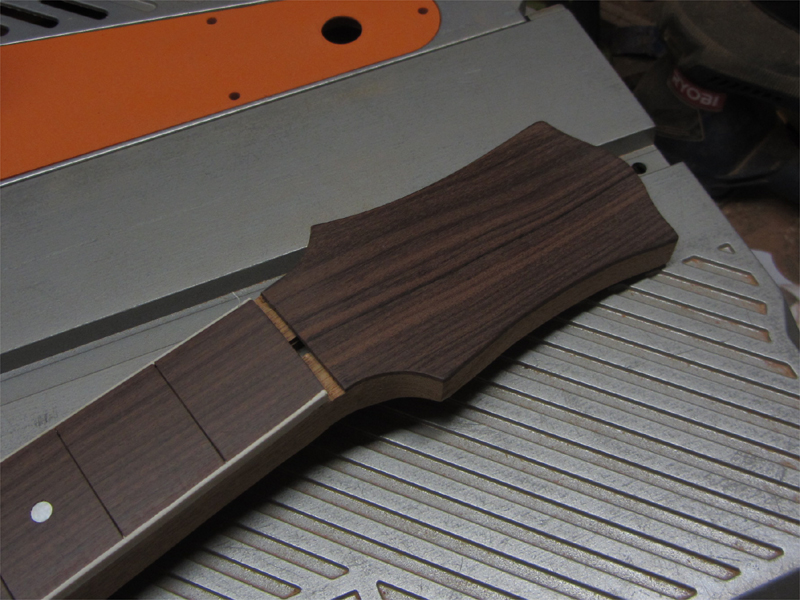
I unclamped the HS veneer this morning. Looks good so far.
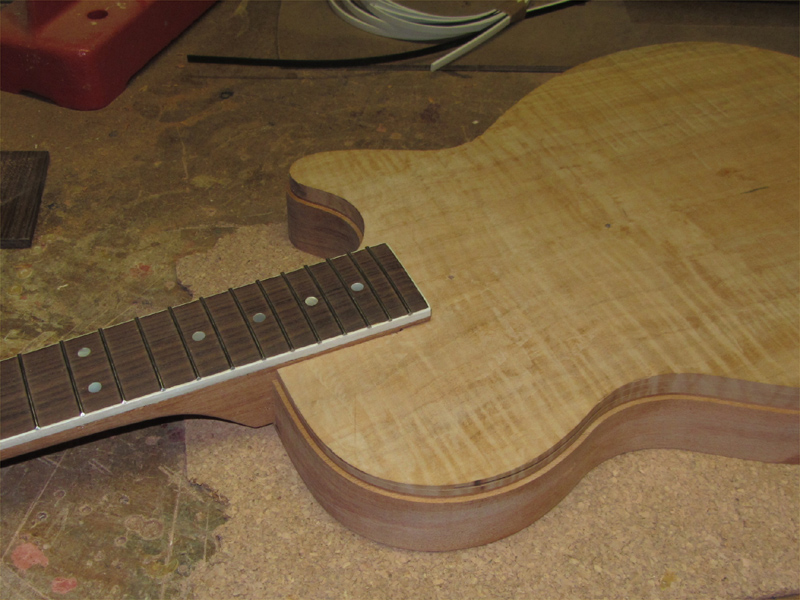
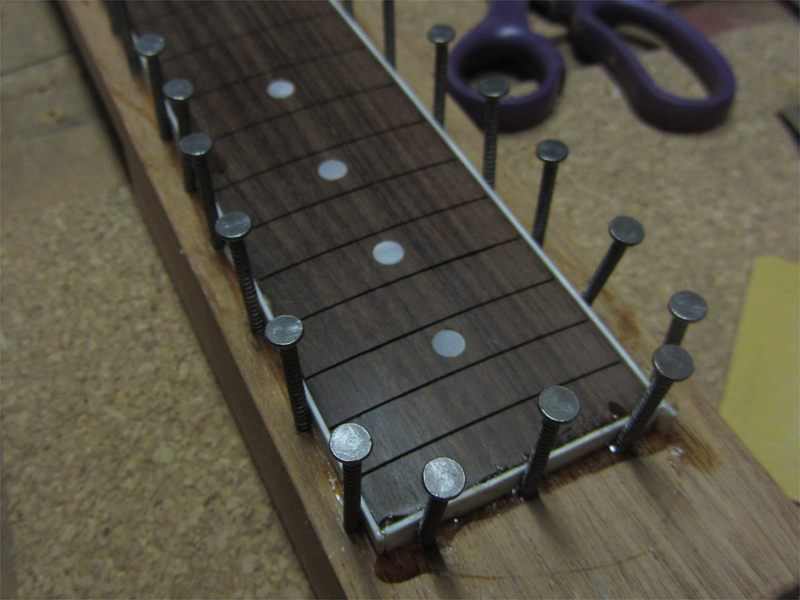
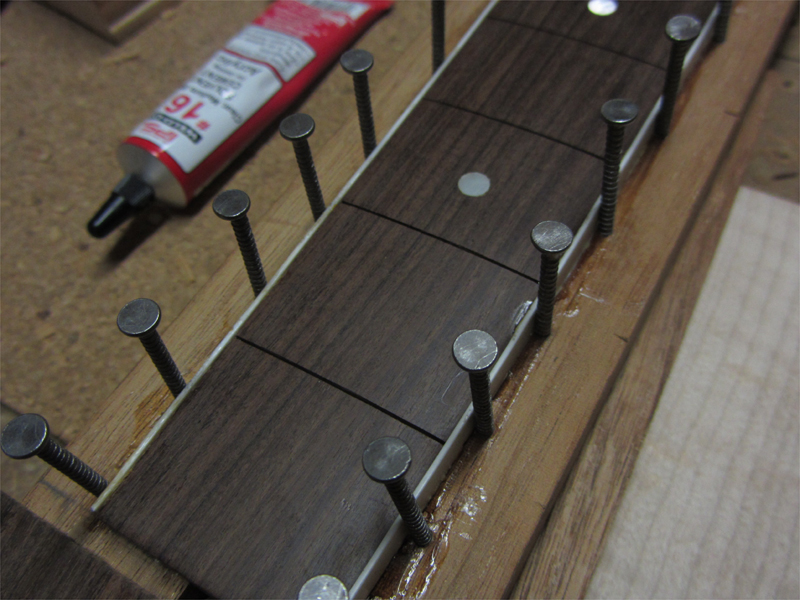
The next step in this build was to get the binding on the fretboard. Since the bottom of the binding will be supported by the neck, I want to trim everything after it's installed.
To get good clamping pressure at this angle would be tough with binding tape, so I used small ringshank nails...those little jewels bite and stay put.
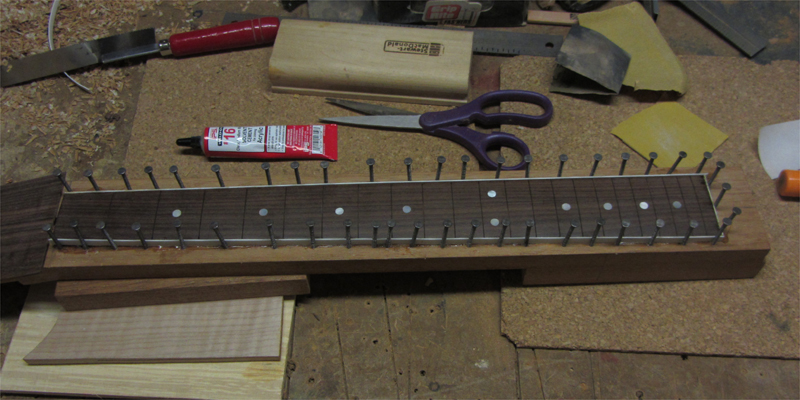
When the binding had set up for an hour or so, I rough cut the neck profile. For you other Gretsch builders, I have an updated headstock drawing that I'll send your way.
While the binding was still unscraped, I ran the router around the edge of the neck. The binding is tall enough that the router clears the fretboard giving me a flat surface to run the baseplate on.
I set the bit so it left just a shave of wood below the binding. This ensured that the cutter wouldn't touch the plastic.
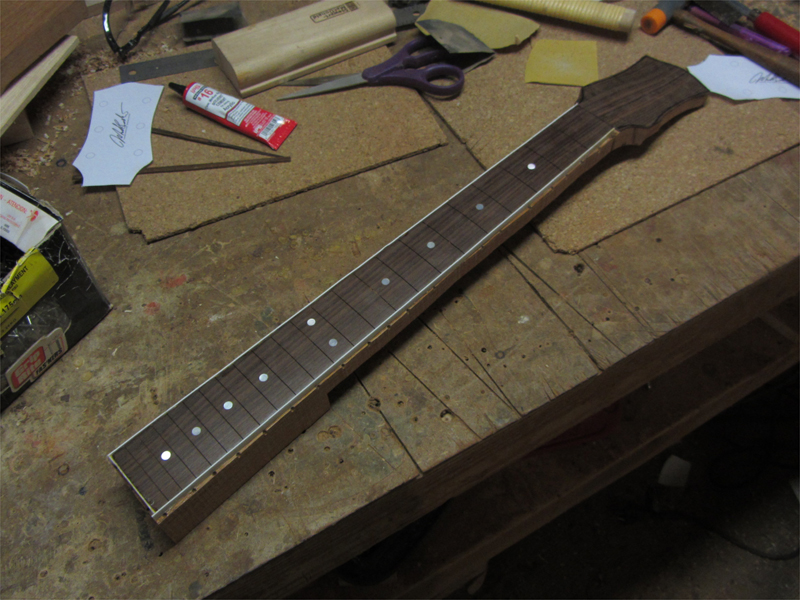
After a few minutes with 120 and a small sanding block everything leveled out. The rest is just carving at this point.
-
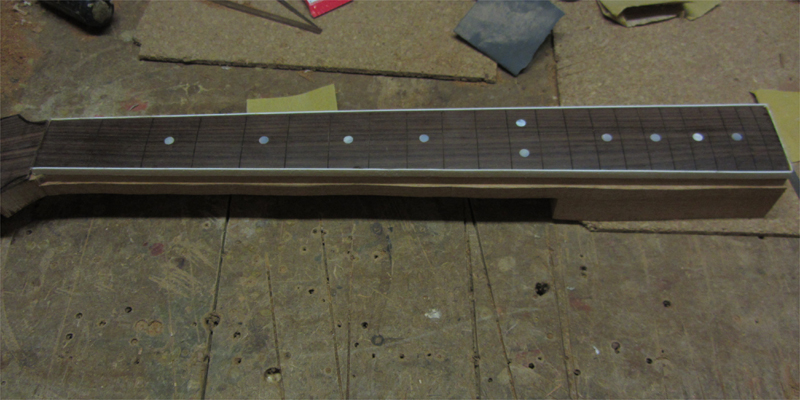
I made a little bit of progress last night...not quite as much as I had on my somewhat ambitious list.
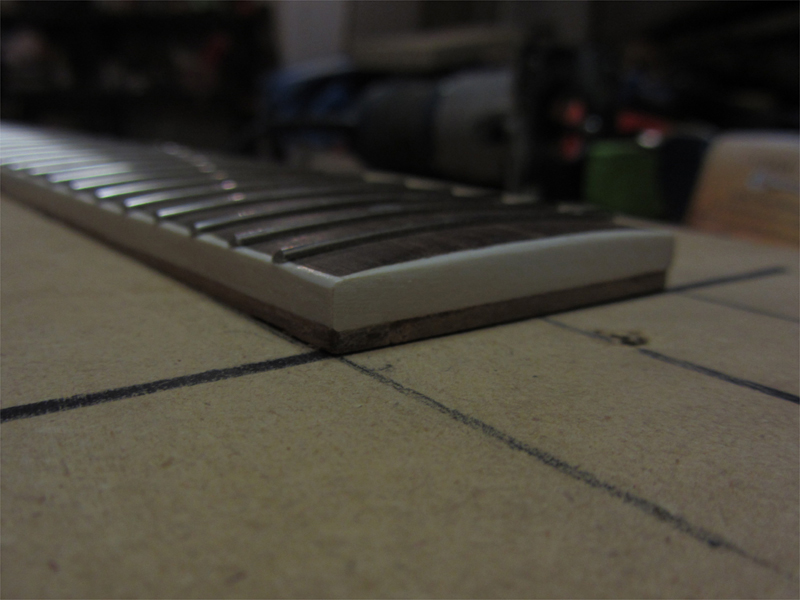
I put a 12° radius on the fretboard with 80 grit and a radius block. Then using a fret saw with a depth stop, I took the fret slots to final depth and gave them a radius that follows the top of the board. Then I sanded up to 800 grit to get a smooth, shiny surface.
I realized that I hadn't thinned out the headstock which is usually done earlier in the process, So, I had to punt.
Keeping the face of the headstock flat against a fence wasn't going to happen since the fretboard was already in place. So, I taped a flat block to the headstock, tucking it tight against the end of the fretboard.
This gives me a flat surface to run through the saw and takes the fretboard out of the equation.

The cut was easy and straight.
I finished it of with a pull cut saw being very careful not to over cut into the remaining headstock back.
Then, after cutting it to rough size, I glued up the headstock veneer.


Gretsch Inspired Carved Top.
in In Progress and Finished Work
Posted
Anyone know why this forum isn't sending me notifications? I've set all of my preferences and am Watching several threads and the overall forum...nothing. Now that I think about it, it's been months since I had any notices from PG. I know they have right email because I changed my password and the action emails made it through.
Of course, if someone answers this, I'll have to check back to get it...
Frustrating.