


pauliemc
-
Posts
1,052 -
Joined
-
Last visited
-
Days Won
21
Content Type
Profiles
News and Information
Tutorials
Product Reviews
Supplier Listings
Articles
Guitar Of The Month
Links and Resources
Forums
Gallery
Downloads
Posts posted by pauliemc
-
-
REAR ROUTE !!!
Route it from the back, screw the scratch panel man.
-
This is looking realy good. Love the pinstriping in the neck
-
No, I used an Xacto knife I know that was one issue because I started the knick that caused this crack in the first place. I just didnt anticipate it to grow like this
Always use the right tools for a job. You just cause yourself problems otherwise. Drill bits cost next to nothing when you look at the use you fet from them.
As for the glueing. I always glue tops on with titebond original, clamp it for at least 24 hours, then let it sit for 5 days min. All your drilling & routes get done after the top goes on, In my oponion anyway.
But keep going, A blue burt will hide that repair, if your up for it. & a mountain of clear polished & buffed to a realy high gloss should fisish it off realy cool.
-
Since I am going to front mount the pickups without a pickguard, cutting/routing the neck pocket and moving everything down is not an option. The neck pocket will be where it is. I did shorten up the pocket a bit but I did it so my short fingers could get to the upper register. I was going to lay the walnut back inside the lower horn like a PRS, but once I cut the arm relief, I didn't do the route at the lower horn.
Pauliemc, what you said has me scared now. I hope that everything works out here... Stay tuned.
Just out of curiosity, What are the dimensions of your neck pocket ?
-
Seeing as you like purple, Why not try a heavy metal flake purple & white swirl ?
you have to try that first - and take loads of pics so he has a tutorial to follow

or if you could do purple and black instead - that would be pure awesomeness
Might just do that. But not with purple. Not a fan.
-
Gibson scale strat eh ? Done a few of them over the years. usually make for a cool build.
BUT. Id still move your pickups, bridge & neck back into the body. you need a good solid mounting for a bolt on heel & yours looks a little short.
I understand your approach, shortening your scale lenght means the bridge & nut get closer - so you moved everything closer to the nut.
But good build practice would dictate that you move the other way. A solid/ridgid structure is the basis for a good guitar with sustain, good playability & superior tone.
Id look at your neck pocket. push it back 10mm into the body. Then figure out your nut location in relation to your neck pocket, & from there relocate your pickups & bridge.
Im beggin you man, trust me here, You wont regret it
-
Is the crack pulling apart on a level plane ? or is there any movement in level from one side to the other ?
-
A refinish will be easy, there are lots of finishing tutorials on the forum here. Seeing as you like purple, Why not try a heavy metal flake purple & white swirl ?
Extending the neck pickup route is easy, Just make sure you have a good template. Filling the centre pickup route has its problems. As it means that you will have to compensate for the wiring for the neck pup while you fill the middle route. Id leave it & wire it up like a jem.
A fixed bridge conversion on a trem equiped guitar is not a beginers job. Its not as easy as it looks to get it right. Id stick to the trem. You can Lock a trem in position by putting a small wood block between the body & trem block, Then adding 5 heavy springs & turning up the tension on them. Looks like a trem - but is solid as a hard tail (almost)
As for binding, If this is your first attempt at this kinda thing id stay away from binding an already carved top. Also, the Ibanez S models are realy thin on the edges & look awful with a binding (Trust me. customer wouldent listen, insisted on having it bound, Then hated it, Then had it all rounded out into a kinda JS type thing, so it worked out in the end)
As to this comment.
The neck is also very slow when playing like solos. It has a gloss finish but so does my JEM and that thing plays amazing. Maybe it's just dirty but any recommendations here too?
The difference between an SA160 & a jem is similar to that between a bicycle & a harley davidson. Especially if the Jem is a 7 & not a 555.
But mostly it would be set up & overall build quality that is your problem here.
But good luck with the project. Sounds like it could be cool
-
Here's a Strat, loosely corrected for perspective, and laid over your photo. You can see that the neck goes further into the body and the PUs are spread out more toward the butt of the guitar.
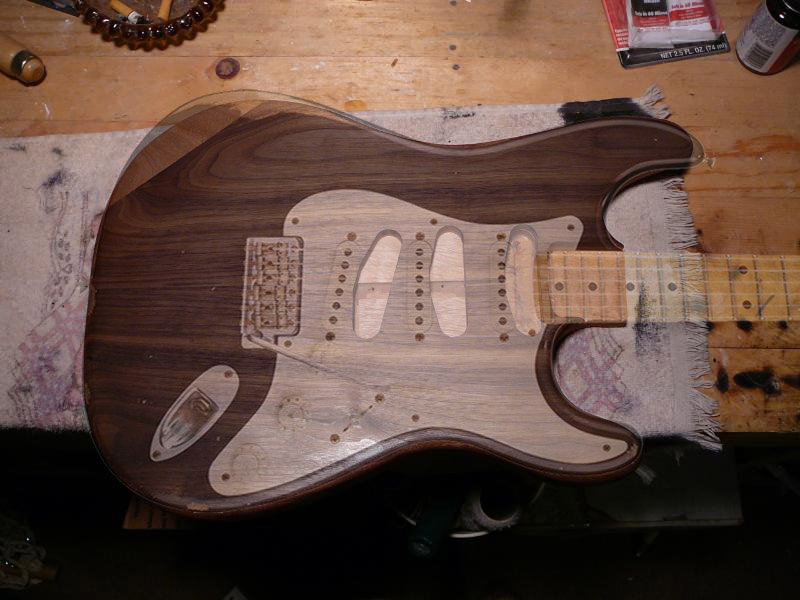
You might want to verify the spacing before you do too much more on this one. I guess you could make it work since you haven't placed the bridge yet, but you would need to cut a custom pickguard.
Peace,
Mark
Im afraid Guitarnut is right. The pickup & neck routes are very crowded & wont work.
This is easily fixed with a Boat route. Just route out the area for the pickups again, in the correct place. you will end up with a big route that you will need to cover with a pickguard. But just dont use a white guard or people will say you copied the Pretender Scrapocaster I did last year
http://projectguitar.ibforums.com/index.ph...ender&st=30As for the elbow carve. Id leave it. makes a nice contrast to the walnut.
-
Listened to these a few times now. Couldnt realy make up my mind as to what the necks were doing tonaly at first, But I think there is defenitly something to the chambered/hollowed neck. Seems to have a broader, more airy tone. Cant quite put my finger on it but there is definitly a lot more going on there than with the solid necks. At least to my ears anyway.
How was the trapazoidal neck profile received ?
Did anybody realy hammer the tremolo, Would be interesting to see how it fared with some abuse.
-
Relax, your freaking out over nothing.
There is always a solution to these things. You just need to look at how the block is going to be cut up & think about how you can do it with what you have in your tool kit.
It will be a pain in the ass, but im sure you can get around it yourself.
-
Videos/sound clips are up - check my site!
Pauliemc, the Rick Toone neck utilizes the Toone-Townsend solid neck core, but mine are all adjustable:
- the Wenge neck has a 15mm OD/12 mm ID CF tube with a single truss inside, mounted asymmetrically at the bottom of the tube
- the Maple neck has a Martin style aluminium truss rod and is reinforced with CF in the laminates
- the last neck (on the f-hole guitar) is a Moses Graphite neck, adjustable in the heel end.
The Wenge neck seems a little brighter and the Moses neck a little warmer with the maple in between, but that is very preliminary. Seems like air channels make the neck respond very quickly, but that is again preliminary. Check out the sound clips and see if you can make any educated guesses :-)
Cool. The whole non-adjustable thing does not work for me.
Its nice to see someone else using carbon strips laminated into the necks & not just as static truss rods.
cant tell much from sound clips, May be a case of having to make 2 identical necks apart from the chambers to see if it has any effect tonally. Bolt ons, for a double neck test rig ?
could be interesting. -
Some realy sweet lookin guitars there.
It looks like you used a solid neck core, non adjustable. what do think of them ?
& how did the hollow neck thing work out ?
-
Yeah, MDF really sucks. First time i cut it, i did it inside with a circular saw, that crap went everywhere!!!
Wear a respirator. MDF dust is bad stuff...
+1 to that .
Gets in your lungs & expands, Absorbs loads of moisture. Will have you coughing up nasty phlegm for a few days. Wear a mask & cut/sand it outside.
Use ply for your templates in future, of clear plastic/pcv sheeting.
-
Realy cool thread you have here men. So much info it could be used as a build tutorial.
Guitar is lookin realy cool aswell.
-
Crap Murphy got me...
All those clamps were not enough. I ended up with gaps... @(&^$^$#!& ... It fit perfect before the glue. It must have been the moisture introduced by the glue.
!)$&%^@() GAPS.... Now I have to get this fretboard off and try another. Man I really don't want to build another neck. I guess I will use the hand plane and rip this board off. With all the glue I doubt it will come off with heat. Plus I hate to heat it as it is a laminated neck.
)!*($)^%@ I hate when this happens.
Next time round. clamp the neck along the centre line, About every 35mm if you can. Then wrap the neck tightly in heavy rubber banding or surgical tubing.
Like post No. 19 in this thread http://projectguitar.ibforums.com/index.ph...15&start=15
Ive been using this method for years, Havent had gaps along a board since i began using it
-
The whole back & neck on this guitar are done with Danish oil http://projectguitar.ibforums.com/index.ph...=43332&st=0
I sanded it to 4000 grit (min) then used 000 grade steel wool to buff it up, Then applied the oil using an egyptian cotton cloth for the first 3 coats.
Waited 3 days. then I applied a further 3 with scotch brite steel polishing pads,
Waited 3 days, Then a final buff with grade 000 steel wool & a light coat of danish.
Waited about a week, then buffed it all up with a cotton cloth.
Comes out fantastic. Then neck feel amazing done this way.
-
what the hell man. thats some serious chunk of ebony !!
how the hell are you gonna slice that up without ruining it - and your saw blades ?
-
Engine turn the copper
is that possible on such thin leaf??? i really dont know
Yea. just gotta go realy gently. Iv turned gold leaf on a few things. that stuff is freaky thin, measured in microns. the copper would easily be twice as thick & still considered leaf.
Id say you could find a tutorial easy enough on youtube or something.
-
Engine turn the copper, Then oxidize it. Will look **** hot !!!!
-
FREAKY GREEN SATRIANI.
Based on the JS model from Ibanez, But with a little Les paul thrown in for good measure.
Body : 2 piece hard ash.
Neck : Glued in - Multi laminate Mahogany & Rock Maple with scarf joint & volute. Rosewood fret board. No inlays, side dots only.
Bridge : Tune-o-matic. No tail piece, strings anchored thru body with ferrules. Chrome.
Tuners : Wilkenson. Chrome.
Electrics : 2 Humbuckers, 01 vol, 01 tone, 3 way toggle switch. Strat styled jack plate on rear panel. Fully shielded.
Finish : Back of body, neck & head stock finished in black poly. the poly on the body was allowed to sink into the wood grain to get a lightly textured finish, This is to compliment the rippled finish on the front. This was then polished & buffed to a mirror shine.
The front is fabric. Applied to the body so that the rippled texture of the material is maintained. overlayed with poly & buffed to a high gloss.
Here is the link to the PG thread. http://projectguitar.ibforums.com/index.ph...42286&st=30


-
HA HA No problems
Im not actually sure what it would cost to build just one. I buy the stuff in batches, Different species all heaped in. The more you get, the better the discount, you know.
This came out of a pile of sapele boards 2.5x18 inch 15 foot long 3 of them, & black walnut 1x9 inch 15 foot long 3 of those also. I think it was about 400 for the lot.
-
Think I might GOTM this for the laugh.
Get my ass kicked but screw it, We have Andyt's groovey swirl this month. I rekon a rippled fabric finish is in order to fly the flag for the oddball finishers on next one.
-
Okay..........now that's just awesome. Polished black poly really looks like buffed pewter or quicksilver huh? No secret step you're not telling us about?
SR
Elbow transplants after you finish polishing
takes a seriously long time to get it to there. Just do it like you normally would, Then go back 6 weeks later & use the finest compound you can find on it again. Then again 2 weeks after that. your arms & shoulders will be in a heap but its worth it. You should have seen some of the piks from outside, Useless because of the reflections. it was like a guitar shaped Jesus, glowing like a bitch in all the shots ha ha ha
Glad you like it.

2010 Crazy Inlay Project Started
in Inlays and Finishing Chat
Posted
Iv done marvin the martian & bugs bunny inlays on a guitars before. Used marvins space rocket for fret markers. looked prety cool.