


sdshirtman
-
Posts
646 -
Joined
-
Last visited
-
Days Won
23
Content Type
Profiles
News and Information
Tutorials
Product Reviews
Supplier Listings
Articles
Guitar Of The Month
Links and Resources
Forums
Gallery
Downloads
Posts posted by sdshirtman
-
-
Hello and happy Sunday evening. I'm updating on my porch while babysitting and slow cooking a nice 3 lb tri-tip.
In between imbibing myself into a defcon 5 hangover Friday and a full day of wine tasting in Temecula valley Saturday I managed to lay down some more stain on these two this week.
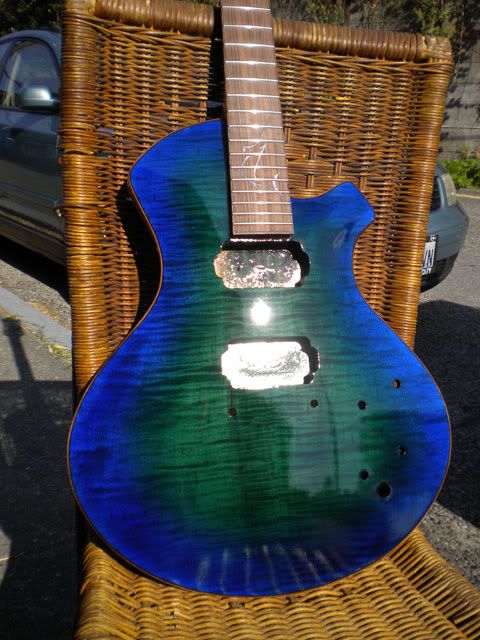
The tobacco is coming along very nicely with no major problems but the blue one is still giving me fits.
I did a second session on the blue and let it dry.

This is just too bright for what I want. Its nice and I could live with it but this is supposed to represent the Aussie flag which is much deeper blue.
I ended up sanding a lot of this session off and hitting it with some more black because I felt the grain still wasn't dark enough.
After that was dry I sanded back again and started session number 3. It almost seems like I'm going in circles here but there is some complexity developing between the turquoise, the blue and the black. I sanded the black back to the edges here (I think).

So I let that dry and sanded back a bit more in the center and started another session.
This was that result.

That damn spot on the left is killing me but I'm going to have to learn to live with it. The customer has seen the progress and is cool with it. He says its probably bothering me more than it is him.
Here It is as of this afternoon with an outside pic. Its a pretty close representation.

The faux grain I painted in there seemed to work pretty well considering.
I'm still videoing the process but that means not as many pics. Hopefully the videos make up for it when its done.
I'll get some pics of the brown one up in a bit.
-
I rest certain that the sprayed was better

Chris
That ended up quite nice.
-
Very cool. Nice job man. I've been mulling around something similar in my head and its nice to see someone attempting it. I think this will have a very cool payoff in the end.
-
Dude. Count yourself lucky! I used a piece of hard curly on the first Marlin and it didn't take stain worth a DAMN! This may look like I don't know how to stain, I assure you I do. This wood just would NOT take it even at all, and some places it did this other strange thing you can't really see in photos. Ended up having to sand it all back off. I ended up leaving the stain in the lows to use as highlight and spraying the actual burst. I don't like the look of sprayed color as much as stain, but sometimes you have to
Chris
Thats a bummer Chris. Do you have a picture of it after you sprayed the burst? I though about spraying this and if fact would have preferred it but just dont have the resources right now. We all know how fast this hobby can drain a wallet.
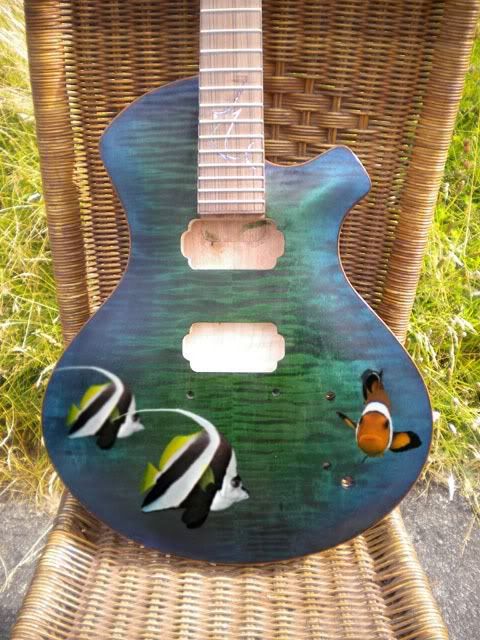
Nice observation on the sea floor Scott.
-
Thats for the input Scott. I think I'm going to do the dark. Here is a minor update.
I started the preliminary staining. As I said I would do I'm documenting all this on video and if it comes out as I plan I'll edit and post the vid. But until then pics will have to do.
My first step was to go over the top with a little bit of distilled water to dampen the wood and give myself a buffer so I could blend a bit. On my samples I just hit the blue one with black and the tobacco one with med brown trans-tints then let dry and sanded back. Because I have a little more surface area I want a little more of a transition on the the flame. So instead of all black I'm attempting to go from dark blue in the center to black towards the edges in hopes that when I sand back and lay down the turquoise in the center that the flames in the center will be somewhat more subtle against the turquoise. Same theory on the tobacco burst. Hope I'm explaining myself coherently.
Here is the blue getting started.

I can always go darker so I'm starting off slowly.
Its still pretty damp in this picture but the color is getting a deeper here. I added and blended some black transitioning from the edges as my last step. At this point the wood was started to push getting over saturated so I stopped and moved on to the other guitar. One thing to note here is the way the wood is just kind of blotching up just left and right of center about 2/3rd of the way down. This could be a problem but more on that in a min.

Here is the other one after finishing the first stage. Obviously the figuring is much more consistent on this piece.

And dry.

Ok so back to the trouble spot on the lower left side of the blue one. When I sanded this one back the grain almost disappeared in that spot. Because of the inconsistent figuring in this area I decided to attempt a bit of faux figuring here. I mixed a bit of diluted dye and applied it with a q-tip. After that was dry I took a fan tipped brush and carefully feathered in some grain lines around it with more blue dye.

And here it is after that section was lightly sanded over and blended in. The dark blue/black section was still damp. Ignore that part.

I realize that this faux figuring wont dance and have the opalescent qualities of the rest of the body figuring but I'm thinking its going to be better than what was there before. We'll see.
Oh and here is the other one sanded back.

Until next time.
-
Awesome. And all for just $399. Amazing.
-
Dude! Look at this picture!
Now imagine the black line left by the cord in front of the camera isn't a cord at all... but the area it "carves out" is actually a decorative route-down and the "black" you're seeing it the shadow from the edge above it, blocking part of the deep route-down. Purely aesthetic, yes, but it looks hot! I mean, just look at how the route down would perfectly meet the tip at the rear. Hot.
These are hot builds anyways too. For sure!
Chris
That guy^^^^ is on to something. Would look pretty sweet anyway. And the build so far is absolutely amazing. All these small nuances like the tearout fix and bad router bits are being stored in my head for later use. That body shape is so tasty though.
Interesting observation on the camera strap. I gotta admit its kind of cool but at the same time way out there. If I ever end up doing a shape like that it will be an interesting story of how it came to be.
I was looking at that shot too. For a different reason. I love that tobacco burst exactly as it is. The walnut binding will show up as a lighter different shade of brown. I suppose you could let the top edge of the binding get sanded off and dyed with the top. Then the color break would be at the corner. I've never seen it done, but it could work. Maybe you should bind a test piece to see what whatever you come up with works.
SR
My significant other thinks I should do it that dark too. I'm torn on it. I like the darker edge too but just want the binding I worked so hard on to show nicely.
Oh did I mention that on that sample that if I turn it 180 degrees the dark flame almost completely disappears? I have high hopes for this finish.
-
Not wanting anything adverse to happen to the masked edge I peeled all the masking off about 3 hours after the third or fourth coat of sealer dried.
The blue vinyl masking tape did its job extremely well. There was only one very small bleed on the edge next to the mahogany and it cleaned up with some sandpaper.


At this point I started wondering if I'll have to do this step twice. Once I start the first steps of the hand rubbed burst which will be the dark stain and sand back I think all of the sealer on the top edge of the binding is going to sand completely off and need to be re masked and applied. I hope not but I really dont see any way around it.
The last thing to cover is the pickup rings. I decided to fill the grain on these with deft sanding sealer. It took 5 or 6 light coats to start sealing the grain then I tediously sanded back to almost bare wood and then shot a few more light coats of the sanding sealer. After that was dry it got tediously sanded back with 220. I started shooting the first coats of lacquer on them tonight.
Here it is after sanding the sealer and right before the lacquer coats. By the way you're looking at the bottoms of em.

I still have no idea how I'm going to buff and polish these things without breaking them. Personal note: Stay away from wood binding and pickup rings on your next build and give some plastic rings and binding a try. But that would be too easy right?
Thats it for now. I plan on shooting some video of when I do the hand rubbed stain processes. If they come out well they might serve to give some tips to others. There are a lot of tutorials on most aspects of guitar building but not too many good ones on hand rubbed bursts. I should know, I've looked at all of em.
Thanks for all the positive comments and advice. Keep em coming. Until my next installment. . . . .
Ciao.
-
Have you decided on colors yet? This build is AMAZING!
The Aussie build is getting Blue and the other is getting a tobacco-ish burst. I've been working on some sample slabs. The blue is is right where I want it but the tobacco is looking a little dark. I like the color but I dont think it will fit well with the dark binding. Maybe it will. Hell I dont know. I might do another round of lighter samples before I attack that one.
Here are the finished and buffed samples.


See what I mean?

I finished routing the pickup cavities this week. While routing I felt that my bit was losing its bite but stupidly kept going thinking "its just a little more to go" and got burnt. The thin section of wood over the top pickup just completely blew out. Thankfully it blew out in three whole pieces and I was able to find them. I managed to puzzle them back in place and wicked some water thin CA glue in the cracks to mend it back together.
Its not pretty on the sides but it will never show. It does bum me out though. This is the first bad thing thats really happened so far on this build.

I replaced the bit with a craftsman 1" pattern bit I found on sale at a Sears by my house that was closing. It only cost me 9 bucks. Lesson learned. Its almost as bad as the one before it and was a total waste of money. It will now be used only for routing new templates out of MDF.
This weekend I finished off the build by installing the jack plate. Since it was installed on a radius curve it sticks out a little bit on one edge. I fixed that with a fine file and brought it flush with the body. I'll polish it up with some micro mesh before it gets its final install.

Ah...
I've used vinyl sanding sealer on many projects and it sands easy fills easy and dries quickly. I've used lacquer sanding sealer and had blush problems out the wazoo. Regular lacquer as a sealer would be fine...not as friendly as vinyl but fine. I was under the impression that was not a first choice of yours so I suggested an alternative. Vinyl does sand and clean up easier
SR
Scott I took your advice and used vinyl sealer on the binding. There might be an easier way to do this but I couldn't think of one. I ended up masking off everything but the binding and spraying several coats. It was nice to finally see the walnut darkening up to its final color.
It was time consuming taping it off. I used Scotch 471 Series BLUE Plastic Fine Line Tape for the edges. I dont want and cant have any bleeding here.


-
Very cool sled idea. When I first saw this thread I was thinking more about the play in the guides and the potential flexing and hadn't considered the dust getting into the bearings. In the last pic you posted it looks as though there were remnants of both problems in the form of multiple intermittent burn marks where the router stopped and sat for a period of time. I'm guessing that was caused by the bearings getting gummed up? Using a vacuum will probably help somewhat but wont alleviate the problem completely.
It also looks as though you might be getting some flex judging by the stripes left on the wood. Hard to tell from the pics though. I'd take some calipers and measure several different spots and see if its all consistent.
The 3/4" thicker base will help stabilize this somewhat but probably wont do much for the bearing slide flex. Oh and remember that if you use lubrication you run a risk of it contaminating your wood and causing
potential finishing problems down the line. I'm sure the risk is minimal but still something to consider. I agree with Wez that the drawer rails might be adding unneeded complexity to a simple idea. I made one using 3/16th thick aluminum angle iron and teflon PTFE tape and there is no flex and it slides like its on bearings.
Keep posting as I'm really curious to see how this develops.
-
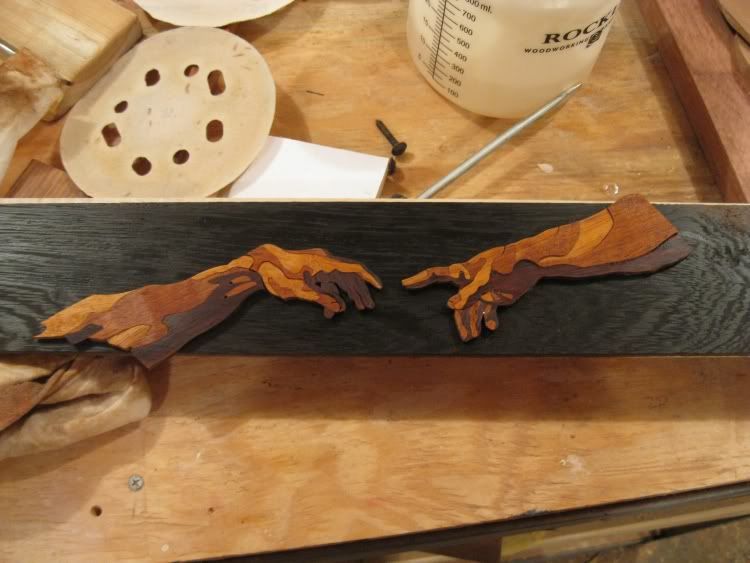
How did I miss this thread? That is absolutely stunning. Michelangelo would be proud.
-
OK never mind. I found some.I had to drive 20 miles to get some though.
-
On the HS I don't see much point to using tru-oil and lacquer as they are not hugely different in appearance and the face of your HS will look different from the sides even if finished with the same material under normal viewing conditions. The light will hit the face and sides from different angles after all. If you decide to go with both however, I wouldn't worry about a line....assuming your finishes will meet at a corner/edge the light will create a line to your eye anyway. I'd just use lacquer on the neck and HS (since you're using it on the body anyway. Get your neck all leveled and then spray a light satin using the valute as a border as you mentioned.
I'd go with the vinyl sanding sealer to mask the body binding. It's just easier.
SR
Ok then let me ask you this. Why vinyl sealer instead of lacquer or lacquer sanding sealer? Could I get the same effect from regular lacquer? I've read somewhere that vinyl sealer has better moisture blocking properties. But will the vinyl sealer dry as clear as lacquer?
One of the reasons I ask is vinyl sealer is hard to find where I am and I dont want have to order it.
-
More cowbell.
Always makes everything better.
Anyone else?
-
OK I have some finishing questions so feel free to chime in here and give me your opinions or open up a discussion.
Bear with me as I explain myself and my thoughts on this.
First off.
On my neck I used ca glue to grain fill the walnut binding thinking that on the fretboard face it would get some lemon oil or similar and on the sides and back it would get true oiled with the headstock face getting lacquered in gloss clear. Well that was the original plan.
Now I'm thinking that mixing the two methods is maybe redundant and could have negative reactions and or potential compatibility finishing problems later. One scenario that has crossed my mind is the transition from lacquer to tru oil on the headstock. Specifically where the binding goes around it. If I tru oil the sides of the headstock and lacquer the face of the headstock there could be some kind of line where the two different finishes meet.
Pondering on this I think the best thing to do would be to simply lacquer the entire neck minus the fretboard face (obviously) but I'm not sure.
What I dont like about this is that I like the slicker feel of a satin finished neck vs glossy. The thought of finishing the neck in gloss and then adding a final coat or satin or semi gloss on the back of the neck has crossed my mind. Maybe bringing the satin to the line were the volute is.
Then again I dont know what would happen to this semigloss section when I buffed out the neck. *sigh*
Second is the walnut binding on the body. Again my original plan was to tape it off and grain fill it with ca glue. First purpose would be to grain fill and the second would be to protect the walnut from the stain I'll be using on the front. I'll be using vinyl masking tape to mask the binding when I stain the front but I'm sure some stain will inevitably creep under somewhere. From my experience using ca glue for filler on the walnut binding works well but is very time consuming and messy.
My other option would be to mask off everything but the binding on the body and spray it with lacquer instead. This gets me more indecisive because my research tells me I could use vinyl sealer in place of lacquer on this part if I wanted to. Then again I used the ca glue on the neck so using it on the binding would insure uniformity in my finish.
I'm really striving to build the best guitar I can an finish is a huge part so help me figure out the best plan of attack on this.
-
Enjoying this thread and rooting for you. Its going to be awesome when you're done.
-
Thanks for the compliment Scott.
My only concern would be the magnetism induced in the strings from six rare earth mags in proximity. Although I have no direct experience working with magnetically mounted truss rod covers (only cavity covers) I would be worried that the additional magnetism in the strings might affect the vibration or the way they vibrate in the flux of the pickups. You might want to make sure that the strings have no magnetism before you mount the pickups by checking with some iron filings or something. Hopefully somebody with direct experience can corroborate or disprove this theory. I am a paranoid kind of person in these situations.
How DO magnets work, anyway.
Magnetic interference with the pickups didnt really concern me too much because the amount of distance the magnets are away from them.
Thats a great idea on the iron filings. I tried it on a spare string and its not a factor. The string does get magnetized but just barely and it only stretches down maybe an inch from the strongest RE magnet I have on hand which is 3 times as big as the ones I installed.
-
Cont...
After I got this finished with this it became apparent that a single picture or two would show how cool this turned out so I has to shoot a quick video. Maybe its just novelette to me right now but I'm really stoked with the final outcome.
Oh and by the way this little modification took up the bast part of my Friday night. But I think it was worth the extra time.
I almost forgot, I did some finishing experiments last weekend.

Using water based dyes I finished staining a few samples. I'm happy with the blue but still have to refine the amber color to be a bit lighter so it stands off and contrast against the drk brown walnut binding. Either way I'm bringing these to a full finish before I start staining the actual guitars.

I'll post some of the finished sample pieces once I get them leveled and polished.
-
Kind words and thank you.
Its been a bit since I updated. I've just been busy.
After making these truss covers I started thinking about how I was going to mount them. My first thought was to just run a screw through the top of em and be done with it.
But after spending some time staring at these and contemplating what I could do different, I decided I thought it would be cool to attach it with magnets and not have any screw showing at all. I'm certain its been done before but in all the build threads I've searched though and seen I haven't seen it done yet.
Anyways heres a brief explanation of how I did it. Pretty simple actually.
Fist off, this would have been easier to install if I decided to do this beforehand, but since this was a last min idea I had to figure out a way to get it done the way it was.
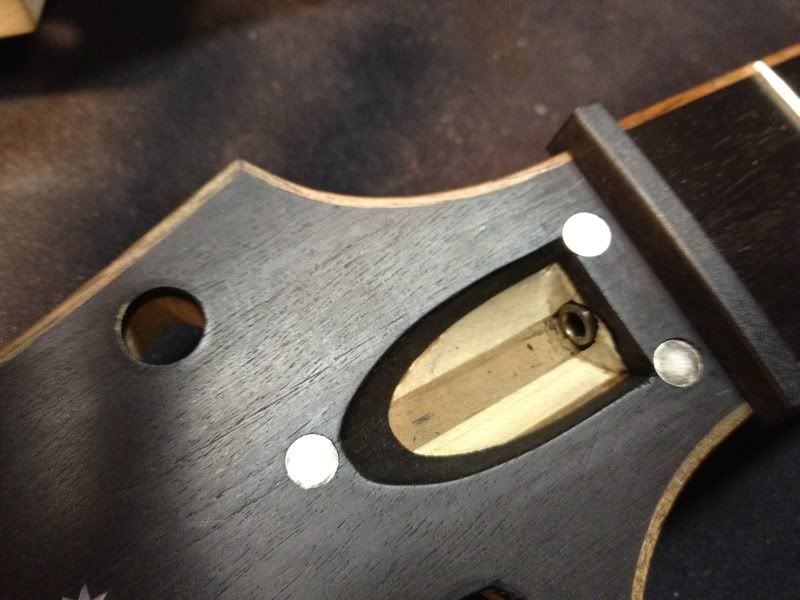
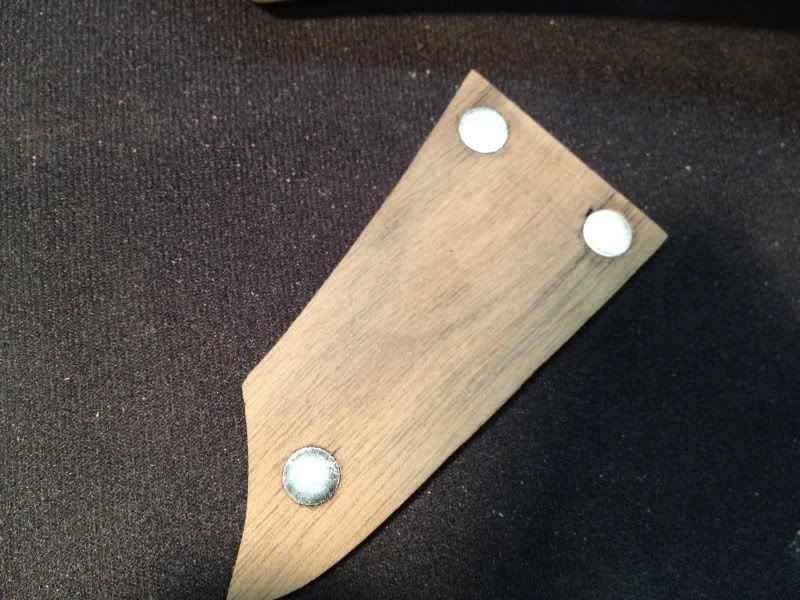
First off I bought some 1/4" dia. x 1/32" thick rare earth magnets. They're cheap at 10X for $1.50.
The next challenge was matching the counter sunk cavities on the truss cover to the cavities on the headstock so that they would line up properly. Making a reversible paper template was the answer for me. I traced out the truss cover of a piece of paper then took traced out the cavity for the truss adjustment and used that to figure out where the magnetic discs would go. Then I cut that out and used it as a guide to mark where I'd do the magnet recesses.

I took the same paper template and flipped it over and traced out the recess placement on the truss cover.
Then I used a 1/4" endmill chucked up in the drill press to do the recesses on the truss covers. I used an endmill because its dead flat on the bottom. You could get away with a 1/4" router but I guess but they can leave a little knob you have to remove.

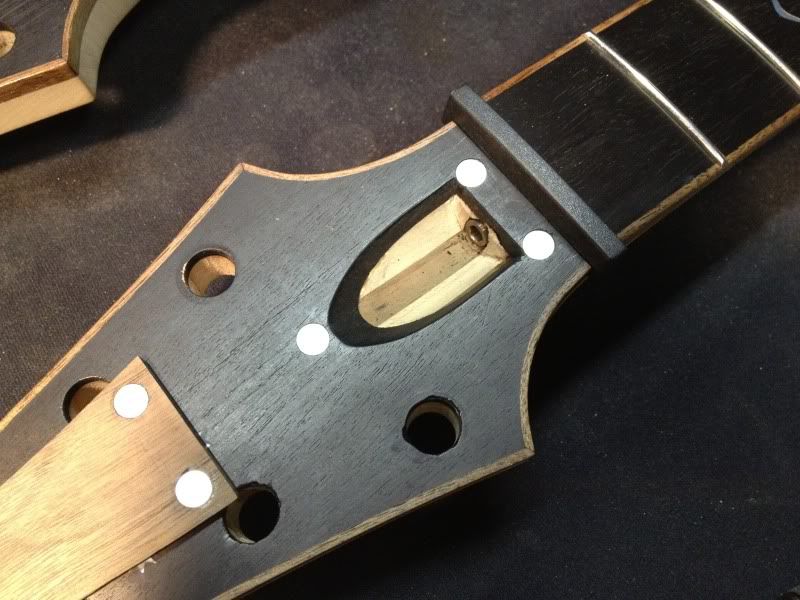
Then I set the recesses on the headstock using the marking I made with the template.
The hardest part about this was aligning the bit with the markings and clamping the neck down.


I had several reservations about boring down into this headstock. I could have easily just run a damn screw through the center of the cover like PRS does to their truss rod covers and been done with it. Despite this I moved forward.

Next part (and I didnt document this well) was to glue in the magnets. Each set of two magnets wants to mate with each other in a certain natural way. North- north , south south ect. I let that happen then marked the outsides and the orientation so that I could glue them in and not have them repel each other. Pretty basic but if you don't get this detail correct it the polarities might not match correctly and it wont work correctly.
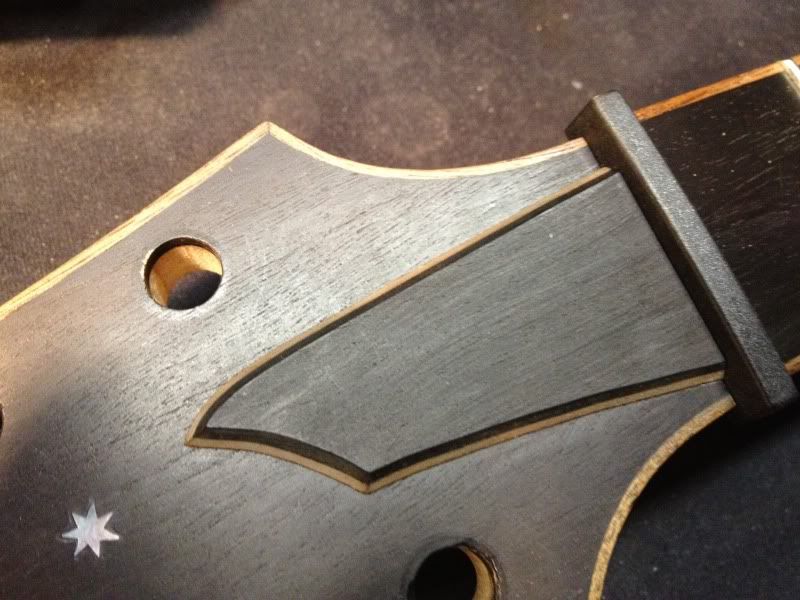
Anyhow here they are installed.
-
I'm a little late on these but Schaller M-6 Mini's are 13mm wide and the smallest footprint I know of.
-
Usuall for the pup routes I use a 3/8 Forstner bit to drill out the corners, then just use my 1/2 pattern bit as usual. The stew mac one is a custom job, so you likely won't find it anywhere else. Your other alternative is to buy one of those bearing sets and put a 3/8 bearing on a 3/8 straight bit.
As for the chrome knobs, you need to look for push on knobs (for knurled shaft pots). There are tons of places on ebay, though some of them can be of lower quality if not careful.
I was thinking about doing something like that but it seems like a lot of extra steps.
I'll do some checking on ebay. Thx.
-
I'm almost done with my build sans the pickup cavities. On my first build I used a standard 1/2" pattern router bit but it doesnt fit into the tight corners of my template and left rounder corners then I wanted.
It seems I need to get a 3/8ths inch pattern bit. My local rockler doesn't have em and I'm having a hell of a time finding one. I'll note that know stew mac has one but its really shallow. I want one at least 3/4 of an inch long.
Anyone know where I can pick one up?
The other thing I'm having trouble finding is chrome knurled barrel knobs WITHOUT those damn ugly set screws. Kind of like you'd find on an ibanez.
Any sources or advice on the pup routes?
-
Nice job. That looks pretty sturdy and heavy. I'd shy away from any oil for lubrication though. That stuff has legs and WILL eventually find its way onto your wood and contaminate it. Instead use some silicone PDFE tape on the surfaces that will be in contact.
-
Between watching Baltimore and San Francisco lose today I made some truss rod covers.
Its a laminate of walnut and ebony with beveled edges. I havent spent any time sanding or refining them but heres a sneak peek. I'm thinking of mounting them with magnets to keep the clean look. Take that ScottR


My Second Build Attempt
in In Progress and Finished Work
Posted · Edited by sdshirtman
Here are a few pictures of the second one. It got a few treatments of med brown on the edges and then another treatment of some black on the edges while it was wet so I could blend it. While applying and blending the black it kind of muted and poisoned the med brown and red I had applied. I sanded back a little bit in the center and close to the edges and reapplied a thin wash of red and med brown.
Here it is in the sun and completely dry. I think its ready to seal now and move onto body filling.
This is backwards but this is the the state it was in before the last step. The only reason I'm posting is because I took it while it was still damp and more vibrant.
Twins and a big mess.