


guitar2005
-
Posts
1,350 -
Joined
-
Last visited
-
Days Won
5
Content Type
Profiles
News and Information
Tutorials
Product Reviews
Supplier Listings
Articles
Guitar Of The Month
Links and Resources
Forums
Gallery
Downloads
Posts posted by guitar2005
-
-
I'm fixing an older acoustic guitar that need the headstock to be redone. Its an older "Morris" brand guitar and I'd like to have a similar looking logo after the repair, which includes a new headstock overlay.
Does anyone know where I could get a one-off decal that would match the original?
It looks like this:
https://www.aprilwine.ca/blog/i-collect-morris-guitars/
-
Anything is possible.
-
I accidentally used a waxed shellac and when I realized my mistake, I lightly sanded it and I added 2 coats of dewaxed shellac over it, then sprayed the lacquer over it,
I just hope the lacquer doesn't peel off because it would be a lot of wasted time, effort and money. So far, on the headstocks, its seems pretty solid but I'm not sure about the bodies with more lacquer layers. Maybe the adherence isn't great because its still fresh?
It seems like the dewaxed shellac coats should be sufficient for proper adhesion, but I'm not so sure anymore.

-
Yeah, I like to use shellac to give the wood a nice hue and it also acts as a sealer and partial grain filler.
This is the first time I mix my own shellac. I used a 2lb cut and sprayed it on. I just wasn't sure anymore whether lacquer would work over it with no sanding. I haven't sprayed lacquer in a while.
-
 1
1
-
-
Do you guys sand a dewaxed shellac base coat when topcoating with Lacquer?
-
7 hours ago, eubie said:
I'm assuming that varies by species as well. I closed-pore species like maple probably has more trouble taking stain after a fine sand than a more open species like mahogany. True? Still, 600 is probably too far either way.
It does depends. On tight, closed grain wood, 180 is what you need to really get that color in.
On something like Korina or Mahogany, 220 works well.Sanding to 500 or 600 is a waste of time and the stain or dye will not take as well.
-
On 6/19/2017 at 7:17 AM, Norris said:
I'm a relative novice myself, but I'd go down to 600 grit aluminium oxide paper before staining. The better your preparation, the better the results
")
600 is waaaay to fine for staining. even 220. I rarely go finer than 180. You want to keep the pores open.
-
As Scott said, carefully scrape that off. I would try to apply some kind of clear over it when done.
-
7 hours ago, GregP said:
It's been a while, but as I recall the common wisdom seemed to be orienting the middle of the "travel range" at your scale length for adjustable intonation bridges.
But this common wisdom never made sense to me... here's a good chance for me to be educated I guess. ;-) Compensation at the nut is making up for sharping the string as you push it down. You make up for it by moving the saddle back, which flats it back a bit. There shouldn't ever be the need for a saddle to go towards the fretboard. That being the case, you could theoretically put the high E saddle 100% forward and orient that spot to be at your scale length.
By doing this, you also optimize the range for the low E. I have sometimes wished for more travel distance on the low-E saddle, and this would at least give you the maximum.
That said, there are always going to be slight miscalculations, etc, so you could build in a tiny bit of wiggle room. But I wouldn't think the scale length at 50% of your saddle adjustment range is a good plan since you shouldn't need to move the saddle forward ever.
Willing to be educated.
You're not entirely wrong. There's more to it than just that. For example, changing string gauge can affect intonation.
-
I would not use CA to fill the cracks. I've always used a good quality Epoxy. Apply it generously over the cracks and heat it with a heat gun or hair drier. The Epoxy will seep in and it will become very solid.
-
For a Genuine Floyd, the nut is not tapered and the "shelf" is 15.4mm.
-
I had that happen to me on an acoustic guitar repair (delaminating fretboard). After hours of frustration, that string broke, I replaced it and voilà! The problem went away.
BTW, when you say "1st E string", that ambiguous. If you say high e or low e, its foolproof.
-
On the Ibanez bridges, you can set it up so that the scale length makes it to the middle of the saddle range. Then, you have to figure out how to setup the posts compared to that. Ideally, you'd have an example you can copy (easiest) or ask Ibanez for a drawing of the tremolo (probably hard to get), or maybe find one on the 'net.
Floyd Rose publishes routing diagrams and I'm pretty sure that the Ibanez Original Edge routing diagrams are available on the 'net as well.
-
For years, I've been building guitars with tremolos and TOMs but never have I done a build with the ABR-1 TOM.
This bridge has the particularity of having a little less saddle travel for the intonation and as such, I'm being very careful with the placement of the posts.
The guitar will have a proper 24.75" scale length and the Stew-Mac calculator places the treble bridge post @ 24.811" (630.2mm) and an extra 1/8" (3.175mm) on the bass side. I usually just set the bridge so that the scale length makes it to the mid-point of the saddle adjustment, which means I rarely use the StewMac calculator for this.
I mocked up the whole thing with a nut, tuners and a bridge with the saddles in the middle position with the high and low E strung up. I proceeded to do a rough intonation check and placed the bridge where it seemed to be perfect. I checked the measurements and I'm at about 632mm from nut to center of the post on the treble side and about another 4-5mm for the bass side.
Why the discrepancy between my values and the StewMac values? The fret board is correct in scale. Could it be that I should not have placed the saddles in the middle for the setup? I always like to have enough travel room for the saddles. The strings are new and had the same result with different strings.
I saying this, It is a little hard to get a good measurement from nut to the bridge post holes on the body since the neck is angled so there is a bit of an error there.
Am I the only one to run into something like this?
-
Nice take on the tele.
For #2, I would strongly suggest you reconsider the Jatoba neck and body. For having used Jatoba extensively, it is very heavy and dense. I would do a Jatoba top but never an entire body.
-
I'm looking for a spot repair and something that is as close as possible to the original factory finish so that they age similarily. Laquer will look out of place after a few months.
-
My acoustic guitar fell the ground ground and the result is a big finish chip. I managed to fix the colour but I now need to apply some clear coat on it.
The finish is some sort of industrial poly/urethane finish that has a yellowish tint to it.
Any ideas as to what could work well for a repair? I'm thinking that a gel clear coat might work.
-
I agree with the above. Try to get it nice and stable 1st with the least amount of deviation.
On the other hand, 1.2mm deviation over 40 inches is not very much. On a laminated neck, you could use the part of the wood where there is the least amount of deviation, or none at all.
One thing I learned in working with wood over the years is that every pass through a jointer, planer, table saw, rasp or any shaping tool releases some potential tension in the wood that could make it shift a little. The most important thing I look, above all, is grain.
You need straight grain with little runout for a neck. You cheat a little on a laminated neck but the basic rule still applies.
-
How is the relief with the neck installed and strings tuned to pitch?
-
Show me a double-blind study where the listeners can hear identical guitars, through identical equipment and identify the body, neck, fretboard, whether it's a drop-top (and if so, what woods are used), etc. then I'll give the myth some credence.
Then, we'll get the same folks to listen to differently made guitars, through different gear, and see if they can identify the woods.
Then, we'll test the "cut under a full moon" myth.
I'm not sure I understand your post. You want listeners to listen to identical guitars and ID the woods? That's not what this thread is about.
-
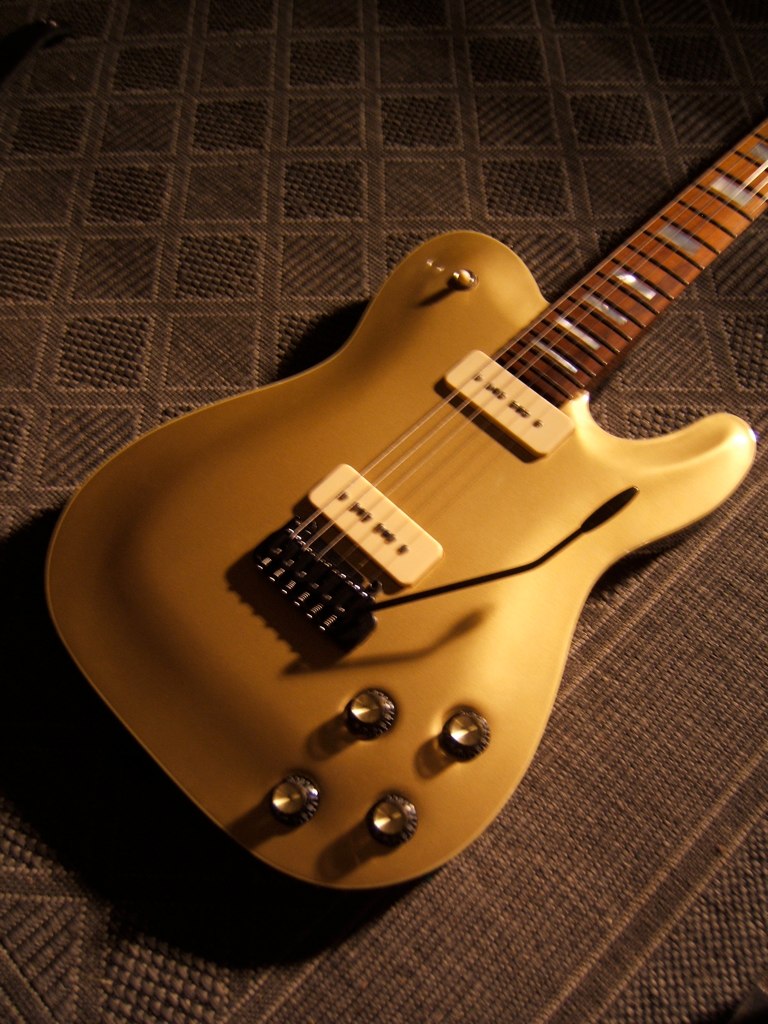
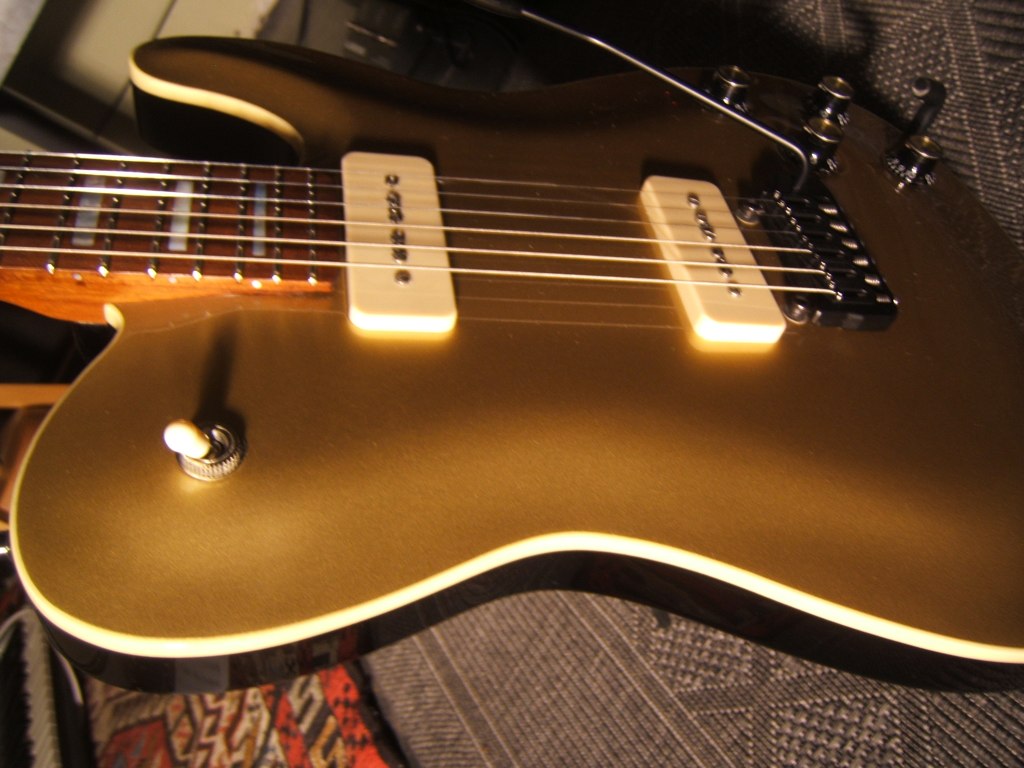
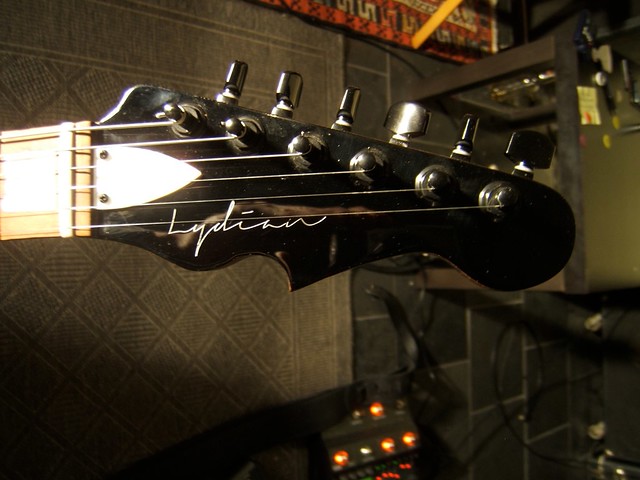
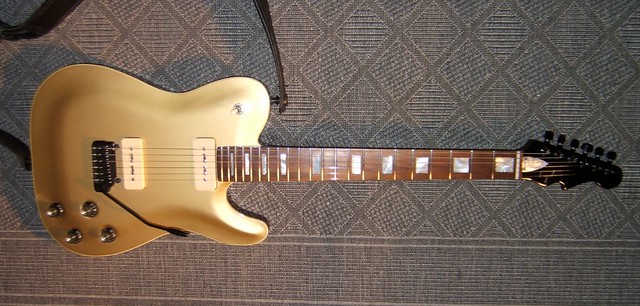
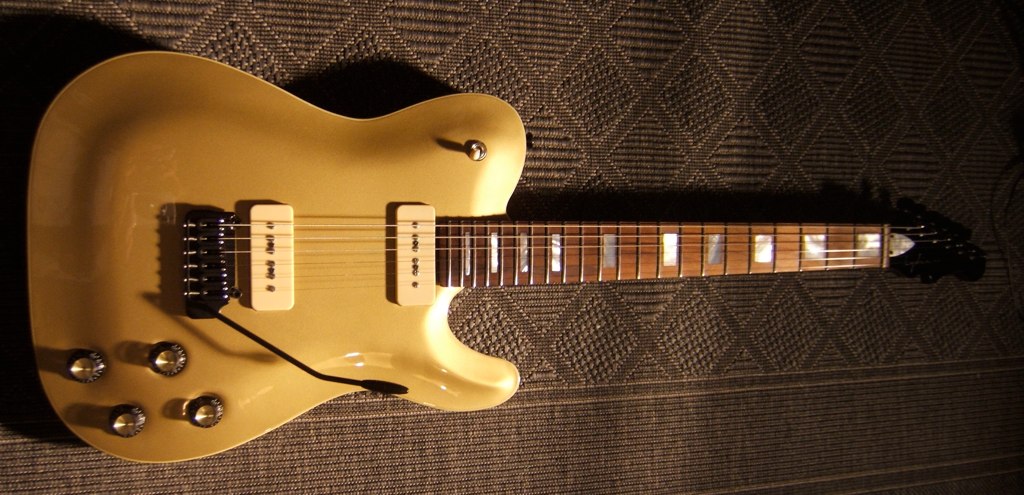
This is the GoldTop P90 Paul/Tele experiment.
I started this project simply to try different things like the metallic gold finish and P90 pickups in a Les Paul / Tele inspired body shape with tremolo. I built this one with the sole intention of experimenting different shapes, combinations and build techniques.
I started out with a warped piece of cherry I found in the bargain bin of the local wood store. The build essentially started from there. I toyed around with the Tele and Les Paul combination before but this is the build that takes it one step further with the block inlays, carved top, tremolo, the finish, volume/tone control placement and electronics.
I've had a lot of things I had to redo and fix along the way as it was the first time I did something like this and I changed my mind a few times along the way as I didn't have anything too specific in mind when this started.
- The body is Alder with a hand carved Cherry top.
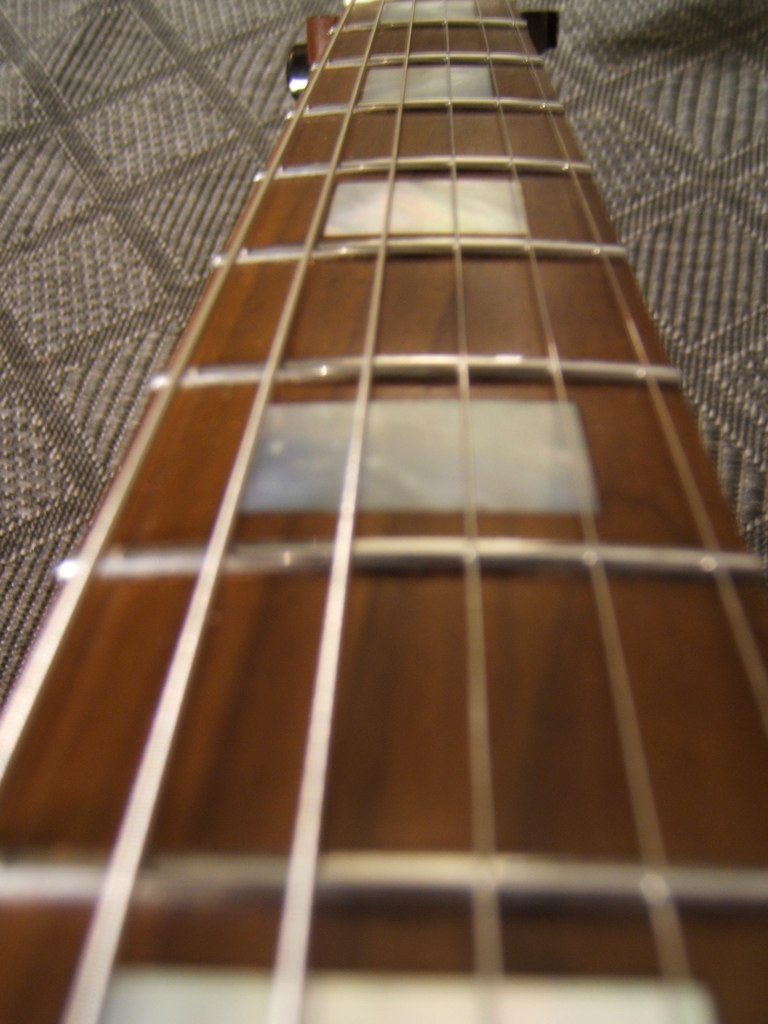
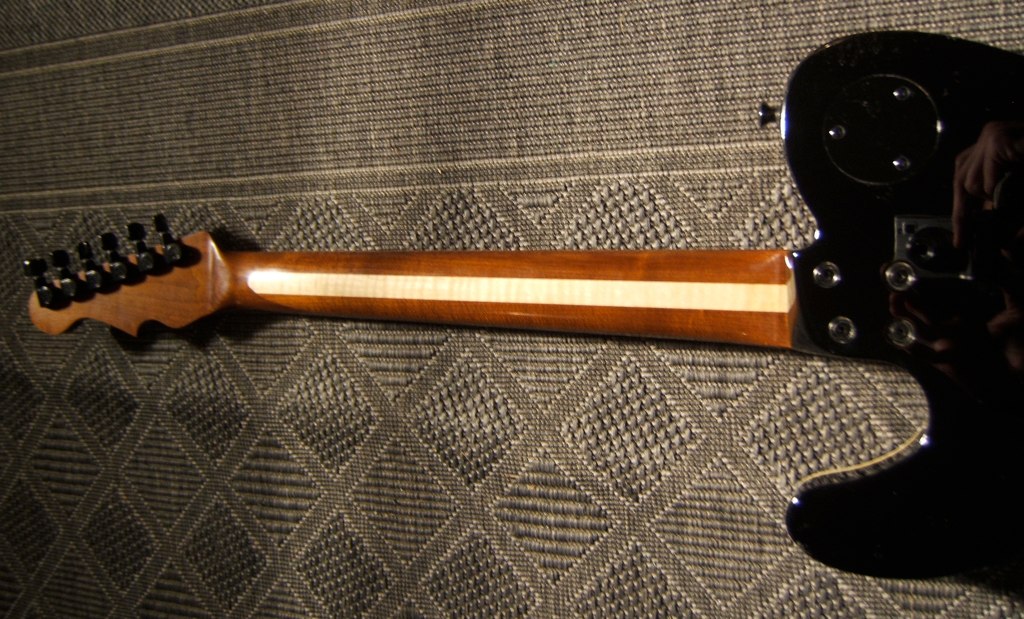
- The neck is torrefied maple with a flame maple skunk stripe. The headstock is a traditional scarf joint and the fretboard is also torrefied maple with block inlays ala Gibson Les Paul Custom.
- The tremolo is a Hipshot two point
- Suhr P90 pickups
- Bourns pots
- Switchcraft switches and jacks
- Schaller mini tuners
- Tusq nut
- Mohawk lacquer for the body finish
- Tru-oil for the neck finish
-
Why the fretboard overhang? I extend the neck shaft all the way with 22 frets and have no fretboard overhang. There's no reason for it on a ground up build, unless you want to keep things like Fender.
-
creating your own shape is quite the task. I've done it and its been tweak after tweak after tweak. When I was happy, I made a template and cut 2 bodies. Then I saw that it was still wrong, so I tweaked again.
-
The shape is not balanced IMO. It doesn't flow well and personally, I think I would hate that carve.
The headstock is nice though.

Lacquer is cracked after polishing
in Inlays and Finishing Chat
Posted
I've had this happen around volume controls.
I think its a combination of water and pressure while wet sanding and buffing.
I've fixed this with lacquer thinner on the cracks, applied a few times, let re-cure for a week then re-spray another coat and fill in the areas where the cracks were.