


Geoff St. Germaine
-
Posts
184 -
Joined
-
Last visited
-
Days Won
17
Content Type
Profiles
News and Information
Tutorials
Product Reviews
Supplier Listings
Articles
Guitar Of The Month
Links and Resources
Forums
Gallery
Downloads
Posts posted by Geoff St. Germaine
-
-
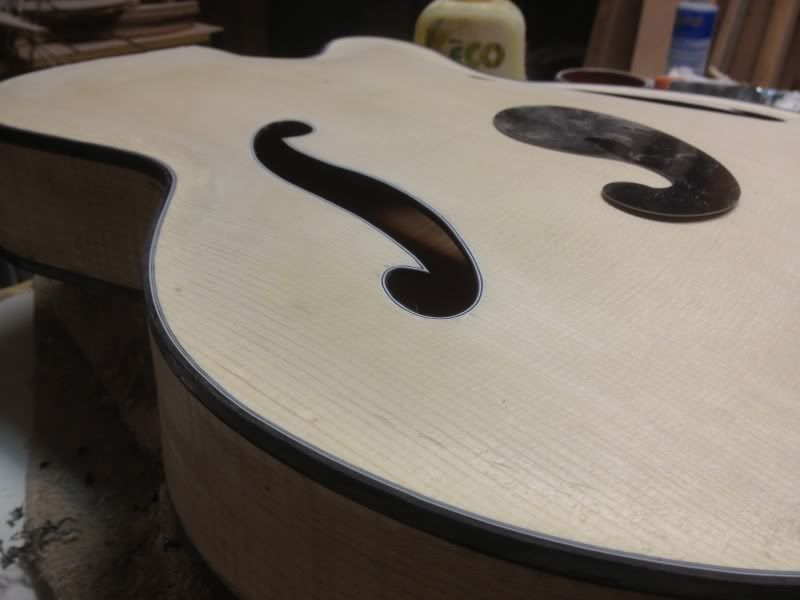
Some more progress:
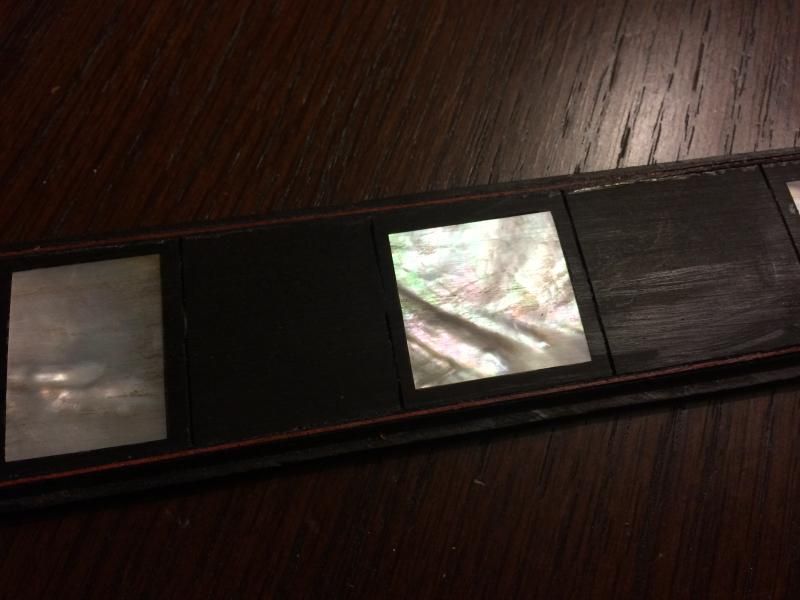
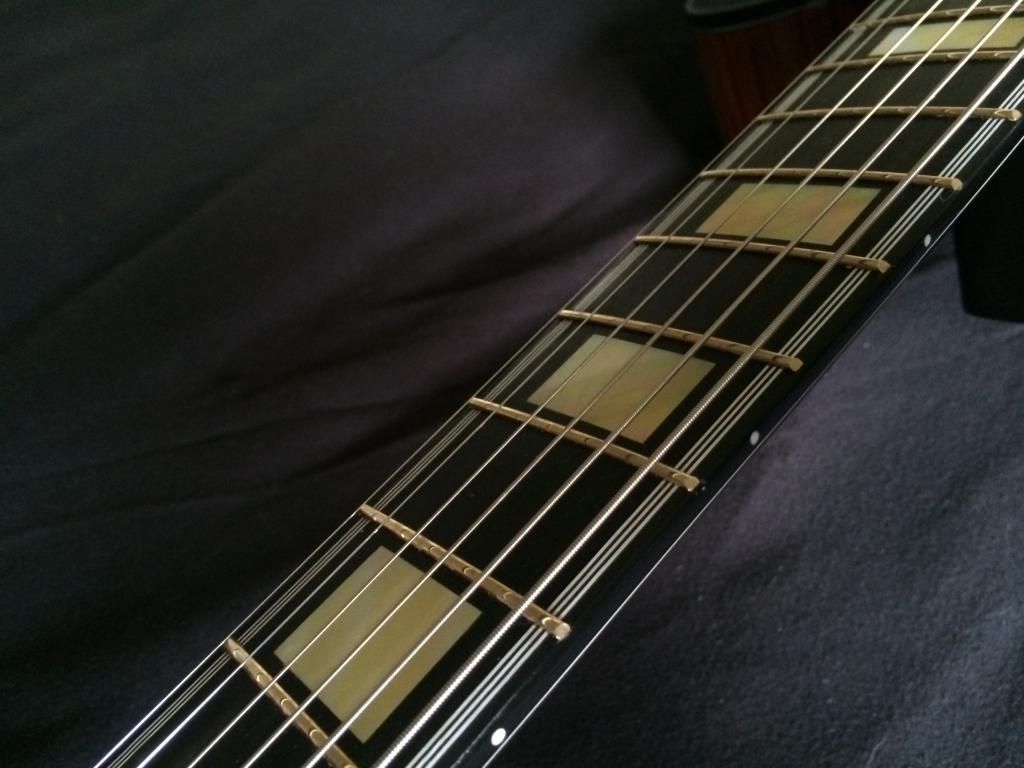
Working on the binding/purfling on the fretboard and headstock. I was not sure if the amount of MOP on the fretboard would be too much with the 2.5 mm purfling and the block inlays, but I'm happy with how it is coming out. Borderline-over-the-top is what I'm going for.


I also got the portion of the "f-holes that extend into the sir completed. I was also going to do a upper bout side sound port, but I've decided against it.


I've got the back fully carved, I'm just finishing the inside of the plate before gluing it on. For the neck I've got to re-radius the fretboard, recut the fret slots through the purfling and then attach the bloodwood binding before getting started on neck carving.
Thanks for following along.
-
 2
2
-
-
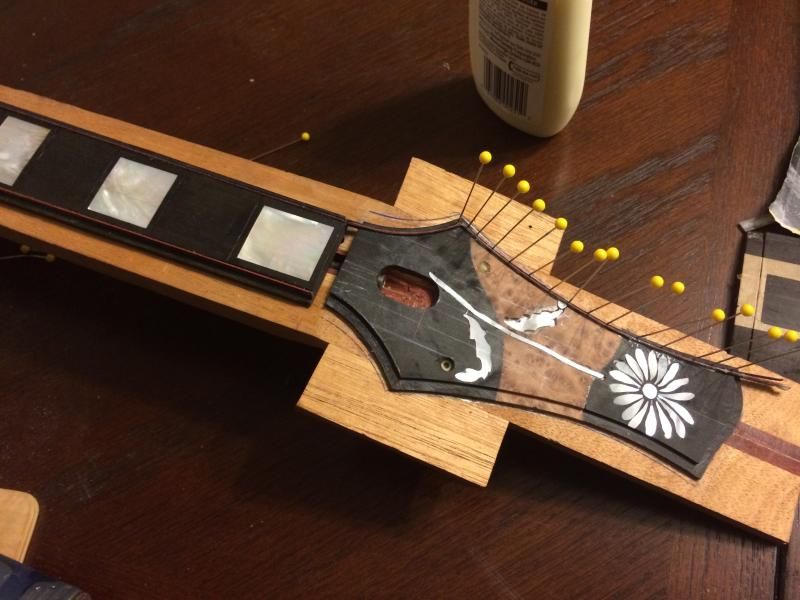
Working on the headstock and fretboard binding. I'm installing the inner black/bloodwood/black purfling. Once the inner purfling is finished on the headstock, I'll glue on the fretboard. The inlays are installed, but need some clean up. The flower (Gerbera) has special meaning to the future owner of this guitar, who doesn't know it is being built.
-
1
-
-
Super cool! Great looking guitar! I especially like the flamed maple toneguard.
-
I've started installing the MOP purfling.

I'm very happy with how the binding and purfling are going so far. It's going much better than on my previous guitars and it's substantially more complicated than the others I've done. I guess that's experience for you.
-
2
-
-
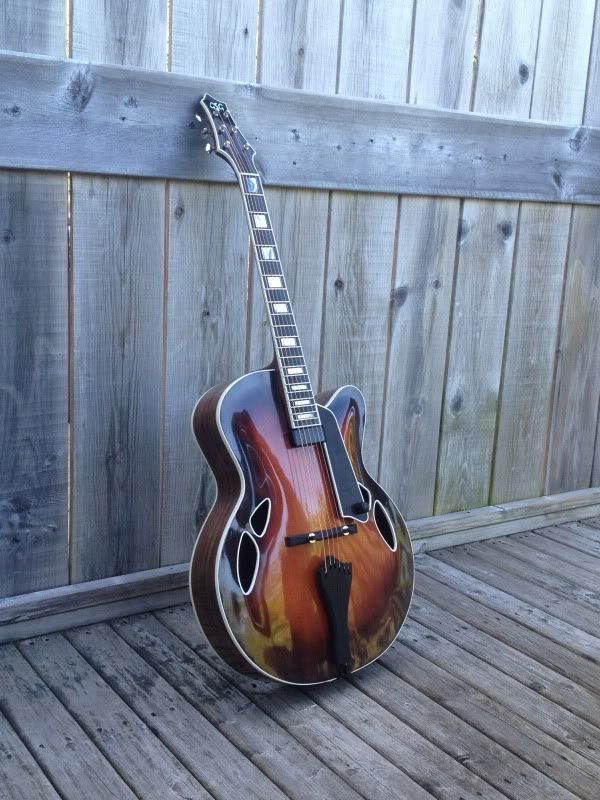
For consideration:
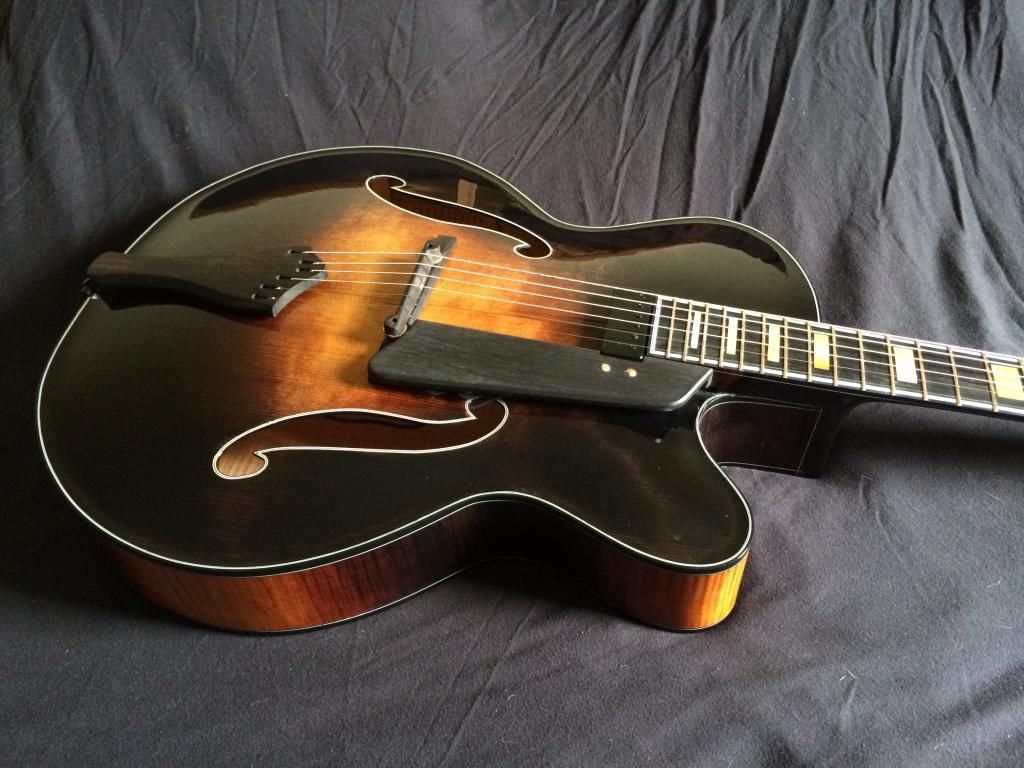
Acoustic Archtop #2 (8th instrument)
Name: Sunrise
Specs:
-25" Scale
-17" Lower Bout with 3" Sides
-Sitka Spruce Soundboard, Parallel Bracing
-Master Grade Flamed Maple Back, Sides and Neck
-Ebony Fretboard, Bridge, Tailpiece, Finger Rest and Headstock Overlay
-Gold MOP Block Inlays
-Black Binding with W/B/W Binding
-Gold EVO Fretwire
-Gold Grover Statite Tuners
-Dyed Sunburst Finish with Gloss Nitrocellulose Lacquer
-Kent Armstrong Floating Humbucker with Schatten Thumbwheel Volume/Tone Controls
Here are a few finished and progress photos:
-
Thanks a lot, Scott.
I have both sides of the purfling that will flank the MOP installed. Next I'll install the bloodwood binding before moving onto getting the back plate glued on.

-
2
-
-
I'm still working on the purfling installation... It's tedious work. I have all of the inner purfling installed. Next I will be installing the outer purfling with the 2.5mm Teflon spacing strip between the inner and outer purfling. The Teflon strip is then removed and the MOP strips are installed. I've been watching some videos of people installing MOP and Abalone purfling and it doesn't look terribly difficult, just more tedious work. Here are a few photos of the progress.
Body with last of the inner purfling installed with the glue still drying. These pins make installing it a snap!

You can see the outline where the arm rest bevel and fret access/faux cutaway bevels are pretty clearly.
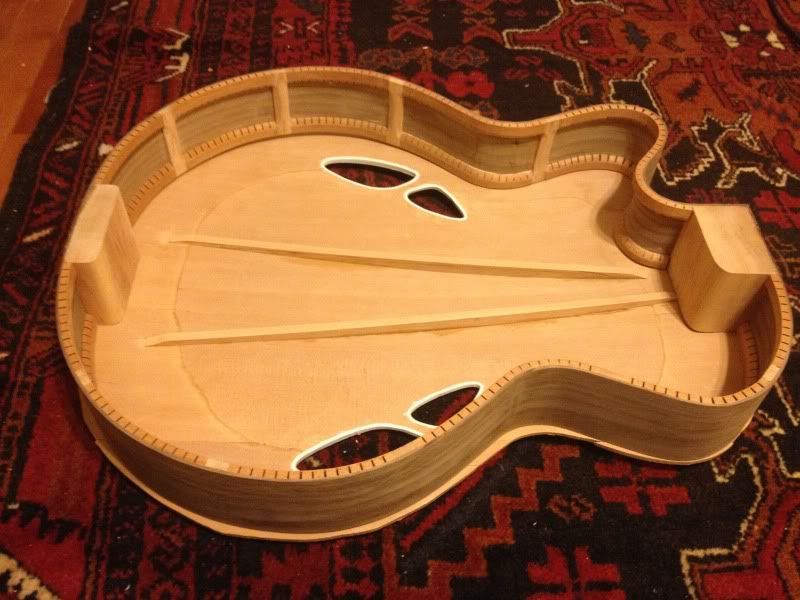
The inside of the guitar. A little clean up still before I seal the inside before gluing on the back plate.

A close up of the X-bracing cross. I've seen something similar to this done on a few guitars. Since the X-bracing will be quite visible with how the "f-holes" will blend into the sides, I wanted to have something interesting to look at which still does the intended job properly.

Thanks for looking!
-
2
-
-
I also started on the x-bracing. I'll get better shots up of the completed bracing once the purfling has dried.


-
2
-
-
Small update. I've cut the "f-holes" and I'm working on the purfling. The purfling for the top is black/bloodwood/black on each side of MOP purfling. Here are a couple of shots of the inner purfling being installed.


Cheers!
-
1
-
-
I don't see any reason that the top and kerfing wood should be the same. I've used kerfing that was the the species as the top (Sitka spruce) as well as different from both the top and sides/back. I don't see any reason that one way is better than the other.
-
My other three archtops were parallel braced jazz boxes. They sounded nice, but certainly in that jazz niche. My aim here is to get a sound that is a little warmer and more versatile. To this end, I'm already using x-bracing vice parallel bracing, but additionally I am going to thin the plates even more. The goal here is to arrive at a lower pitched tap tone to hopefully improve the bass response of the plates. The jazz boxes are very mid focused guitars to cut through an ensemble. With this one I'd like to be a little closer to the response of a steel string archtop.
On my previous tops the centre plate thickness was 3/16" and this tapered to 5/32" on the soundboard and remained constant on the back plate. For this guitar my initial plates will be 5/32" with no taper. I'm planning to string this guitar up "in the white" to then further tune the plates thickness based on the instruments sound.
Here are a few pictures of the plates. Right now they sit at about 3/16" thick.


Thanks for looking!
-
1
-
-
I really like the look of the dark stained oil finished Explorer! Too bad you're having difficulties with the finish.
-
Brett - I use the pulltruded carbon fibre rods from LMII. I think they're around $5 for a 24" rod, which is enough for a guitar. I'll include the 7 string in this thread once I start bending the sides, which will be probably this weekend.
Scott - Thanks a lot! I did the thread for the last two archtops over on mylespaul. I figured I'd do this one here.
-
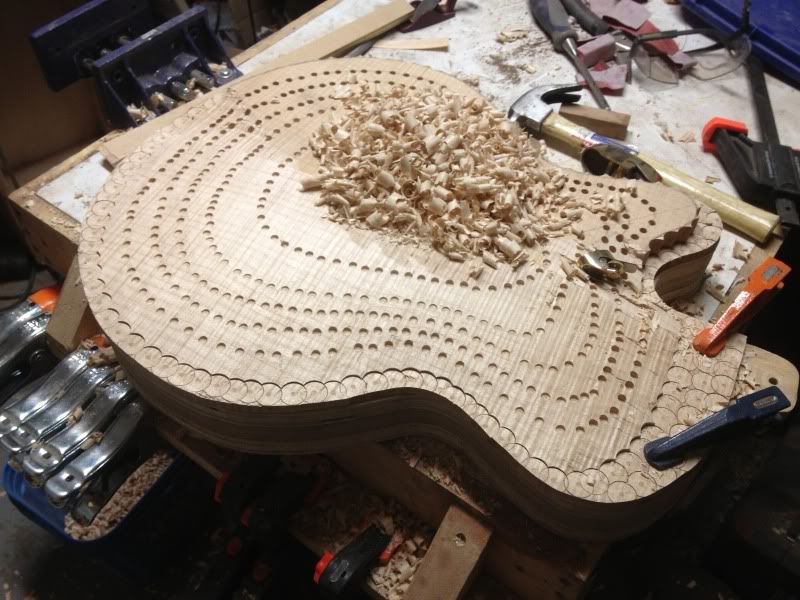
The plates are mostly carved now. I use a 3/4" Forstner with the centre tip ground off to remove the bulk of the material. Once I get the tool marks out the plate is down to around 1/4" thick. After that I establish the taper between the centre and sides of the rim of roughly 3/16" to 5/32". After that I carefully remove material until it reaches a point where the tap frequency starts to drop quickly as material is removed. At this point I consider the soundboard ready for bracing. Right now I'm finalizing the taper on the top plate.

On the back plates I've been leaving them about 3/16 uniform in thickness across the plate. On the guitar pictured in my first post I really noticed the difference in tone between the guitar played with the back held against my body and the guitar played on an angle with only the rims touching the body (in typical jazz fashion). The improved warmth and complexity was immediately noticeable even to some non-musicians who saw and heard the guitar. With this in mind I hope to liven up the back plate even more with this guitar.
Here you can clearly see that not all of the tool marks have been removed.

Something I'm trying with this guitar is call a flying buttress. Basically it is a system or supports that stiffen the side structure. In this case I'm using carbon fibre rods. They are extremely light but add a lot of additional stiffness. Given the low cost of these rods and the ease of installation I will almost certainly be using these from now on.


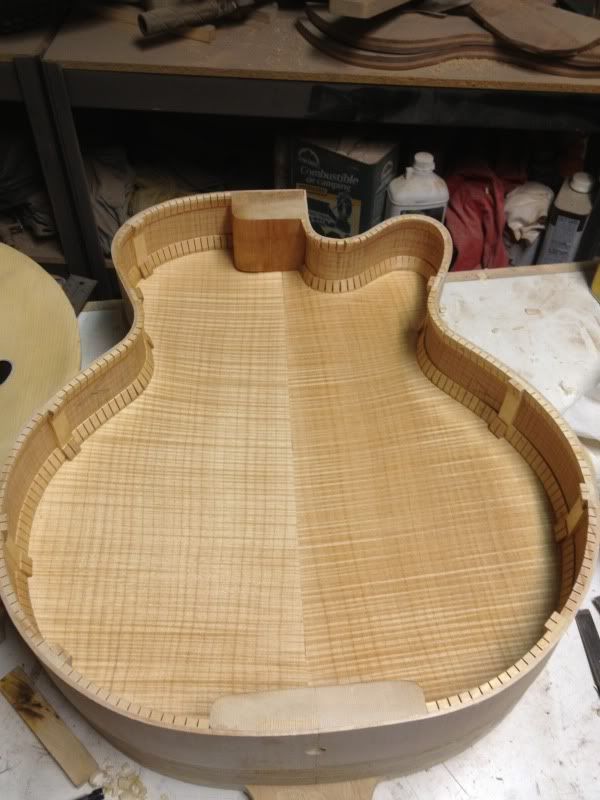
The sides are complete without final sanding to true the edges for gluing the soundboard and back plates.
-
1
-
-
I prefer the bottom headstock. Nice builds!
-
Thanks Brett. I actually have a 7 string in the works that will be essentially the same as the build I'm documenting here except with a cutaway and a different wood selection. An 8 string archtop would be interesting... I've ever seen one.
The bracing of the previous three guitars is parallel bracing, while this one is x-braced. Unlike a steel string acoustic, there are just the two braces on the soundboard and nothing on the back plate.
Here's a shot from the first one I built:
I sold the guitar pictured in my first post here. Based on the customers review I'm satisfied that the workmanship and build quality are high enough to be marketed. At this point I'm researching what the best approach to this would be.
-
1
-
-
Looks great! Certainly a first scratch build you can be very proud of.
-
1
-
-
Some neck work.
The neck is mahogany with 2 bloodwood strips separated by a mahogany veneer. This neck is built as two pieces - the main part of the neck which is everything up to the neck joint and the separate fretboard extension for the section that sits on the top of the guitar. Pictures will likely explain this better.

The fretboard extension sits in a joint routed into the top of the neck. I use a top bearing flush trim bit along with a piece of MDF clamped to the top of the neck to act as the guide. The fretboard extension needs to be 5/8" thick to give the proper angle over the bridge sitting 1" above the body, which is all dependent on the carve profile and neck angle. I'm trying to get an angle of about 14 degrees between the path of the strings on the neck to the bridge and and path they take past the bridge to the tailpiece. I route the joint to 5/8" and the extension is a tiny amount thicker and is planed level after the glue up.


The last ting to do before gluing the extension is to cut the dovetail into the neck. I have a jig that aligns the neck based on the truss rod slot that I use.

Thanks for looking.
-
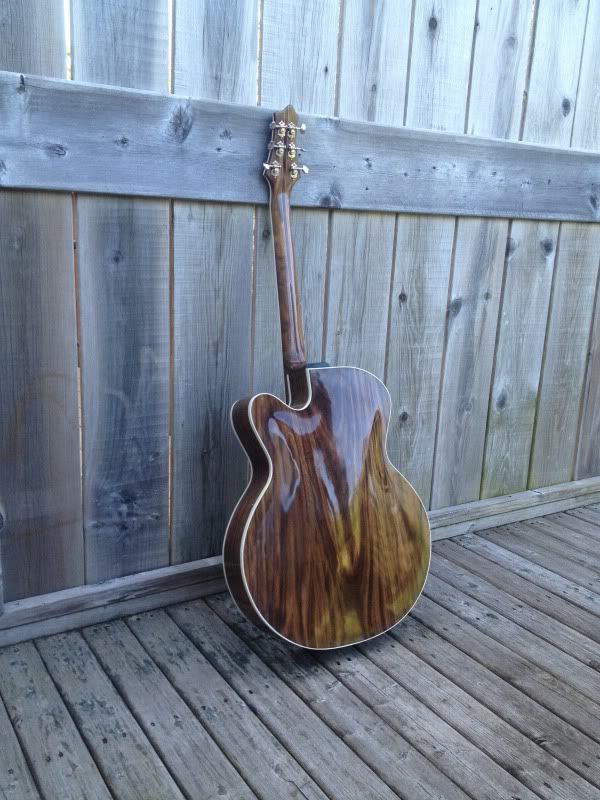
I started with a very nice Claro Walnut back and side set that shows a lot of colour on the back plate in particular. The POC is an interesting wood. I've seen a few guitars built with it and I am interested to try it for myself. It certain smells great when times being worked... sort of a citrus smell.
Here's a shot of the back, soundboard and neck:

I thinned the sides down to about 0.075" and went to work bending them in my bending form:

Once bent, I made and glued in the end and neck blocks and made the supports for the two bevels:

To carve the soundboard and back, I traced on the contour pattern and drilled the profile contour using a 1/4" bit in my drill press. I then went to work with gouges and some curved sole planes:


-
2
-
-
- Popular Post
- Popular Post
I last had a thread up for my first prototype archtop guitar. Since then I've completed one other and have started on a 4th.
This one will be a little bit different than the previous three, which are really jazz boxes. With this one I'm aiming to achieve a more balanced a full sound, as opposed to the focused mid-presence that my previous archtop guitars have had.
To that end, here are the specs:
-16" lower bout, 2.5" sides with x-bracing
-No cutaway
-Port Orford Cedar soundboard
-Claro Walnut back and sides
-Mahogany neck with bloodwood centre laminates
-Ebony fretboard, 25" scale, 22 frets, MOP blocks
-Ebony/redwood burl headstock overlay, tailpiece and finger rest
-Pickup not yet decided - between a piezo transducer in the bridge and a Kent Armstrong 12 pole floating humbucker
-Gotoh Stealth tuners
-Ebony bridge with bone saddle
-Arm and fretboard access bevels
-Bloodwood binding with black/bloodwood/MOP purfling
To set the scene, here is my second archtop and the concept for this guitar:

-
5
-
Any more progress on your violin?
-
It's juat how the finger rest is mounted. Benedetto uses screws in the neck and no bracket attached the the body.
-
Thanks guys!
Pros, it seems the screw method is common, though I don't find it to be terribly elegant nor is it easily adjustable. I will likely be coming up with another attachment method for the follow on guitars.
-
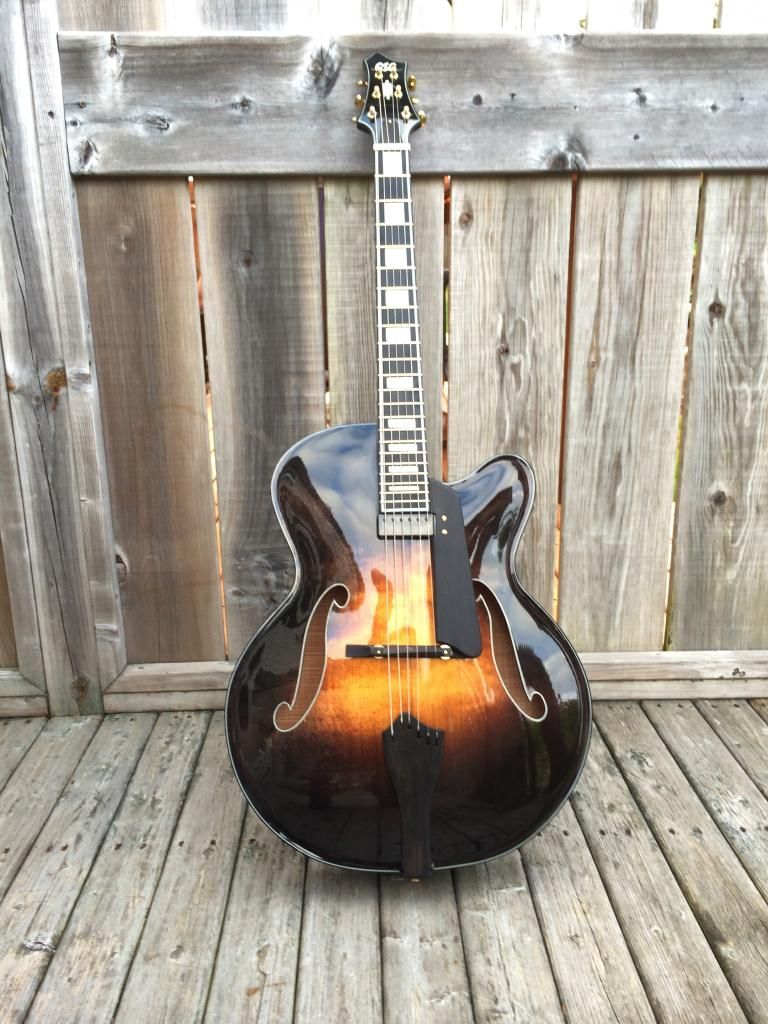
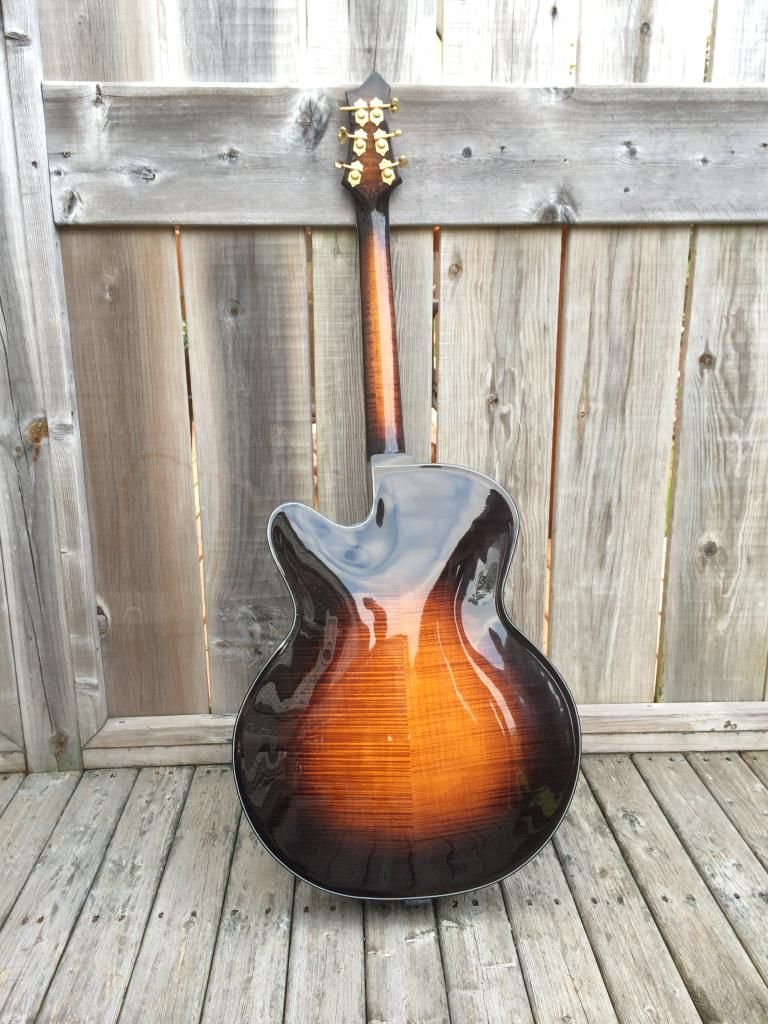
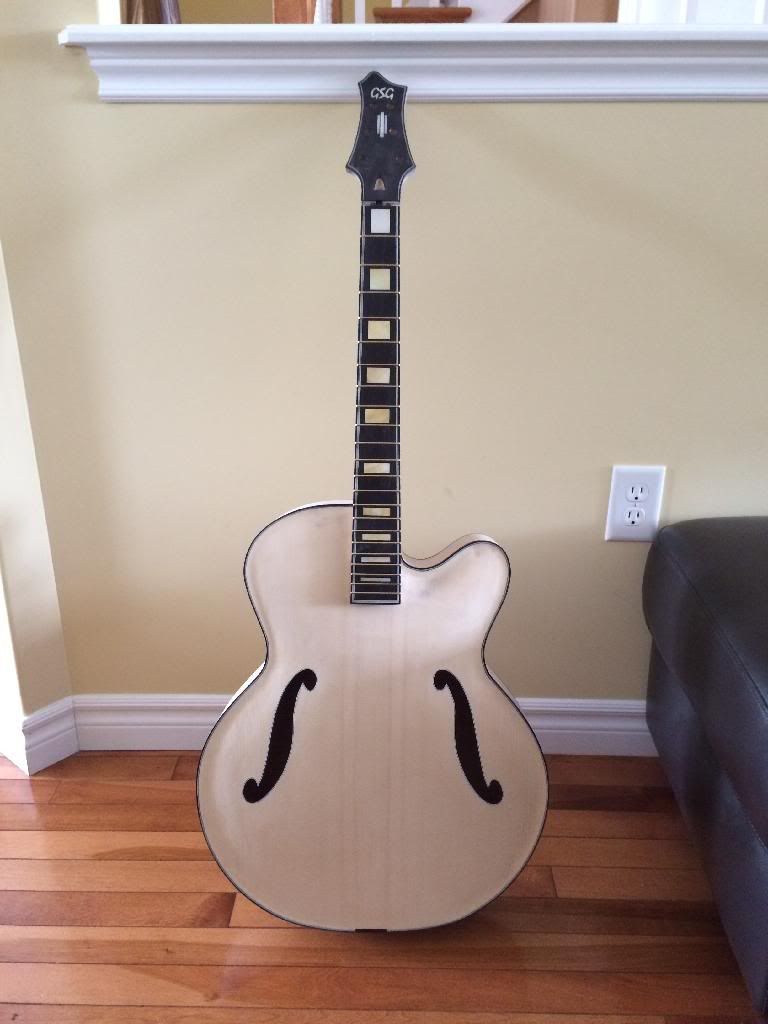
I've been pretty slow with updates on this. The guitar's done.
Overall, I'm happy with the guitar. I had a few issues trying to keep the finish thin ad as a result had a few spots with sand through that required respraying. I'll have to do some reading up on better techniques for wet sanding a polishing. In the end my hesistance to sand through and respray any more means the finish still has some scratches and swirls. It may simply come down to having to go with a proper buffing wheel, rather than hand polishing.
-
2
-

Archtop Guitar No 4
in In Progress and Finished Work
Posted
I thought the inside of the back looked too good not to get a shot of it up.