


scorpionscar
-
Posts
249 -
Joined
-
Last visited
-
Days Won
18
Content Type
Profiles
News and Information
Tutorials
Product Reviews
Supplier Listings
Articles
Guitar Of The Month
Links and Resources
Forums
Gallery
Downloads
Posts posted by scorpionscar
-
-
17 hours ago, Prostheta said:
Skilled painters using proper paint guns can get reasonably flat finishes "off the gun", however this needs skills. More often than not, we accept a certain level of orange peel with most paintwork. The trick is to build up enough paint that you can cut it back with sandpaper until it's flat, and then sand through to high grits, polishing compounds, etc. to regain the gloss. Look at any factory-made car in the sun like a Ford or whatever, and you'll see orange peel on the paintwork. Then check out a show car, or maybe a high-end Merc (not sure if the quality is still as high, meh). The quality of finish is so different. It just takes a bit more work and it depends on how far you want to take the paintwork.
Painting is really an art, it seems to be simple with a spry gun and a compressor, but the true is different, it requieres some practise and take into account too many factors. I found easy for example the rear of the guitar, however the front, with the electronics cavities done, are created air currents and that increases the orange peel effect. I did what you say and buil up an enough layer of paint in order to wet sand with 800 and level it perfectly. Always learning!!!
Scorpionscar
-
2 hours ago, Prostheta said:
Fantastic. It looks like there's a little orange peel on the clear lacquer, however this is fixed using the same method of flattening it with sandpaper and shooting more clear over the top. Orange peel is the result of spraying technique, the product itself, gun settings or that it's rattlecan paint. Very common. If you do sand back your clearcoat, be careful not to sand through the colour coat, especially on corners and edges!
Thanks for the advise Prostheta, corners are sacred prefer don't touch them. The orange peel is very little, this is normal or it should be completely flat after spraying?
Scorpionscar
-
On 6/4/2018 at 9:14 AM, Prostheta said:
Good to hear man!
This is the result Prostheta, is perfectly flat and the gloss is amazing. Last coats of clear lacquer.. I'm very happy and always learning!!!

Scorpionscar
-
23 hours ago, Prostheta said:
I think what you have from the gloss red is simple "orange peel", which is normal. After you sand back the paint flat, you'll lose the glossy look, but that's fine. The main thing is to achieve a flat surface. Most people would shoot more gloss red over the top of that. The pale colour is likely because you have sanded it, nothing more. Lacquer over the top of that will regain the glossiness. personally, I would spray another coat of red, then sand that back with 600-800 grit. Then shoot lacquer. If things are working as they should, this should be very flat, red and glossy.
Thank you for your answer prostheta. I've done what you have told me and the red seems to have won the glossy effect, and the surface is totally flat. I will post pics of the result during the week. The guitar is really coming to life. Thank you so much.
Scorpionscar
-
I have a question about the Flying- guitar finish. Had applied a primer coat in order to fill the grain. After that I've applied the color coats (Gloss red in this case) as you can see in the picture above. After painting is normal some rugged surface like sand (not exagerate, something normal I think). If I sand for leveling the paint, the red lost the glossy effect and seems to be another tone of red colour, pale. I want to add about two coats of gloss clear poliuretane lacquer, but I'm concerned about if the red remains matte under the lacquer and if the 400 sandpaper is suitable. I would be very grateful if you explain me the correct way of doing this type of job. Thanks in advance.
Scorpionscar
-
Some pics of the process. Everything is completely handmade with much love, dedication and passion. Hope you like!


Scorpionscar
-
 1
1
-
-
It's time for design and print my logos. Need some help about how to print the decals and what material are meade of. Thanks in advance. Knowing the possibilities, I will be able to designt them.
Scorpionscar
-
Is time for communions in my workshop and what better for celebrating than this nuclear white Flying-V!!! Jokes aside, these are some pics of the finish of the guitar. This first communion white is a primer coat for filling the grain and regularize the surface, but it will be painted in another eye-catching colour. Stay tuned...


Scorpionscar-
1
-
-
Some artistic pics of the necks:


Scorpionscar
-
1
-
-
Have calculated the exact place of the studs of the bridge, in this case a Gotoh 510 UB, amazing, it has surprised me this wraparound. Some pics of this hardrock beauty:


Scorpionscar
-
1
-
-
Today I've drilled the holes for the Hipshot bridge. For doing this I've used a drill press and onces the position of the bridge was calculated, I screwed it to the body and used as a template. I used a 3.75 mm drill bit and did the 1st and the 6th holes totally through the body, and the rest, only half hole. Uncrewed the bridge and positioned it in the back of the guitar and placed introducing two bits in the 1st and 6th holes. After that did the other holes.
For the ferrules used an 8 mm diameter brad point bit. Before this I built a jig consisting in a table of about 300x300 mm and drilled a hole with the same bit, 3.75 mm, after that cut the bit and introduced into the hole, allowing only about 6 mm standing out resptect the surface of the table. I marked the center of the bit with a cross and aproached the brad point of the bit until I reached the cross of the pin. Now you have only to put the guitar upsidedown and insert the holes into the pin, The drills are perfectly concentric.


Scorpionscar
-
1
-
-
I've purchased this warparound bridge for the Flying-V:
https://www.axesrus.co.uk/Gotoh-510UB-p/510ub.htm
Do I have to mount angle the high E respect the Low E about 3 mm the same way of bridge + tailpiece, or is mounted straight?
Scorpionscar
-
3 hours ago, Mr Natural said:
very nice save and very nice first guitar build!
I (think) I saw the exact same method used on one of Michael Schenkers Vs except I want to say they used maple drum sticks as the inlayed wood.
very nice work.
Thank you Mr Natural. Mapple is very hard too. I used wengué cause I had a stripe in the workshop. Now the headstock is solid as a rock. Haven't assembled the bridge and put strings but I think the tuning problem has solved.
Scorpionscar
-
11 hours ago, ScottR said:
Nice save! Your attention to detail is amazing....and no longer surprising.
You do fantastic work.
SR
Thank you very much Scott. Is a proud for me hearing this words from you. They motivate me to follow doing things the best way I can. Happy week begining to everybody!
Scorpionscar
-
This weekend I’ve been repairing the headstock of one of my guitars. An explorer I built some years ago, to be honest, my first guitar, and as a result I met this amazing forum. I’m going to explain the way I did it, cause I think is interesting for its complexity and for the risk as any mistake could be a disaster. With the permission of the moderators of the forum, I’ve decided to use this topic, instead of this reparation has nothing to do with the project of the four hardrocker guitars building, the reason is to avoid opening another topic. If this is no correct, we can move it to another properly section.
The question is that I was playing my guitar and when I put it in the stand, it suddenly slipered and fell down. Aparently has no cracks, no scratches, nothing visible, but had problems for maintaining the correct tuning. I used my optivisor, and found that there was a little fissure just in the glue line of the scarf joint, almost invisible but when forced the headstock with my hands, the micro fissure opened then and got bigger, I decided to repair it.
Some people said: “what a pitty, did not your heart break when you saw it falling down? My answer is NO, I didn’t. This things happens and is impossible to avoid them. If the guitar were in the case ten, twenty or forty years and had no use, it always look radiant, but an instrument only has sense if makes music, if serves as a vehicle to transmit emotions and feelings. Is normal that a guitar has scratches, and war scars, that makes it more beautiful and functional.
Well, lets go, for the reparation I decided to make three mortises of 6x6x60 mm and insert three tenons of wenge with dimensions 6x8x60. 30 milimiters in each side of the glue line of the scarf joing for reinforcing it.
I masked the front and rear of the headstock to prevent any scratch or damage. With the help of a template I marked the position of the mortises. How about my Coca-cola towel? hahahaha, is pretty cool...


In order to do the job as precise as posible, I built a jig for mounting the router. With this jig is very easy to do the job


I fixed the jig to the work bench with a clamp and screw the headstok to the slope of the jig using a pletin and the tuner drills.


Now is time to make the tenons. This part thougth would be difficult but was really easy and fast. I cut the the tenons with a japanesse saw and marked the radious for rounding them with the help of my homemade sander. I tried if they fitted into the mortises and retouch if necessary with a file.


After that I began to glue and clean the excess of titebond with a wet cloth, this way appart from clean beter, force the tenons to increase its volume some tenths of a milimiter and this helps to maintain them pretty tight. Afther that I use a clamp and left drying overnight.


In order to increase the strenght and the aesthetics of the rear of the headstock I decided to glue a veneer of 1.7 mm. For achieving this I used the router mounted into a tunnel. Then marked the silhouette of the headstock with a template and cut with the bandsaw.


The next morning I took off the clamps and since the mortises were 6 mm depth and the tenons 8, if maths does not fail, there are a difference of 2 mmthat have to be removed. For this I used a chisel.


I sanded the zone for nivelating the tenons with the headstock Surface and for removing the coats of nitrocellulose.


Since the headstock has an angle of 17º was neccesary to build a mould with the band saw in order to forcé the veneer to be bent. I put the veneer into the mould and applied steam and fastened the clamps slowly until the veneer achieved the definitive shape.


I considered it was a good idea to drill the tuners holes before gluing it, I marked them with a wood bit wit brad point and drilled the 6 holes. They coincided perfectly, and began to glue. I used my MDF mini-clamps that make the job very easy.


For eliminating the excess of the bubinga of the veneer I designed a jig for the routerbase of the Dremel, very easy. There are bits with bearings but very expensive…


Finally only have to repaint the headstock. This hard rock beauty is now ready for much rock!!!


Scorpionscar-
4
-
-
Some ideas for drilling through body string holes without a proper drill press? the problem is that in mine, the distance between the bit and the colum is not enough and for doing this is necessary precissionn for drilling the holes and then in the back of the guitar the cavities for installin the ferrules, I mean, two concentric differente diamter holes, one for the string and the other for the ferrule.
Scorpionscar
-
12 hours ago, Andyjr1515 said:
Top class work. Some classy photos there too
")
Thank you very much for your words Andy. Glad you like my work and pics!!
Scorpionscar
-
20 hours ago, ShatnersBassoon said:
Hey! I’m sure posting porn is against the rules?
 All looks beautiful to me!
Hahaha, pure porn!!!
Scorpionscar
-
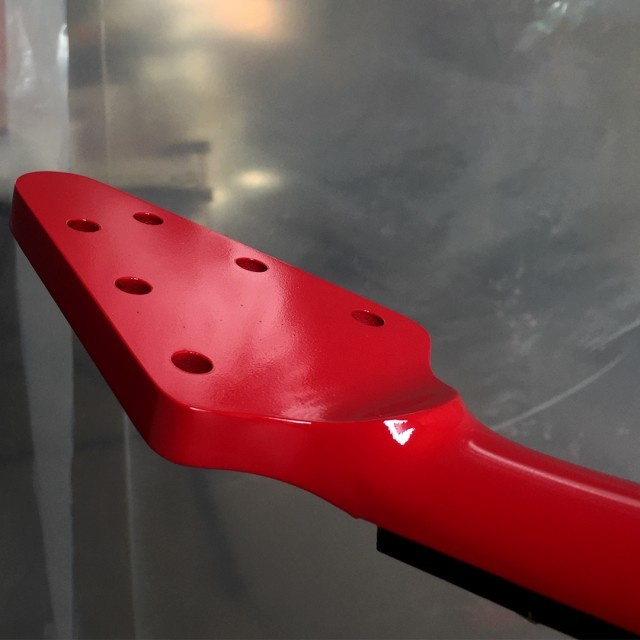
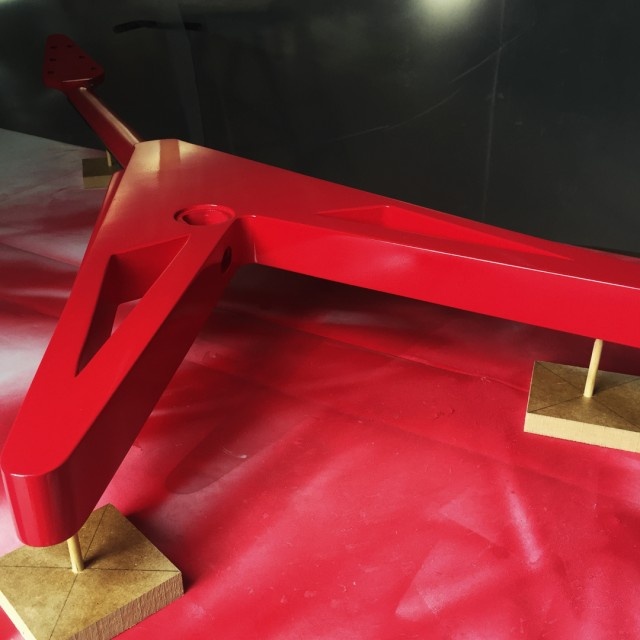
I've continued working on the Flying-V. I routed a border through the headstock. For this I used table for the dremel and use a tungsten router. I routed too the frames over the cameras of the wings whera I'll places a stainless steel grid. After a hard day of working, went home for dinner but could not resist the temptation of gluing the neck to the body, so, I had dinner and want again to the workshop for doing it. Had to use the chisel for adjusting some zones, but it fixed perfectly like a glove. Some pics of the process:


Scorpionscar-
3
-
-
On 4/22/2018 at 12:00 AM, curtisa said:
You're not worried about the impact positioning the input jack there will have on playing the guitar in a seated position?
You are right Curtisa, to be honest, had no thought about that issue. I usually play with Flying-V's standing up. The reason I led me to locate the input jack in the lateral of the wing is due to the design of the guitar, no other place came to my mind. When played V's sit down, usually use the stratp and don't put the thight between the shape of the guitar...
-
Today I've been working on the jack access of the Flying-V. Since is a modern desing, I decided to locate the imput jack in the border of the inferior wing of the guitar. Usually goes in the front of the guitar, perpencicular to it, this way is unconfortable for my taste. For doing this and due to the angle of the wings, is not a good idea to do the drill directly. I made a template-guide with a piece of the same width of the guitar. I made the drills in the drill pres for assure perpendicularity. After that put the guide in its position and fix both the guitar and the template-guide with a clamp. Now is easy to do it correctly. I made two drills, one for the border of the jack (16 mm) and other for the jack itself (12 mm). Some pics of the process. Happy weekend:

[


Scorpionscar
-
On 13/4/2018 at 9:12 AM, curtisa said:
I've personally not found there's any need for a fallaway on the end of the fretboard.
Thinking about it logically for a minute, when you press the string to the frets in the upper registers the angle between the string and the fretboard is steeper than it would be if you pressed the string to the frets in the lower registers. Thus there is automatically more clearance between the string and any adjacent frets the higher up the neck you go. The string's maximum displacement when fretted up high is also nowhere near the fretboard, further minimising any chance that the string will buzz on the upper frets.
Provided the frets are properly levelled and dressed, it seems to me that there shouldn't be a need to add fret fallaway
You are right Curtisa, using logic is true that the way you play upper frets the angle increases, starting from a perfect leveled frets there shouldn't be problems. I made fallaway in one of the fretboards and no fall away in the others. When they are finished, I'll test.
On 13/4/2018 at 3:01 PM, ScottR said:My understanding was always that it was most useful on setups with very low action, mostly to guard against buzz when fretting in the low registers. That is when the string oscillation is greatest over the higher frets.
Have I been looking at this the wrong way?
SR
If the action is very low is possible it has sense the idea of fallaway, but an excesive low action has no much profits in playing, in my experience.
Scorpioncar
-
Could someone explain me how to proceed for a perfect fallaway?
Scorpionscar
-
4 hours ago, psikoT said:
Don't you assemble them before painting?
Nice work BTW.
Yes, I'll assemble all the componentes before painting. It's true I don't like very much drilling much holes due to when wet sanding the water penetrates the wood and could detach the paint in this area...
Scorpionscar


Three new rockers are coming to life
in In Progress and Finished Work
Posted
Its time for logo design and put into the headstock, I usually put it into the trussrod cover, but like to put into the headstock, no inlay. Could someone tell me about experices with this type of work and how to deal with it? I have thought about cutting vynil, but may be too thick for cover it with the lacquer. I have doubdts about if the materials are resistant to lacquer and solvents. Any help is wellcome in order to advance work. Thank in advance and have a nice weekend!!!
Scorpionscar