


Skyjerk
-
Posts
213 -
Joined
-
Last visited
-
Days Won
13
Content Type
Profiles
News and Information
Tutorials
Product Reviews
Supplier Listings
Articles
Guitar Of The Month
Links and Resources
Forums
Gallery
Downloads
Posts posted by Skyjerk
-
-
19 hours ago, Prostheta said:
Wheeeeeeeeee!
Absolutely perfect, and given the backstory, that perfection brings everything in as it should. How does she play?
She plays really nice.
")
It usually takes me a while to "connect" with a new guitar. Get the feel of how hard or soft to play to get the tones I want, where to put my hands and arms etc. Where to get the best harmonics, Etc
To bond with it. I'm sure you know what I mean.
This guitar took me no time at all to connect with. The action is low, but not too low. Frets are smooth and bends are nice and creamy feeling
It plays easy and sounds really good. I made the right choices for pickups and body and neck wood. There is excellent synergy there. The sustain is phenominal, particularly considering it has a floating tremolo. I credit the neck-through construction, laminate neck and carbon fiber (it's very rigid) as well as the tungsten block on the tremolo for that. The block adds a lot of weight (the bridge plus block weighs nearly 2.5 lbs by itself) and that much mass completely offsets the loss of sustain you would expect from a floating trem. I'm not one of those guys that gets all fussy if the guitar weighs more than 8 lbs ") The downside is the block is $150.00 by itself which brings the overall cost of the bridge to around $350.00 which is a big pill to swallow, but when you play it you know instantly it was worth every penny
The downside is the block is $150.00 by itself which brings the overall cost of the bridge to around $350.00 which is a big pill to swallow, but when you play it you know instantly it was worth every penny Honestly I couldn't be happier with this guitar :-)
-
What guitar pictorial is complete without a shot of the axe floating in space?

-
 1
1
-
-
Thanks guys
-
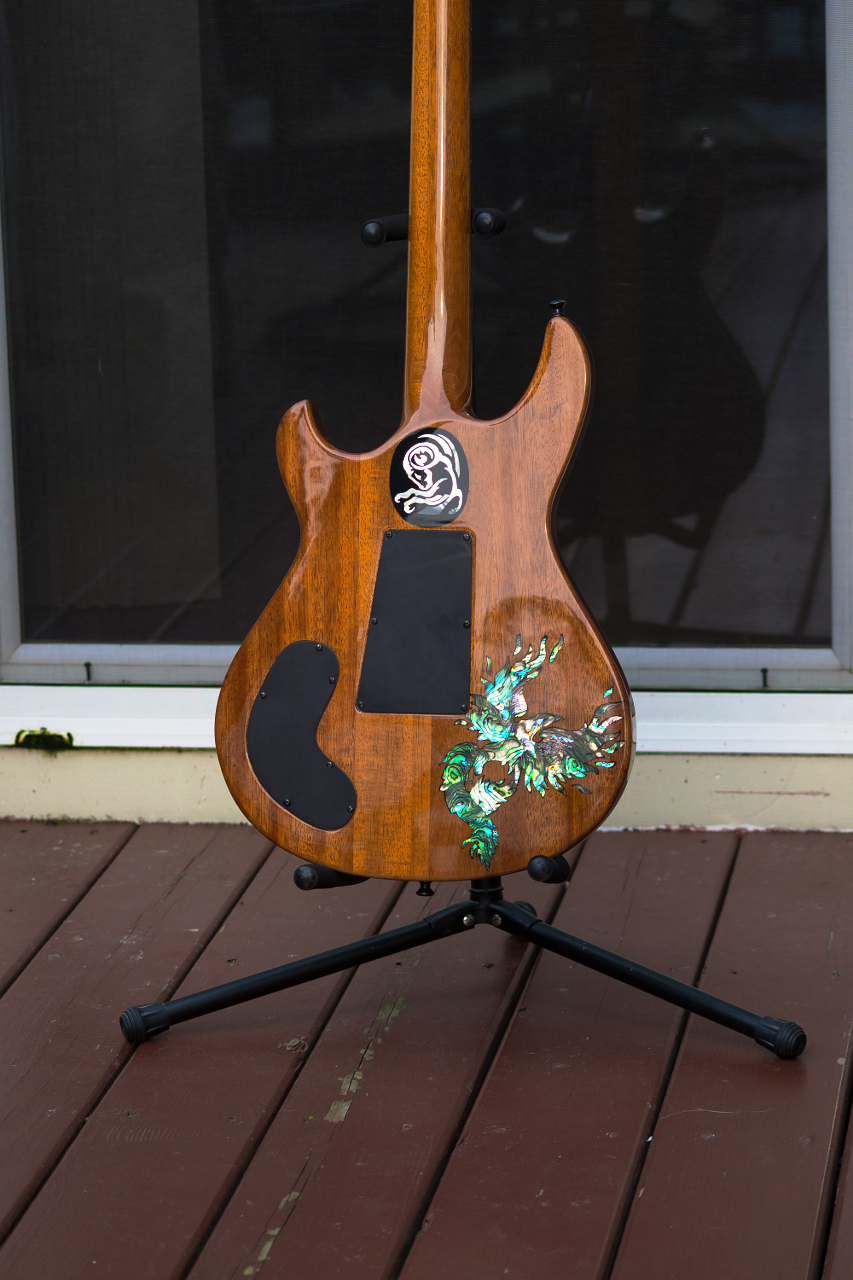
For those that might not have seen my build thread, I built this guitar in memory of my firstborn son Chris who passed away 7 months ago, Feb 18, 2017. He was 24 years old.
The guitar has special inlays on the back that represent tattoo's that my son had on his chest and shoulder. A Phoenix (mythological bird) symbol, and an Aries (ram). Chris was an Aries and we both have Phoenix tattoo's on our chests for personal reasons. Also smaller versions of each on fretboard and headstock to match
This guitar is named "Phoenix"
The model is one of my own designs, called "24 Magnum". Its my 12th build to date, I build in my garage/shop at my home. This model, as with most of my builds, has the following notable features:
- Neck-through-body construction
- 3-piece laminate neck (all mahogany)
- carbon fiber neck reinforcement
Specs:
- 25.5″ scale length
- 24 stainless steel frets
- 12″ fretboard radius
- Genuine South American mahogany ( Swietenia macrophylla ) body and neck
- Bookmatched, flamed maple top
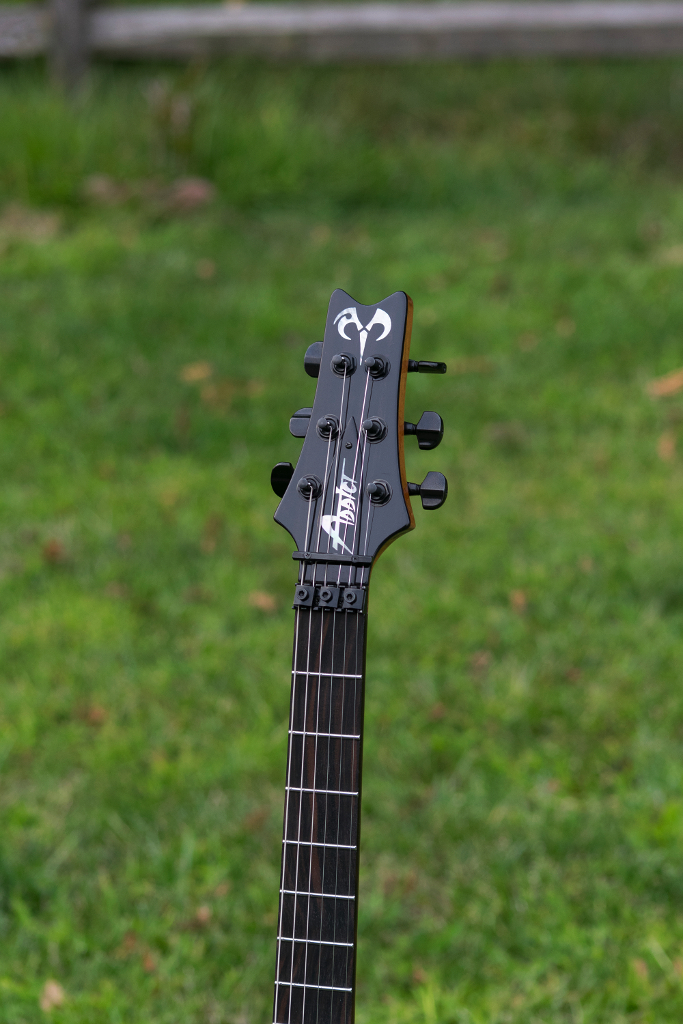
- Ebony headstock overlay
- Natural “faux” binding
- Macassar Ebony Fretboard
- Original Floyd Rose Tremolo w/ tungsten sustain block
- Custom white mother-of-pearl phoenix 12th fret and Aries headstock inlays
- Custom white mother-of-pearl in ebony Aries symbol inlay on back
- Custom paua abalone and select blue paua Phoenix inlay on back
- Planet Waves 3×3 locking tuning machines
- Seymour Duncan pickups – Custom Custom (TB-11) bridge, and Sentient neck
- 5-way Oak Grigsby super switch (n, n-split, n/br, br-split, br)
- CTS pots, orange drop caps
- Nitrocellulose Lacquer
The photo of my son Chris is included to show the tattoo's on his chest and shoulder that are the inspiration for the inlays, thus there are 9 photo's in all. I included only 8 photo's of the guitar itself so hopefully this is still in keeping with the rule stating "a maximum of eight photos for the instrument" since Chris is not the instrument


-
I officially dedicate this guitar to my firstborn son Chris who passed away Feb 18, 2017. He was 24 years old
Its called "Phoenix"


-
3
-
-
1 hour ago, Prostheta said:
Holy shit, that looks fun. How's it working on you therapeutically Chris?
Well, as any activity that focuses my mind and occupies my hands its very helpful. Being busy works for me right now.
Emotionally, the inlays and such keep me connected to my son, which I really need.
This guitar is only a part of my overall project. The very last time I saw my son in person while he was still living, I recorded a few tracks in my recording studio with him singing against a really crappy backing track. He hated the way he sounded (typical). He actually sounded really good. I was unable to make myself listen to this until only two weeks ago. It was hard.
Anyway, I decided I'm going to dump the backing track, and re-record it all using real instruments. Of course I'll be doing the guitar tracks (using this build), I have the drummer from my band thats going to do drums, and a former bass player that will do the bass. I'll do backing vocals. My brother is going to play keys. Gonna make this into a bad-ass tune. I'd always dreamed of one day jamming with Chris, this is the best I'll get and while not exactly what I had in mind I'm grateful I have this much,
-
OK, sanded and buffed. Still need to clean some compound out of some cracks and crevices...
sometime in the next two or three days I'll level, crown, and polish the frets, and then put it all together.
Just a couple days from finished guitar


-
Well, its been hardening 2 weeks and still a couple to go, but its hard enough to take it off the hanger and get a few pix that give an idea what the finished product will look like.
Picture this with all the black hardware (pickups, rings, Floyd Rose, tuners, knobs) installed, as well as back and TR covers.The lighting in these pix make the mahogany look a bit more yellow than it looks for real.
Of course the very minor orange peel and you can see on the top as well as the little crust of nitro along the fretboard edges will be gone too


-
3
-
-
On 7/27/2017 at 11:05 AM, StratsRdivine said:
Thats precisely why I mount round conduit to my neck pockets that then fit into holders that allow me to spin the body right after spraying to kill sags before they happen. Not new, of course as the pros have the same spinny things, but the conduit / metal pipe idea was quick and easy.
Crazy sweet spray job Chris!!! It is a pleasure to wet sand flat, well flowed-out finishes to begin with.
Pic below only shows one of the two pipe rests in the lower left corner, but you get the idea. Spinning it while spraying is the best part, but spinning after done every few minutes kills any sag / run potential.

Ive actually considered this very type of thing. Problem for me is that with only a couple exceptions all my builds are neck-through, This presents quite a challenge in determinie how to reliably mount it since theres no neck pocket or screw holes. I've come up with a couple ideas but havent actually tried anything. Ive seen devices that can hold the guitar in the pickup cavity bu that would prevent unobstructed access to the top for spraying and I'm not sure it its held securely enough to hold while its rotating...
-
Yo John,
Really enjoyed the video. I've thought about doing one myself, however just the added time of taking detailed pictures, editing the pictures, and posting them to document a build is a huge increase. Probably adds 10-15% more time to the job.
Video I have to think is gonna add 50% more to the job itself, and then all the editing into a coherent production after the fact, I decided not to bother.
Plus my shop is always such a mess
-
2 hours ago, sdshirtman said:
Nice job Chris. Its a stunner. Thats a crazy smooth finish. Did you use retarder?
Thanks. Yes, I used about 5% retarder in the cut I shot on the top
-
Thanks everyone for the kind words
So I had some lacquer issues over the weekend that required I sand the clear off the back. As it turns out, shooting nitro in high temps can cause some issues with bubbles forming in the clear if you shoot even a moderate coat.
Temp on Sunday was a cozy 95 F. (35 C.). Humidity wasnt too bad, around 55%. I shoot in my garage with the door all the way up so its outside for all intents and purposes. I'd hoped to finish the clear and put the guitar downstairs to harden and be finished with this phase, but I'm just going to have to wait for better conditions. Normally I shoot in spring and fall, but didnt really want to wait on this guitar so I gave it a shot.
The top on the other hand helps me feel like the day wasnt a total loss. I had already shot most of the clear a couple weeks ago without issue. In addition to the back, I level sanded the top with 320 grit dry paper which made short work of the job, but of course left pretty heavy scratces, and then I shot a flow-out coat of lacquer that was cut with 60% thinner and 5% retarder. I shot it with the guitar laying on its back and let gravity be my friend. It also prevented runs and sags which a very thin lacquer can do very easily. the result is almost no orange peel at all.
I'll still have to level sand this when the time comes but its going to be a very quick job. I'll hit it with 800 wet and then go straight to the buffer and I'm confident its going to look spectacular. This is definitely the best pre-wet sanding finish I've managed to date.
So I still need to get about 4 good coats of clear on the back. I'm hoping to do this piece meal like one coat each day early evening when the temps are lower but before the humidity gets too high...
So the below pix are the finish as shot straight from the gun. Not wet sanded or buffed at all. Its gonna look like glass after I actually do the wet sanding and buffing...


-
3
-
-
OK, shooting the clear.
Still have a couple coats to shoot on the back this evening.
Learned something new yesterday. It was 95 F. in my shop, but humidity was low, around 50% so I thought I didnt need to use retarder. I shot one coat a bit heavy and it formed all kinds of bubbles under the surface. A bit of reading showed me that in temps like that it skinned over too fast for the solvents to escape so they formed bubbles.
Waited till it hardened and then sanded it off.
Re-shot it with a little retarder and lighter coats and didnt get the bubbles.
I thought retarder was just to prevent blushing in high humidity, but I was wrong
Still learning...
Used timbermate for mahogany to grain fill, but darkened it with trans-tint tobacco brown


I like the darker fill in the pores.


-
3
-
-
15 hours ago, KnightroExpress said:
Very nice! I bet that phoenix looks craaaaazy in person.
Thanks. Yup, it does. Especially now that it has a beak and an eye and the head looks like a head instead instead of a pseudopod...
I used one of the floating flame pieces to make the beak and for the eye I just carved a divot with my dremel and filled it with epoxy when I set the rest of the floating flame pieces for his eye.
It looks like a stained glass window. To be honest I was somewhat afraid this would come out looking stupid and wreck the guitar, but I'm REALLY happy with how this turned out.

-
2
-
-
Tattooing the guitar...
Still some work to do. I have some small detached pieces of abalone "flame" for the phoenix, and a few gaps to fill. I plan to carve a bit of detail on the head like beak silhouette with another piece of abalone and an eye, but this thing really lights up.
I decided to use a dark epoxy on the phoenix because I like the dark border. It sets it off nicely and looks more "tattoo-like" IMO


-
3
-
-
10 minutes ago, ScottR said:
That's a lot of bling! I guess you are making a tattooed guitar.
SR
Yup
The large size bling (the Aries in the 2nd photo above and the Phoenix) go on the back though, so the main view of the guitar wont be overwhelmed with inlays. The front only has what you can see in the photo above. Headstock and 12th fret inlay which you can partly make out in the photo above as well. I think it'll remain in the realm of tasteful with regard to the bling
-
Sanded the gunk down and then spent some time at the disk sander roughing things out.
TR cover needs to be thicknessed to about 2/3 its current thickness (from the back) and trimmed
off where you see it overhanging the headstock overlay, the rest of it is sitting in the approximate
location.The big Aries inlay for the back needs to be trimmed in some more. Still a bit oversized and the
shape itself needs a bit more work.
I'll do that tonite.You can kinda make out the big Phoenix inlay on the counter there. I'll be inlaying that as well as
the Aires tomorrow and will hopefully shoot the rest of the finish over the weekend.Then it'll just be wait a few weeks, sand, buff, and wire it all up. If I'm happy with the finished product maybe I'll enter it in August GOTM


-
1
-
-
My standard truss rod cover. Pix speak for themselves I'll sand it off and cut it out tonite...


-
2
-
-
Did a bit of inlay work over the weekend.
Unlike the headstock inlay I did not cut this myself, but sent my design to DePaule and they cut if for me

This comes glued to the the cardboard, so I had to soak it in water to remove the backing from it. Had this been a more complex inlay with a lot more pieces I would cover the top with clear packing tape and just sit the bottom in the water until it comes off.
The tape keeps all the pieces in their places. then I would put it where it will go, tape and all, and proceed as usual. Taking it apart and trying to work with all the little pieces can be a gigantic mistake and lead to a lot of regret

Many thanks to Komodo for the chalk idea. Next time I think I'll sand the piece a bit smoother beforehand as the chalk filled a lot of stuff I didnt want it in, however even with that it was still a lot easier to see the lines when I did the routing
Also, all I could find on short notice was kids sidewalk chalk which might not do as well as real "blackboard" chalk. I'll know soon, I still have my TR cover inlay to do 


I'll be cutting this out with an oval border and inlaying the entire oval into the back of the guitar. I inlayed the MOP into the ebony first because the white MOP just doesnt stand out that well in mahogany and I want the symbol to pop.

-
1
-
-
Did
Hm. Not sure what happened here
-
1
-
-
On 7/7/2017 at 9:22 PM, djobson101 said:
I loved going through this thread. And as with your last one I saw, the effort put forth into documenting and explaining the processes is invaluable to a beginner like myself.
Absolutely stunning guitar and a beautiful tribute to your son. He will always be within you, your family and those whose life he was a part of.
Thank you Dalton
-
It
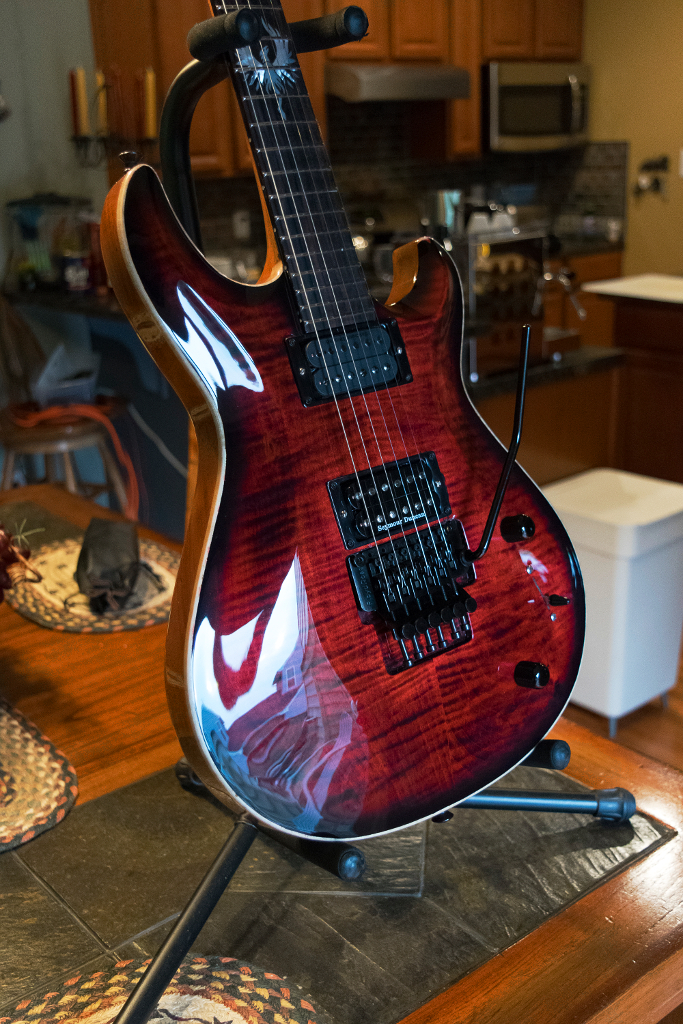
1 hour ago, ScottR said:I can't decide if that is red or rusty brown, but it's close enough to red to push my buttons. A black burst over red is one of my favorite combinations.
What was the thought process behind leaving the black sand back out of the treble side cut away?
SR
It's straight up red darkened a bit with a VERY small amount of black, and I expect that some of the black still in the top darkened it a touch more.
I left the black out of the lower cutaway because I knew it was going to mostly get covered over by the burst anyway and I wanted to make sure enough red was still there to show. It actually worked out exactly as I'd hoped :-)
-
forgot this pic. its my fav. dont mind all the orange peel..
I'm excited to see the finished product...

-
29 minutes ago, ScottR said:
Call it mojo. Mojo is always good.
SR
Mojo it is


'Model 222' electric guitar
in In Progress and Finished Work
Posted
There is no better dedication for your build than to your new son. Congratulations and welcome")
Thats a very nice bend I have to say. Ive done a couple that thick and didnt get such a nice joint")