


charisjapan
-
Posts
361 -
Joined
-
Last visited
-
Days Won
15
Content Type
Profiles
News and Information
Tutorials
Product Reviews
Supplier Listings
Articles
Guitar Of The Month
Links and Resources
Forums
Gallery
Downloads
Posts posted by charisjapan
-
-
Oh, yeah ... for @Mr Natural
")
-
 1
1
-
-
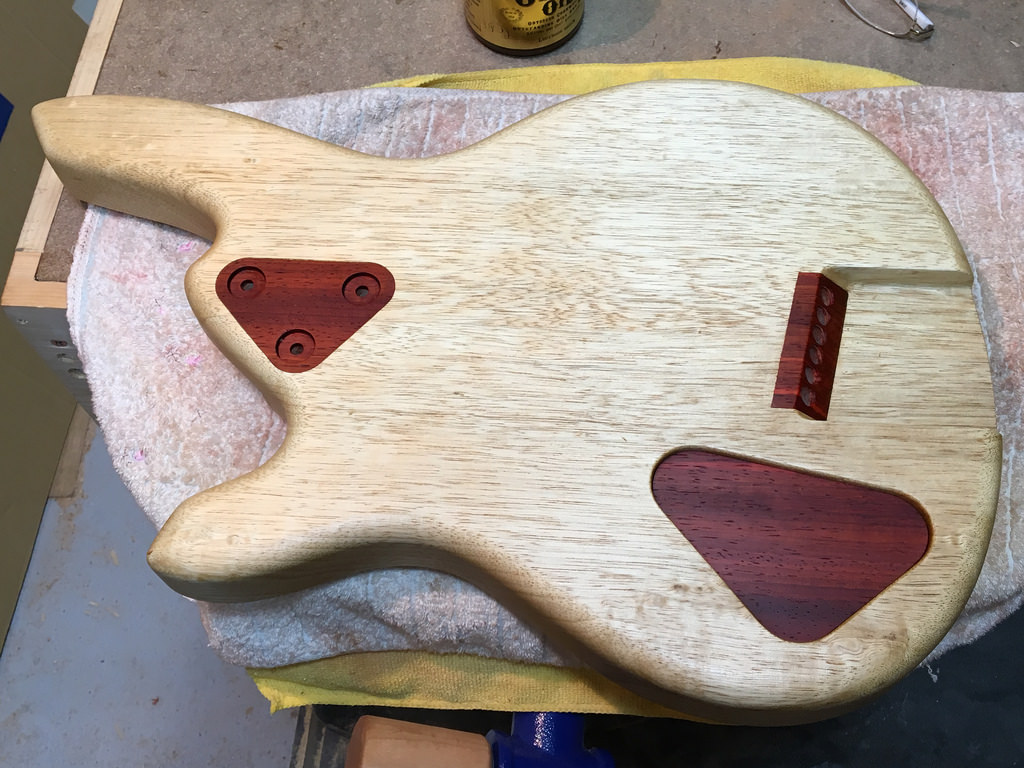
Mockup Time!Still several applications (guess "coats" doesn't work) of Odie's Oil to go, but had to do a mockup to confirm bridge location and nut height (more honestly, to drool over my own build, and get a sense for balance and feel). Looks like weight will be a little over/under 8 pounds (3.65g). I wasn't really shooting for light weight, though Limba IS a light wood, but wanted a full 2 inches (51mm) of body thickness. I could have thinned the body, made a larger controls cavity, or even taken off a tummy cut and arm contour ... but that would have made it too "stratty" (thought that might happen on Padauk Mt.Fuji #2
") ).
).


-
3
-
-
Double post
-
This is still "on the workbench," but brought it upstairs to show a family member on Skype. Here's a compare shot of the size and shape alongside a strat and an LP.
![[IMG]](//projectguitarcache.s3-eu-west-1.amazonaws.com/imageproxy/38374749301_94e1c3e00e_b.jpg.830348bd035026d6fcf6a45191d7a1b2.jpg)
-
24 minutes ago, Prostheta said:
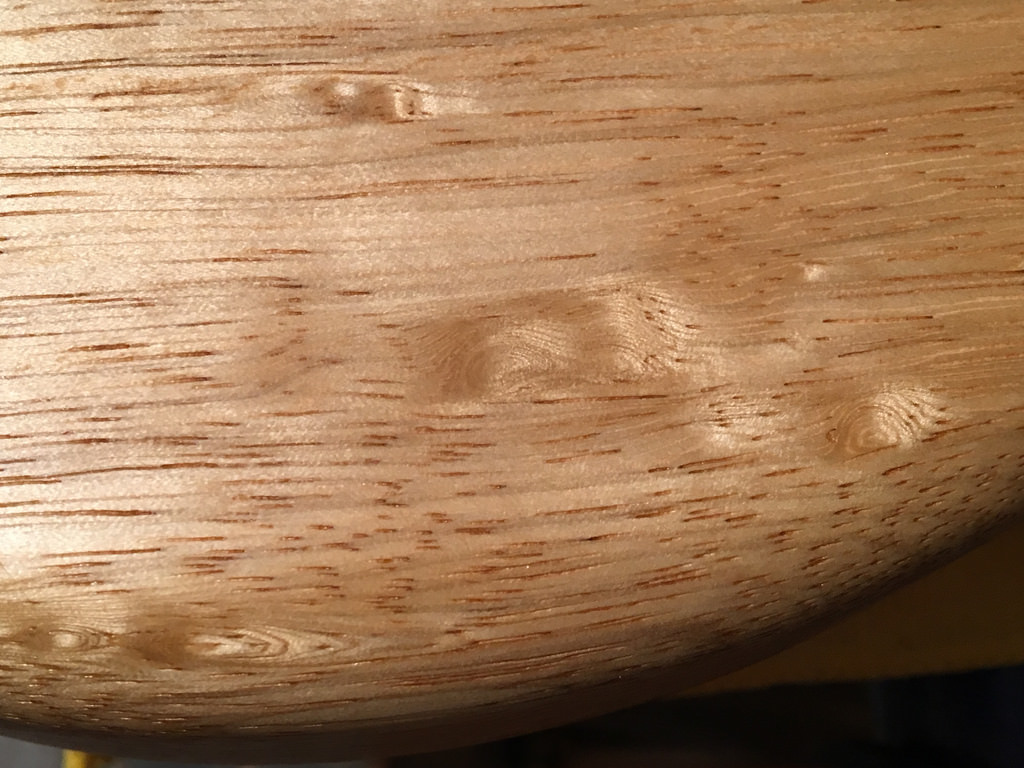
I was discussing what causes that "micro ripple" effect in certain woods. You can see it here on your Padauk at the right-hand side. I've seen it prevalent in Zebrano, Wengé and a few other hard woods. It almost looks like miniature planer blade marks!
Indeed, Padauk has a lot of interesting things going on. When carving the Mt.Fuji headstock area, there were lots of unusual “phenomena,” those micro ripples, strong mineral streaks, and something like a micro burl. I’ll see if I can get a picture of it. Probably why I’m enjoying Padauk so much! Chinaberry has these effects, too. Was really surprised by the White Limba in today’s post ... it’s like seeing water effects in a clear stream. Weirdest so far is a Black Palm (Palmyra) fretboard blank I picked up at Woodcraft in Honolulu ... can’t wait to see wha5 that looks like sanded and oiled!
-
On 11/5/2017 at 10:07 AM, Mr Natural said:
A nice worm hole ...


All the more "natural!"
Nice body shape ... kind of Bulbous Bouffant
 .
.
-
Glued the bridge plate/pickup ring yesterday ...After a bit more sanding, locating the bridge, and a few final tweaks, started to apply Odie's Oil. It's become a little cooler, so this stuff is thick. But as instructed, using a little abrasive pad (not sure, but #1500?), it starts to work into the wood. I knew the Limba had some interesting things going on, but the oil really brings out all the wood "eddies" ... Cool!

-
1
-
-
Roundover Time, Yay!! Notice the block in the neck pocket to keep the router bit from diving in and rounding the pocket edges.After a little #240 sanding, I found a few more (new?) dents, which ironed out easily. I love morning light, so a few mood shots, and a post-ironing pic.


 [
[
-
1
-
-
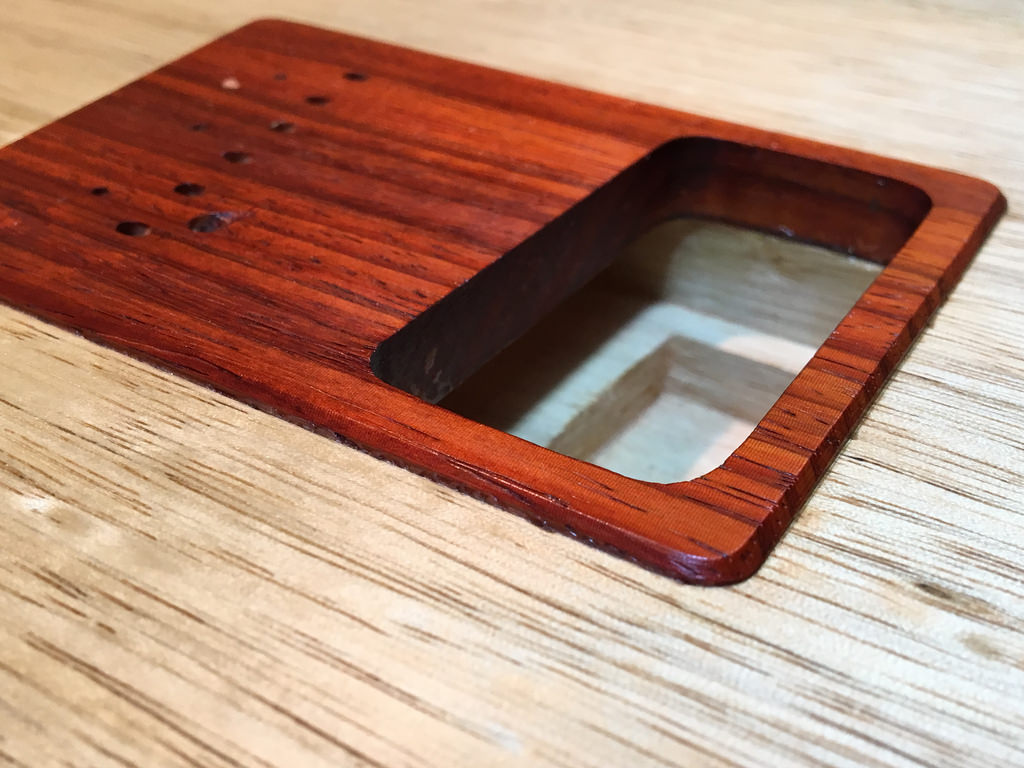
The pièce de ré·sis·tance ... Strap Pin Intensification Transmission using Padauk, or SPITuP for short.
 Okay, okay! No more stupid Tonez Jokez.I just didn't want the strap pins to pull out of the Limba, so hoping Padauk will be tougher.

-
2 hours ago, Mr Natural said:
that is a bad ass little do dad. - whatever its called- I am not sure I have ever seen a tool like that. very cool Did you get that in Japan or stateside?
That is a Veritas Small Router Plane, based on the Stanley #271. I wish I had the big one!!
-
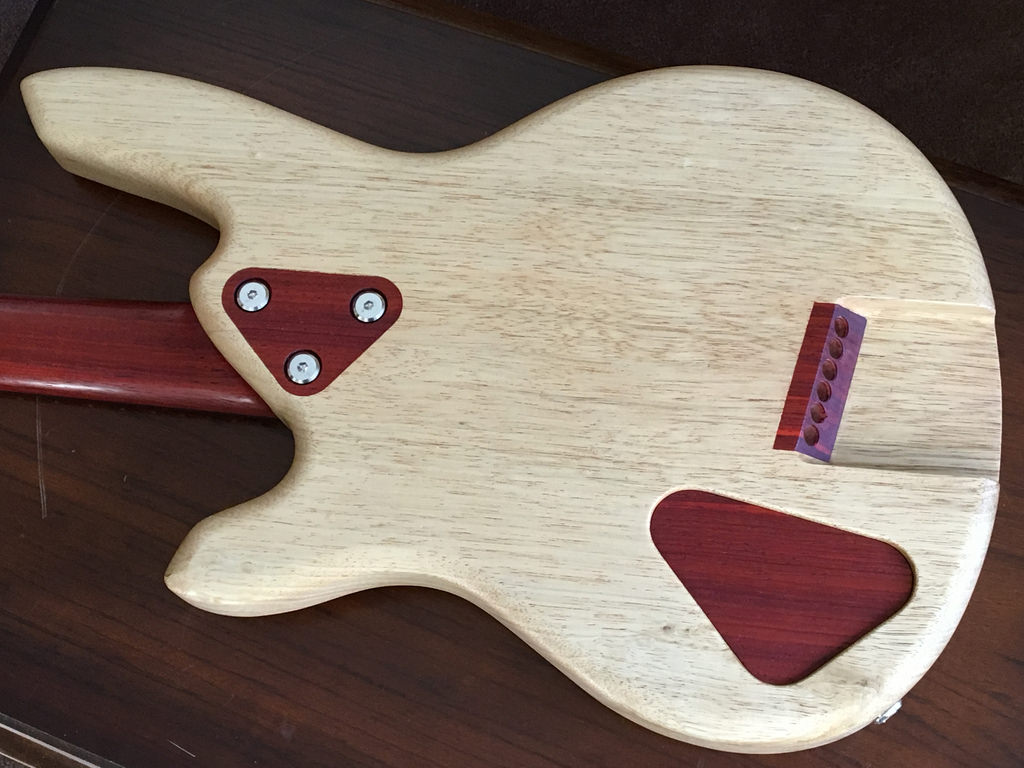
TIPIP (Tri-Bolt Intensifier Padauk Inlay Plate)


-
Yet again, Limba is kinda soft, so the neck bolt area became the next target for Intensified Sonic Dispersion.After routing, I found that I miscalculated, and the "plate" was 1mm too high. Rather than trying to get the template precisely over the original rout (and possibly making the rout larger ... assuming that CAN happen), I pulled out a hand tool that did the job quickly and accurately! And I enjoy using hand tools from time to time. I know this will clash a bit with the controls cover, but ...
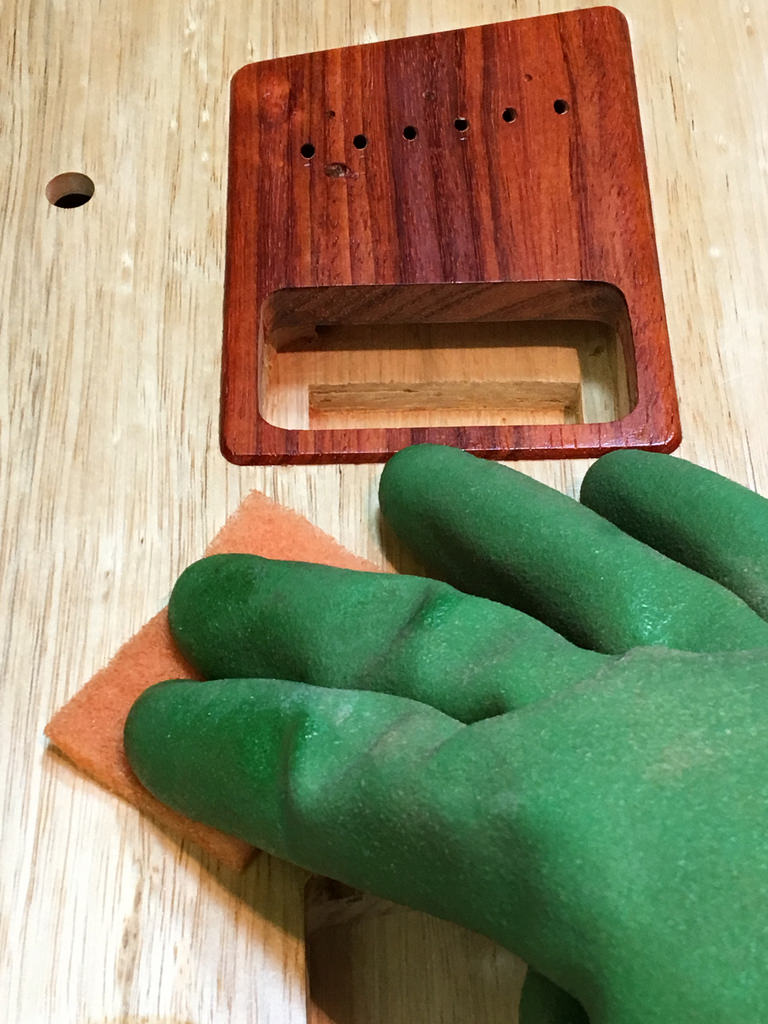
The controls cavity will have an unusual interior (i.e. not LP), but it's similar to what I did with the Chinaberry basses. I forgot to take a picture of the finished product, but here's mid-rout and the slightly recessed cover.


-
2
-
-
Welcome!
I’m relatively new myself and on my first scratch build guitar ... after a kit guitar and a short scale bass.
Do try the iron thing ... I just did on my Limba 6 build, and it works on anything short of a bona fide gash.
cheers!
-
1
-
-
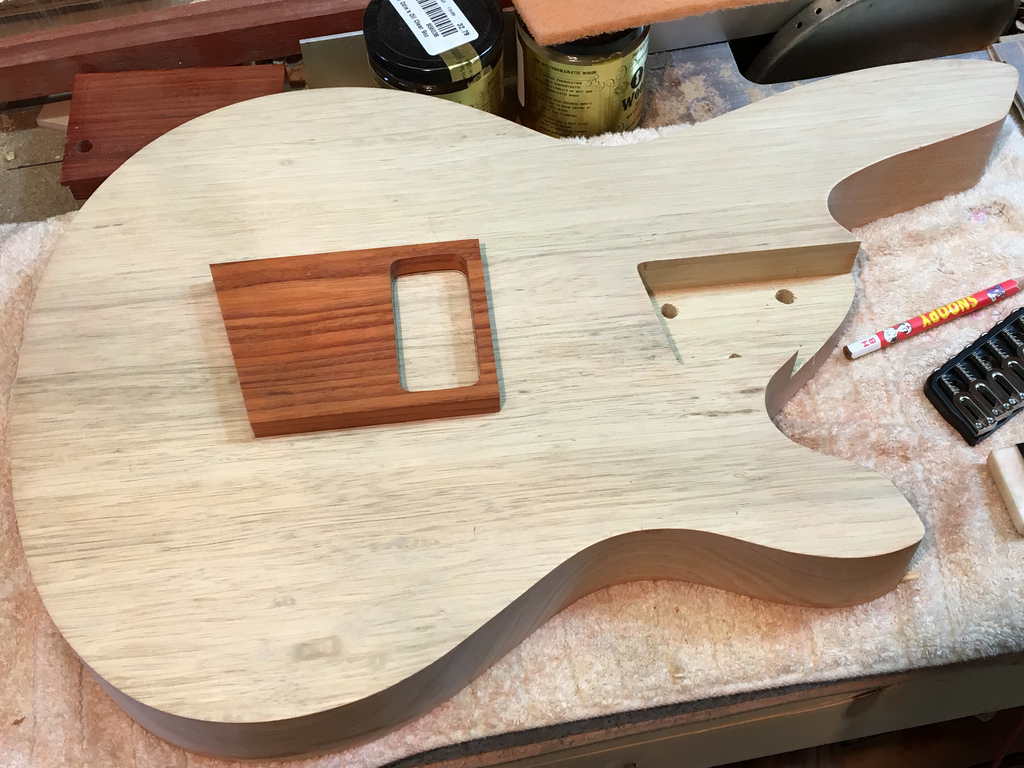
After sketching things on a piece of paper, I find that the "angled down" (if that makes sense?) version makes for a more complicated cavity very close to the P.I.B. (Padauk Intensifier Block) on the backside. With a controls cover like so, I can get my desired 45 degree jack. Still chewing on it, but right now this is looking better than the alternatives ...


-
Chiseled a pocket under the pickup to put a foam+spring thing. Also cleaned up the neck pocket repair. Neck is nice and tight ... and straight! The repair shouldn't be too noticeable after Odie's ... fingers crossed. At least I won't see it when playing!Here's a couple mockup shots, as well as my two choices for controls ... still undecided
 .
.


-
Yet again, trying to decide controls ... Tone and Volume, no switches ...?


-
The neck pocket was always a tad loose, but thought a few coats of paint would take care of that ... but then decided to use Odie's Oil, which has virtually no build up. Got a cutoff from the body, and shaved a 0.4mm thickness, then glued that to the treble side of the pocket. It might be a little too tight, but should sand to a good fit easily (fingers crossed).


-
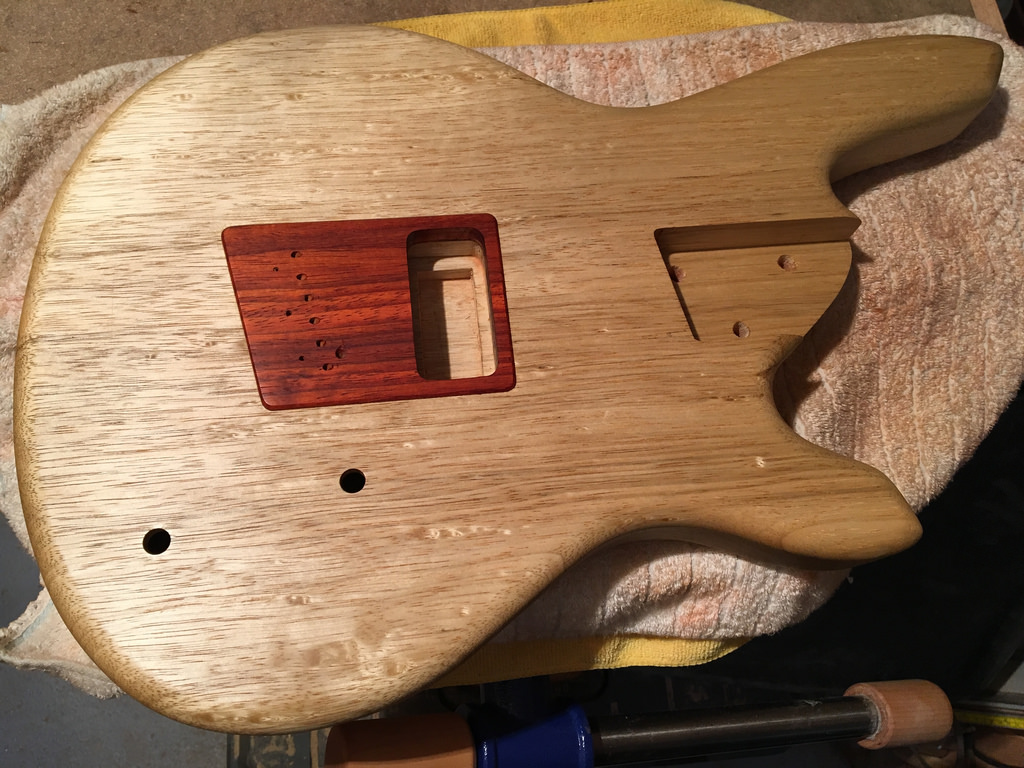
Final body work is electronics cavity and roundover, so before that a bit of repair ... must've put the top on something. Ironed out pretty nicely!! Before/after/sanded #240


-
Congrats! Beautiful guitar.
-
 1
1
-
-
Routed out the pickup first, making it a bit oversize, then the inlay. Rounded the edges by hand, and it came out a nice fit. Will give it a roundover before I glue it. I think I have to make the pickup rout about 5mm deeper for the foam/spring to not be over-compressed.
Weighed the completed neck ... 959g, a little over two pounds. It feels heavy-ish, but I really have no idea what a neck like this should weigh. Anyone?![[IMG]](//projectguitarcache.s3-eu-west-1.amazonaws.com/imageproxy/38101536866_0f8b366303_b.jpg.fe467fc8fa7347a381fd54e616c836a2.jpg)
![[IMG]](//projectguitarcache.s3-eu-west-1.amazonaws.com/imageproxy/38125022482_43536d5ca3_b.jpg.5f74d727cd9ef6ded82aab562e57a567.jpg)
![[IMG]](//projectguitarcache.s3-eu-west-1.amazonaws.com/imageproxy/26380166069_f842692cc8_b.jpg.93e4413e7841bc98ca730ae818e0c8f4.jpg)
![[IMG]](//projectguitarcache.s3-eu-west-1.amazonaws.com/imageproxy/37447099804_a79ecde5fd_b.jpg.7d12d320442ed85e46474a7deeceea7b.jpg)
-
1
-
-
Magic. Voodoo, Mojo ...
Indeed, some of the best inventions came unintentionally!

Seriously, though, the Limba IS a soft wood, so hoping the inlay will give me a stronger bridge mount. And the 45 degree string-through will add maybe 10mm extra string length for a "wrap-tail" effect ... appropriate for a what started out as a "sloppy beater" guitar for me!

Glued up a template for the bridge/ring inlay. I will use a 10mm router bit, and round the edges of the Padauk with a 5mm radius. Was considering sharp edges, but as this will be sitting proud about 2mm (will lower to 1mm if necessary), thought it would look better with rounded corners and a slight roundover.
Undecided as yet, but might make the bridge and pickup gap flush with the body to emphasize the "ring" look ... will decide after I see what it looks like. (or I could do a poll!)![[IMG]](//projectguitarcache.s3-eu-west-1.amazonaws.com/imageproxy/26375820029_de3fce8da9_b.jpg.154b0c0271ab7143d0d9683d60d3820a.jpg)
-
1
-
-
Well ...I find that my bridge is a bit low. My careful measurements told me it would be tight, and I still think I can get decent action with the saddles set high ... but I don't like that. I was already going to have a "surround inlay" of Padauk around the pickup to look like a ring, so thought it might look interesting to extend to the bridge. The pic is what I am thinking. The Padauk would be raised 1~2mm.From my Facebook:"And I can always claim it’s a “Tone Thing” ... the specific gravity of the Padauk adds tone depth matching the neck, and the tone dispersal of brass to Pad...auk to the Limba body connected to the Padauk neck transmitted to the Wenge fretboard (giving due consideration to the relative Janka Hardness) to the brass nut will cause the strings to reverberate at a precise nodal pressure to stimulate aural satisfaction senses. Combined with my innovative 45 degree through-string with brass and Padauk intensifier block, and multiscale octavation, this guitar will surely be a certified Tone Monster."

-
1
-
-
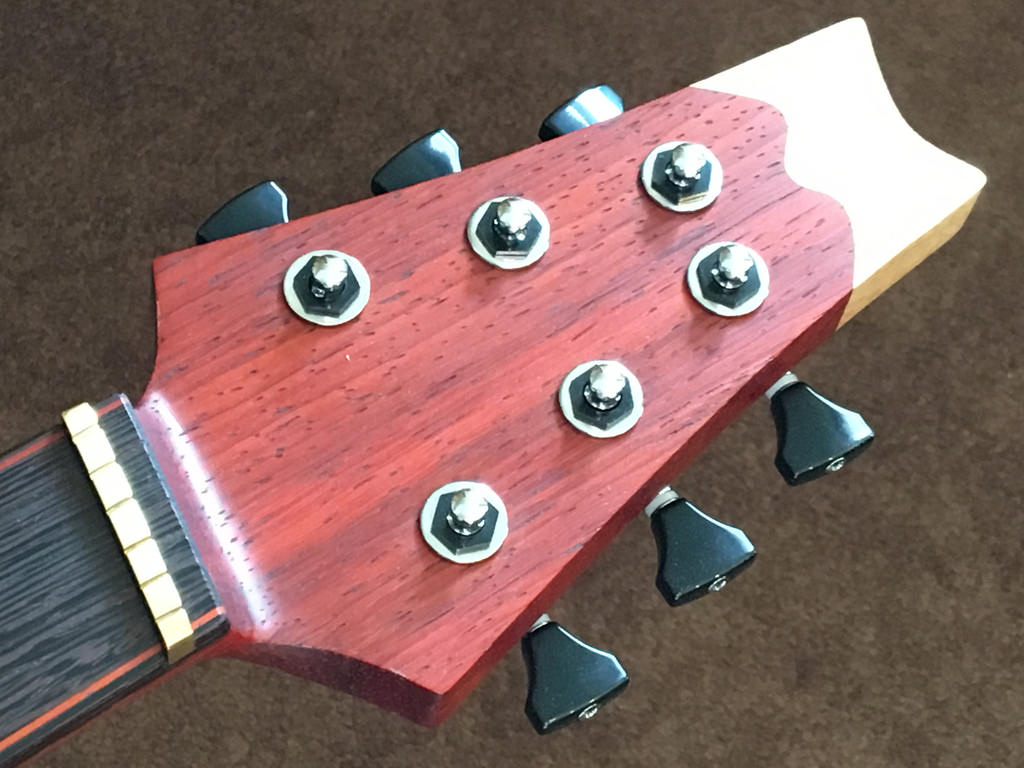
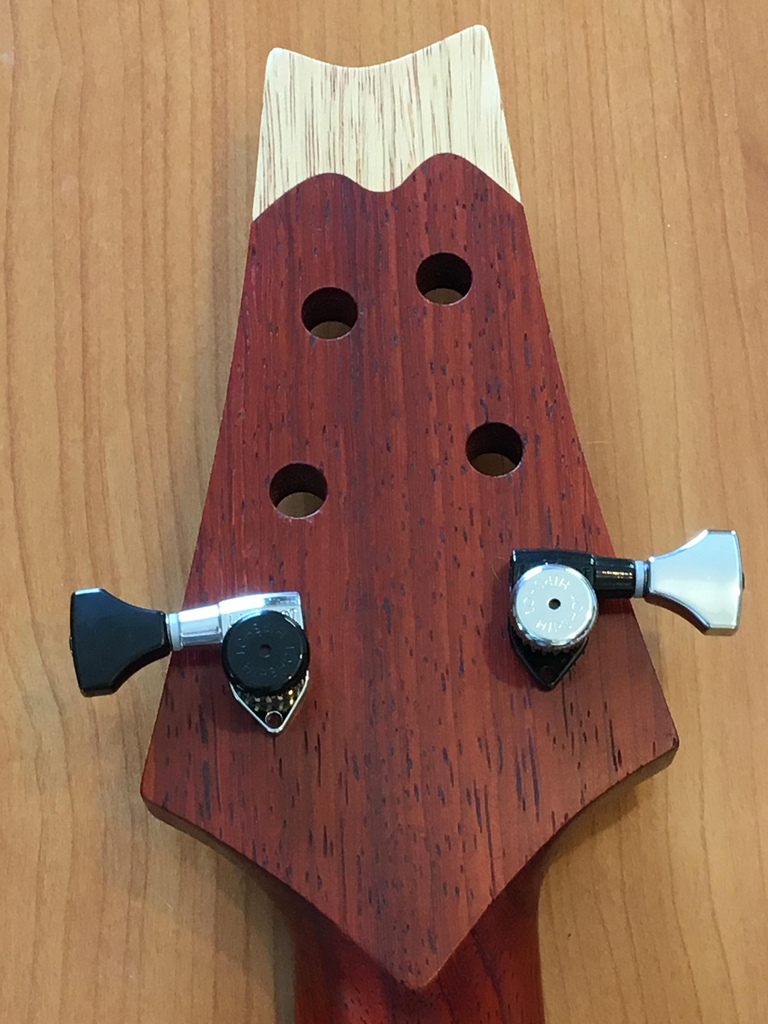
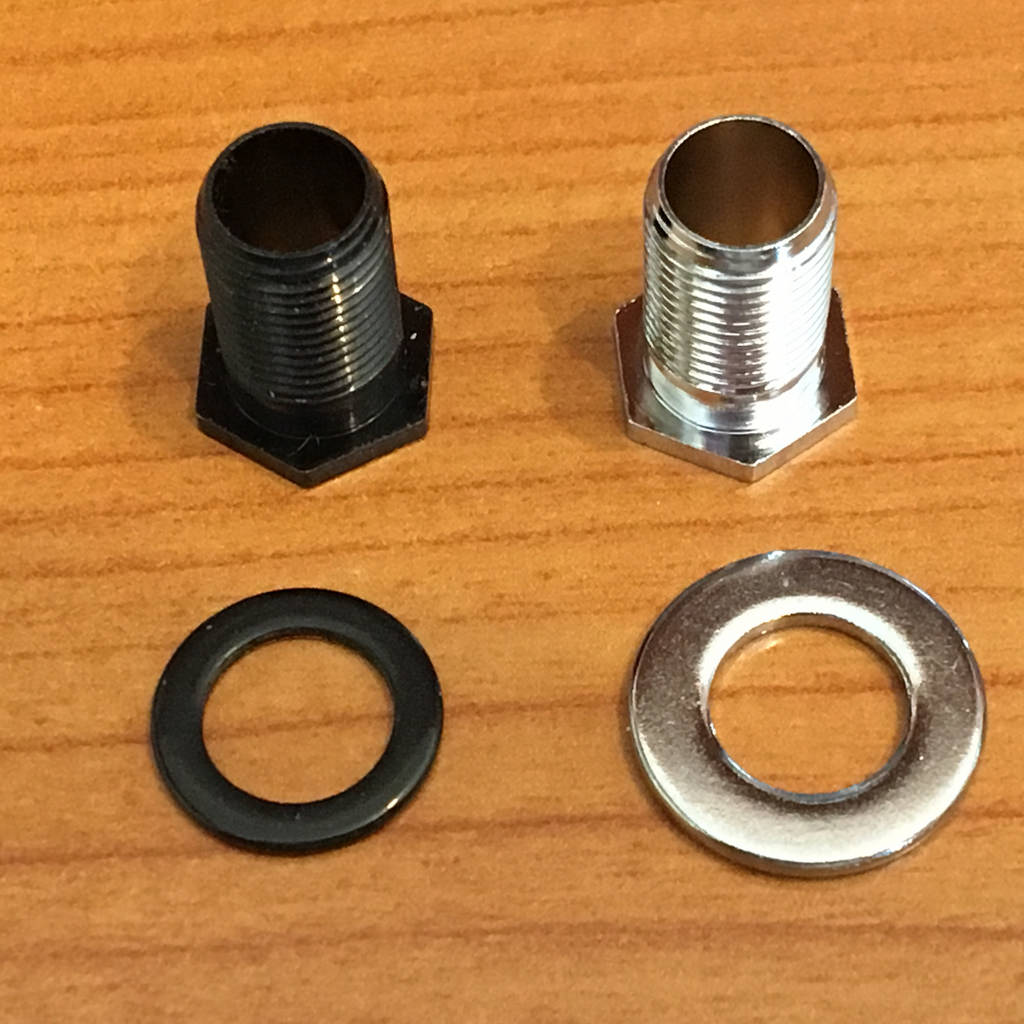
Now I have to decide which I will use for this build! There was one snag, though ...The black tuners were a 3+3 set, and the chrome were purchased separately, and they came with different sized washers! The black washers are 12mm, and the chrome were 14.6mm. After drilling this neck with 10mm holes, the 12mm washers look a bit silly, and more importantly, have very little purchase on the wood of the headstock. My local supplier has no stock of parts like this, so I am again asking Hipshot for a replacement. But shipping will be appreciably more than the cost of six washers, so I will probably just end up looking for some black anodized M8 washers. I could probably just use readily available M8 stainless washers, too.

-
Bill Woolery at Hipshot came through with the answer last night, and even attached several photos of the process. Hooray for Hipshot!!! (again)

The pics he sent were of the enclosed tuners, and mine are the open gear, so I took some of my own pics to share here. I tried also a pair of large needle-nose pliers to push up on the bottom of the locking wheel, and that worked too. But the easiest was as he described, the flat face of the side-cutting pliers was the fulcrum, and gently grabbing the shaft with the teeth ... you only have to pull it past the small flange, maybe 1/32" to be able to unscrew it the rest of the way. I'll say it again ... "Carefull you don't lose the pin!""Here are some pictures on how we do this when needed. We use a pair of side cutting pliers with some tape on the flat side to guard against scratching. Back the lock wheel up as far as it will go, then use a gentle prying force to get it past this point. If the wheel does not come completely out, just in-thread it the rest of the way. Careful you don't lose the pin! I hope that they will help, just know, the first one is nerve racking but after that, it really is very easy."Last pics are switching the knobs ... not any kind of rocket science, but to show the results.
")
![[IMG]](//projectguitarcache.s3-eu-west-1.amazonaws.com/imageproxy/24249599158_eba04eb13b_c.jpg.171c52662e99e528a586268261b9348c.jpg)
![[IMG]](//projectguitarcache.s3-eu-west-1.amazonaws.com/imageproxy/38070625252_242137626d_c.jpg.02206f24dbceda8af903c08a7d6416b6.jpg)
![[IMG]](//projectguitarcache.s3-eu-west-1.amazonaws.com/imageproxy/37393148734_8d0bcc33dd_c.jpg.372197094729f4a96cf8ff8d61ffc832.jpg)
![[IMG]](//projectguitarcache.s3-eu-west-1.amazonaws.com/imageproxy/24249598908_be30dbd9f3_c.jpg.22c5fecc7e6a8414dc20002808c24ceb.jpg)
![[IMG]](//projectguitarcache.s3-eu-west-1.amazonaws.com/imageproxy/37393148284_94223e1b1c_c.jpg.99f4f9d365590b204b0573f2ab1b7d6d.jpg)
![[IMG]](//projectguitarcache.s3-eu-west-1.amazonaws.com/imageproxy/38101981761_ce232b2ac1_c.jpg.dea45c120a43d24f5a10a4ba86bbdf5b.jpg)
![[IMG]](//projectguitarcache.s3-eu-west-1.amazonaws.com/imageproxy/37393148074_33e47d0cdb_c.jpg.8047857f7d9d453101b64f94e1aaf928.jpg)


![[IMG]](http://projectguitarcache.s3-eu-west-1.amazonaws.com/imageproxy/38374749301_94e1c3e00e_b.jpg.830348bd035026d6fcf6a45191d7a1b2.jpg)


 .
.


![[IMG]](http://projectguitarcache.s3-eu-west-1.amazonaws.com/imageproxy/38101536866_0f8b366303_b.jpg.fe467fc8fa7347a381fd54e616c836a2.jpg)
![[IMG]](http://projectguitarcache.s3-eu-west-1.amazonaws.com/imageproxy/38125022482_43536d5ca3_b.jpg.5f74d727cd9ef6ded82aab562e57a567.jpg)
![[IMG]](http://projectguitarcache.s3-eu-west-1.amazonaws.com/imageproxy/26380166069_f842692cc8_b.jpg.93e4413e7841bc98ca730ae818e0c8f4.jpg)
![[IMG]](http://projectguitarcache.s3-eu-west-1.amazonaws.com/imageproxy/37447099804_a79ecde5fd_b.jpg.7d12d320442ed85e46474a7deeceea7b.jpg)

![[IMG]](http://projectguitarcache.s3-eu-west-1.amazonaws.com/imageproxy/26375820029_de3fce8da9_b.jpg.154b0c0271ab7143d0d9683d60d3820a.jpg)


![[IMG]](http://projectguitarcache.s3-eu-west-1.amazonaws.com/imageproxy/24249599158_eba04eb13b_c.jpg.171c52662e99e528a586268261b9348c.jpg)
![[IMG]](http://projectguitarcache.s3-eu-west-1.amazonaws.com/imageproxy/38070625252_242137626d_c.jpg.02206f24dbceda8af903c08a7d6416b6.jpg)
![[IMG]](http://projectguitarcache.s3-eu-west-1.amazonaws.com/imageproxy/37393148734_8d0bcc33dd_c.jpg.372197094729f4a96cf8ff8d61ffc832.jpg)
![[IMG]](http://projectguitarcache.s3-eu-west-1.amazonaws.com/imageproxy/24249598908_be30dbd9f3_c.jpg.22c5fecc7e6a8414dc20002808c24ceb.jpg)
![[IMG]](http://projectguitarcache.s3-eu-west-1.amazonaws.com/imageproxy/37393148284_94223e1b1c_c.jpg.99f4f9d365590b204b0573f2ab1b7d6d.jpg)
![[IMG]](http://projectguitarcache.s3-eu-west-1.amazonaws.com/imageproxy/38101981761_ce232b2ac1_c.jpg.dea45c120a43d24f5a10a4ba86bbdf5b.jpg)
![[IMG]](http://projectguitarcache.s3-eu-west-1.amazonaws.com/imageproxy/37393148074_33e47d0cdb_c.jpg.8047857f7d9d453101b64f94e1aaf928.jpg)
Limba 6 Multiscale Filter'Tron
in In Progress and Finished Work
Posted
A few shots of Padauk whatever-it-is ...
... and incredibly elusive to my iPhone's auto-focus!