


flashriprock
-
Posts
85 -
Joined
-
Last visited
Content Type
Profiles
News and Information
Tutorials
Product Reviews
Supplier Listings
Articles
Guitar Of The Month
Links and Resources
Forums
Gallery
Downloads
Posts posted by flashriprock
-
-
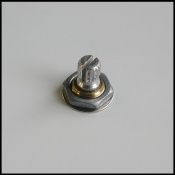
Something I haven't yet explained is the flat black disk in the pictures above. That's a killswitch, and its sole purpose was to solve the problem of what do do with the hole(s) I'd need to fill by relocating these controls. Clever, right? I thought so.
This killswitch topic was a whole other area for research. I learned that momentary switches come in "normally open" or "normally closed" configurations, but that either can work for a killswitch. I learned a lot here, Iron Age Guitar.
I especially wanted a switch with a recessed button because I didn't want to inadvertently hit it. This is a plug for a hole first, and maybe a killswitch secondarily.
This is the one I bought from Amazon. Just $7. Added bonus is that it lights up if I choose to wire it that way.
.thumb.jpg.93b79ac6968a489bb424e24382a21ac9.jpg)
-
Here is what it looks like from the front.


-
Here is what it looks like using the Bourne mini pots. Not shabby. Notice how the spacing works by exploiting the fact that the toggle switch wiring is elevated over the pots.


-
Here was my first, and most obvious, test -- pack things as close to the bottom of the cavity as possible.

-
I also bought new electronics:
- Pots: (2) CTS 500K pots + (2) Bourne 500K mini pots. (Will pick the pair that fits best.
- Toggle Switch: (1) Switchcraft toggle switch
- Knobs: (2) large tophat-style Fender base knobs, and (2) small tophat knobs. (Will pick the pair that fits best).
- Wiring kit: StewMac

-
To plan out the knob relocation, I decided to make a template. Space was going to be tight and I didn't want to make any mistakes.

-
@curtisa, thank you very much for your responses above. I'm pleased to get confirmation on things like: pot size doesn't necessarily = quality, or which manufacturers make well-regarded electronics.
Your observation that my enthusiasm for this project is getting a little excessive is spot-on. I blame YouTube! After watching luthier videos for several weeks there's a generous helping of "oh, I want try to do that" going on. The wiring, as you point out, is a prime example. For owners of this guitar, know this -- the wiring and components worked fine! I just wanted to try my hand at redoing it.
For better or worse, this guitar is now a little like a model airplane. I'm trying to make a cool one. Only I will fully appreciate the work going into it. I won't ever sell it, but... I might harvest the parts if I decide to do this again.
Thanks again for the comments!
-
At this point, if I'm committed to relocating one or two of the controls, I'm going to have to understand what's behind the cavity plate. Below is what it looks like.
The two troublesome controls are the coil-tap volume (top-center) and the the toggle switch (left). The tone pot in the bottom is just fine where it is.

Staring at this, my compulsive novice mind thought...
- This space is not very big. How am I going to shove everything to the bottom?
- Why so many wires?
- The coil tap looks complicated, and it's big -- I could make more room if I just used a standard pot instead.
- I think these pots are small compared to my other guitar. Are they? They must have chosen them because of the small cavity space. Are small pots bad?
- If I were wiring this I could do a cleaner job of it. I could rewire this. I should rewire this.
- I should redo all of the electronics. How much are these parts? Not much I bet. Who makes the best pots and switches?
- If I redid ALL of the electronics then it would be a 100% upgrade.
- I definitely need to replace the pickups now too.
Yeah, I'm all in at this point.
-
Back to relocating the knobs, here are a couple pictures showing the stock knob and switch placement.


-
4 hours ago, Andyjr1515 said:
I like the way you visually compared the different makes with the key dimensions. Quite revealing for a number of features when you see them scaled and side by side.
Thank you. I found it interesting as well. It really invites a question of form versus function in guitar design doesn't it. One of the things I admire about Strandberg is that I suspect they could point to every design feature and offer some kind of modern, functional rationalization. That's very interesting to me.
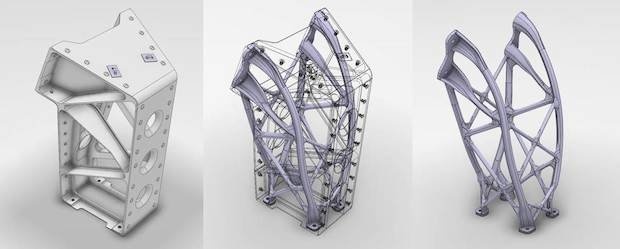
If we really push the topic of form vs function using today's technology, it makes one wonder what we'd get if we designed a guitar using artificial intelligence and we fed it parameters like: ergonomic, portable, light-weight, primarily used in the seated-position. I wouldn't be surprised if it produced something like a Strandberg. What about: primarily used in the standing position, durable, stays in tune, well-balanced. The combinations would be endless, and the end products would be too.
One could constrain the design to something CNC'ed out of wood, which might lead to more traditional designs. Alternatively, if one considered 3D printing as another viable approach (if we could 3D print something with tone wood-like qualities for example), it might produce the kind of alien looking structures they're finding in other industries.
Sorry, I digress. This whole form vs. function topic is very interesting to me beyond guitars.
-
My initial ideas revolved around making the current locations work.
Solution idea 1 -- Recess the knobs in their current location. Hey, Paul Reed Smith does it, so maybe I can too. Unfortunately, the NK headless only has 6mm of maple cap thickness to work with, and I concluded that wasn’t enough to meaningfully recess the knobs without compromising the integrity of the top itself. Next.
Solution idea 2 – Low profile knobs? Does anyone even make these? Turns out, someone does. They’re called Pro-Dials, and their solution is to recess the pot using a plastic spacer (not concaving the top like on a PRS) and then capping it off with a lower profile knob.
.jpg.d6690b78525c1f8ccac8158961e500ae.jpg)

This was a pretty slick solution, but I did not choose it. For one, the recessing only works if one has the control cavity depth to spare, and I was not confident that I did. Next, I didn’t really want a low profile knob because I’d still have an obstruction.
This realization pushed me into contemplating relocating the knobs.
-
Perhaps it’s just me. I haven’t seen many others complaining about this. I tend to extend my pinky finger with my picking hand, and that’s the finger that is bumping into the controls.
Alternatively, maybe it’s the design. Are the controls unusually close to the front-side of the bridge?
The answer seems to be a combination of the two. Below is a picture I arranged to compare the NK headless guitar to other popular body styles.

One can see that the NK headless design crowds more control dials near the front of the bridge than the Strandberg or the Les Paul. The Strandberg is especially interesting because it too is a small ergonomic body, and yet they’ve cleverly tucked the controls below the bridge (not in front of it), and pushed the toggle all the way to the edge of the body away from one's picking hand – nice design.On the other hand, the NK headless’ dials are not necessarily more obstructive than the layout on a Fender Strat or a PRS. I’ve played a PRS and I don’t recall any knob location problems – maybe because they’re recessed? The Fender volume knob looks particularly obstructive, and yet, I used to own a strat many years ago and I have no recollection of it being a problem. And since Fender strats seem to work just fine for Yngwie Malmsteen and 1/3rd of all guitar players, yeah, I think this control knob issue is probably unique to me and my odd picking hand position.
Curiosity now satisfied, I still had an issue to resolve -- how to deal with the knob placement issue?
-
RELOCATE CONTOL KNOBS
For me, the volume and toggle switch are inconveniently close to my picking hand. It’s not an issue if I’m just strumming, but it is an issue when I’m palm-muting picked notes on the highest three strings – G, B, E.

-
On 5/27/2018 at 12:45 PM, Andyjr1515 said:
Look the business. Interesting seeing in the thread of the iterative process often encountered in unconventional builds, certainly in my own, where the final solution to a task is often quite different to the original thoughts.
Thank you, and yes. This project was a series of best-effort solutions by a noob. Hopefully my experience helps the next person.
-
Here it is almost complete. One of the things I learned (and you can probably see in these pictures) was that the string height on the low E side of this new nut was a little too high. I next needed to sand down the bottom of the nut on the low E side to reduce that extra height a little. Once done, however, it turned out nicely.


-
-
The Tusq nut was thicker than my stock one, but after a little sanding I got it to size.


-
I wanted a pre-cut nut and I searched for one that best matched the E-to-E spacing of my stock nut. That turned out to be the Tusq XL SLOTTED 1 23/32" (Model PT-6114-00). Note, I deliberately chose the black nut but these come in white too.
I removed my stock nut without any problem because it was not even glued. It slide right out.

-
NEW NUT
I next decided to replace the nut. I didn't have to, but I wanted to. One of the reasons for replacing the bridge was to achieve reliable tuning and I didn't want to skimp for a part that's less than $20. I wasn't crazy about the stock nut because it was flat, not angled, and it also wasn't sitting perfectly flush in the channel. I was developing a fairly critical eye by this point after the effort and time with the bridge!

-
I quickly changed my mind however, and I DO NOT recommend staggering them as I did at first.
One of the things I quickly learned was that tightly aligning each of the pieces next to each other gives them rigidity and stability that is not possible when each is independent. Note too that with the NK headless guitar you will need to trim the center screws because they will otherwise penetrate the truss rod tunnel. This is another reason to line up the pieces for shared rigidity because the center pieces will have less screw depth than the others. One bonus was that only one of the four dowel holes was showing after installation.


-
I originally planned to stagger each piece in an attempt to be clever. It just seemed a little boring to line them up in a straight line.


-
This left me with four holes, which I filled with dowels.


-
LOCKING HEADPIECES
With the bridge installed, now I needed to install the new T4M locking headpieces. But first, I'd have to remove the stock piece.


-
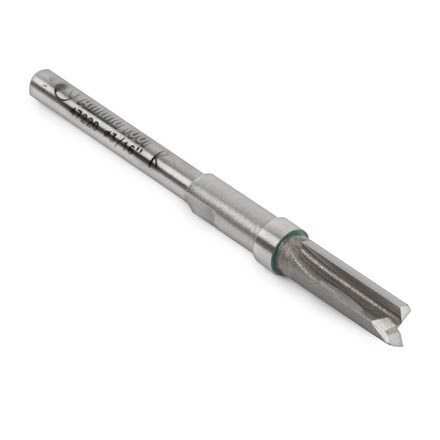
Also, Amana makes 1/8" ball bearing router bits that can fit in a Dremel. If I'd known this I might have pursued a more traditional template path than I did. They're available from StewMac here.
.jpg.ce677fef28cd0056fecce79ceb329348.jpg)


.jpg.d6690b78525c1f8ccac8158961e500ae.jpg)


Upgrading my NK headless guitar
in In Progress and Finished Work
Posted · Edited by flashriprock
Back to the test layout above -- I didn't like it.
For one, I didn't like how the killswitch and the volume knob were on top of each other. I'd want to revise that in my next test.
Secondly, I wanted to see if I could tastefully plug the holes with dowel caps instead of the killswitch. I bought some dowel caps from the hardware store and sanded them to fit. Below is what that test looked like.