


mwez219
-
Posts
23 -
Joined
-
Last visited
-
Days Won
2
Content Type
Profiles
News and Information
Tutorials
Product Reviews
Supplier Listings
Articles
Guitar Of The Month
Links and Resources
Forums
Gallery
Downloads
Posts posted by mwez219
-
-
On 7/7/2022 at 10:51 PM, mwez219 said:
Cut to shape now ready for sanding and final shaping. Not sure of final results but have noticed one thing, with it being rosewood it is quite heavy. Adding reading compounds the weight bit more. So if anybody knows any weight lifters who play guitar let me know , they can have a workout at the same time.


-
 1
1
-
-
Thanks everyone
-
10 hours ago, mwez219 said:
The wood will become the binding in theory.
Cut to shape now ready for sanding and final shaping. Not sure of final results but have noticed one thing, with it being rosewood it is quite heavy. Adding reading compounds the weight bit more. So if anybody knows any weight lifters who play guitar let me know , they can have a workout at the same time.
-
1
-
-
5 hours ago, JGTay said:
Thanks Bizman. It catches my eye everytime I look at it, but it is probably because I know it is there and so for me it is obvious.
I think you are far to critical of yourself.
yes it’s there, but only with close scrutiny and a very very minor thing. As I tell people these things are made by hand there will always be something to say could be better. If you want perfection then buy a machine made by the thousands guitar .if you want character then make by hand.
-
4 hours ago, Bizman62 said:
This is going to be interesting! So the wood will not show at all on the top?
The wood will become the binding in theory.
-
Just now, mwez219 said:
Looking mighty fine to me
I love neck through body guitars but have not had the wherewithal to try it yet, but and that’s a big but I may try ordering some more timber and give it a go. Seeing your build has inspired me.
-
1
-
-
Looking mighty fine to me
-
 1
1
-
-
Next job will be cutting and shaping the body, have decided to use danish oil on side and rear. Will post more as I go
-
1 minute ago, mwez219 said:
Have decided for my next build to try a little experiment for me anyway. How about a full front resin insert I thought. So here goes.


-
Have decided for my next build to try a little experiment for me anyway. How about a full front resin insert I thought. So here goes.
-
3
-
-
On 7/4/2022 at 3:15 PM, Akula said:
Had a very nice day today, despite the continuing downpour of rain here. I'm enjoying having a quiet week at work - I was home by midday today - so I'm trying to make as much headway as possible before I go abroad later this month. If everything works in my favour, I can have the major geometry completed before I go, so it can rest for a good month before tidying up, fretwork, and finishing.

Those boards definitely slipped during glue-up. The revelation about the oversized veneers came too late, I'd already started the process, so I had a lot of cleaning up and dressing to do. I hit it hard with the electric planer to get both faces flush, then got the Stanley out for fine-tuning to get everything square again. Started out with 51mm thickness stock, and ended up with a bee's over 48mm. But the veneer stripes came out stark and bold, just as intended!

Got out the paper plans and transferred everything onto markings on timber. There is a point in every guitar build where you step away from paper plans and start measuring and designing on wood, and that switch takes place now. The simple act of drawing lines square around all four edges and marking it "B" is cathartic - that line is now sacrament, for it marks the absolute position of the bridge, which holds all other measurements in relativity.

Today's main operations will concern the neck geometry, so I paid special attention to the truss rod, neck thickness and profile, headstock, and volute. I'm modelling the neck dimensions from my favourite guitar of all time, my main touring guitar for the last four years. The loss of 3mm of stock thickness means I can achieve a 9 degree break angle. Drawing out the fretboard, nut, tuners and thus string lines shows me a decent real string break angle, and I'm still toying with the idea of a string tee for the bass strings. This is going off a 14mm headstock thickness, to which I may add a slice of my Tassie Blackwood if I can successfully cut a thin piece on the bandsaw.

Been using this jig for years. I'm thinking of improving it with thumbwheels and threaded inserts, but it works just great as is. The truss rod is a 440mm dual-action, with the socket placed directly behind the nut and the end of the rod dictating where the neck profile transitions into the heel. I've always done truss rod routing and access in a fairly simple and somewhat rough manner - I mean, it's all hidden by the fretboard, right? Well this time I'm going to try out a few more professional touches.

I've had a 10" bandsaw in my possession since my friendly neighbour handed off his old one to me back in the winter of 2020, but I must admit that it's been left quite alone until now. For rough body shaping I've previously been handy with a jigsaw, and for removing large amounts of material such as the underside of a neck I've normally gone with a router-on-rails. But a few months ago I bought a new blade for the big machine and learned a little about setting up and tuning. I know it's only a 10" bandsaw with a 1/2hp motor, which I guess puts it in the hobby class, but I discovered it can easily plow through two inches of hardwood, so long as you treat her well and tell her nice things.

Now I've tasted the sweet taste of large-calibre power tools, I can't imagine going back to my old methods of routers and layers of dust everywhere. I think the reason why I've shied away from the bandsaw for so long was fear, to be honest. Just like how I was afraid of the router when I started using one at the age of 16. With experience, that fear is replaced by respect, and it is my belief that this transformation from fear to respect is actually what creates safety.

Fancy footwork with the truss rod access. I took this photo at a very rough stage - this will get cleaned up. The comparatively low headstock angle makes for a tight fit with the allen key, so I'm thinking about routing a T-shape to facilitate some left-right swinging room. It'd have to be wide and deep enough to make a difference, but skinny and shallow enough to fit underneath the truss rod cover and not wreck the strength of the area.

Glued on some ears. I took the offcut from above the headstock face, made it into two offcuts of maple, and glued them back on with the same grain orientation as the original piece. Revisiting past builds, I remember using the smallest offcuts to glue on to create real estate on the headstock, and usually that meant triangle-shaped bits that were a mother-pain in the orifice to glue without slip. This time round, I went for some oversized rectangles far larger than the requirement. I will be shaping to a template, so I'm keen for the extra stability under the router base.
Tomorrow I'll be tapering the neck, making templates for body and head, and hopefully trueing and gluing wings and jointing the top.
- Jam
On 7/4/2022 at 3:15 PM, Akula said:Had a very nice day today, despite the continuing downpour of rain here. I'm enjoying having a quiet week at work - I was home by midday today - so I'm trying to make as much headway as possible before I go abroad later this month. If everything works in my favour, I can have the major geometry completed before I go, so it can rest for a good month before tidying up, fretwork, and finishing.
Those boards definitely slipped during glue-up. The revelation about the oversized veneers came too late, I'd already started the process, so I had a lot of cleaning up and dressing to do. I hit it hard with the electric planer to get both faces flush, then got the Stanley out for fine-tuning to get everything square again. Started out with 51mm thickness stock, and ended up with a bee's over 48mm. But the veneer stripes came out stark and bold, just as intended!
Got out the paper plans and transferred everything onto markings on timber. There is a point in every guitar build where you step away from paper plans and start measuring and designing on wood, and that switch takes place now. The simple act of drawing lines square around all four edges and marking it "B" is cathartic - that line is now sacrament, for it marks the absolute position of the bridge, which holds all other measurements in relativity.
Today's main operations will concern the neck geometry, so I paid special attention to the truss rod, neck thickness and profile, headstock, and volute. I'm modelling the neck dimensions from my favourite guitar of all time, my main touring guitar for the last four years. The loss of 3mm of stock thickness means I can achieve a 9 degree break angle. Drawing out the fretboard, nut, tuners and thus string lines shows me a decent real string break angle, and I'm still toying with the idea of a string tee for the bass strings. This is going off a 14mm headstock thickness, to which I may add a slice of my Tassie Blackwood if I can successfully cut a thin piece on the bandsaw.
Been using this jig for years. I'm thinking of improving it with thumbwheels and threaded inserts, but it works just great as is. The truss rod is a 440mm dual-action, with the socket placed directly behind the nut and the end of the rod dictating where the neck profile transitions into the heel. I've always done truss rod routing and access in a fairly simple and somewhat rough manner - I mean, it's all hidden by the fretboard, right? Well this time I'm going to try out a few more professional touches.
I've had a 10" bandsaw in my possession since my friendly neighbour handed off his old one to me back in the winter of 2020, but I must admit that it's been left quite alone until now. For rough body shaping I've previously been handy with a jigsaw, and for removing large amounts of material such as the underside of a neck I've normally gone with a router-on-rails. But a few months ago I bought a new blade for the big machine and learned a little about setting up and tuning. I know it's only a 10" bandsaw with a 1/2hp motor, which I guess puts it in the hobby class, but I discovered it can easily plow through two inches of hardwood, so long as you treat her well and tell her nice things.
Now I've tasted the sweet taste of large-calibre power tools, I can't imagine going back to my old methods of routers and layers of dust everywhere. I think the reason why I've shied away from the bandsaw for so long was fear, to be honest. Just like how I was afraid of the router when I started using one at the age of 16. With experience, that fear is replaced by respect, and it is my belief that this transformation from fear to respect is actually what creates safety.
Fancy footwork with the truss rod access. I took this photo at a very rough stage - this will get cleaned up. The comparatively low headstock angle makes for a tight fit with the allen key, so I'm thinking about routing a T-shape to facilitate some left-right swinging room. It'd have to be wide and deep enough to make a difference, but skinny and shallow enough to fit underneath the truss rod cover and not wreck the strength of the area.
Glued on some ears. I took the offcut from above the headstock face, made it into two offcuts of maple, and glued them back on with the same grain orientation as the original piece. Revisiting past builds, I remember using the smallest offcuts to glue on to create real estate on the headstock, and usually that meant triangle-shaped bits that were a mother-pain in the orifice to glue without slip. This time round, I went for some oversized rectangles far larger than the requirement. I will be shaping to a template, so I'm keen for the extra stability under the router base.
Tomorrow I'll be tapering the neck, making templates for body and head, and hopefully trueing and gluing wings and jointing the top.
- Jam
Can’t wait to see the next stage. I made a jig just like that years ago and works fine for me to. Love the veneer strips. Have tried this myself but without any luck as slippage and not centrally aligned at time but seeing how you have done this is great. Can’t wait to see more.
-
Thanks for looking.
-
1
-
-
Interesting neck shape. Would love to see it being played.
-
Full nitro finish. oiled fretboard. 24 fret 25.5 inch neck scale.
-
Rear as requested


-
2
-
-
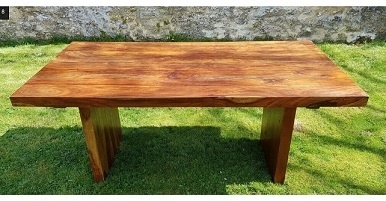
Another build from my second hand table . 2 piece solid rosewood body rosewood neck and rosewood fretboard.
all 100% recycled 100% made by myself including maple fret markers.


-
4
-
-
I have also thought long and hard about how to finish my guitars so far I have used textured paint , polyurethane satin, and nitrocellulose gloss clear coat. I find textured paint hides a lot of blemishes while nitrocellulose gives a deep gloss shine. I have just purchased some teak oil for my next project and will post pics when done.
-
16 hours ago, Dave Higham said:
I spent the first 45 years of my life in England and the only exotic wood furniture I ever found was an old, broken chest of drawers (with some missing) that turned out to be solid mahogany. Not much of it was useful for making instruments.
Got a lot more pics if you want to see after cutting and planning?.
-
17 hours ago, Bizman62 said:
A picture is worth a thousand words, eh? And six pictures worth six thousand... In this case that's so very true although it doesn't tell anything about you and your builder history or how you acquired that table

I sort of envy you guys living in old colonial powers as you have access to some rather inexpensive exotic wood furniture - solid wood instead of battenboard (old good quality) or chipboard (current quality). Having first been the backwoods of Sweden and later a periphery of the Russian Empire the rare upper class furniture is considered antique... And even back then the local cabinet makers substituted the exotic woods with dyed local ones. And our local ones aren't too sought after as tonewood...
Sorry for not explaining enough.
the table was purchased from GumtreeUK £450.
the only problem with rosewood is the weight, this took 3 of us to carry.
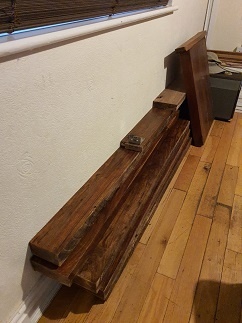
as you can see it is or was 60mm thick took 2 days to cut and plane in my shed.
with the legs I have enough for 12 bodies 8 necks 18 fretboards although the one pictured is wenge fretboard.
it is a rather heavy guitar as you can imagine. About me well this is my hobby and I build in my shed in the garden. All guitars are cut shaped routed by hand as I don’t have cnc just a bandsaw and Agee other bits and bobs.
have already made a reverse explorer with this table . If anyone wants to see let me know and I will post.
-
2
-
-
recycled rosewood table leg


-
4
-
-
based it on the ibabez i seen once
-
here is my first build floating trem guitar.
beech body, maple neck, wenge fretboard.
full 24 fret 2 octave 25.5 inch neck scale, guitarheads active pickups.
any comments welcome


New build new concept( for me anyway)
in In Progress and Finished Work
Posted
Oiled the base . Now just lots of buffing and sanding.