


JGTay
-
Posts
329 -
Joined
-
Last visited
-
Days Won
18
Content Type
Profiles
News and Information
Tutorials
Product Reviews
Supplier Listings
Articles
Guitar Of The Month
Links and Resources
Forums
Gallery
Downloads
Posts posted by JGTay
-
-
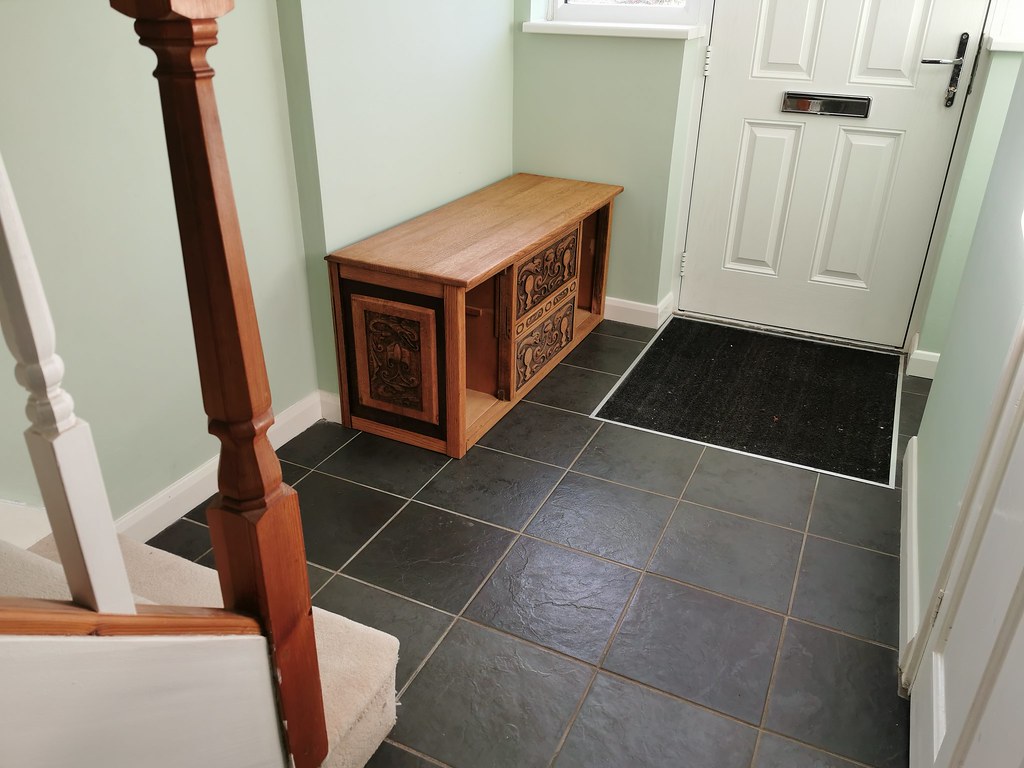
Thought I would share a project from just before Christmas...
My wife had always wanted a Monk's Bench, but we never had the room, so after I did the extension on the front of our house last year we had a perfect space in the new hallway.
After trawling round some antique stores online, I came across this late 1800's heavily carved oak sideboard
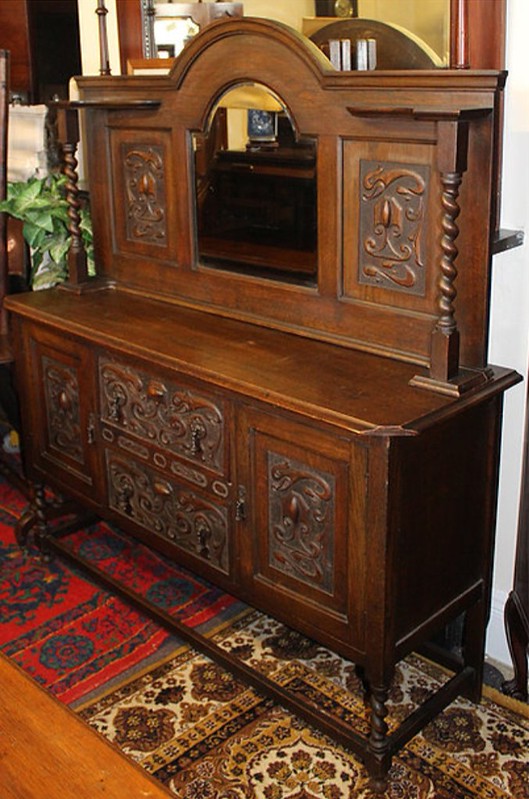
It had a few dints, scratches and broken parts, hence being listed as a restoration project for £90
")
And after a short drive to take a look, it was in the back of my car and heading home with me.
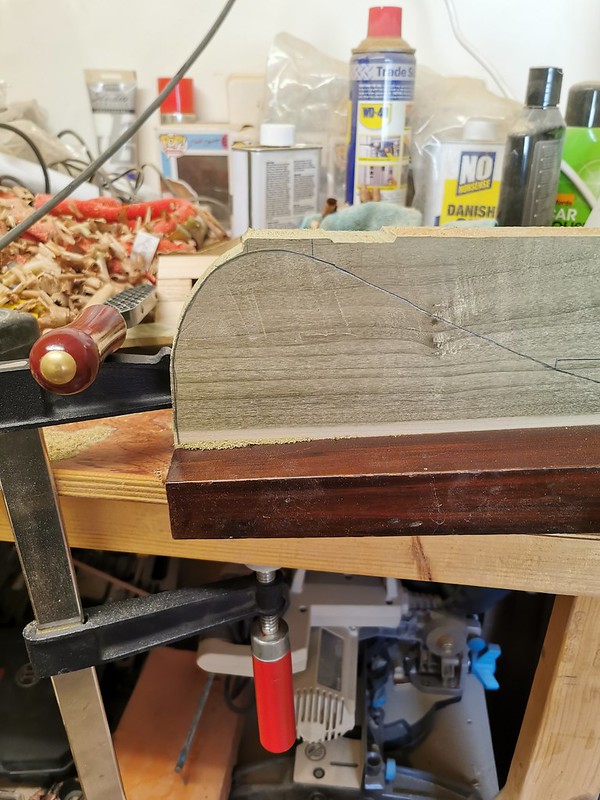
It was almost 30cm too long for the space that we had decided on, so I had a bit of resizing to do. The first job was stripping it down into the individual components and removing the old dark varnish.


After working out how best to resize it, I got on with cutting the selected pieces to size.
And a bit more work stripping and sanding back

I then used some light oak stain to get a better overall colour match

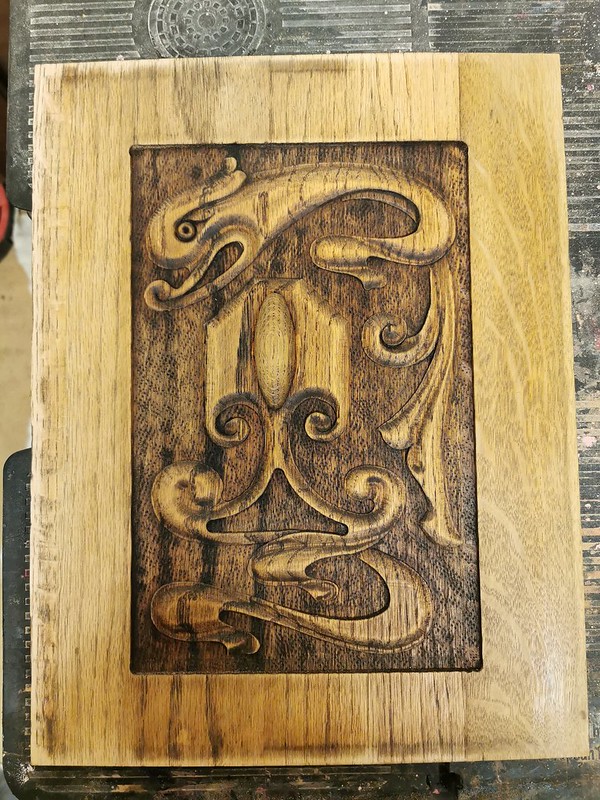
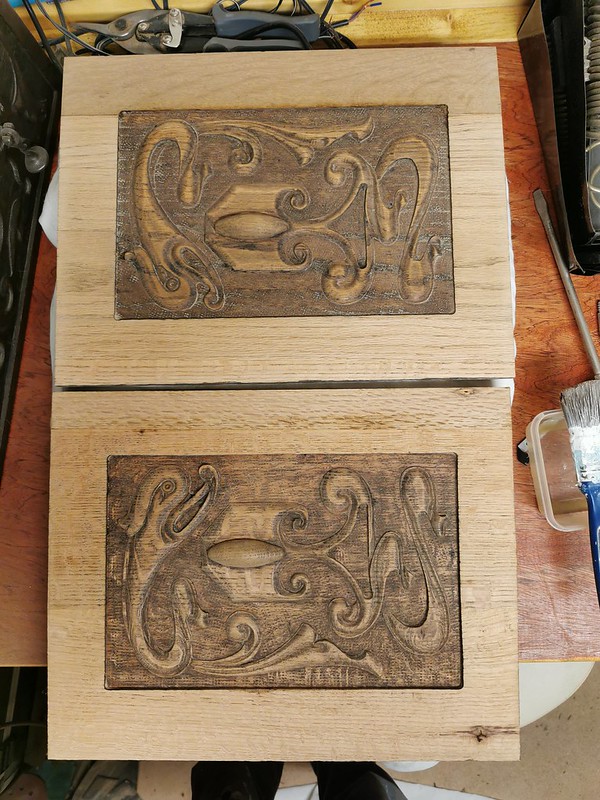
I then removed the carved panels from the top section and prepared them to go onto the side panels

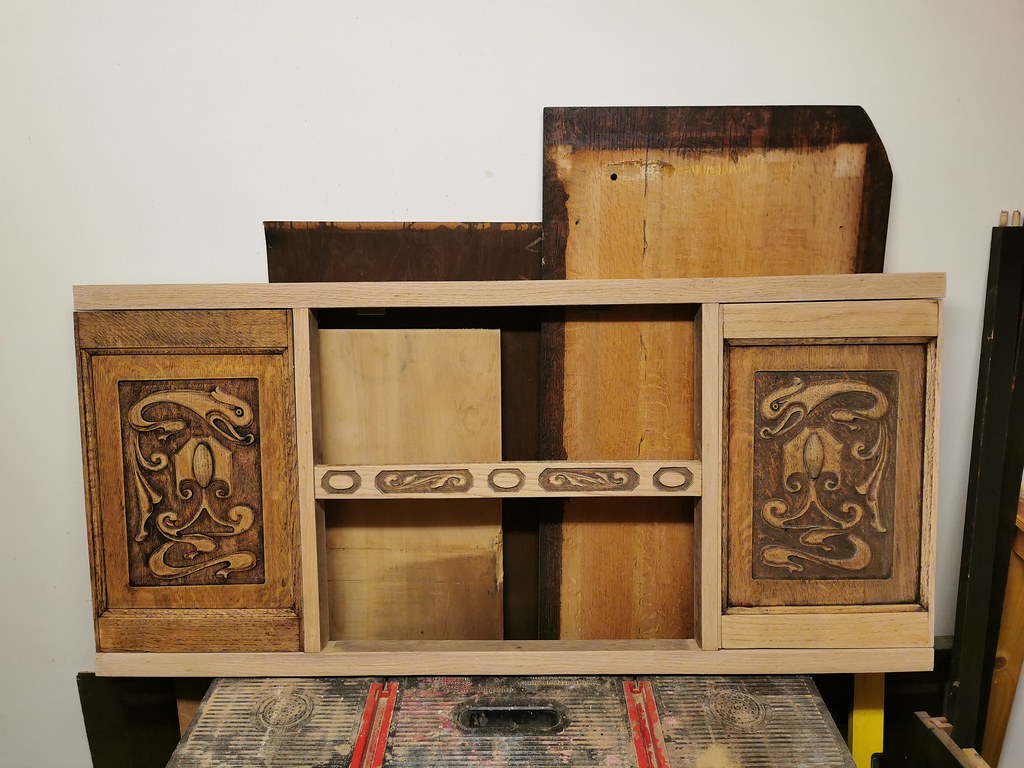
Did a test fit of the base (notice the carved side panel precariously held in place with offcuts
 )
)

Then secured the side panels and started putting the base back together.

Next job was the large top, and after cutting, removing the old varnish and a bit of sanding, it was ready to be attached


Next up was the back piece, precariously balance in place while working out the cuts needed

I moved the base into it's new home in the hallway to make space in the workshop
And then worked on the back piece
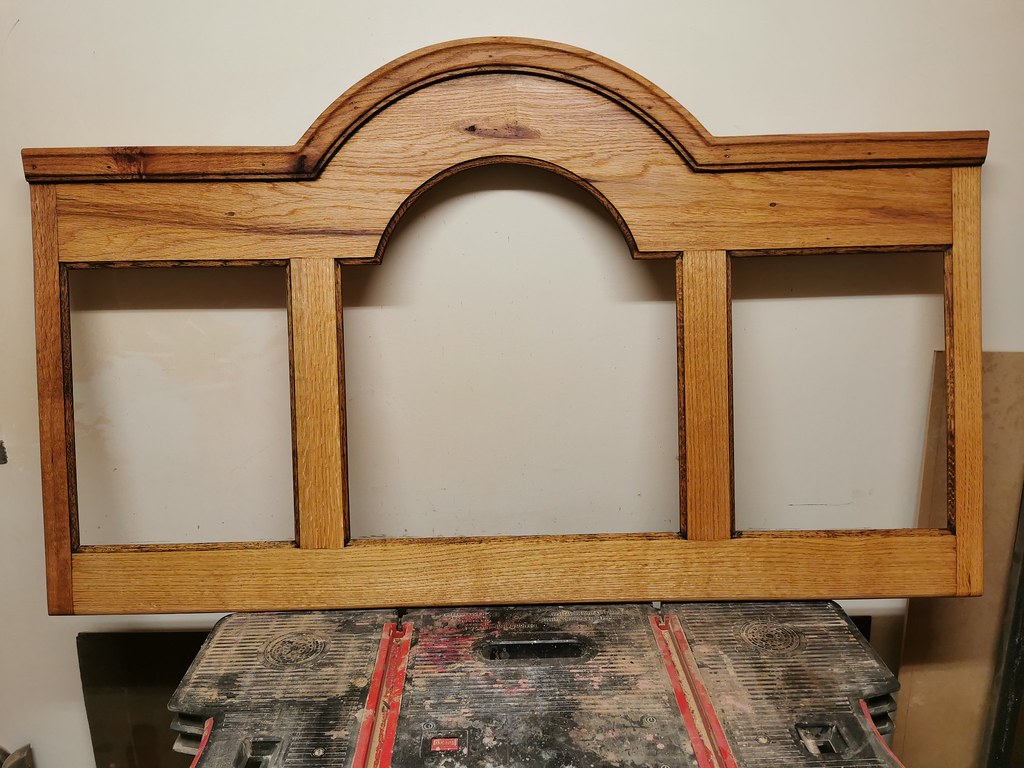
Tested in place

Then made some arms and secured everything
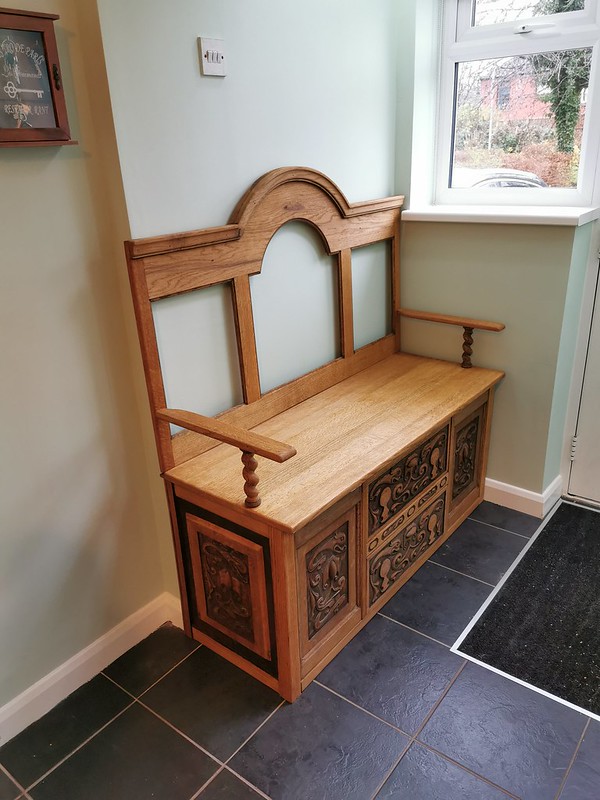
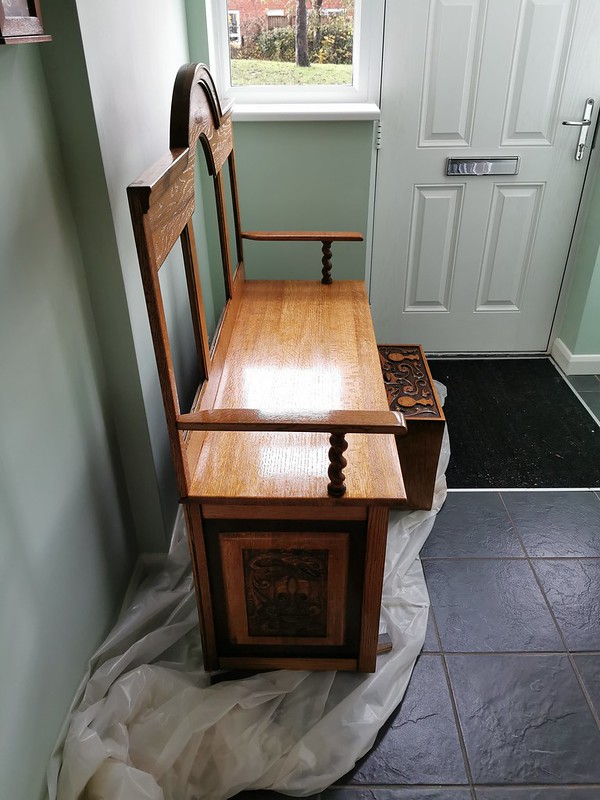
Next job was to Danish oil it all, which had to be done in it's new location now that it was all together...


After numerous coats of oil and allowing time for it cure, it was time to make the pads for the back.
I managed to find some William Morris fabric, which is in keeping with the time period the original piece is from, I cut some panels to match the shapes, used some foam padding and attached the fabric.
The finished piece -
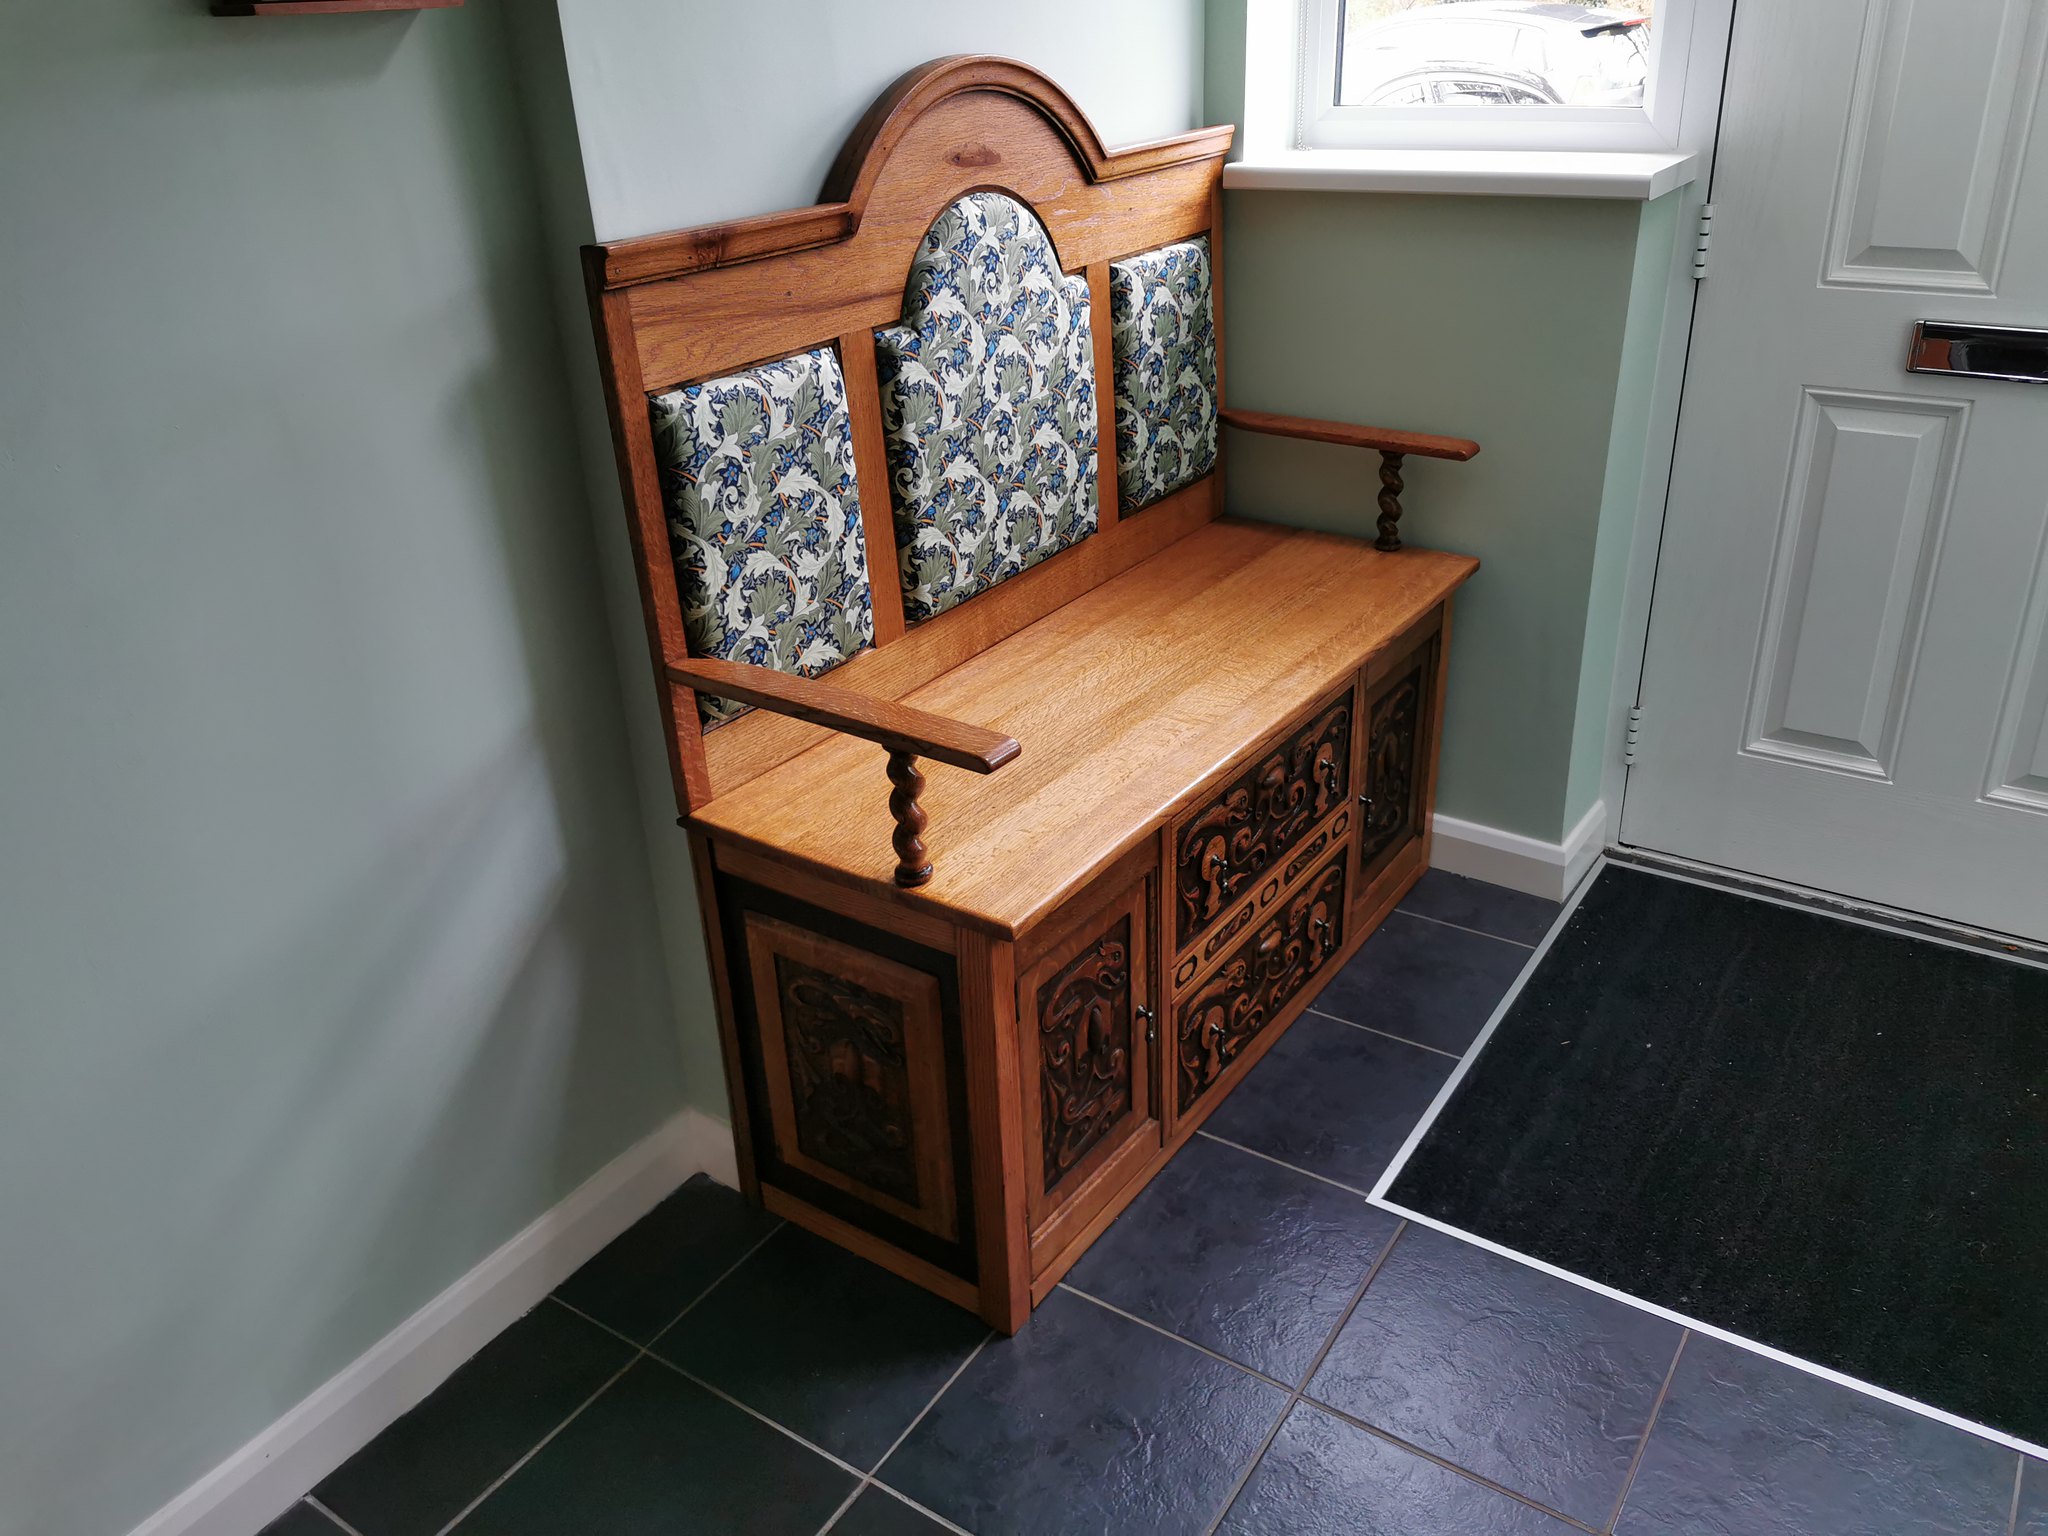
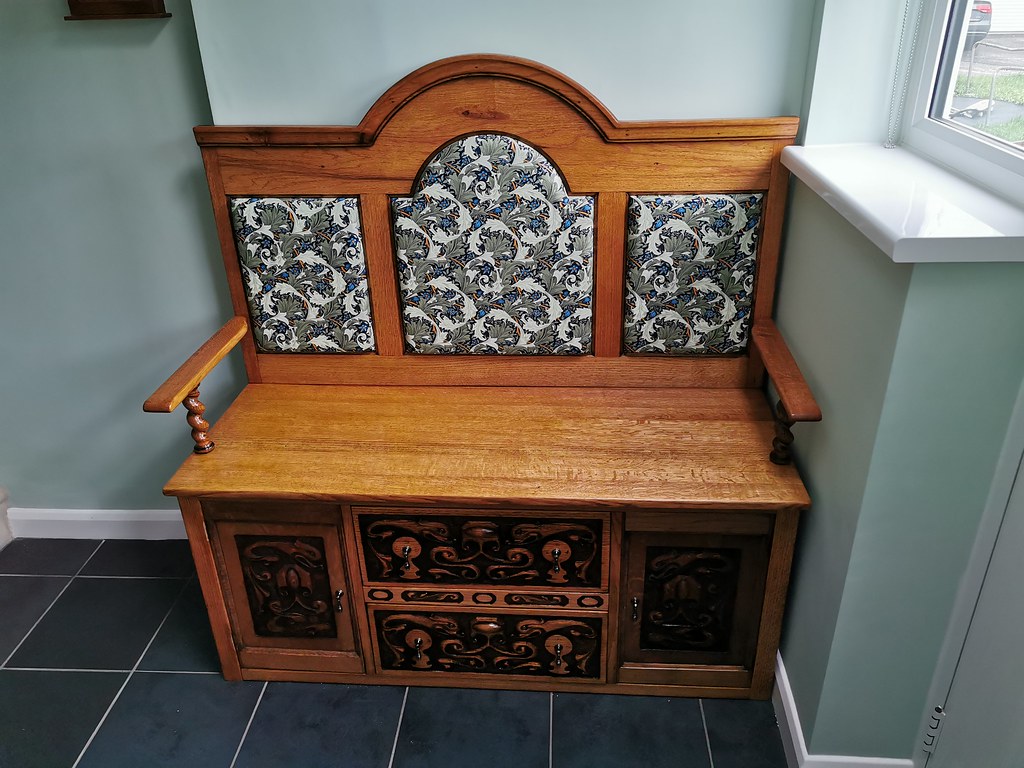
A lot of work, but worth it. The wife got her Christmas present and she is over the moon.
It is now known in our house as the treat seat, cupboards and draws are stacked full of goodies.

-
 1
1
-
-
After gluing up the poplar for the top wing, I sketched a rough outline of the shape

Then set about getting the excess wood off and getting some shape into it, leaving some clamping points which can be cut off afterwards
rough shape done, through neck cut close to size
Next up is cutting and gluing some pieces for the bottom wing.
-
1
-
-
Turns out the biggest pieces of wood from the piano are all poplar. The smaller planks are Ash and the trims are mahogany. I guess back in the day when it was made it was down to availability and cost.
I may double up the poplar and see how it goes with shaping, etc. before attaching to the neck. I do like the natural green and if it doesn't work I can get some other wood.
-
1
-
-
Thanks Mike, I have some other pieces to check through yet, I know they used Ash on quite a few pieces of the piano, it just finding some big enough.
If it comes down to it I will buy a nice body blank, but will see what I find first.
-
1
-
-
The oak table is a failure, cut a strip wide enough and found it is chipboard with an oak veneer, thankfully I didn't pay anything for it and will not mention it to the person that gave it to me.
Back to the drawing board and checking through my wood stocks from the piano for pieces wide enough for the body wings, I came across this under the mahogany veneer -


Not sure if you can see from the pics, but it has a nice natural green colour to it. No idea what type of wood it is, but it cuts well, seems very dense, has some nice grain patterns and machines well.
Anybody got any idea what type of wood it is?
-
23 minutes ago, mistermikev said:
looking fwd to some body shots (don't take that the wrong way).
Was just stripping off and getting my camera ready!

-
1
-
-
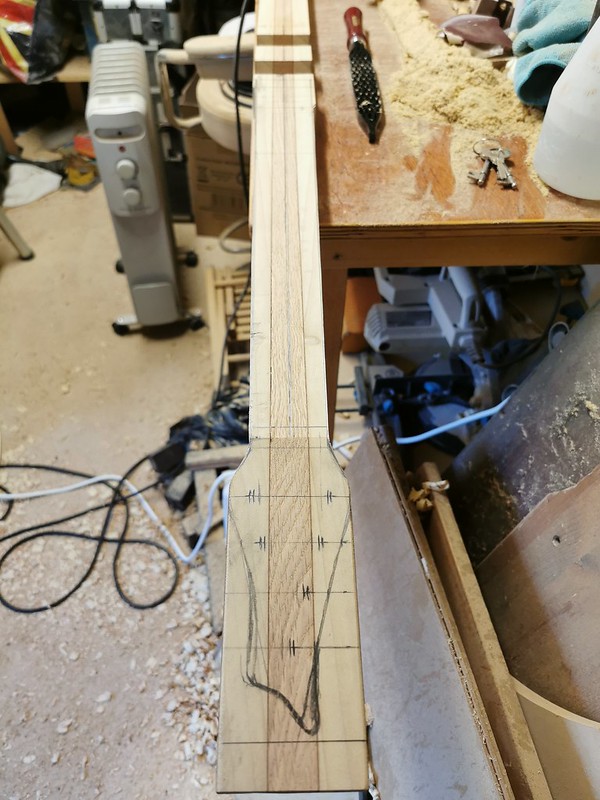
Volute shape finished from headstock side, will just need to be done on the neck side once I get the neck profile done.
Sanded to 400 grit and cleaned with white spirit. Will have another sanding once the neck profile is done and the other side is finished.


-
1
-
-
Just tested some tuners in and need to flatten out a couple of places around the volute for them to sit properly, but overall it is very close to the final shape, just needs a good sanding.
-
1
-
-
This will be the first Mockingbird guitar I have tried when it is finished... when I asked what guitar shape he wanted, he said he had always wanted a BC Rich Mockingbird and I had to google it.
Have made a couple of guitars out of Oak and so long as you get the weight relief right, it makes a very nice guitar with plenty of good tones.
Progress so far today...
Drilled the tuner holes and started shaping the headstock, still needs more sanding, but a good start.


And then got the volute and back face started.


Just taking a break for a little while to allow my back, arms and shoulders to recover. Then will try to get a bit more done.
-
3
-
-
Please excuse the mess in my workshop, should really get it tidied up, would make it a lot easier to find everything.
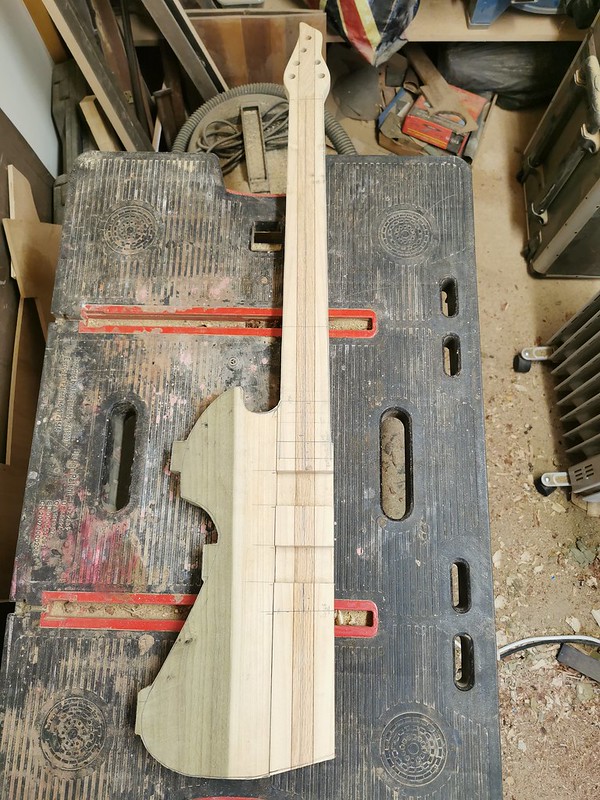
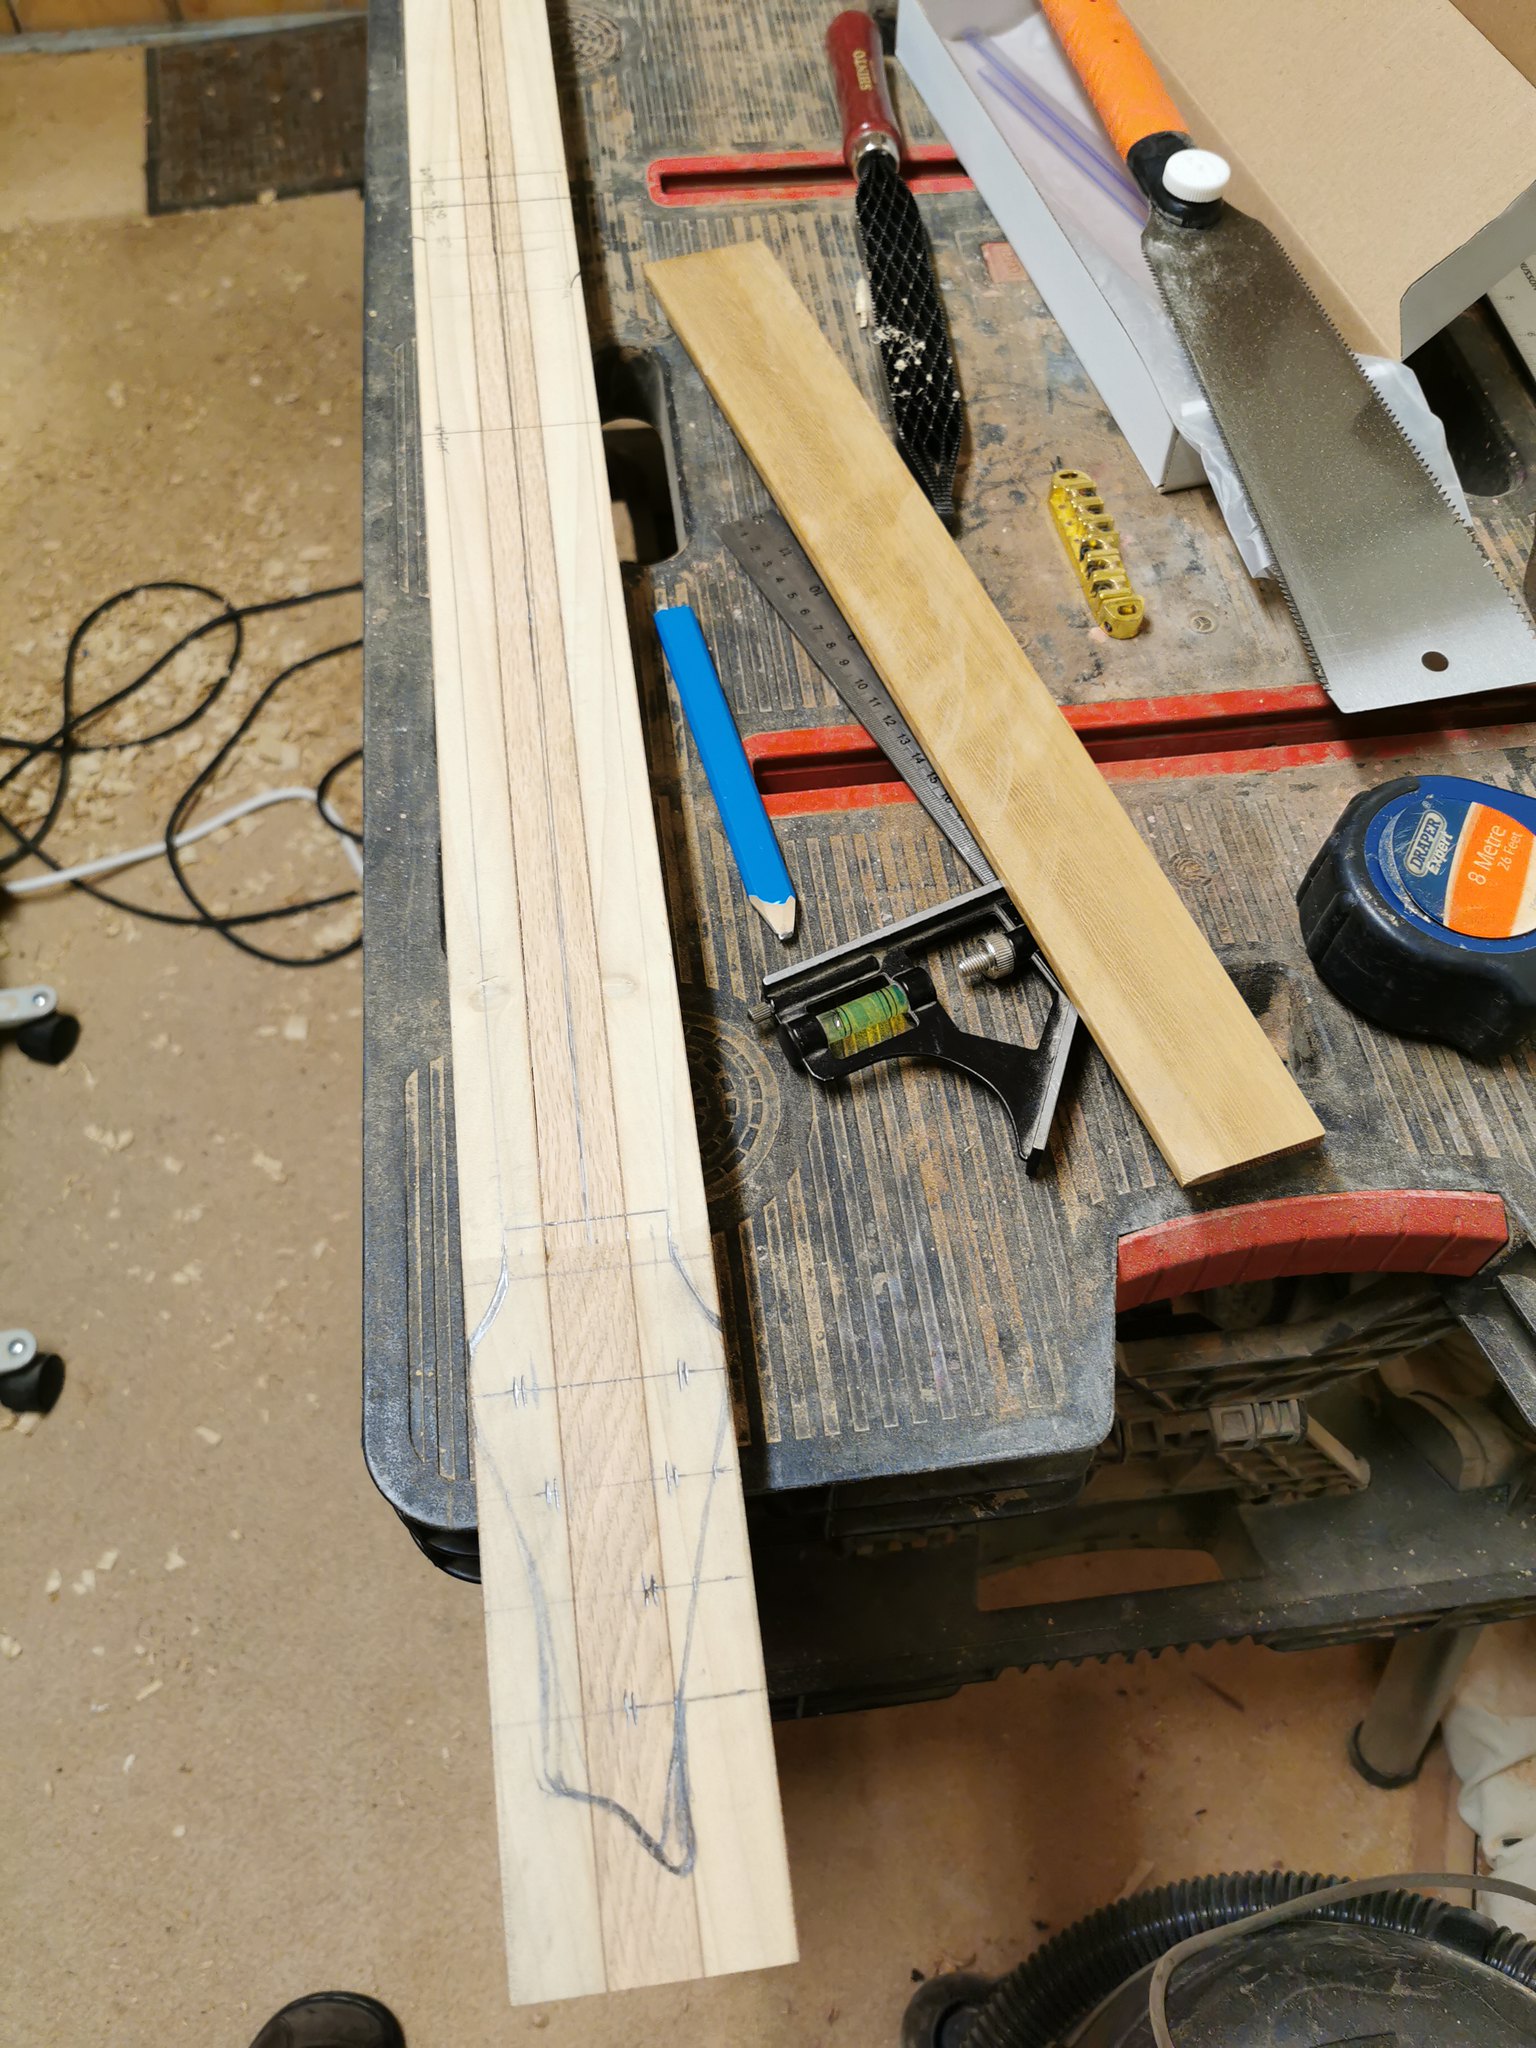
First job was doing the neck laminate, went with oak in the centre and Ash either side, I left the mahogany veneer on as well to give it a darker stripe between the woods.
It was then time to cut the headstock angle with my new Japanese saw that is a really nice addition to my tools. Makes light work of getting through the dense woods.
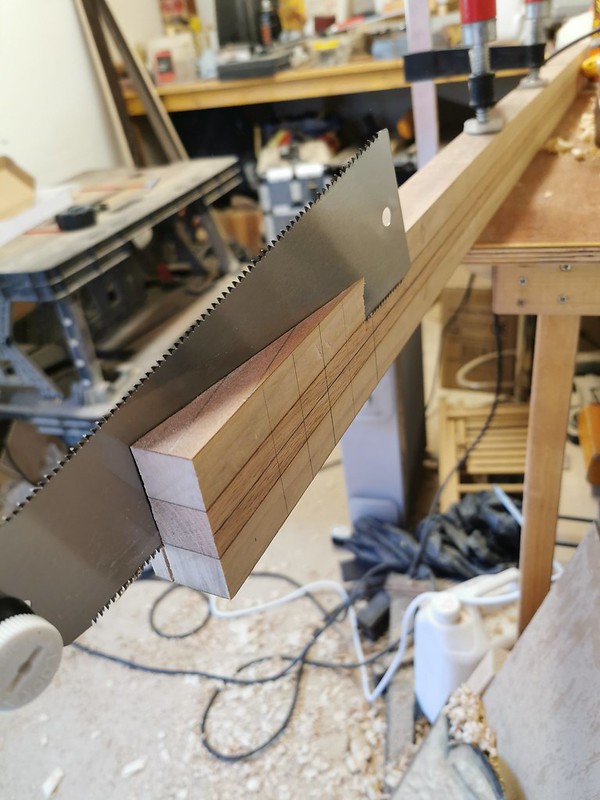
Then marked out the headstock and worked out the position of the tuners.
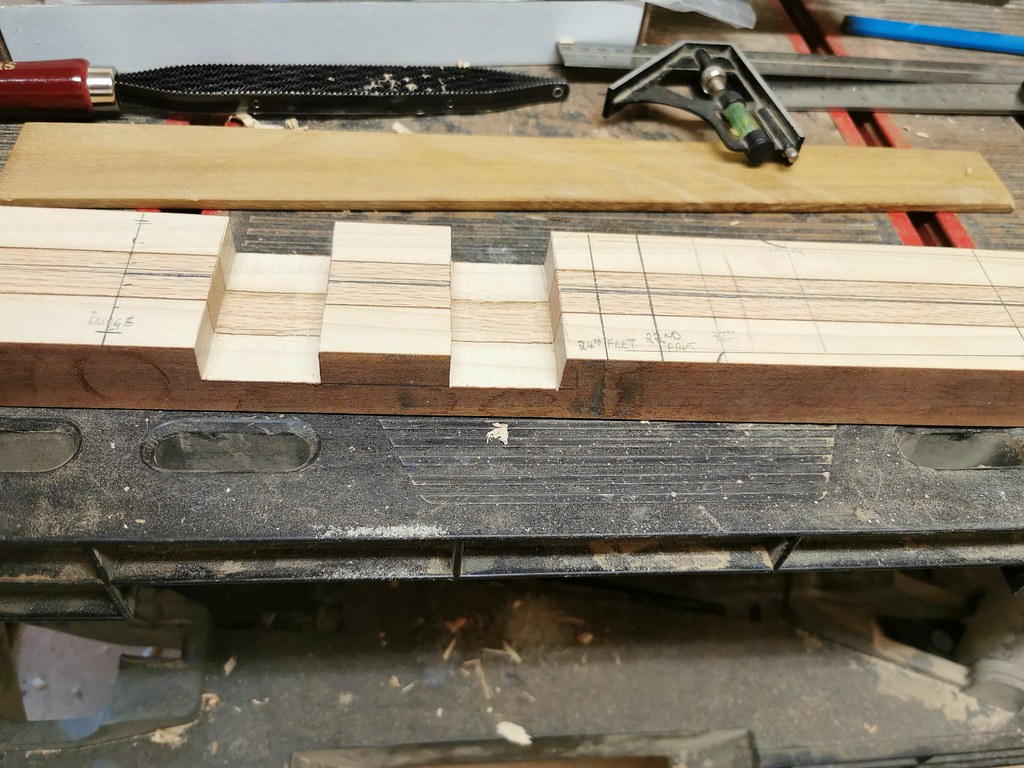
Cut, chiselled and smoothed out the pickup cavities. Will do the cavity side sections and wiring cavities in the wings before gluing them on.
Then started shaping the neck edges with the Shinto rasp, still amazed at how good they are for this type of work.

Then printed out the template for the body and checked the positioning.

Next job will be hefting in the oak table and cutting some nice pieces for the body wings. I will do some shaping on the wings, the neck profile and headstock before gluing the body on. Will also look at some weight relief options before gluing.
-
3
-
-
I'm back after nearly two years away from guitar building. Hand tools are out and at the ready!
Had a busy couple of years building an extension on the front of my house, replastering the front room and various other jobs around the place. Also had a lot of building/plastering jobs for other people that has kept me too busy to do any fun stuff.
Part of redoing our front room included disposal of our old 1930's double iron frame upright piano, which was badly in need of restringing/tuning. This is now in pieces in my wood pile, a nice surprise to this is that it has an Ash body underneath the mahogany veneer, perfect for guitars.
I have also been given an old solid oak dining table, very large and heavy, which will also come in handy for my builds.

All of which brings me nicely back to the present and a nice little project to get my teeth stuck into...
I have been asked to build a BC Rich Mockingbird inspired guitar and just started working on the through neck, which is multi-laminated oak and Ash (pictures will be uploaded shortly)
The body wings will be made out of oak (with plenty of weight relief!!)
Going with a 25.5 inch scale, 4+2 headstock, dual humbuckers and probably a wraparound bridge.
The Hardware is yet to be decided on, as well as the type of finish and fretboard material.
Looking forward to this build

-
Truly stunning Andy, looks and sounds amazing.

-
 1
1
-
-
That sounds really good.
-
1
-
-
Excellent work as always Andy.
Have you decided on what you will do with the end of the fretboard yet?
-
1
-
-
Just to clear up any confusion
7 hours ago, JGTay said:This was my 4th build,
I was building two other guitars at the same time, my daughters pink guitar which was shown in the build thread and finished shortly after this one and also the red one in my profile pic, which is still to be finished at some point in the future...
So the Oak hollow body was actually my 4th completed build

-
- Popular Post
Oak Hollow body guitar
This was my 4th build, I wanted to try something a bit different recycling the wood from an old oak wardrobe, carving out the hollow body by hand and having a go at making my own bridge, tailpiece and pickup rings. Very lightweight with no balance/neck dive issues.
Specs
Oak body, with a bolt on Maple neck and a rosewood fretboard and brass nut. 24 frets 646mm scale.
Oak bridge, tailpiece and pickup rings.
Wilkinson Machine Heads.
Wilkinson Zebra Pickups.
Colron natural Danish Oil Finish.
Build thread -


-
7
-
Congrats on the win
-
The mention of Swallows made me think of Monty Python -
BRIDGEKEEPER: What... is the air-speed velocity of an unladen swallow?
ARTHUR: What do you mean? An African or European swallow?
BRIDGEKEEPER: Huh? I-- I don't know that. Auuuuuuuugh!
BEDEVERE: How do know so much about swallows?
ARTHUR: Well, you have to know these things when you're a king, you know.
-
2
-
-
Coming together nicely, looks really good. The grain match is spot on.
Very impressed!
-
1
-
-
1 hour ago, JayT said:
Turned out awesome! Great job from soup top nuts, looks like it'd be fun to play too
Thanks Jay.
Bob really enjoyed playing it, he warmed up by playing some Steve Vai songs on it, pity I wasn't recording at the time...
He said the neck profile was very close to his PRS, slightly thinner if anything and the neck width was spot on. Also he was very impressed with the intonation and string height, said it made it very easy to play with just a light touch.
-
1
-
-
I asked Bob to do a few tunes on the Oak Hollow body -
-
1
-
-
Managed to pop round to my friends house today and asked him to do a few licks on the guitar. Once he had cleaned that off he played a few tunes...
-
3
-
-
Forgot to do the weigh in...
Just over 6.3lb

-
2
-
-
4 hours ago, ScottR said:
You snuck in some glamour shots while I wasn't looking! This came out very nice indeed. I particularly like the look from below with the wings all spread and the different levels on display.
You even captured some trees including a tiny one. I used to catch a bonsai every now and then myself.
Very well done!
SR
Thanks Scott, very much appreciated!
I am really happy with how it has come out and glad the shapes worked. Have to agree the pic looking up the body with the angles of the wings is my favourite part. I keep looking at it and thinking 'did I really do this?'
-
2
-


BC Rich Mockingbird inspired Through Neck
in In Progress and Finished Work
Posted
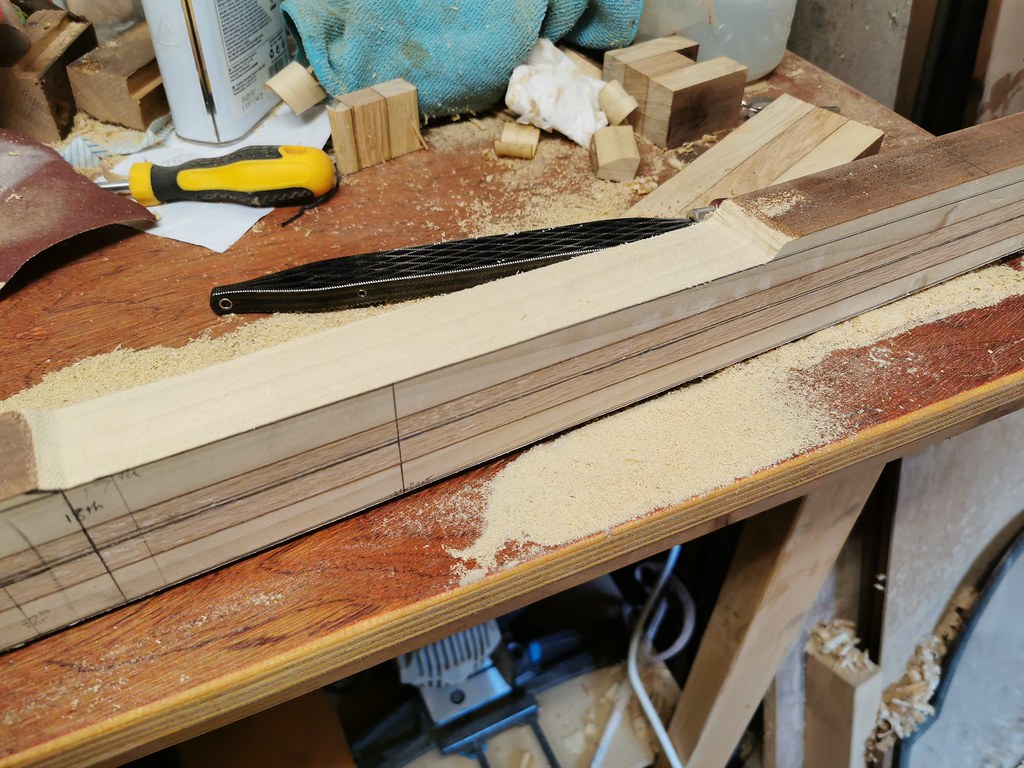
The good thing about doing the body in two pieces this way is that you can do the wiring and control cavities before gluing.
After gluing, clamping and leaving to dry for a few hours it was onto the rough shaping in, again leaving clamping points
The control cavity from the back
And all lined up.
Need to get some bits ordered before the next section, hopefully they will not take too long to arrive...