


al heeley
-
Posts
775 -
Joined
-
Last visited
Content Type
Profiles
News and Information
Tutorials
Product Reviews
Supplier Listings
Articles
Guitar Of The Month
Links and Resources
Forums
Gallery
Downloads
Posts posted by al heeley
-
-
Where did you post the link? I'd be interested to see that please.buddhist, I posted a link to a very informative podcast on finishing with oils and varnishes, it might be worth having a quick look as it'll answer many questions on application, and gives some great tips in creating a good finish. It also gives you some more names to look out for so you don't as Rick points out get a tung oil that never dries. -
Widen thr fret slots and superglue the frets back in- then the tension is relieved. To be honest, I'd be amazed if it retained a backbow once you had the string tension in there.
-
Made some good progress on the neck carving this evening. Sadly doesn't really show up well in the photo.
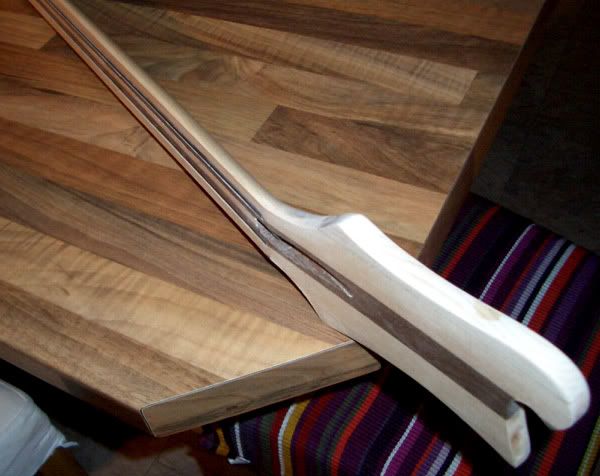
It's immensely pleasing to see a slim neck carve slowly emerging from a thick slab of wood.
Getting this done is a massive milestone in the guitar build. Once it's done, it's time to attach the fretboard and glue the wings.
Then she'll really begin to take shape.
Ric Pups arrived today, courtesy Rosetti London. Now waiting for the bridge pup mount ring and cover to arrive, which had to be sourced US-side.

Watched a 4003 bridge mount and cover soar to a ridiculous price recently on ebay. HORROR!
Been searching for a jackplate narrow enough for the slim ric body. Yet another non-standard item with all the UK parts shops selling only the Les Paul and Epiphone generic types, which are too wide. Luckily I have a friend who is a master of metalwork and has promised to fashion me a nice little chrome piece to fit the body.
-
I get my binding from Allparts
-
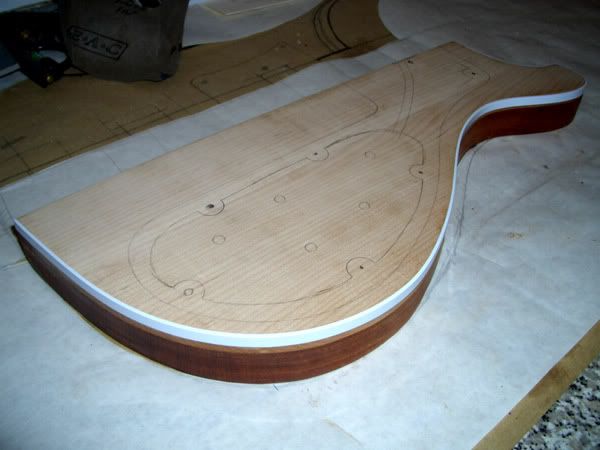
Finally got some time to get back to the bass build today. Here the lower wing has been sanded smooth, binding channel routed and binding glued and trimmed flush. MArked on the routing area for the ctrl cavity.
Work started on shaping the neck/headstock; a real apin without access to a bandsaw. Annoying Miscalculation with the jigsaw in cutting the headstock to thickness means its now a little thinner than i would like before final sanding, and there's a bit of an ugly gouge out the back. Maybe I can glue on a 2mm laminate to get back up to thinckness before drilling for the tuners.
-
Thta's really rather neat, though I'm not sure of the relevance of the Nano- jumping-on-the-new technology-bandwagon-for-increased-technical-credibility bit.
-
Another possible solution would be to try twisting the volume knob on your amp anti-clockwise if the output seems a little loud, and vice-versa if its too soft. Saves having to spend $300 on a pedal you don't really want. I understand this sort of output reguation is quite common in music amplifiers.
-
http://www.asrobotics.com/products/nanomag.html
Interesting, seems it powers itself and has build in video cameras. Epiphone are getting surprisingly advanced.
-
-
Neck-thru ric 4003 replica build: when to bind?
I am working on shaping the neck. the body wings are just about finished but they are not yet jointed to lie flush with the neck block.
I have routed the channels for the binding. The maple cap will be primed then painted.
Is it too early to fix in the body binding yet? Should it be done after undercoating or painting? Should I wait and get the wings propoerly joined, butted up and glued to the neck block first? Not sure what the proper order should be for this. I don't want to get paint in the routed binding channels but presumably if I fix the binding in first I can scrape the paint off the binding with a modelling knife?
-
Rosewood is not supposed to need a protective finish like varnish. I have an old tiny tin of fretboard conditioner [number 1 fingerboard oil] meant for cellos and violins. It's some sort of resinous mix like linseed oil with lemongrass oil in it as well (it says on the can...). It's marvellous stuff to sink in and nurture the wood though it darkens the appearance it doesn't leave a gloss coating. I use it on all my non-maple fretboards once every 6 months to recondition them. I love this stuff and will mourn the day the can's finally used up. I've had it maybe 12 years now and have no idea if it's still available.
-
masking tape to stop the drill bit skidding, prick the hole first with a very sharp bradall. make sure your drill bits are really sharp.
-
Good post. I think there's a lot to be ssaid for the 'small steps' approach. i started by building a strat off ebay parts - ebay body, ebay strat neck, ebay pickups, then reckoned I could do my own body from a blank billet and fit it with an ebay neck.
Then it went to chambered body/maple cap/ebay neck, and a few more builds before trying a neck-thru design from scratch, radiussing and fretting the fingerboard, etc. These steps allowed me to learn about the tools and techniques needed and to gain confidence.
Next step for me will be a set neck guitar, then one which would represent a unique design rather than copying a PRS/LP/whatever. Still a long way to go.
-
Is this a bolt-on neck? If so you could place a thin shim in the neck pocket then loosen the truss rod a touch, this will help rais eaction at the lower end and give you more acceptable action above F12.
Sounds to me though that it's the nut that needs a little shim, and we're probably only talking less than 1/2 a mm.
-
Hey that would do it, switch down takes the easy route (bypass) instead of going thru C1.
middle pos'n routes thru c1 and up goes thru C2.
Perfect! Manya thanks for the input - thanks for bearing with me Joe!
-
OK thx, we have to back to the start then now you fully understand what it is I'm trying to achieve. Sorry I was not able to explain better at the beginning. Thank you for your boundless patience.
I want to try and achieve the vintage switch option using a 3-way toggle as a standard push-pull will not fit within the shallow body cavity that is a Ric bass.
And since I have a 3-way dpdt switch I want to see if it's possible to add a second cap option so the bass cut is not so severe. I need to retain the bypass so the full bass sound is still available and I'm not in the slightest bit bothered how you would prefer to call the bypass, series, parallel, in, out, whatever.

-
Errrmm...yes. Have a look here - its the schematic for the ric4003 with push-pull vol pot to switch in a small cap in series between the vol and tone pots. (The 'vintage treble tone circuit').
http://www.joeysbassnotes.com/TipsPics/400...TC%20wiring.pdf
What I wanted to do was put in a 3-way toggle switch instead of the push-pull so I could then add a second different value cap which would then give me access to 3 tone ranges: no extra cpa, extra cap value 1 or oextra cap value 2. I think with the Myka diagram it should work fine.
-
That's a lovely looking bass, must have been quite a build getting the 3 sets of strings on, but I know what you mean - very tasty bass but not really a ric, just the same body shape.
-
Yep, it's the big characteristic bridge, the pickguard shape, the white binding, the chrome bridge pickup cover, that make the Ric 4001 & 4003 the iconic bass instrument for me. These are it's defining features. Lose any of those and it just doesn't push my buttons.
-
David,
Thanks to you for solving it for me!
-
Thanks Myka, that's just what I was after - I really could not get my head round it.
No it isn't, it's similar - JA's scheme gives no bypass.This is just like JoeAArthur saidBut I want to use this without bypassing the tone pot completely, I still plan to have a 0.047uF cap in with the tone ctrl but this switch will add in the option of 2 different low value caps in series as well. Thx for the clarification.
-
Rick: Yes I confirm you are 50% misunderstood.
2 caps in series is no use! I want the three positions of the switch to give me:1) bypass (no caps)
2) Cap1 selected (0.0047uF)
3) Cap2 selected (0.0022uF)
JoeA: when i say a bypass, I do not mean a bypass of the tone pot, i mean a bypass of C1 and C2.
Your diagram of 'no cap selected' (the switch 'Down' position) does not compute with your earlier post - switch down would give you C1.
-
This would not work - from your diagram the middle position and the lower position would both route the signal thru cap1, there's no facility for bypassing both caps. This is a conventional 6-lug DPDT on/on/on switch we are talking about here. Con 1 has to find a route through to con2 without passing thru a cap. Go to the back of the class and read the question properly please.
-
I have a DPDT 6 pole on/on/on type switch - the sort I've used before for wiring series/parallel/coil tap options, but I want to use it for switching between bypass (no cap), cap1 (0.0022uF) and cap2 (0.0047uF) in series before the tone pot, to give a gretsch-style tone option (nice, muddy and muddier...)
Can I do it with this type of switch?
Yes.
how?


Transparent Cast "air Coil" Pickups
in Electronics Chat
Posted
Yeah! Neodynium rare earth magnets rock! But don't necessarily guarantee virtuoso tone or performance. They look cool but I think the cost is what really puts me off.