


Vinny
-
Posts
324 -
Joined
-
Last visited
Content Type
Profiles
News and Information
Tutorials
Product Reviews
Supplier Listings
Articles
Guitar Of The Month
Links and Resources
Forums
Gallery
Downloads
Posts posted by Vinny
-
-
Great work Blackdog, I look foward to seeing this one come together. -Vinny
-
Nice build Dean, looks like you really planned this all the way. I look foward to seeing more progress. -Vinny
-
Update: Believe it or not, just last week I went to set up the planer on a stand I made and noticed the lower housing was Cracked! Oh Crap! Im screwed big time, no way are they (Rockler) gonna help me some 4 months later. Well, I called and guess what, 4 days later a new one arrived (not cracked) and they included shipping paperwork to UPS back the damaged one. Great customer service in 2007 when it seems companies are getting more frugal, the employee I spoke to must've apologized 4 times for the mis-hap, She said Delta will take it back so its no problem. Im a happy camper and will continue to buy from Rockler. -Vinny
-
Great info from Rich & Fryovanni, Thanks for posting. -Vinny
-
Funny thing that this topic happened to come up as Im about to clamp down a 3/16 birch ply top on my ES175 style hollowbody. Ive been looking at the arch I have in the center block and Im worried that It'll split the birch when its clamped down. The ply bends great with the grain, but across the grain it wants to split easily. Add to that the fact that the body's kerf-lined edge is flat across, so this birch will have to do a helluva dance to stay glued down. I see no other option but to reduce the arch to the bare minimun. Its a trade-off for not carving a top in the traditional way, but thats okay. I really want get on with completing this one and move on. -Vinny
-
Nice Build! Im diggin Les Pauls and plan to build one after the Tele's finished. One thing Im curious about is you drilled the bridge holes before the neck/fingerboard was fitted, will the scale length land in the right spot? -Vinny
-
Hello and welcome, Hopefully you mean you'd like to install a tremelo on a guitar and need advice on what brand to purchase? I understood your post as wanting to scratch-build your own tremelo system which I cannot see doing. Please elaborate a bit more -Vinny
-
Hi Woody and welcome, I dig Les Pauls myself and plan to build one (a goldtop) next year. Though I tried to grasp the method you described to get the neck angle, I honestly couldnt wrap my brain around it. Maybe its cause Ive seen simpler/safer methods posted here. I pulled up a batch of photos I saved that were posted here by a member. Im sorry to say I dont recall his name to give him credit. He posted pics of the build up along with some great jigs. Use the search tool and search 'Les Paul' in the Work in Progress section, you'll find some great stuff. Heres the pics I mentioned. take care, -Vinny
-
I pulled this up in the search function at the top/right of this page. The Vintage page has the story of the making of the original Cracked Mirron Iceman, its a good read. Hope it helps -Vinny
http://projectguitar.ibforums.com/index.ph...l=iceman+mirror
Heres the 'making of' story:
http://vintageibanez.tripod.com/psmirror.html
Search 'Iceman' here and a bunch of posts come up.
-
I have that particular B&D, the small nose is useful, however its only a single speed and can bog down a bit. -Vinny
-
Hi Sam, good to have you here. -Vinny
-
Wow, I remember seeing the first posts with your drawings and now its ALIVE!!! Very, very cool ! -Vinny
-
I realized this should've been posted in the Hollowbody section, Mods please move as needed, sorry, -Vinny
-
I picked up a few 24x48 sheets of 3 ply birch, 1/4'' thick and nicely finished (Home Depot). I thought they'd be good to use for tops and backs for a hollowbody archtop project Im working on. I've seen other builders here use a similar thin plywood and clamp/glue down onto their body to form a hollowbody. The wood looks promising with decent grain but the one thing Im not crazy about is the Red hue of the birch, Can this be bleached out and turned back to a white-ish wood color? If it can be done I would appreciate some advise. The color I plan on for his guitar doesn't include red. Has anyone come across other lighter natural colored finished thin plywoods? Im not too crazy on the idea of hand-carving a top. Thanks, -Vinny
-
The guys at Reranch seem to have it figured out, their site has step by step instructions for an inexpensive spray can paint job.
-
My experience is just 2 necks so far. I hammered the frets in on my first, I didnt have a 'feel' for it at the time so I didnt seat some enough and over-hammered some others. On neck #2 I got the Stew Mac 12 '' radius caul only and made a holder from hardwood. There is a satisfying 'crunk' sound that you hear when the fret is seated. I found the caul's perfect radius left small contact gaps at the fret ends, probably cause the frets were overbent. Like what was mentioned above I may get a 10'' radius caul and use both. I still had to tap in the ends to fully seat them, this was with my fret tangs cut back so that may be why the end stayed high. Still learning but Im happy to have both a fret hammer and caul to use. I think I'll put a support block underneath the press table just in case. -Vinny
-
Nice Build you got going there. On the first fingerboard I glued down, I read a tip here that said to shoot 2 staples into the neck, one at each end along side the truss rod channel. You snip them back so all that remains is 2 sharp little pins, align the fingerboard an simply tap down. its locked in place and wont slide around for glueing up. -Vinny
-
Looks good Davis, at 1½'' thick would you consider it a thinline LP? Do you plan to add binding on the body or neck? -Vinny
-
Oh well, back to the drawing board.
 -Vinny
 -
The replacement blades (Dremel part #546) are about $7 each US. They have a .023 inch kerf, which is perfect for slotting but are a cross cut style, the tangs flare outward the tiniest bit, therefore the need to lightly sand down the side edges. -Vinny
-
Tonite this hit like a lightning bolt, I've been trying to come up with an idea for a shooting table to do fret slots. The stumbling block has been the .023 kerf saw blade (I know, I know, why not just buy the blade stupid, right?) I wasnt crazy on buying a $70 blade and having to swap out blades from my table saw and go thru the set up every time I wanted to slot a fingerboard. I really wanted a small dedicated power slotting table. A couple weeks back I picked up a saw attachment for my Dremels (part#670 paid$20 US), I didnt have an immediate use for it but it was too cool an attachment to pass up, it looks like a micro circular saw with a spring loaded blade gaurd. It threads onto the nose of a Dremel in about a minute's time. The saw housing is not perpendicular to the Dremel but is angled maybe 15 degrees so you can make a 90 degree cut and the main body of the tool isnt hitting the board you're cutting. So I opened the package tonight and looked it over, I held the tiny saw blade in my hand and thought this is really close to a fret slot's width. I mounted it up and made a test cut on scrap that I compared to a pre-slotted fingerboard. It was close but a hair too wide. I then took a piece of 180 grit paper and lightly scuffed down the side edges of the blade, sanding back the alternating sharp side edges of the cross cut blade. I then put the blade back in the saw and BINGO! perfect fret slots! I hammered in some fret wire and its nice and snug. So my plan is to mount the Dremel under a small table with the blade coming up thru a slot and slide my fingerboards over it on a typical slotted track. I'll post some pics of the shooting table as it comes together. Take care -Vinny

-
I gotta agree with Mikro, the water in the water based stain will evaporate. If you raise the grain in doing this, simply sand it back down. -Vinny
-
all i really wanted to say is that your guitar is ugly...
I'm sure it's beautiful on the inside...
Good to have you here Ibanez, your guitar is coming along nicely, keep posting pics of your progress and join in. The people here are always willing to help. -Vinny
-
I bursted the top last week after adding the white binding. First I used black aniline alcohol based dye and sanded back a bit in the middle. Then the blue stain I used was Minwax water based wood colors, the blue wound up more like an ocean burst which is kinda cool. I may spray black around the outer perimeter to add more contrast for the white binding. Its coming along well, I still have a bit of finishing to do on the headstock and I'll be spraying the Sherwin Williams Conversion Clear on the first warm day we get in New York. -Vinny
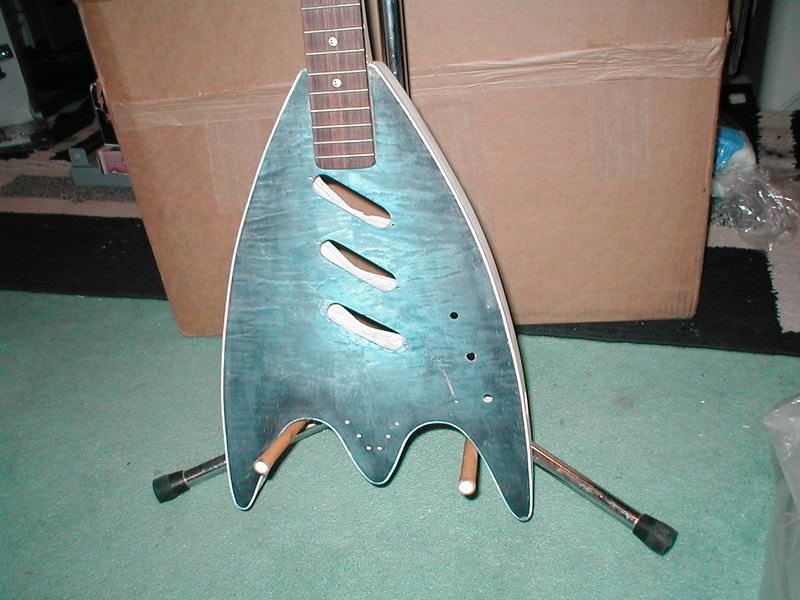
 -Vinny
Interesting Projects?
in In Progress and Finished Work
Posted
Wez, I nearly spit my coffee all over the desk when I read that! -Vinny