


oz tradie
-
Posts
365 -
Joined
-
Last visited
Content Type
Profiles
News and Information
Tutorials
Product Reviews
Supplier Listings
Articles
Guitar Of The Month
Links and Resources
Forums
Gallery
Downloads
Posts posted by oz tradie
-
-
Welcome to the forum UNIT.
Have you tried a search through previous posts?
Can't help you with the Qld maple as I'm in Victoria and can't find any merch joints that stock it.
(btw I've got an acoustic em325 LH Maton and a Mastersound 200dlx LH in Qld maple with tas oak flame top.) It's healthy to be patriotic.

Can you get blackwood close to you. That is definitely worth a look at.
Seeya,
Stu
-
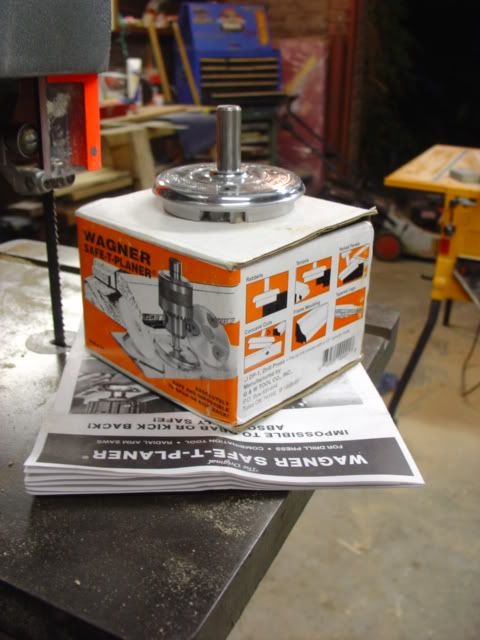
G'day Jon. The maximum width of cut you get with the S-t Planer is 70 mm or close to 2 3/4"
If you buy or have a Stew-mac branded block, it is the same width as that.
It is possible to double that to get at least a 5" block, but it wouldn't be easy as you'd be running two separate tracks/passes and trying to marry both of those up to make one huge radius. It can be done though. Just takes extra time on the angle setup and fence placement. (You would have to set the angle on 2 axis/planes instead of just the one)
And Brian, It's always good to inspire someone to buy more tools quicker.
and by the way, the pedestal drill was cranking at -/+ 2800 rpm for all feeds.
cheers,
Stu
-
+1 to the smaller bevels.
What's the story up the headstock end? any ideas yet?
-
I think you've hit your groove with this one
Frequent updates pics required.
-
Here's an example of a V-joint.

-
Allrighty, Matt.

I'm looking forward to the technical data when it's ready. Just use words no bigger than 2 syllables.
The divergence issue does interest me greatly, as it could be a useful thing.
Stu
-
Question for the more math minded: is this actually a circular radius you're getting, or is it actually an elliptic shape?
There is no doubt at all that it is technically an ellipse. As you turn a circle( in this case the safe-t-planer)from being on edge,
to front on, it goes through a dramatic change in shape.
Pretty much from dead flat , to varying degrees of elliptic contours until you are face on to the circle.
Now this is the interesting part. How close is it to circular at a 12" radius is something the maths-heads can
work out.
Matttheguy seems pretty interested in running some sums for us.
I also wonder how much change to an ellipse is also governed by how 'front on' to your angled cutter you
are? ie. if the cutter is angled 5 degrees toward you, but you take a slight cross-angle to it, I would bet that would also change the ellipse as well.
I'm curious as to how close it will be , as I really can't tell the difference from the 12" template block used.
I'll stop here as my head was never made for intricate thought patterns.
cheers all,
Stu
-
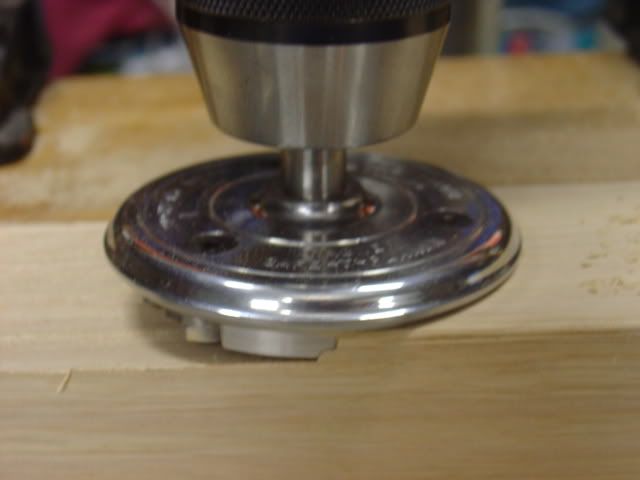
If you could, oz tradie, give me the radius of the whole disk itself, from the center to the outer edge of the cutter when extended, that would be great.
You can get a 70mm width of cut, so radius would be half that.
The exact thickness of the stew-mac blocks, funnily enough.
-
I had to admit I got kind of excited when I tried it out for the first time and it actually worked.
Thanks for the links to pics conversion, Setch.
I was aware you could use extra pics in a tutorial, but was loath to go overboard and annoy everyone with too many loading up all at once.
Chris, I don't think lack of drill speed will be a big issue. It just means a bit more time on the feed through.
cheers,
Stu
-
This is another way of making your radiussed blocks in any length and any radius profile using this tool.
This must not go unsaid: Not for use in a router.......ever Pedestal drill only peoples.
Now, if you've got one of these babies, I thoroughly endorse rereading the safety instructions you got with the planer. Use it as a bible and you may keep your fretting hand intact.
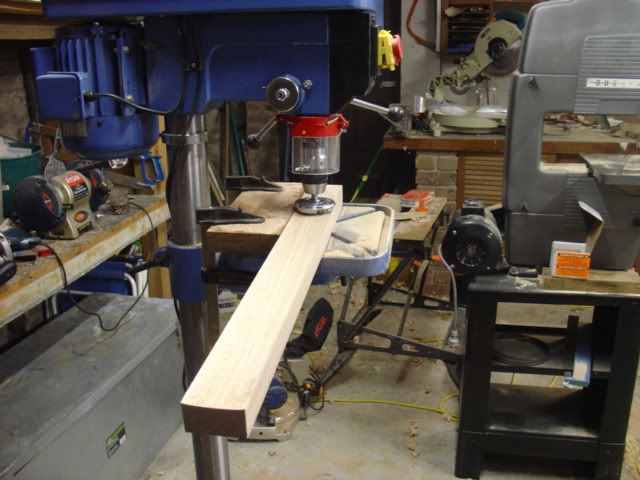
Now this tutorial will show you the steps I took to create a two foot long 12" radiussed sanding block in under one hour. (this time include my set-up,taking photos, cracking a beer and a bit of sanding,too.
I would just like to clarify that this was done on a heavy duty 18" pedestal drill and I was very surprised at how easy this thing was to make. Game on.
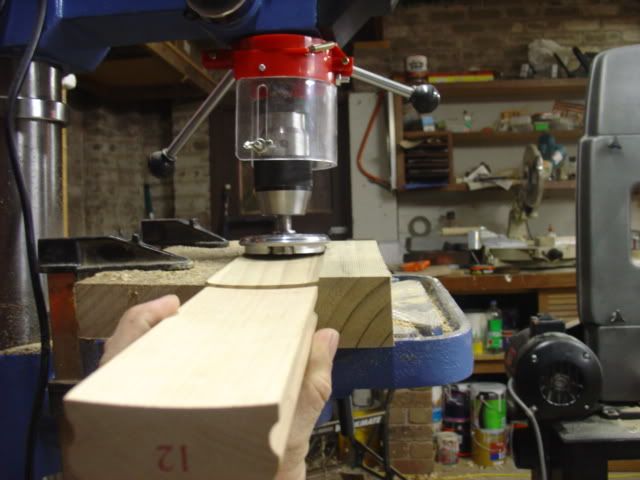
The first set up stage is to clamp on a guide fence of sorts. No real mystery there as you want to get a full arc of cut from the blades, but also use the fence as a stabilizer as you slide from right to left with your
'soon to be radiussed timber'. (Is that a hunk of blackwood used as a guide fence? w.t.f.?)
The guide Fence:
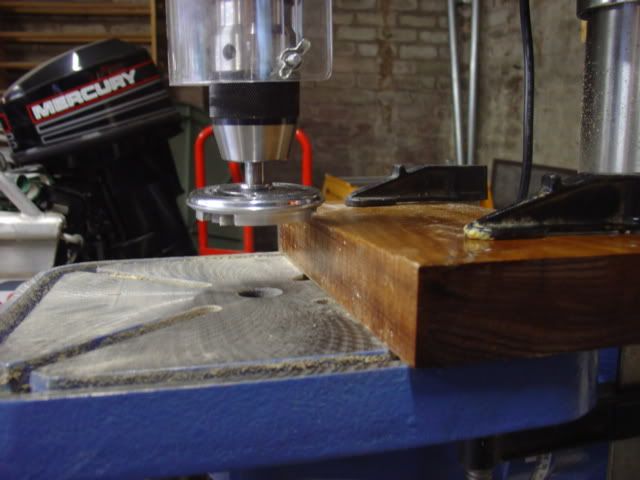
Next is the most important part where , in this case, I'm using a radial drill and I'll be pivoting the workbench on angle to produce a 12' radius cut in the workpiece.
For this, I had a Stew-mac radius block as my template and it was all done by trial and error over no more than ten minutes. A scrap piece is handy to use until you've got the right angle. And finding the right angle is easy if you have radius gauges, or make your own up. Me...........I used the Stewmac block
I found my perfect angle for a 12" radius at bang on 5 degrees. (My drill shows increments in degrees.)
And more importantly, the tilt is to the left side downwards, right side up.

Now, would be a good time to set your depth of cut by offering up the workpiece to the blades and moving the bench to suit. Don't plunge down to change the cut depth The maximum depth for a smooth plane is 1/8" deep, with lesser amounts providing an even smoother result. (For a 12" radius, you only need 1/8" depth of cut overall for a good, fat profile)
And remember you can do alternate passes and take a little more out on each pass.
The shallower the pass the smoother the result.
The first pass:
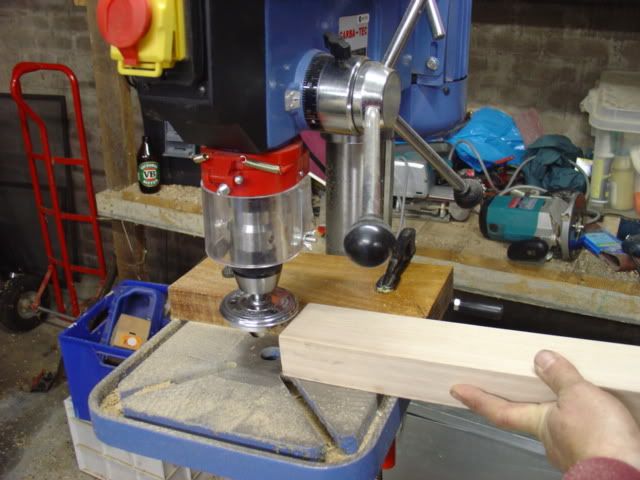
Now, back to the first pass. Feed your workpiece from right to left , while being mindful of those huge
blades are invisible when spinning.
A nice easy feed is all you need, and you'll find it extremely easy to get a good result providing you keep the workpiece solidly on the bench and against the guide simultaneously.
Just repeat this until you're happy with the last plane. That's it, really.
And now a few more pics.
A light feed through:
As a precursor to making this sanding block I cut a piece of Tasmanian Oak to 2 1/2 feet long
and used the extra 1/2 a foot as a safety device. ( something to hold onto, really)
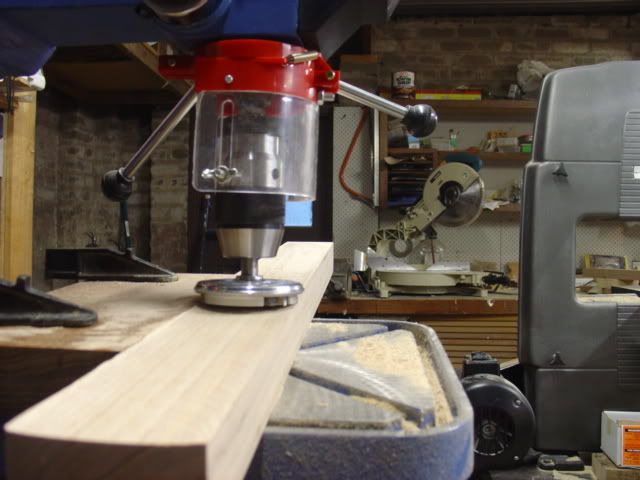
Afterwards I just cut the excess off and was left with a solid 2 foot sanding block.
after routing the top:
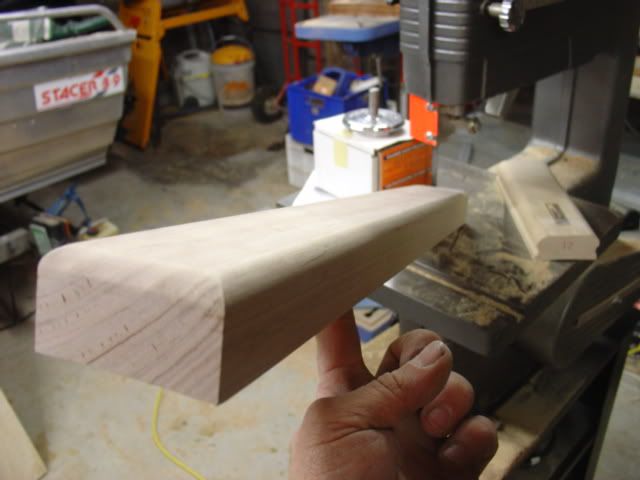
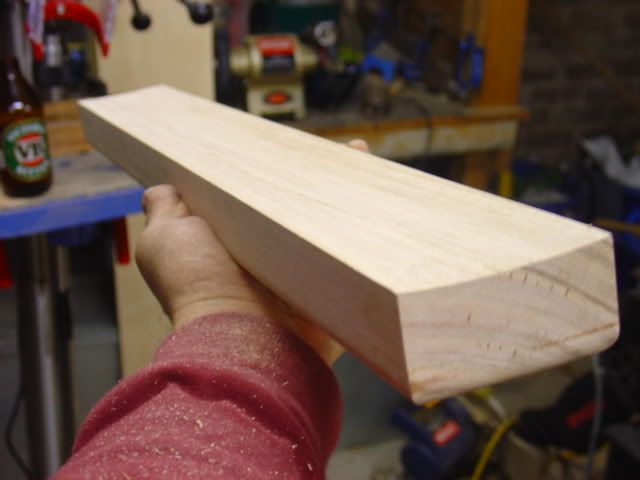
All done minus a bit of fine sanding.
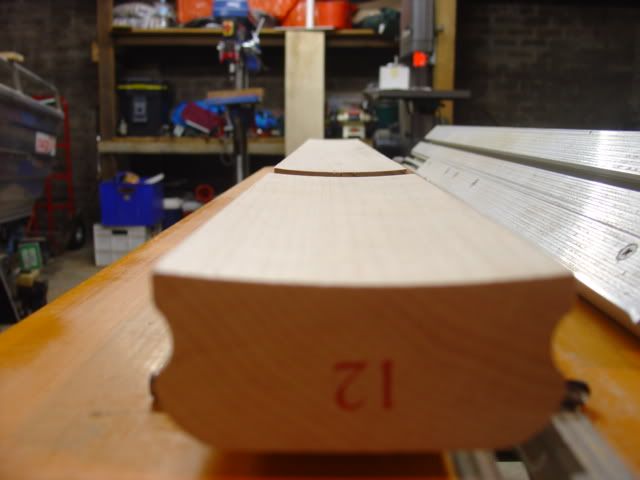
The Stew-mac block in the foreground, with the new 2 foot block behind it. Matching radius.
Hope this helps someone, somewhere. Cheers all,
Stu
-
Working out the radius is all done with a radius gauge, either bought or made as a template.
Or you can work straight off another sanding block as I did. (p.s. made a 2 foot long radiused sanding block on the safe-t-planer and pedestal drill no more than two hours ago.)
Enough of that for now.......... just in the process of colating photos and the appropriate wording
for a tutorial on that subject.
It Should be fairly useful. I got my pedestal drill from Carbatec. You'll see it in action on a future post.
No regrets there.
-
attempting to post a pic of a stew-mac 12"radius block and a freshly cut one on the safe-t-planer.
If I learn how to post the pics I'll do a tutorial tomorrow. Please bare with my lack of technical skills.
bugger. what's the magic formula for pic posting?
just joined photobucket.
-
O.k. I've just been out in the garage and produced a 12" radius block 12' long in one minute.
that's right. one minute. (Can hardly believe it myself. it's too bloody easy.)
5 degree angle on the drill press bench, and using a timber guide.
run the timber from right to left for the smoothest and safest cut, and voila.........
there's your radius block which is the same width as the stew-mac ones
I've got pictures just taken, but in the biggest frustration of all, I don't even know how to post 'em.
(slight technophobia kicking in.
) p.s Brian, tas oak/vic ash will last you a lifetime
-
Stu, how do you get radiused blocks from it. Won't it give an elliptical cross section rather than round when placed and an angle?
Yes Brian, that's spot on............and you would think there would be a fairly discernable difference in the profile of a Stew-Mac 12" radius block and a safe-t-planer on angle. I thought so too
(stay with me, I'm getting to the crux of the biscuit)I currently have in my hot little left hand, a 12" Stew-mac Radius block.
And in my right I have, yep that's right. The aforementioned safe-t-planer.
Now , when holding up the cutting implement to the radius block you can pivot the cutter until you get the desired cutting angle which,( everybody gasps in amazement
) matches the radius block contour with no discernable difference in angle. (to my eyes anyway, which are 20/20 and not akin to anything less than perfection......well, close to it. All I can say is, If you've got a safe-t-planer, give it a go and you'll see just how well this little baby works.
You'll also find the results are even better for 14", 16" and 20" radiuses.
Give it a go peoples, and let's hear if it works for you. Just tilt your drill press bench to the required angle.
The instructions on the box show you how, and whats more, isn't bending the safety guidelines of use.
Close to foolproof and a time saver.
cheers,
Stu
-
G'day Brian,
I picked up a safe-t-planer from carbatec in springvale 2 weeks ago.
It's a great multipurpose tool, which you can also use to make neck cauls or even radiused rubbing blocks when tilted at the appropriate angle.
As far as using it in a router..........BIG NO NO. all to do with revs per min.
But perfect for the drill press. an absolute dream to use too.
On the box it warns against router use, and I'd heed that warning. (at the speeds the average router turns at, you'd want to rename it the 'where did my fingers go-planer'
cheers Brian,
Stu
(even with variable speed, I'd be cautious of the repercussions.)
-
Nothing left but to give them a good shoeing then. 3 Goons and a van, say no more
You got room for one more? my boots are steelcapped , just the way we like'em
-
That's my situation right there, RGGR. It's only the figured tops I will have to order from elsewhere.
I've got a good lumber yard just down the road from me that sells great stuff for body and neck blanks,
(utile,& fijian mahogany,walnut, cherry, blackwood, birdseye maple, ash, kauri, etc.) but unfortunately they don't stock the highly figured gear.
. And really, why would you stock all of that 'drooly gobsmack' stuff when you had little to no market for it?
kudos to them I say.And there's nothing better than picking through a stack and finding the timbers with your name written all over them. Must be a throwback to the old caveman days of hunt and kill.
cheers,
Stu
-
Mammoth,Phil and Rich........ cheers for the info and for sharing your experience.
I think I'll only source the highly figured tops from O/seas and source what I can locally for blanks.
That's not to say we don't have a good selection to choose from here, it just seems very limited
when you're talking about the knockout looking tops on offer elsewhere. (eg. quilted maple
)I'll order a few and see how things go with customs, and at the very least, I'll gain experience and
learn the ins and outs of Aussie tax minimisation techniques.
Thanks all,
Stu
-
I want to order quite a few body blanks and highly figured 3/4 tops for future builds, and want to get it from some of the sources in America. (members of this site, most probably)
The thing is, I don't know what is involved.
I had a look on the Aus. customs website, which told me little, although it did make me cross-eyed.
Sooooooo............ has any body either imported via mail or sent from an outside country to Australia ?
Just need to know whether it's viable.
P.S I'm not fishing for deals........ That's why it's posted here and not under classifieds or w/site supplies.
-
That looks sensational.
The black hardware over natural finish wins everytime and this is no exception.
How did the weight balance turn out when on the strap??
Now you've made two, and with excellent results, it is now time to step into the realms of
producing your own necks..............go on....... you know you wanna.
-
Redgum is very heavy stuff.
I'd use it if you're gonna support the guitar on a tripod.
-
screwdelulu Posted Today, 07:44 PM
Seems like it being used as tonewood:
Cheers for the extra info. much appreciated.
thirdstone Posted Today, 08:18 PMI have used it for a cap on a mahogany body LP JR type guitar (Blackwood Lp Jr )
I just had a look at your Lp Jr. Love the blackwood burst.
Is Blackwood mainly used as a cap in most cases? ......... or ................
can it be used to a good effect on its own as the main structural base. eg neck and/or body?
Anyone built a blackwood only guitar?
cheers,
Stu
-
Big day today, with a quick 2 kilometre trip to Mathews timber, Vermont ( Melbourne, Australia that is)
I picked up 5 different tonewoods with blackwood being one of them.
As a timber for planing and working with , I'm very impressed. BUT...........
I don't know anything about it's tonal characteristics.
I've heard that Tasmanian Blackwood is like koa and a very good tonewood,
but that is all.
Is it bright or boomy? good for necks and/or complete bodies? any info desired
-
It doesn't get any clearer than that !!


Cordless Drills...
in Tools and Shop Chat
Posted
Sorry to hear of your tales of woe with battery drills.
I can only comment on the Dewalts as I've got the 18v hammer/drill which is a part of my 18v 4 piece combo kit that I use everyday and it hasn't skipped a heartbeat. It's got to be one of the most robust drills out there but also the heaviest. So are the batteries.
I'm building houses everyday so it does help if you're constantly working the batteries like I do.
Even with cordless technology, I tend to use an electric drill if I've got a power source handy and
only really use the cordless when I'm in some uncomfortable 'oofus' position or running a couple of drills at the same time.