


pukko
-
Posts
247 -
Joined
-
Last visited
-
Days Won
12
Content Type
Profiles
News and Information
Tutorials
Product Reviews
Supplier Listings
Articles
Guitar Of The Month
Links and Resources
Forums
Gallery
Downloads
Posts posted by pukko
-
-
amazingly clean as usual, Pukko. Is the top glued already?
Thanks Eddie! No, the top, body and neck hasn't been glued together yet. I need to decide what soundholes I'm going to have and then cut them out. Must be a lot easier to do when the top is still a separate piece.
-
>>Petrucha
Thanks!
Got the neck pocket on the top fixed, now I have a giant guitar puzzle! No glue yet.
-
Nice woods there! Could the fretboard be ziricote?
I had to try photoshopping that body shape without the humps in the body lines. It could work that way too! Not as much METAL!!! though. I guess that the fact that the upper strap button is pretty high up (in line with the 10-11 fret) helps the balance?
-
Routed the neck pocket.
Tight fit? Seems so.
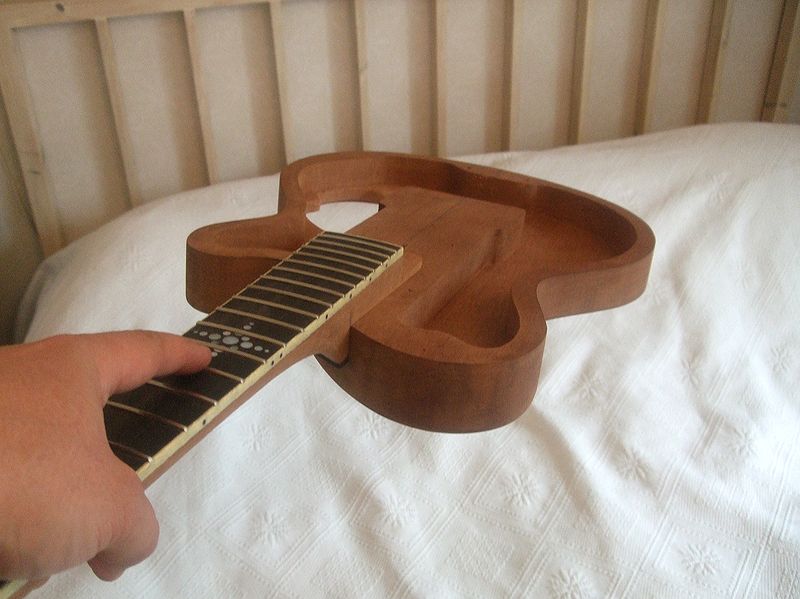
Shaped the heel a bit more now that I can follow the lines of the body.
Starting to look like a guitar...
-
Honestly, I like the first version better. The greater angle gives it more visual interest and uniqueness IMO.
SR
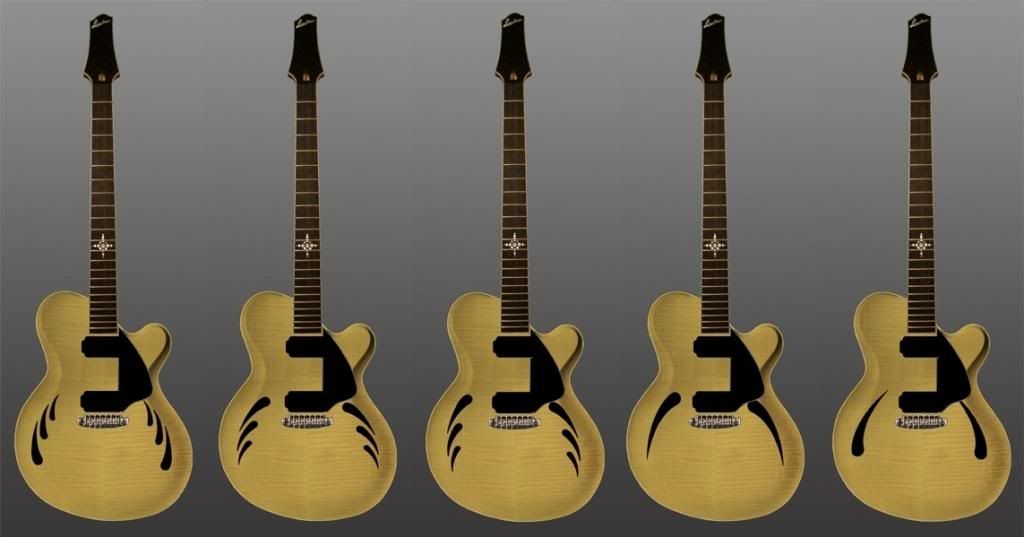
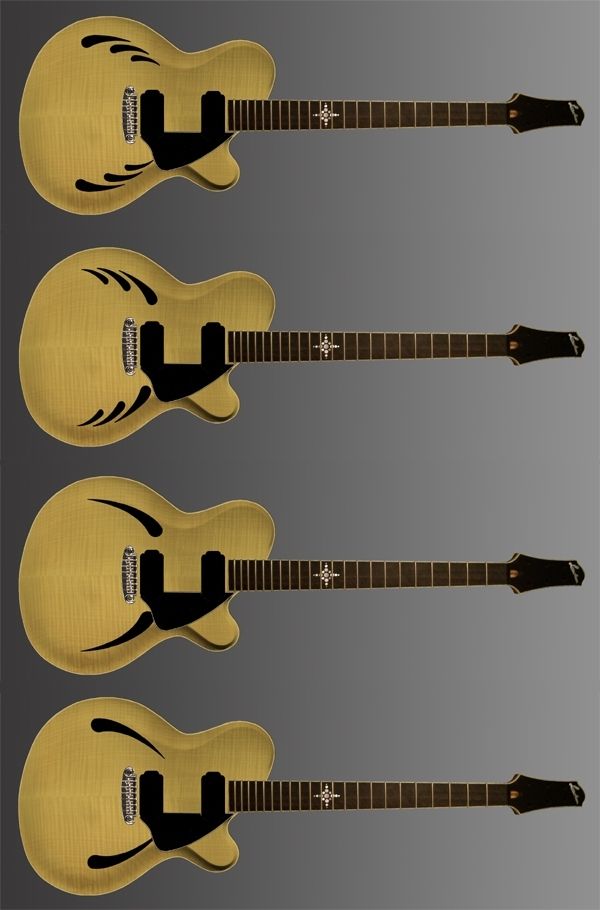
No 2 kind of makes the lower bout look more round, no 3 makes it look more sleek. I actually like the no 1 version best myself. Right now at least... I'll probably change my mind a couple of times and design a few more to make it even harder to decide. There is also the option to only have a soundhole on the upper part, that would make it easier to place the controls.
-
>>Scott, Chris
I did another one where the second version has the holes following the body lines a little more. Compare 2 and 3:
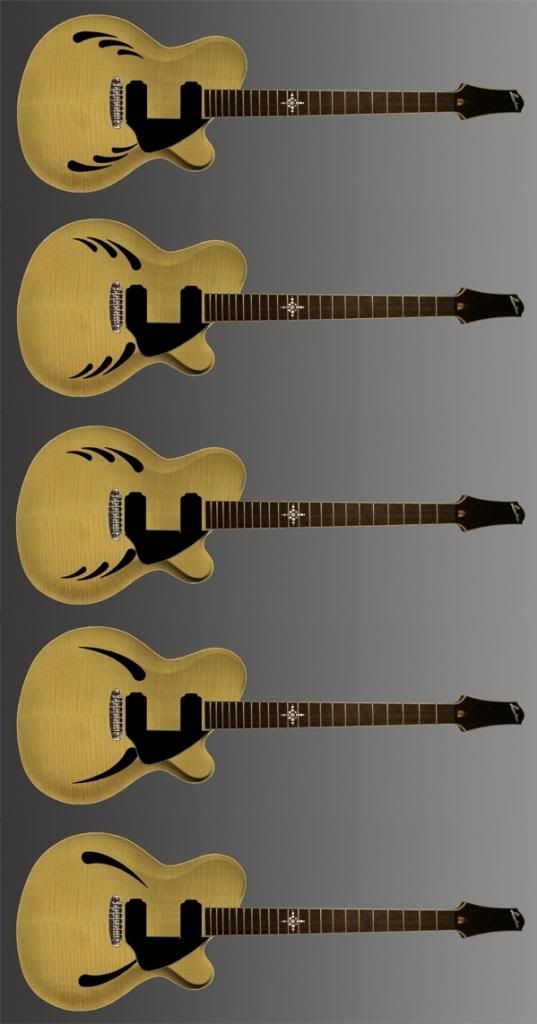
And standing , always helps to see both standing and hanging/playing positions:
-
I decided to remove the extra thickness of wood between the neck and bridge on the inside of the top. I also thinned the top down to 6-7 mm. No pics though but it kind of looks the same as the last pic anyway...
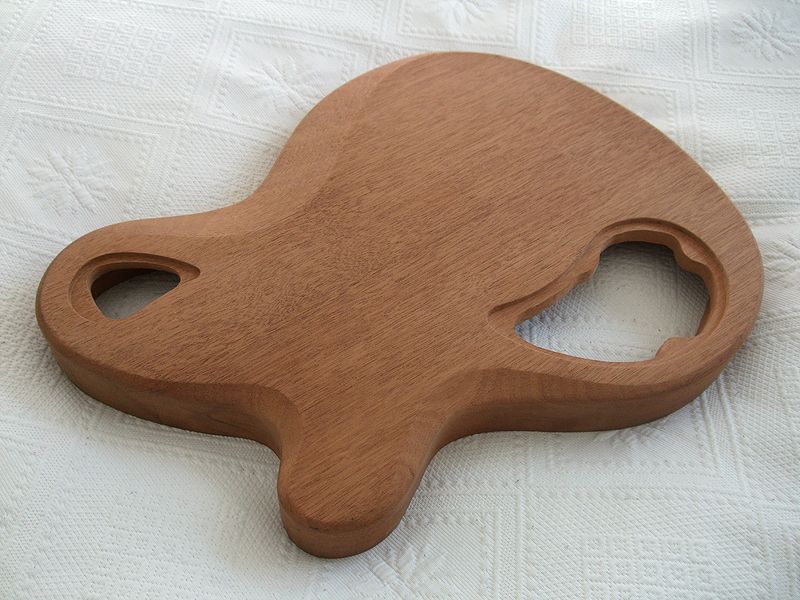
I decided to try out some soundhole shapes. Ordinary f-holes are... ordinary. The assymmetric body shape makes it a bit hard to design the holes too, you can't just put two identical holes on there because one of them will look crooked/out of placement. I like the Gretsch cats eye hole so I started messing with that. Grosh has something similar on the Hollowtron too. Here are a couple of variations I photoshopped together:
>>HCRoadie
???
>>spaced_ghost
Thanks! What are you building?
-
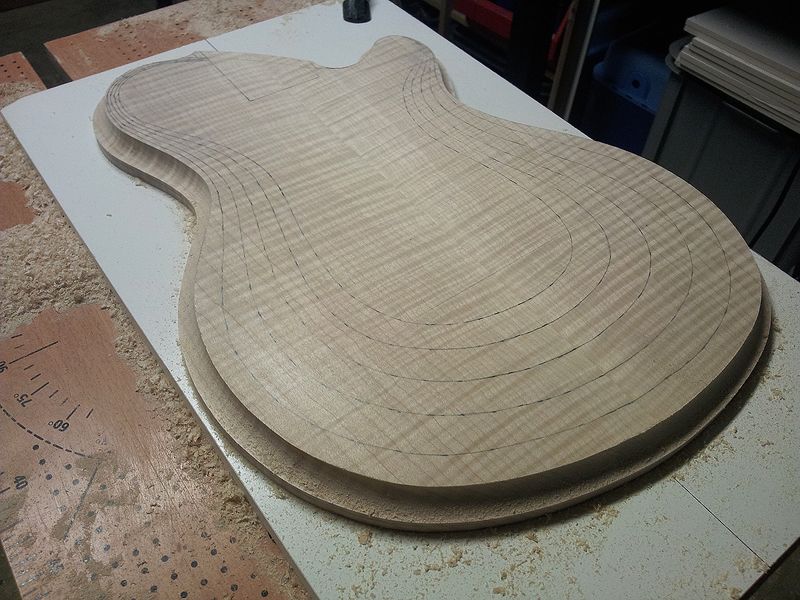
Started carving the inside of the maple top...
I drilled a bunch of holes to remove some wood. I made a crude depth stop using a piece of wood and a wine cork:
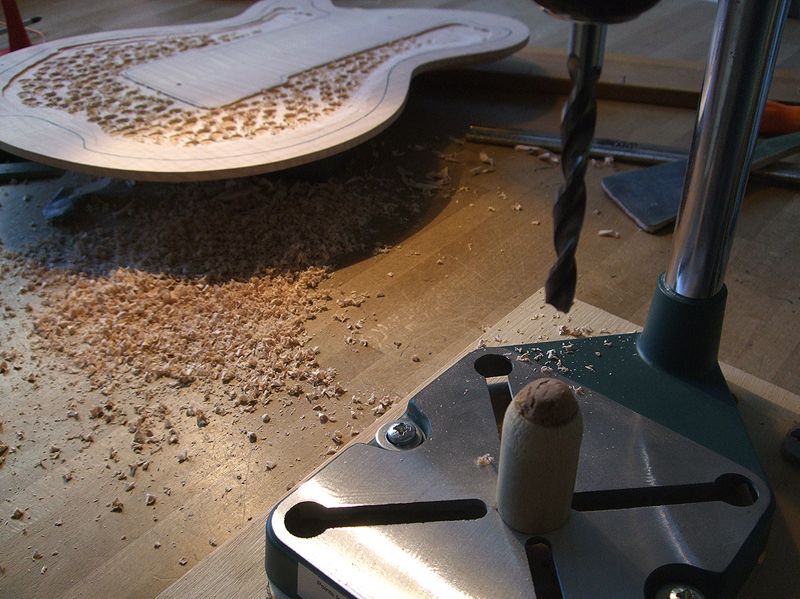
And this is what it looked like after the drilling:
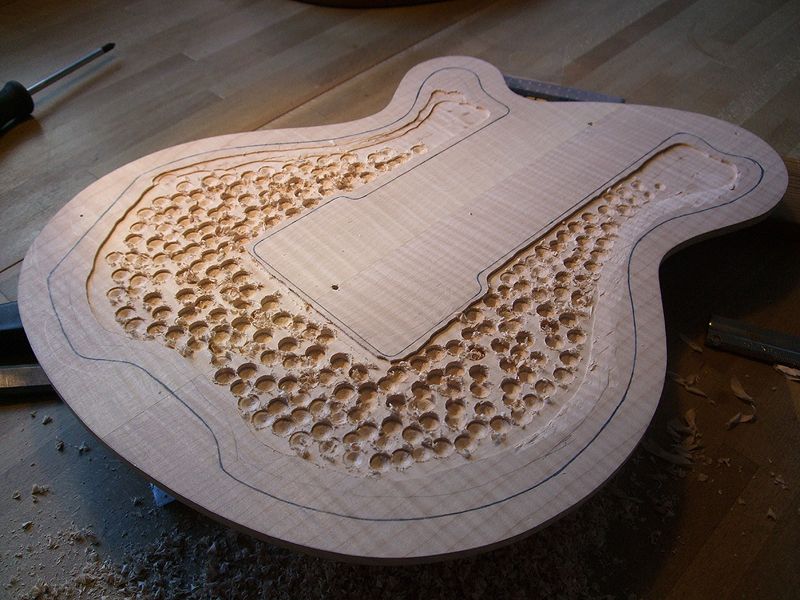
I then used chisels, Dremel in a router base, Dremel with a sanding drum, cabinet scrapers, knives, sandpaper... This is the first top I've carved so there's a bit of learning-by-doing involved. This is what it looks like now:
It's a bit uneven in a few spots but I'll take care of that later. No more work today, my hands say no.
>>ScottR, Our Souls
Thank you both very much!
-
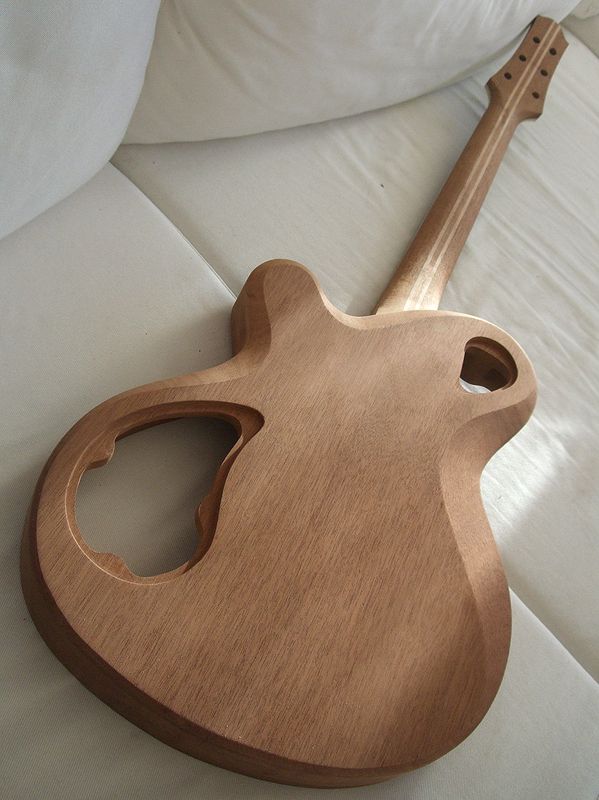
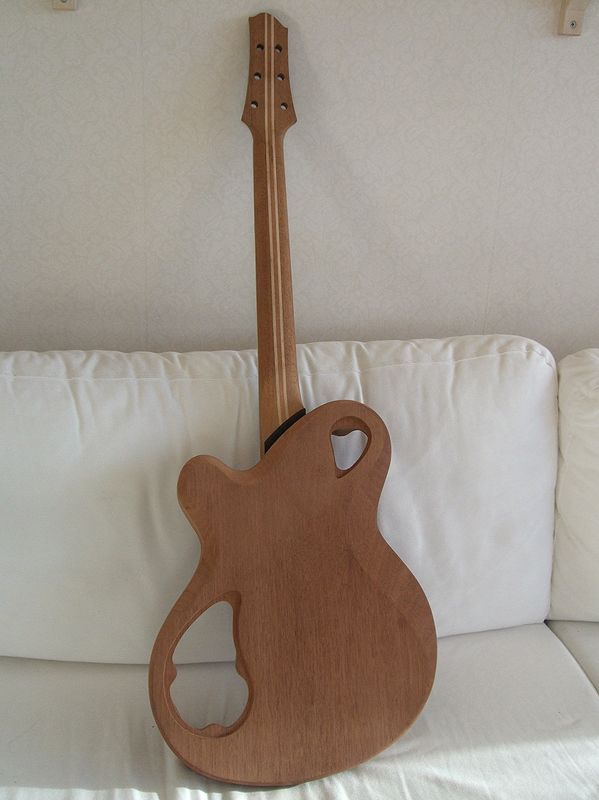
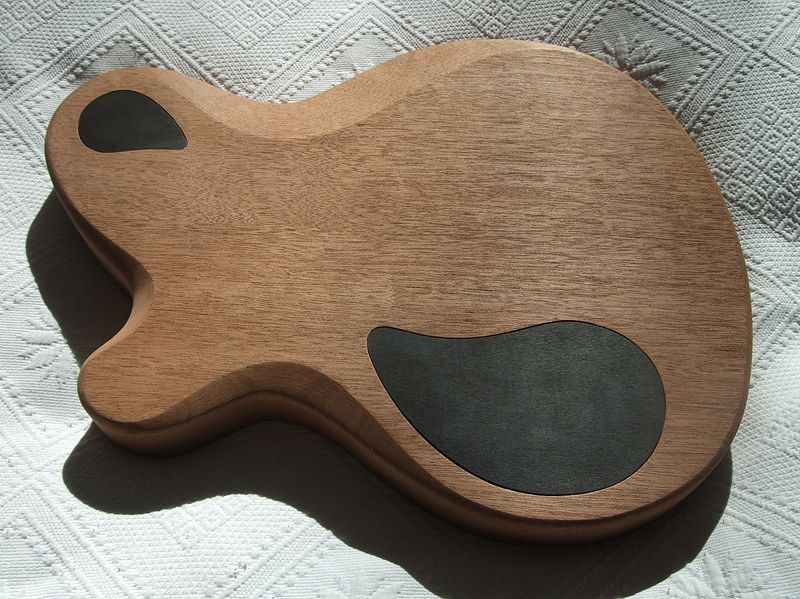
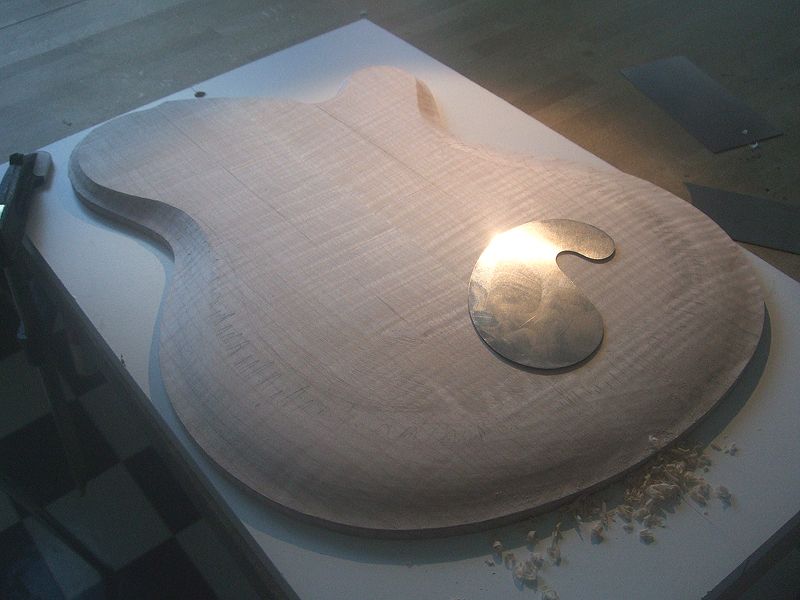
I made some cavity covers out of ebony. No pics of the scrollsawing though...
I chose not to make any routing templates. I put double sided tape on the covers and stuck them on the body. I cut around the edges with a sharp knife:
After that I carved the wood from the edges with the same knife:
That gave me a border to use as a guide when free hand routing with a Dremel with a router base. I then sawed out the holes.
This is what it looks like now:
-
That's one beautiful top.
Thanks!
Gorgeous! Good call carving it more. The first one looked good but the current carve looks great.
Thanks! Yes, I think it turned out better with more definition to the shape. By the way, I'm seriously considering ripping off your soundhole design from your archtop build, the whole build looks great! Understated elegance, I love that.
-
Good call there, that looks nice.
SR
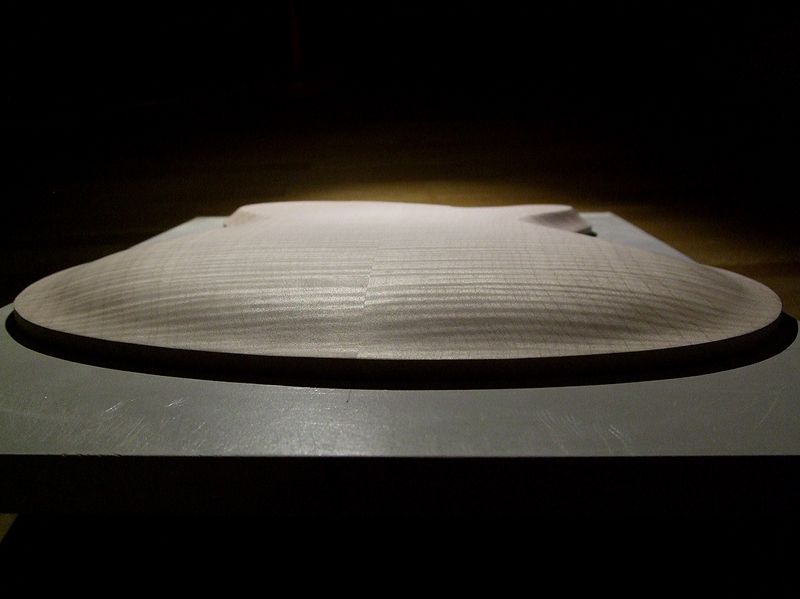
Thanks, Scott! Here's a couple of shadowy pics to show the carve a bit more:

-
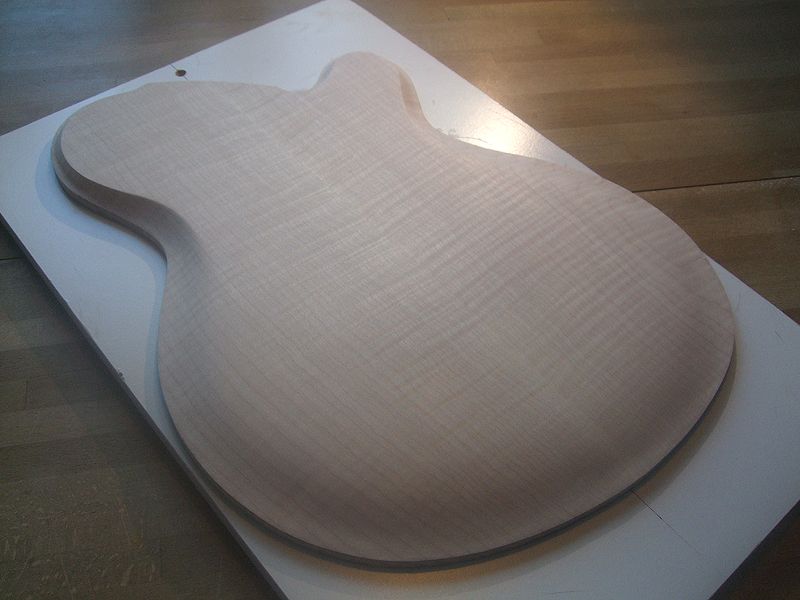
I didn't think the carve was deep enough so I went at it again:
Here's a comparison between the old and new carve. The lighting isn't the same obviously but you can see that I carved the waist more and with that follows more carving both upwards and downwards from the waist to balance it out:
-
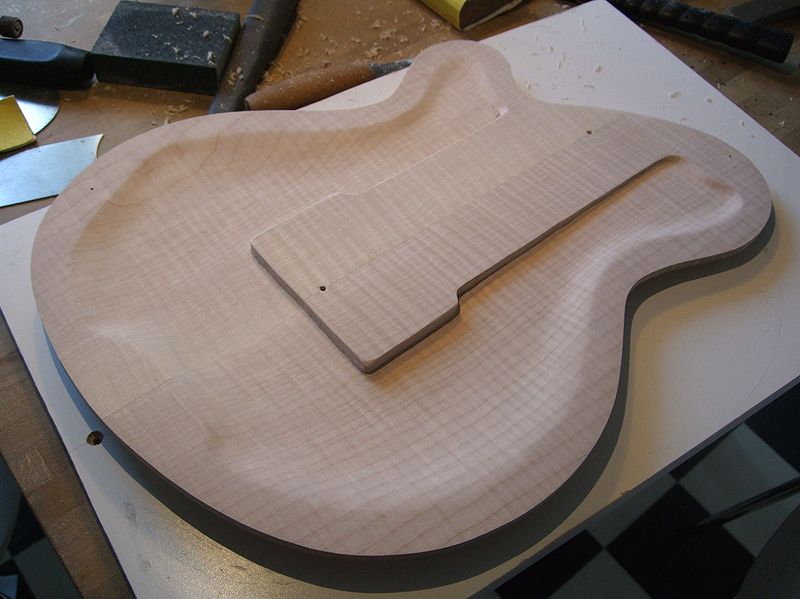
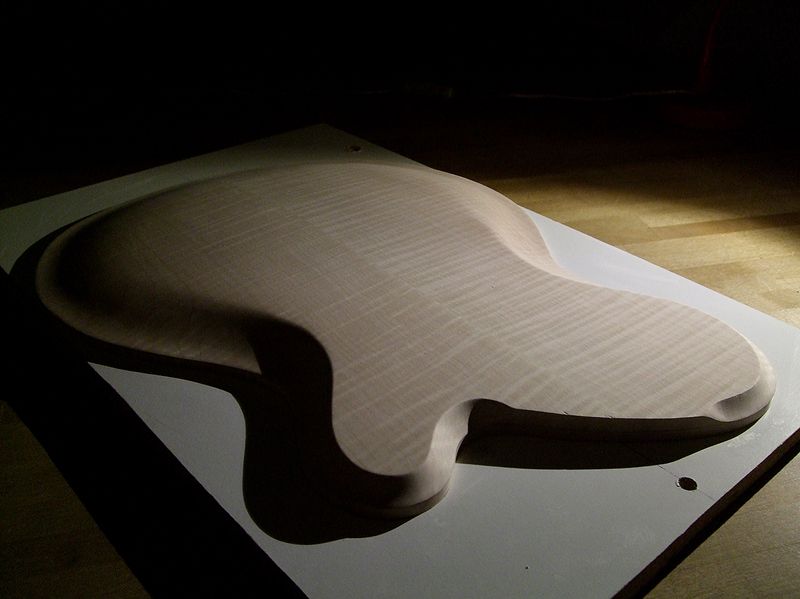
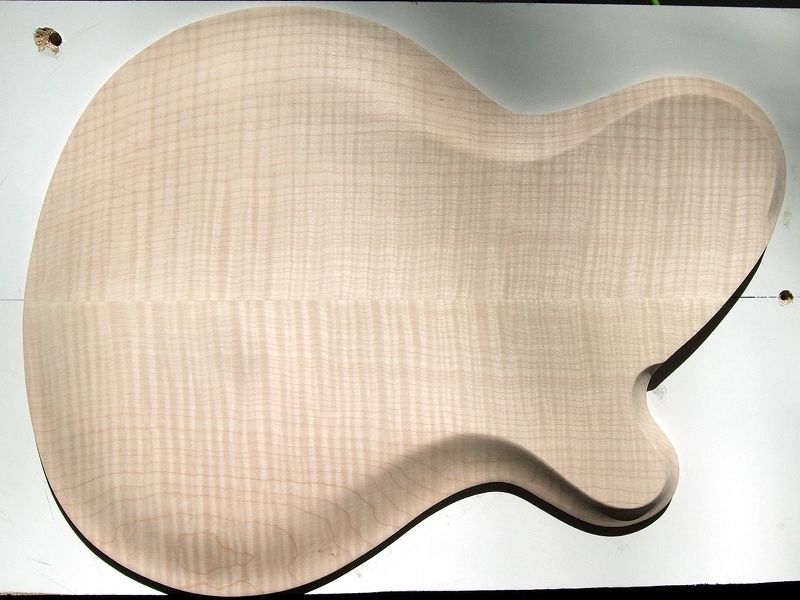
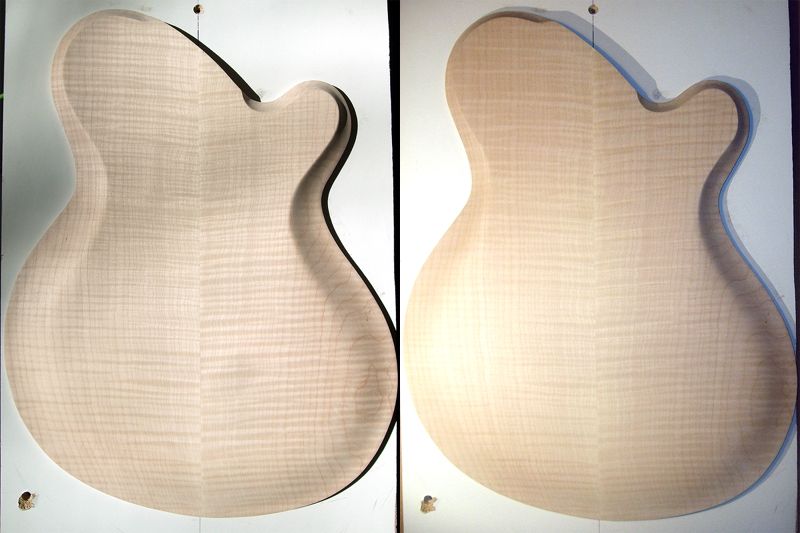
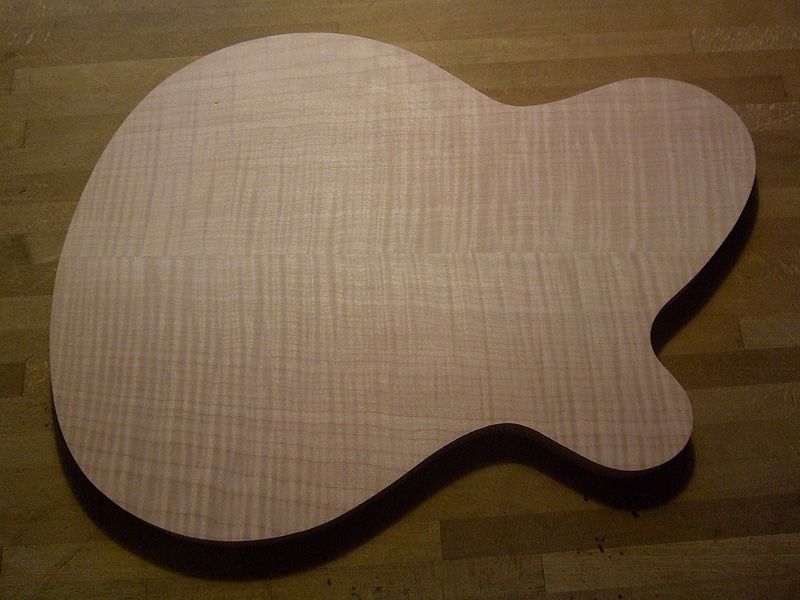
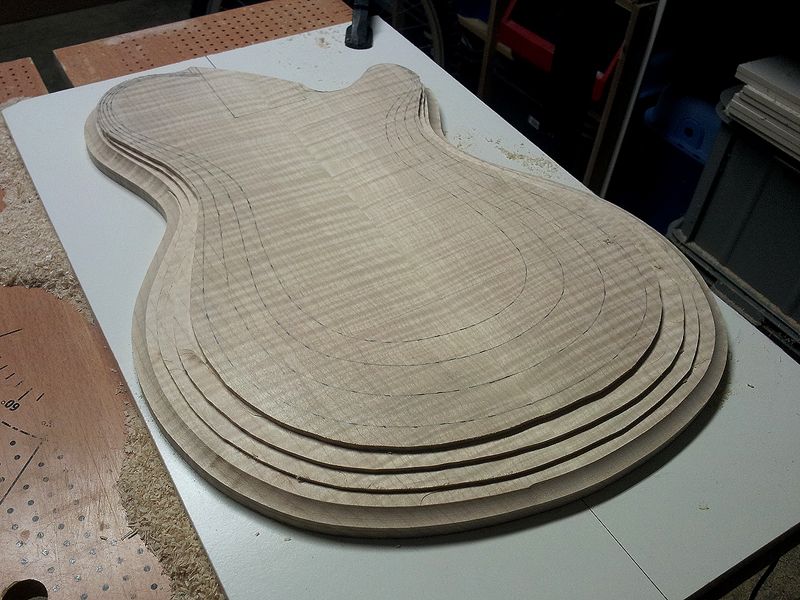
I started to shape the maple top.
First I routed it to the right shape using the body as a template:
After that I routed along the edge with a cove router bit to get the correct edge thickness:
Next step was to route steps to remove wood and get kind of the right curvature on the top:
After that it was time to start chiseling/scraping/filing/sanding...:
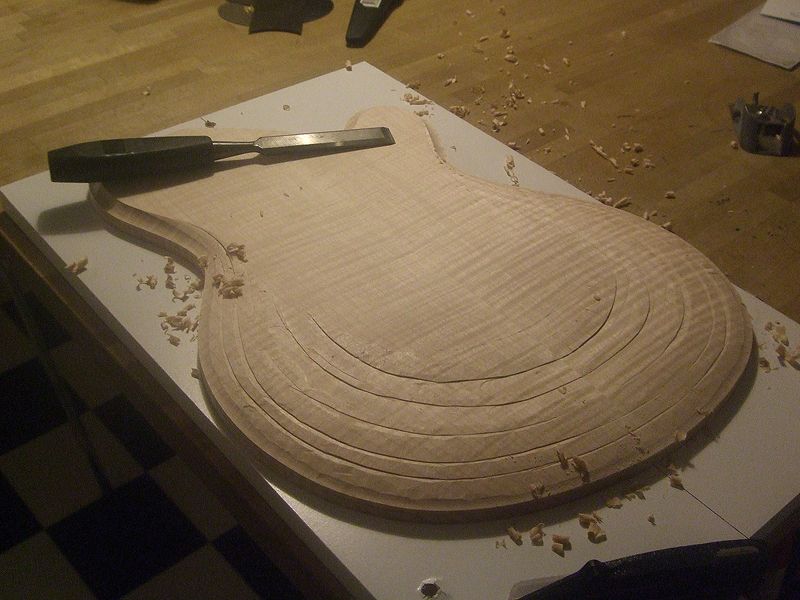
...and this is what it looks like right now:
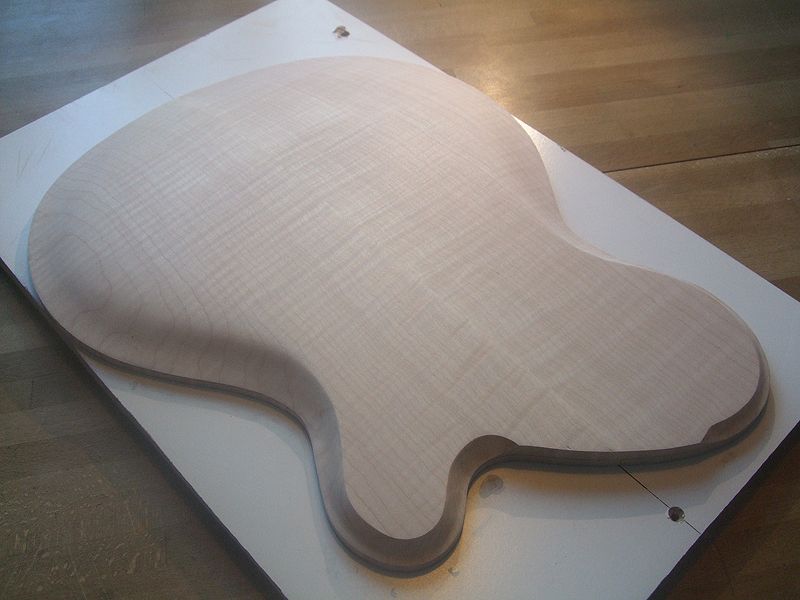
It's nowhere near done but you get an idea of how it will look. It needs more shaping around the horns and I'm thinking about rounding off the lower bout a bit more.
-
>>Our Souls
Thanks!
>>eddie
Thanks! I ordered the binding from a Swedish guitar parts online shop. www.gitarrdelar.se
I'm guessing it's binding from Hosco (a Japanese parts supplier) since Gitarrdelar uses pics from Hoscos catalog in their item description for the binding.
-
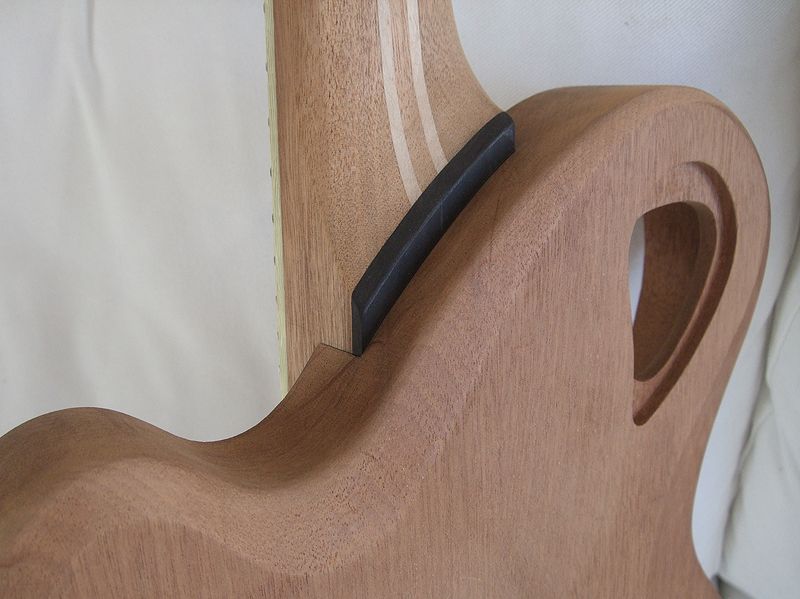
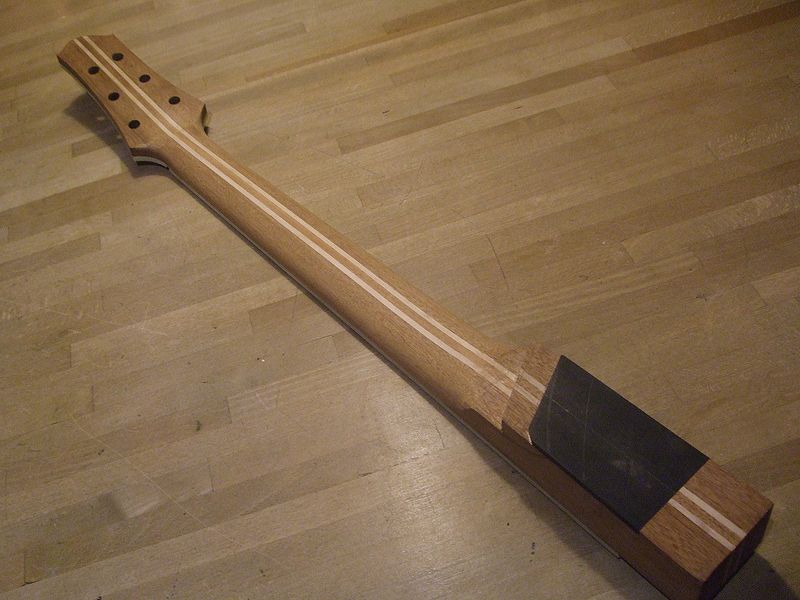
Started carving the neck:
First I create a rough neck profile at the first and twelfth fret with a rasp.

After that I bring out the spokeshave. Stunt-carving-with-one-hand-while taking-pic-with-the-other-hand...
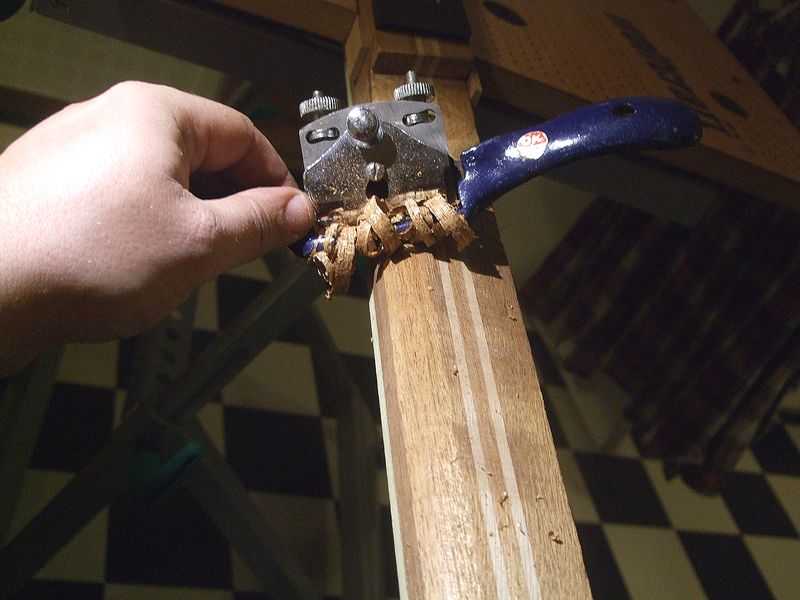
Neck profile is roughly done. The neck to headstock transition is done later with a sharp knife, rasps/files and sandpaper.

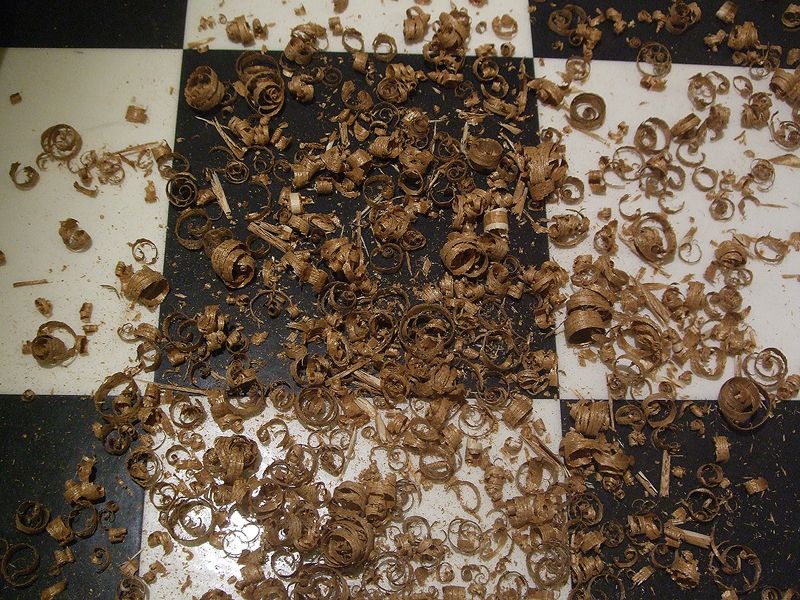
Kitchen floor after neck shaving...
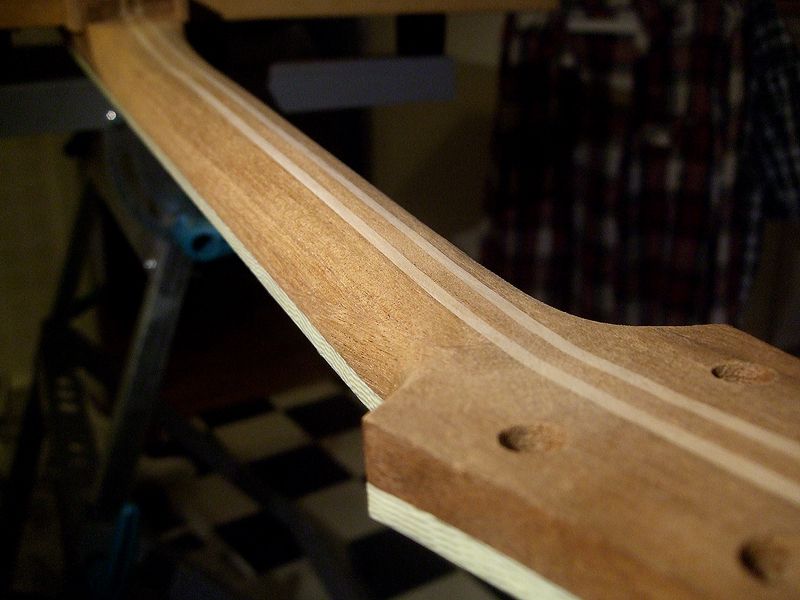
...and here's how it looks right now. I haven't done anything to the heel end of the neck yet, I'm doing that when I've routed the neck pocket. That way I have better control over the neck to body transition.
-
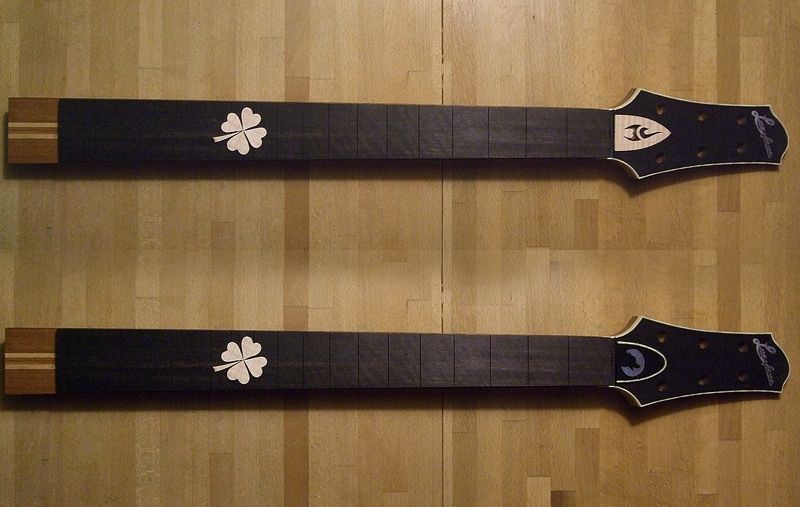
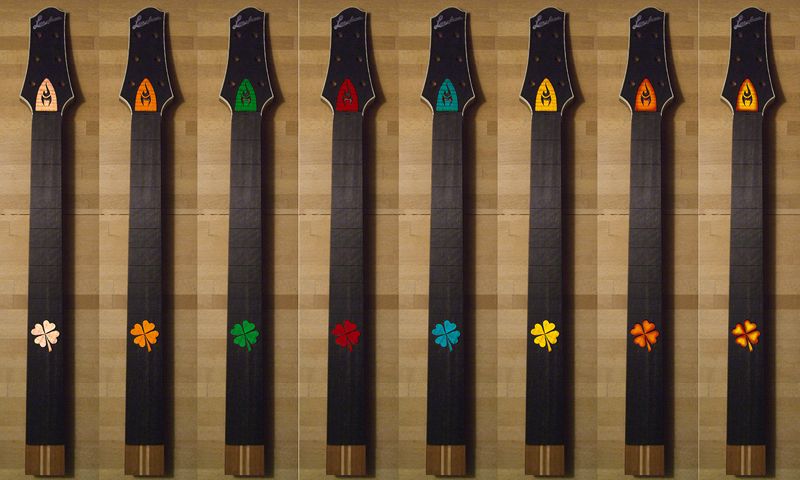
Decided against using the clover, it only works with the maple truss rod cover and since I haven't decided which cover to use I just did my old inlay. I also bound the fretboard and put the frets in. No other fretwork done yet though as you can see.
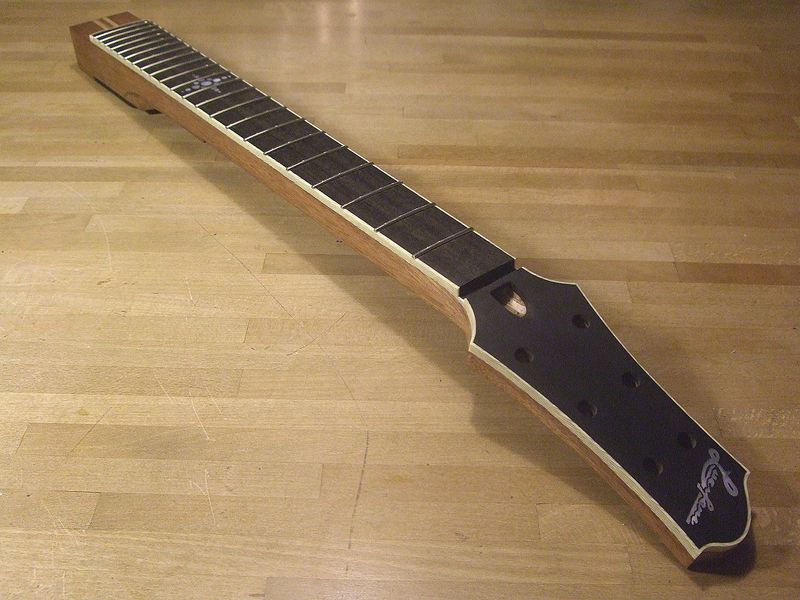
i also bought some ivoroid(ish...) tuner buttons on eBay to see what that would look like. Either match the buttons with fretboard/headplate or with the binding. As you can see the colour of the buttons doesn't quite match the colour of the binding. Might try to "age" the buttons a bit to a closer match...
-
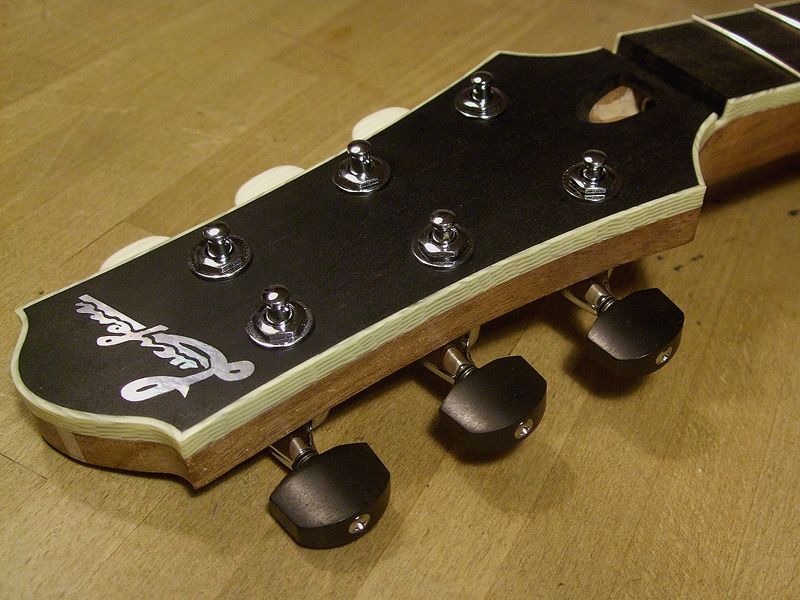
Got the headstock binding done. Heat and bend binding to the correct shape:
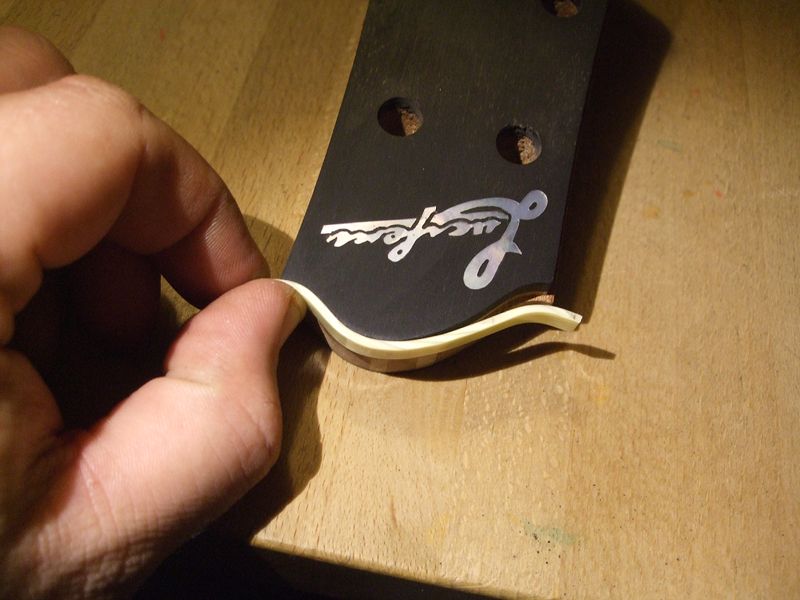
Brush with acetone and then... TAPE! LOTS AND LOTS OF TAPE!
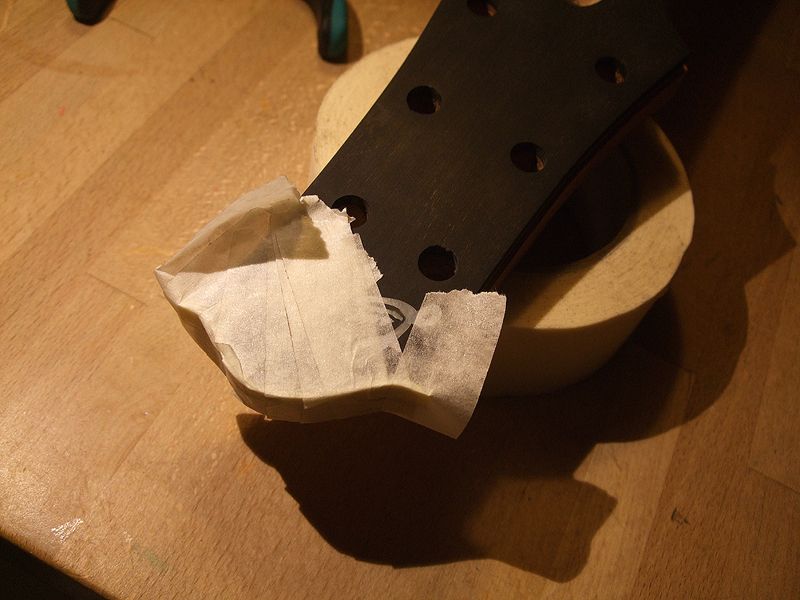
The reason for only putting on one piece at a time is that I wanted to do miter joints since I'm using grained ivoroid binding. Don't want any visible joints right?
Here's the result:

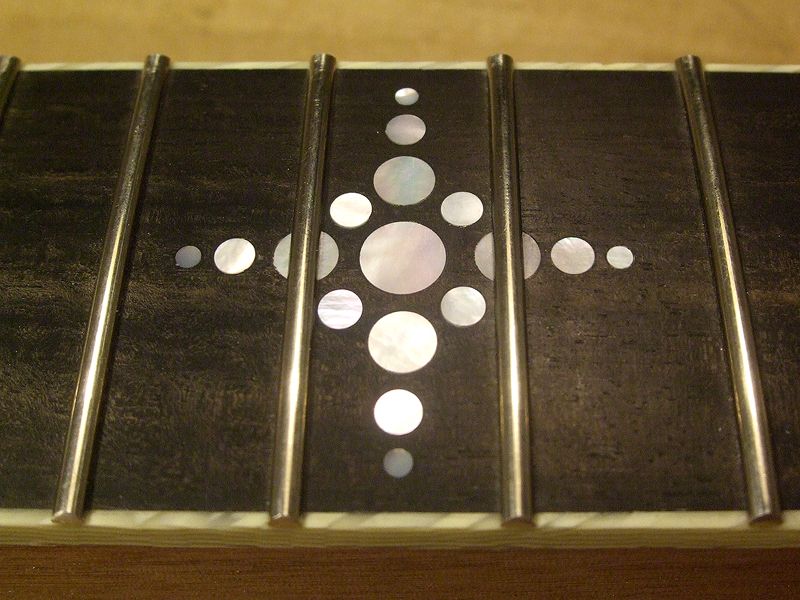
I'm having trouble deciding what to use for a 12th fret inlay. I was going to do my usual "dot star" logo but I don't want to repeat myself too much. I did a test with some flame maple:
The inlay (and truss rod cover if I use the maple one) could be dyed the same color as the maple top. Here's a test, the colors are a bit intense but you get the idea:
>>pauliemc
Thanks a lot! Yours would be clean too if you had to build in your kitchen... Otherwise the missus won't be too happy.
>>Levi79
Thanks!
-
 1
1
-
-
Made an ebony/ivoroid truss rod cover and inlaid the wolf into that:
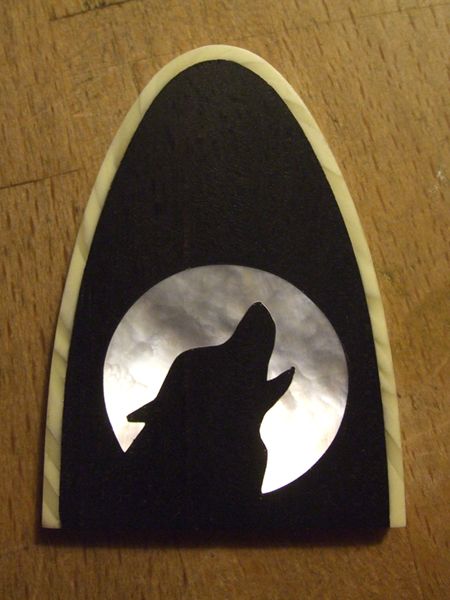
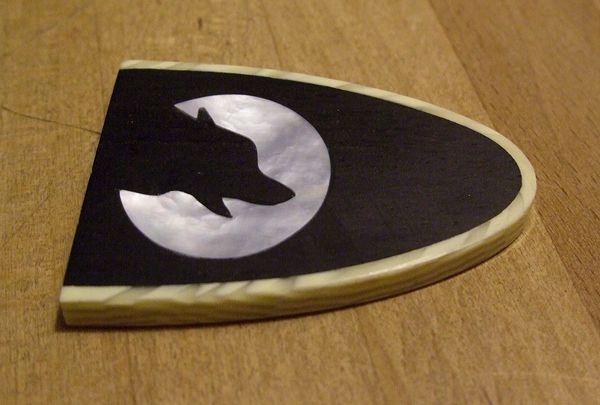
i kind of like the way the mother-of-pearl shifts from dark to light like the surface of the moon...
-
Made an ebony/ivoroid truss rod cover and inlaid the wolf into that:
i kind of like the way the mother-of-pearl shifts from dark to light like the surface of the moon...
-
>>corsa2
Thanks! That's like the pic in the post before yours right? I think it looks cluttered.
>>ScottR
Good to hear that they are good tuners! The wolf at the twelfth fret would look good. Unfortunately the piece is either too big or too small depending on how you see it. It's too big to fit in the 12th fret area but too small to continue into the 11th and13th frets. The only option then is to cut it flat to make it fit the 12th fret area. That kind of takes away from the roundness of the moon... Someone on another forum suggested that it could be put on a truss rod cover. I'm making an ebony cover to try it out, I think it has to be ebony to give enough contrast.
-
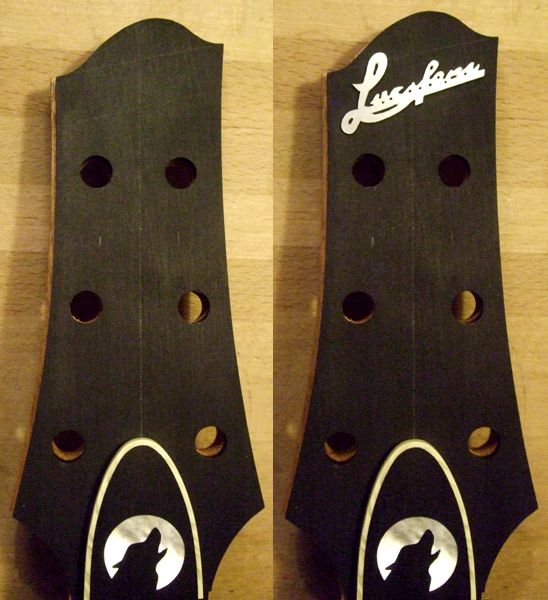
Really big fan of the pierced truss rod cover. How does the inlay look with the wolf at the tip, and then the name going up the headstock like you have it in that last photo?
Chris
Glad you like it! It won't stay like that though, I'm going to glue it to a piece of mahogany later on. I'm going to have the maple the same colour as the maple top and the mahogany the same colour as the rest of the mahogany on the guitar. Haven't decided on any colours at all yet though...
Here's how your suggestion looks:
I still think it's too much going on at the same time, and another problem is that the three pieces aren't on the same distance from each other. I'd prefer that the middle piece (whichever order you put them in) would be more centered. Now it looks unbalanced. The wolf loses, it goes somewhere else.
-
>>AxAxSxS
Thanks!
>>sunday_luthier
Thank you! I think less is more as well, I think this holey design might be a bit too much but it does depend on what colour is behind the guard too. Too much contrast might be too much of an eyecatcher.
>>ScottR
Thanks! Have you used the tuners before?
Got some stuff done. The always nervewrecking headstock binding channel route had to be done. Ebony, end grain and very little space to rest the router on... A recipe for tearout. Anyway, it went well.
Routing the sides first, saving the worst for last...:
The result, has to be cleaned up a bit of course:

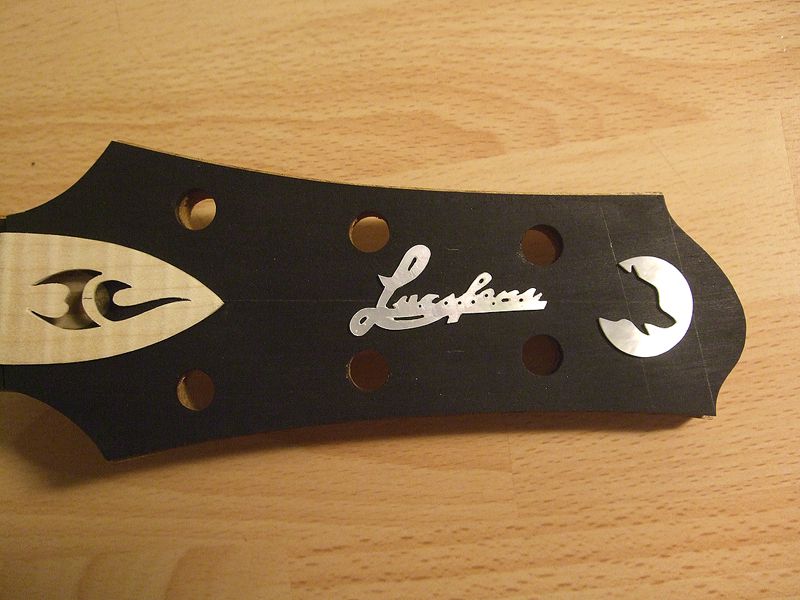
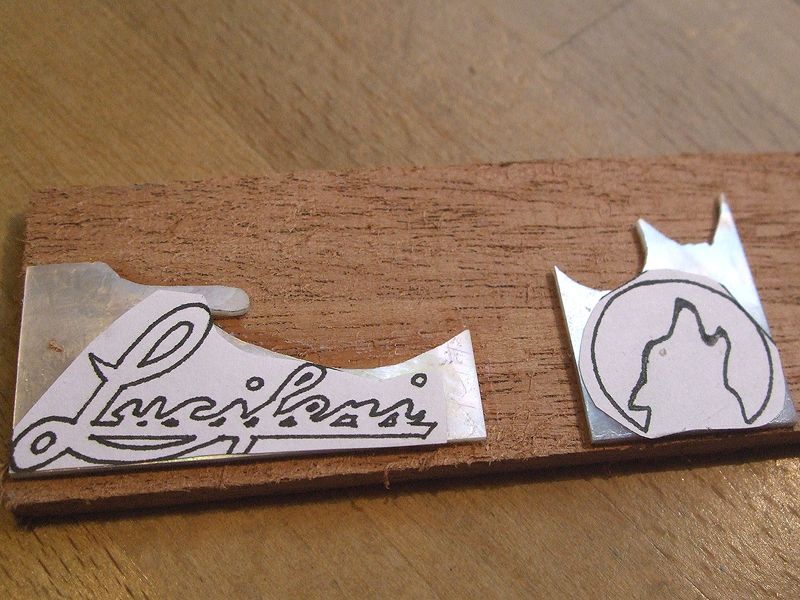
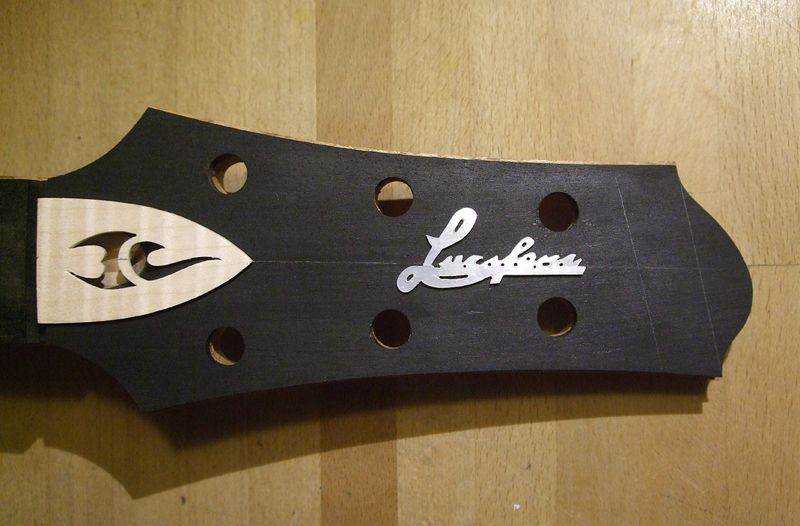
Time for a headstock inlay. We've had a full moon recently, got inspired by that. Drew the patterns on paper, glued the paper to the pearl pieces, glued the pearl pieces to some scrap wood.
And this is what it looks like. The logo will be cleaned up. Some other day...
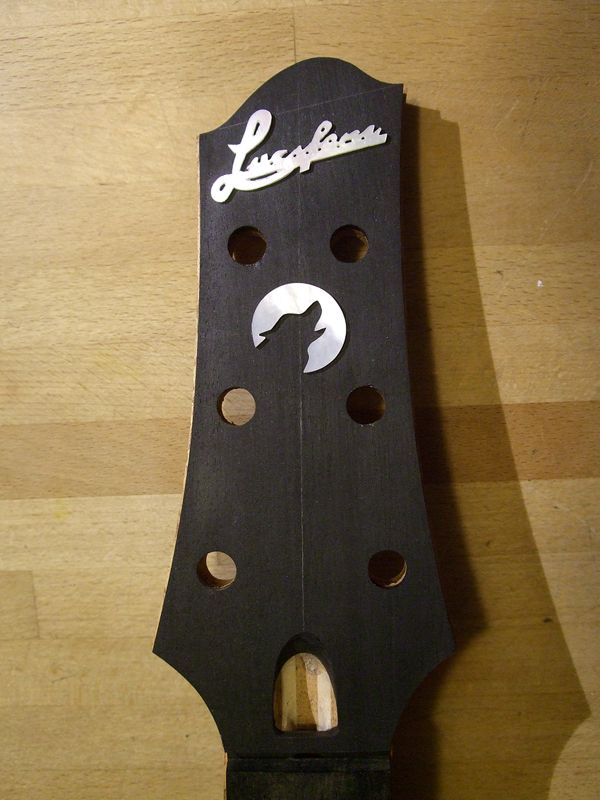
I forgot to test it together with the truss rod cover I made. I think it will be too much with both logo, wolf and cover, especially when there will be binding as well. Here's a couple of ways to do the headstock:

-
>>mattharris75, elvock
I'll think about it for a while. I'm not going to do it until I'm done shaping it for pickups etc.
>>Anthony
If I hadn't already glued the headplate to the head I might have done that too... I'm using ebony for the electronics back cover, I'll do that one the same way if I decide to do it to the pickguard.
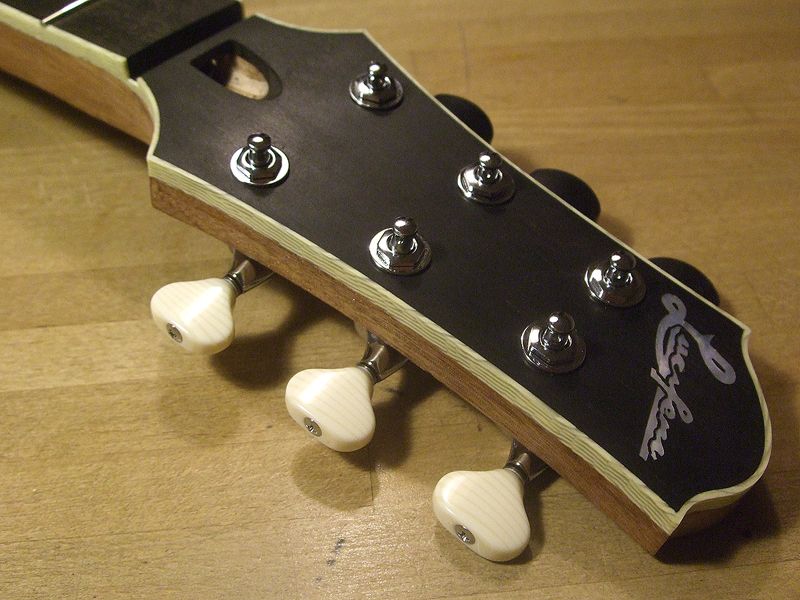
I went to the same guitar show as I visited when I bought the wraparound bridge last year... Time moves fast. This year I bought a set of insanely expensive Gotoh tuners for what I believe was half the ordinary price.
Drilled for the tuners, made the truss rod access hole, thinned down the headstock a bit:
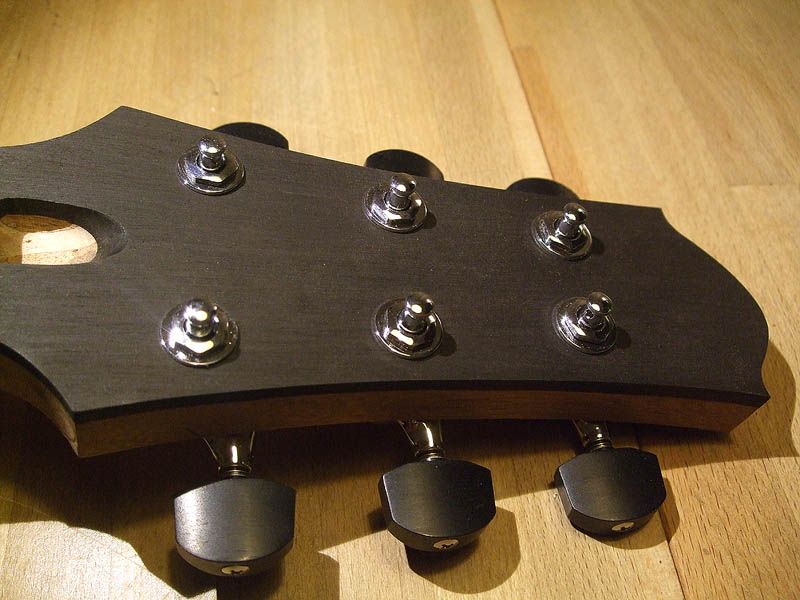
Backside:
-
That looks like it going to be sweet.
Thanks!
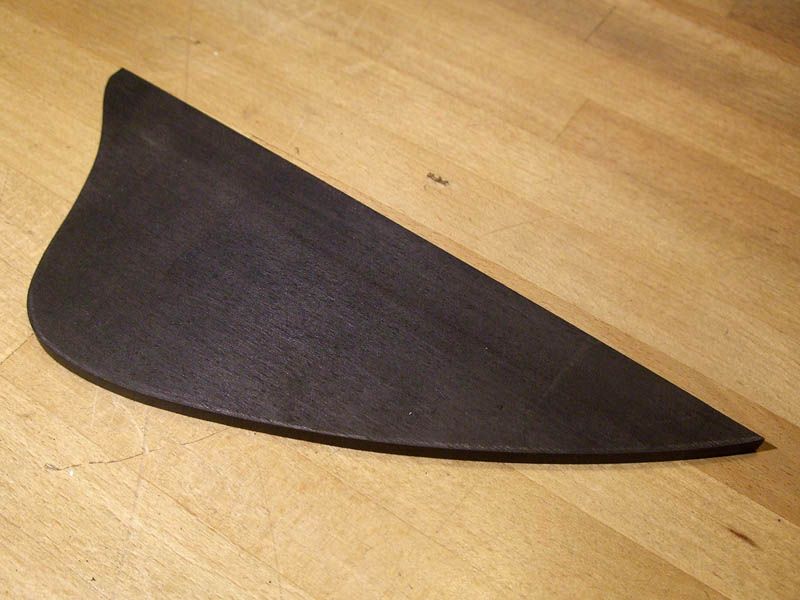
Got some minor stuff done this weekend. Sawing the ebony pickguard with my hi-tech saw:
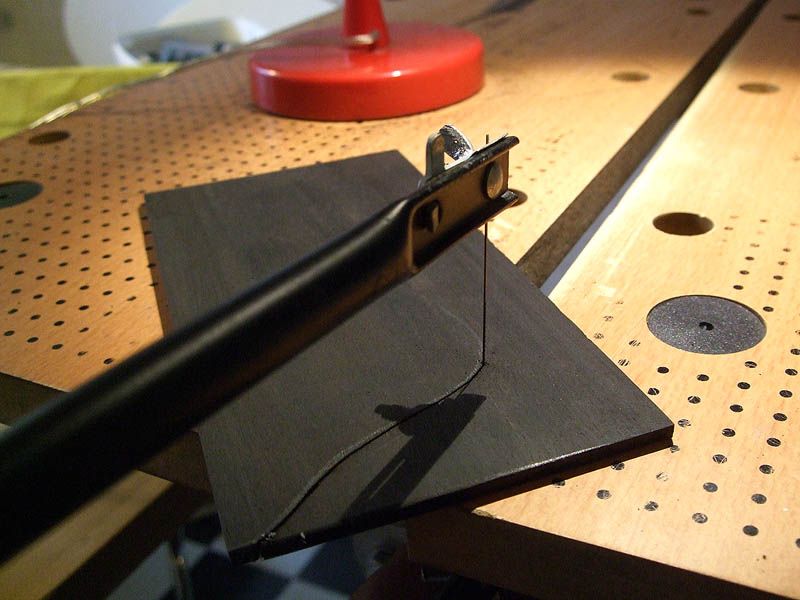
Here's the rough shape, I'll cut out for the pickups later. It will have ivoroid binding just like the body and neck will:
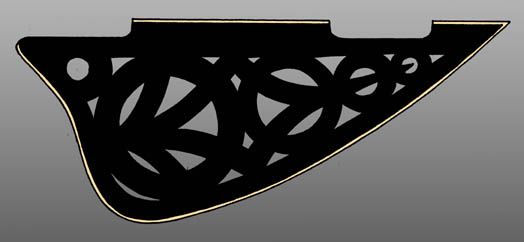
I've been thinking about sawing out some kind of pattern in the pickguard. It might look cool either with holes right through it or with a contrasting wood glued to the back. Here's a test to see what it could look like:
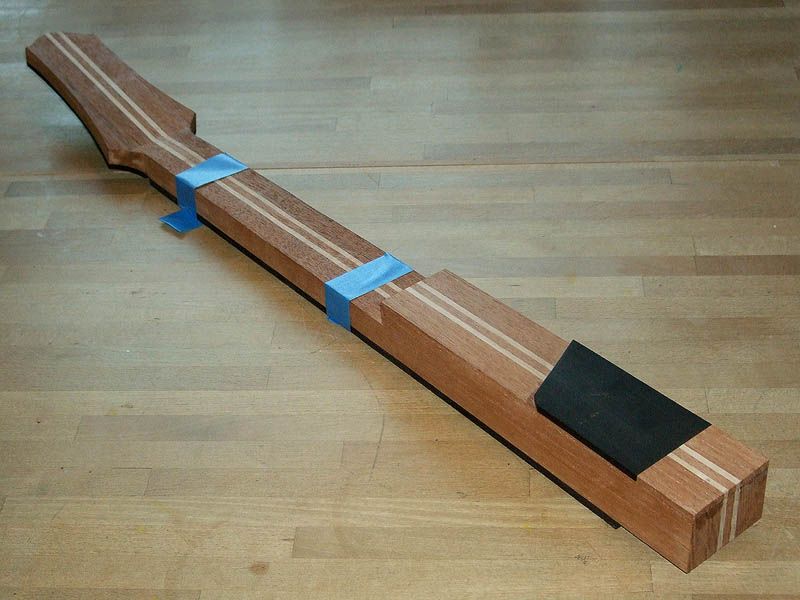
And I glued an ebony heelcap to the neck:

Archtop Soundhole Reinforcement?
in Acoustic and Hollowbody Guitar Chat
Posted
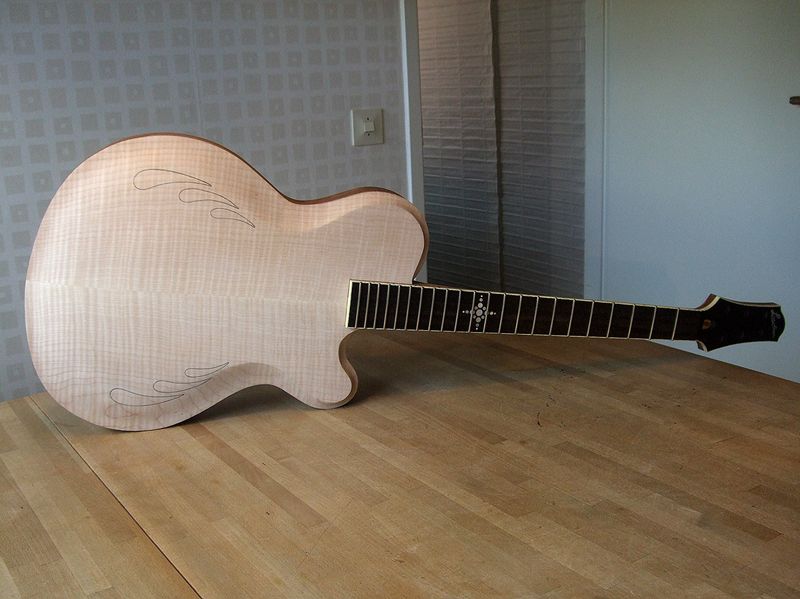
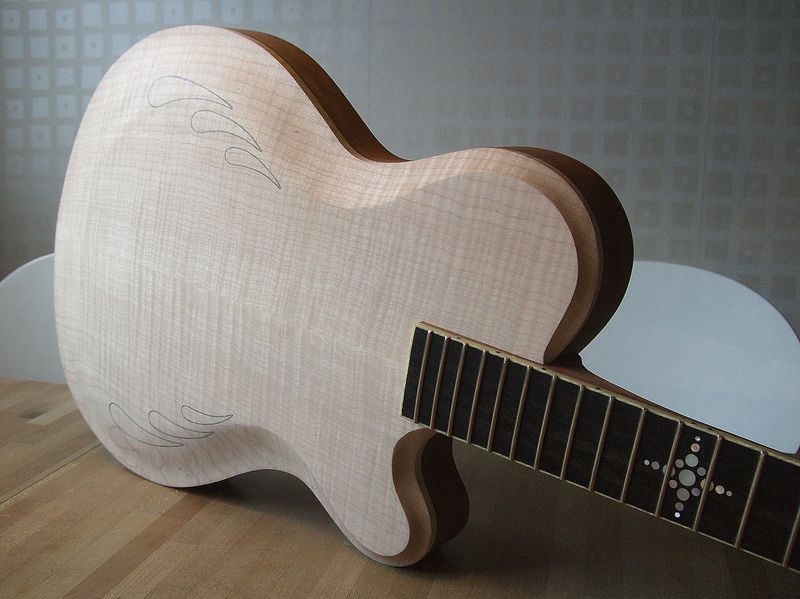
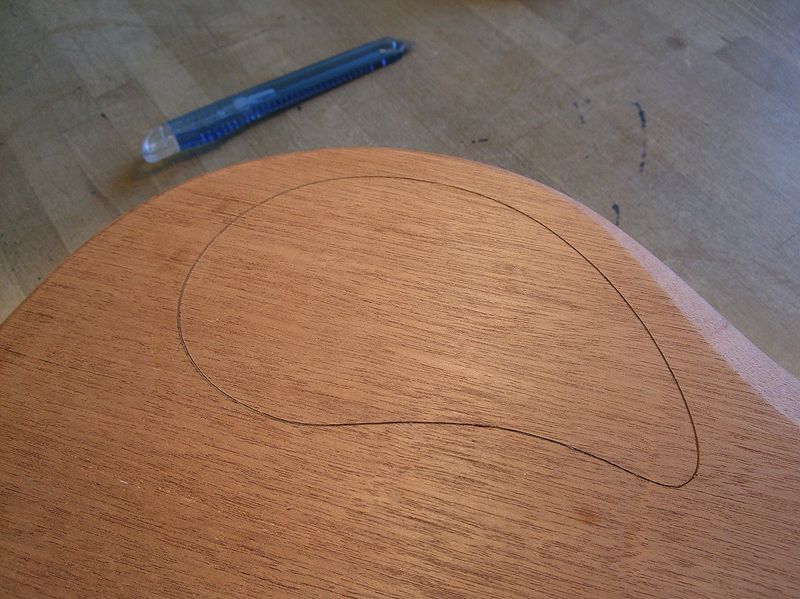
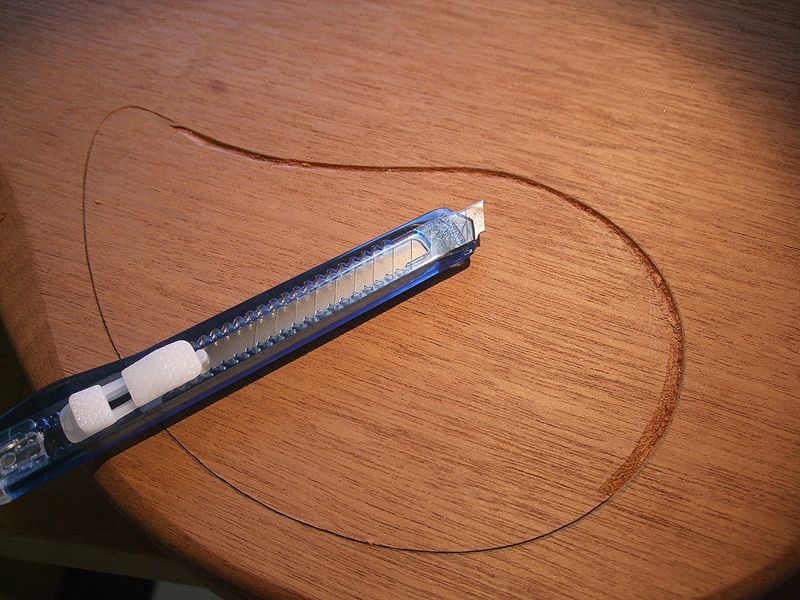
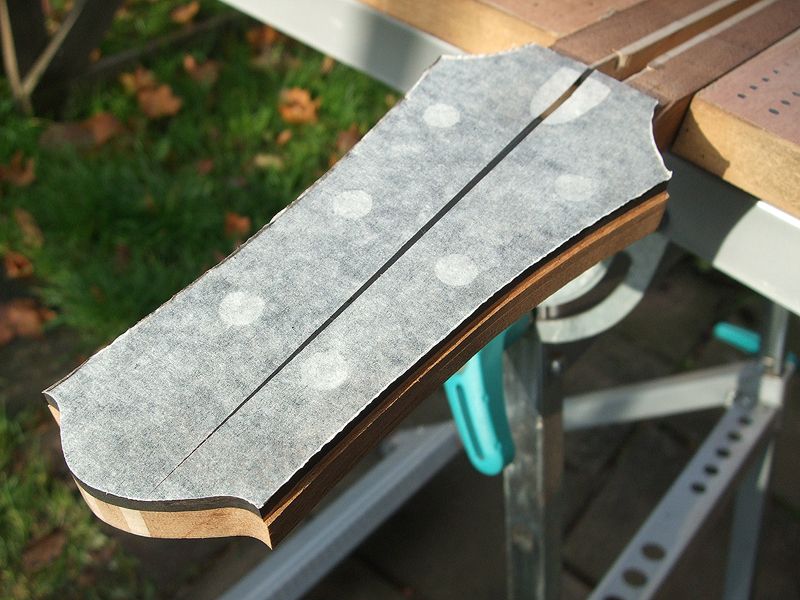
I'm building a hollow archtop guitar right now and I'm thinking about doing a design with multiple soundholes like I've drawn on the top here:
What worries me is that there isn't a lot of wood between the holes. I see that some builders here also make split soundholes so i figured someone could chip in with some knowledge/tips regarding this.
The top is maple as you can see. Approximately 6-7 mm thick (=about 1/4").
Do you think I need to reinforce the holes from the inside in some way? In that case, how? A veneer glued on cross grain? Some kind of glue applied to the inside surface?
Binding the holes would strengthen them I guess, but it will be a pain in the sitting area to do it... The rest of the guitar is/will be bound with grained ivoroid.