


pukko
-
Posts
247 -
Joined
-
Last visited
-
Days Won
12
Content Type
Profiles
News and Information
Tutorials
Product Reviews
Supplier Listings
Articles
Guitar Of The Month
Links and Resources
Forums
Gallery
Downloads
Posts posted by pukko
-
-
I tend to stay away from GMF as much as possible...The markups are just ridiculous, and considering I usually get stuff from Stewmac to my door in 36h I don't really see the point of doing business with them. Bought some small stuff from them on fuzz guitar show when the prices where ok. also had a look at the necks they displayed but where less than excited about the quality.
I totally agree with you. If I can get stuff both cheaper and faster from USA than from GMF, why buy from them? The fact that they have gotten some competition from gitarrdelar.se actually seems to have made them lower the prices on some stuff, but they're still really expensive... Just one example, the nitrocellulose spray cans I used to clearcoat the guitar cost twice as much from GMF compared to Slöjddetaljer... and gitarrdelar.se charges 30 kr less than GMF for the same spray can.
-
What is the pole spacing on your pickups? gmf.se carries 49, 50 and 52.5 mm spaced covers in crome. 150 spänn each (that 25$ for you non-swedish folks). I might even have some unused covers laying around. Unsure about pole spacing right now...
PM me if interested.
The spacing is 49 mm on the neck pickup and 52,5 mm on the bridge pickup. It just bothers me a little that the total cost for getting two pickup covers from across the Atlantic costs 35$ and getting them from GMF a 100 km away costs 67$... I usually order stuff from GMF through Musikbörsen in Uppsala though, no shipping costs to pay then. Still more expensive than getting stuff from the US though...
PM sent!
-
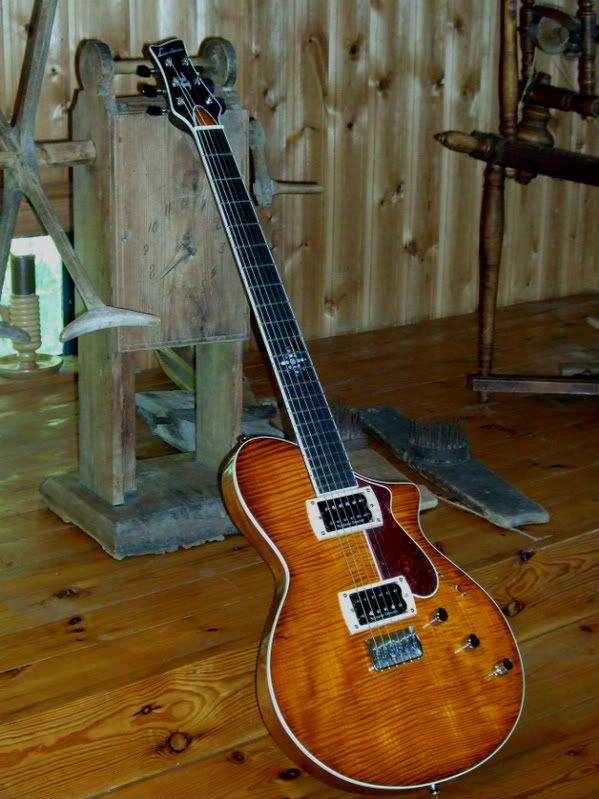
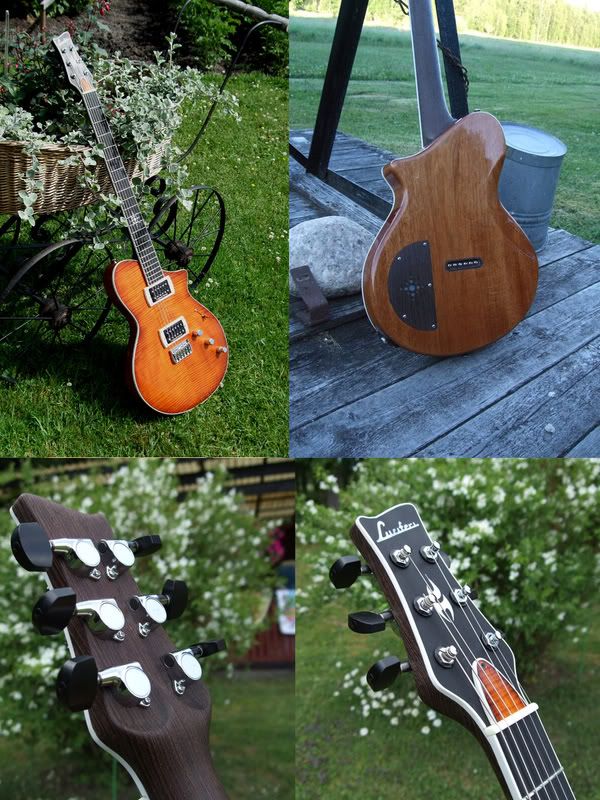
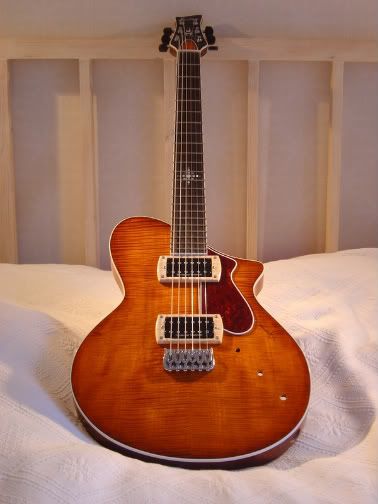
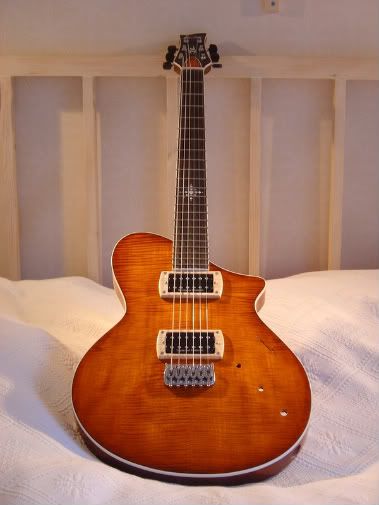
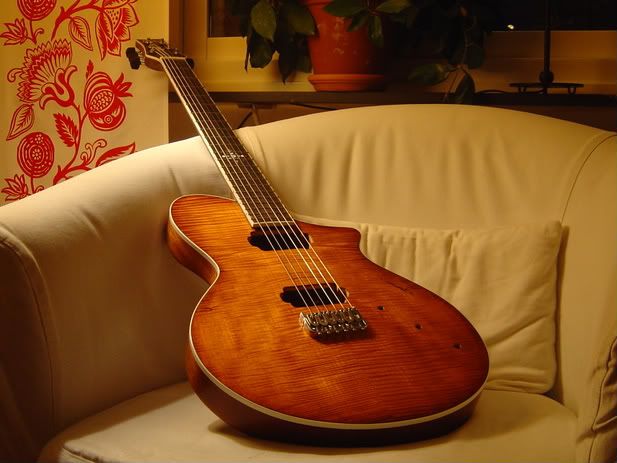
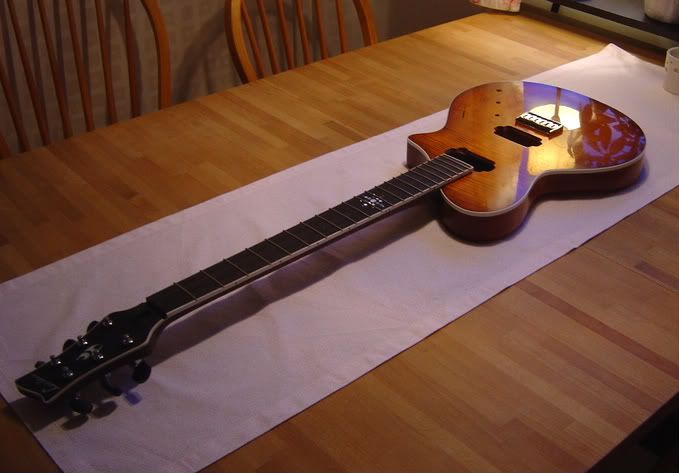
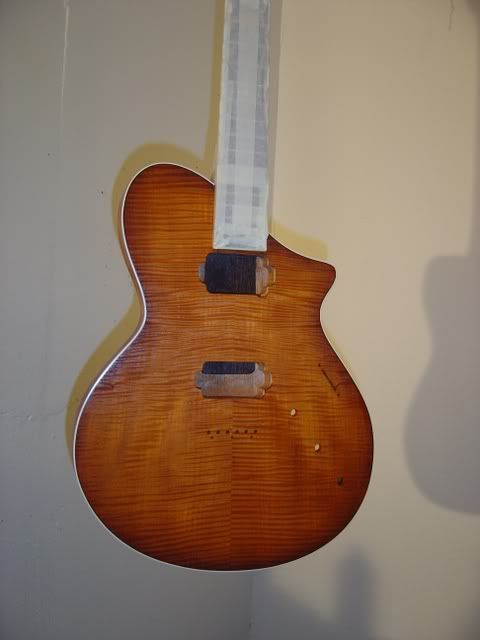
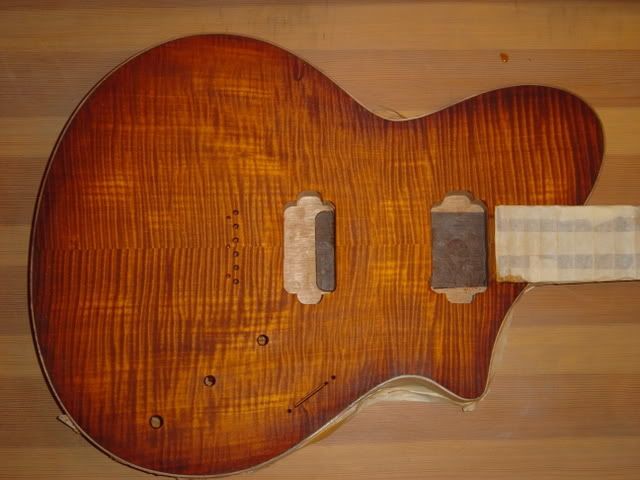
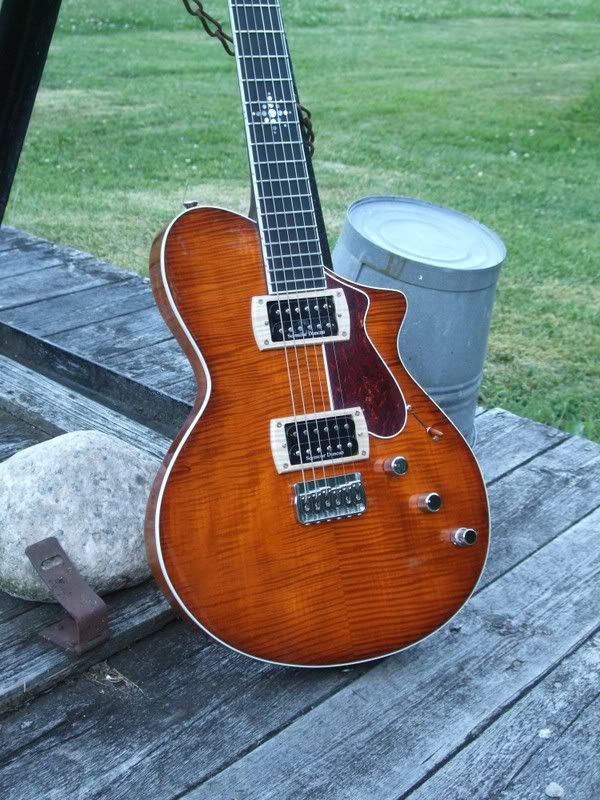
LUCIFERI AIRYTONE
Body: 1-piece chambered mahogany with bookmatched 2-ply bound curly maple top, (white binding with black accent line)
Body finish: Hand stained Stunburst with nitrocellulose clearcoating
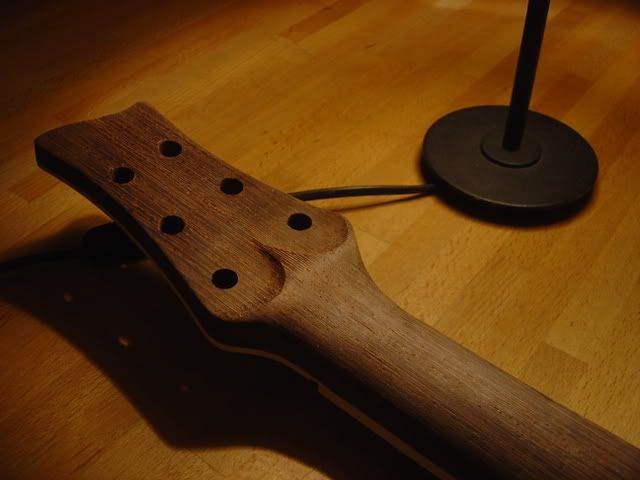
Neck: Wenge set neck (goes all the way to the bridge pickup) with ebony fretboard and headstock veneer. 1-ply white binding on fretboard and headstock
Scale length: 27”
Neck finish: Oil
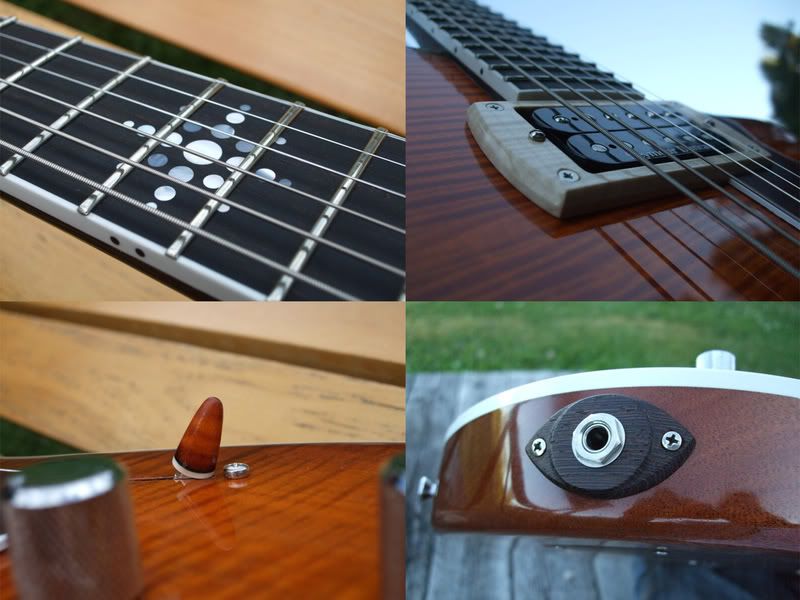
Inlays: Mother-of-pearl on 12th fret and headstock
Nut: Bone
Tuners: Gotoh with ebony knobs
Truss rod: StewMac Hot Rod
Frets: StewMac Wide/High
Pickups: Seymour Duncan TB-14 Custom 5 (bridge) and Seymour Duncan SH-2 Jazz (neck)
Pickup switch: 5-way Megaswitch P-model which gives these pickup combinations:
1) Bridge pickup
2) Inner pickup coils, parallel
3) Outer coils, series
4) Outer coils, parallel
5) Neck pickup
Electronics: 500k volume pot, 250k tone pot, EMG VMC sweepable (300 HZ to 3000 Hz) mid boost/cut control
Misc: Curly maple pickup rings, curly maple (with 2-ply white/black binding as on body) truss rod cover and switch knob,
wenge string anchor, wenge back plate, wenge jack plate, tortoise pickguard with white binding
Without pickguard: http://i188.photobucket.com/albums/z35/puk...SCF0122-1-1.jpg
Another front pic: http://i188.photobucket.com/albums/z35/pukko3/DSCF0432.jpg
Build thread: http://projectguitar.ibforums.com/index.php?showtopic=31074
-
Thanks everybody! I'm glad you like it!
Mind if I save some pics to my computer as wallpaper?
He he, go ahead! Aren't they too small for that?
I would be curious to see how it looks with chrome covers on the pickups, though... but I'm kind of a sucker for covered humbuckers.Yeah, I've thought about that too, might increase the retro feeling a little. I don't know if I can find covers with the correct pole spacing (trembucker in bridge position...) here in Sweden though, and if I do they're probably really expensive. I'll definitely get some if I order some other stuff from guitarpartsresource again.
Christmas is just a few months away, and I know what I want under the treeBeen a good boy this year then?
Now then.... YOUTUBE that sucka! We need to hear it!Somehow I don't think my little digital camera will capture the sound to well... And I don't have a proper video camera.
-
All done! Had a little photo session with my new camera (suddenly it's kind of fun taking pictures...) at my grandparents summer house where I did most of the work on the guitar. Thought it might be a good ending to the build process...
Another full front: http://i188.photobucket.com/albums/z35/pukko3/DSCF0428.jpg
Full front without pickguard: http://i188.photobucket.com/albums/z35/pukko3/DSCF0133.jpg
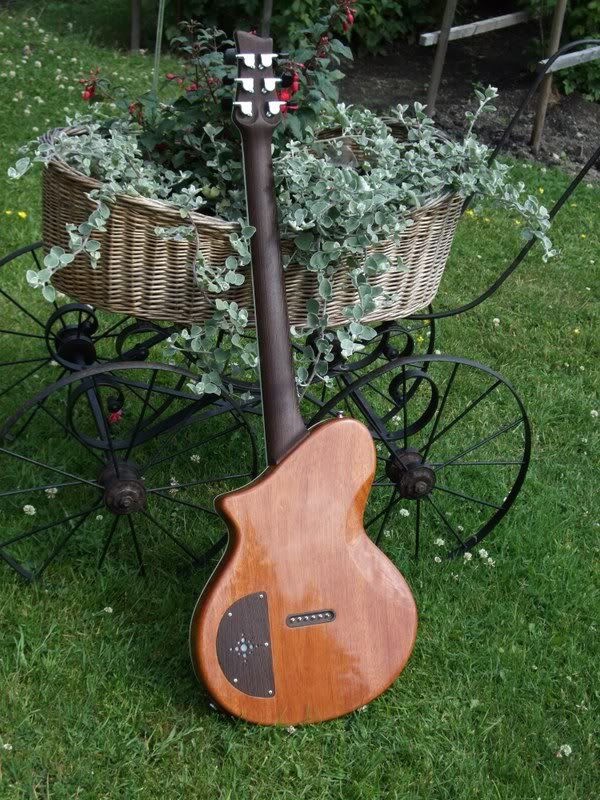
Back full view: http://i188.photobucket.com/albums/z35/pukko3/DSCF0130.jpg
Back full view (different view): http://i188.photobucket.com/albums/z35/pukko3/DSCF0175.jpg
Back of body: http://i188.photobucket.com/albums/z35/pukko3/DSCF0442.jpg
Headstock front: http://i188.photobucket.com/albums/z35/pukko3/DSCF0178.jpg
Headstock back: http://i188.photobucket.com/albums/z35/pukko3/DSCF0177.jpg
Inlay at 12th fret: http://i188.photobucket.com/albums/z35/pukko3/DSCF0166.jpg
Wenge jackplate: http://i188.photobucket.com/albums/z35/pukko3/DSCF0455.jpg
Maple switch knob: http://i188.photobucket.com/albums/z35/pukko3/DSCF0164.jpg
Maple pickup ring: http://i188.photobucket.com/albums/z35/pukko3/DSCF0451.jpg
-
>>Bygde
Thanks/tackar!
>>eddiewarlock
Thanks! Nah, the weather is ok, though around midsommar we had some rain as you say. Everything that's left to do on the guitar can be done indoors, so that's no excuse for me either... There's only the boring stuff left, shielding and soldering the electronics. After that it's time to plug in...
-
Finally got around to finishing the neck... Sanded up to 1200 grit paper and finished off with a 4000 grit sanding sponge called Abralon. After that some ordinary mineral oil, and this is the result:
A pic to show the color difference before/after oil:
http://i188.photobucket.com/albums/z35/pukko3/DSC04860.jpg
Some more pics:
http://i188.photobucket.com/albums/z35/pukko3/DSC04863.jpg
http://i188.photobucket.com/albums/z35/pukko3/DSC04865-1.jpg
It feels really good, extremely smooth surface but still kind of "alive" when you can feel the pores.
-
>>Bygde
Man tackar, man tackar!
>>CrazyManAndy
Thanks! What is it about the rings that you're not sure about? Size, height, shape?
>>WezV
The size of the rings is necessary to cover up the broken-router-eating-into-the-top damage. I just enlarged the shape of the metal rings I made before, and I didn't want to change the proportions of them so that they would look too square. I could thin them down a bit I guess, but not too much since the beveling of the rings start a couple of millimetres up. I can't sand them down all the way into the beveling, that would make the rings smaller and maybe make the damage visible... Can't really make them darker either without sanding them down since they are clearcoated. I have no spraying equipment, just rattle cans. I don't really want them darker either, I was going for a Les Paul "cream rings on a sunburst top" look.
>>Xanthus
See above for the pickup rings answer. I don't know what knobs I'm going to use yet. The ones I made seem to make the top look a little busy, with maple rings and switch knob. I got some chrome Telecaster type barrel knobs that I might use, and i also have two ebony barrel knobs (the Stewmac type). Not really feeling like ordering just one extra knob from Stewmac though... The big problem is that I'm using a concentric pot for one of the controls and there aren't too many variations to choose from.
>>GregP, WAK Guitars, jmrentis
Thanks!
-
I made a pickguard out of tortoise pickguard material and white binding. I'm definitely not going to screw it onto the guitar, but some doublesided tape might work if I want to put it on.
With or without? Which looks best?
>>Daniel Sorbera, eddiewarlock, piedpiperX2000
Thanks a lot!!!
-
So now it has strings on it... I just test fitted them, the nut is way too high and I didn't set the guitar up at all. I just wanted to try the neck profile and hear the acoustic sound. The neck needs a little shaving, it feels a little to big for me right now. Sounds pretty loud acoustically, long sustain and more dynamics than my PRS Custom (not that strange maybe considering the hollowness). I'm not sure I'll need the double strap button arrangement, it seems pretty well balanced.
Amazing how it looks a lot more like a guitar just by putting the strings on...
http://i188.photobucket.com/albums/z35/pukko3/DSC04705-1.jpg
-
>>TemjinStrife
Yeah, that's another good thing! What guitar have you used that has such buttons?
>>Xanthus
I think the main reason for putting the strap button near the crux of the V (and somewhere around the centre line on an Explorer) is that those bodies have pretty long bodies. If you put the lower button out on the tip of the V or the Explorer the strap wouldn't really hug your body, it would just balance on your shoulder. That's not such a big problem on a "traditionally" shaped guitar though. I think that by putting two buttons on and using the highest one, the guitar will hang with the head pointing a little more upwards (or really the lower bout of the body a little more downwards) making it hang less horizontally. I'll have to think about it when I'm test playing it...
-
After clearcoating, drying/waiting, sanding, more clearcoating, more drying/waiting, sanding and polishing it is now a bit more shiny...
http://i188.photobucket.com/albums/z35/pukko3/DSC04673-1.jpg
I've started to mount the hardware but at first I'm just going to make it playable without electronics to see if the neck profile is to my liking etc. I'm also considering fitting two lower strap buttons like on a Tom Anderson. One reason is that the guitar might be neck heavy since it's a longer neck and I think placing the strap button a little higher up might reduce some of that. The other reason is that the guitar will hang differently when playing standing up. Haven't made my mind up on this yet though... I've never tried a guitar with strap buttons like that so I'm just guessing here, can anyone tell me if the difference will be noticeable?
>>stereordinary
Thanks a lot!
-
>>Bygde, al heeley
Thanks!!!
>>Blackdog
Thanks! Yeah, it looks really easy when he does it. I think getting the right thickness of the burst edge in combination with the right colour must be the hardest part to get right.
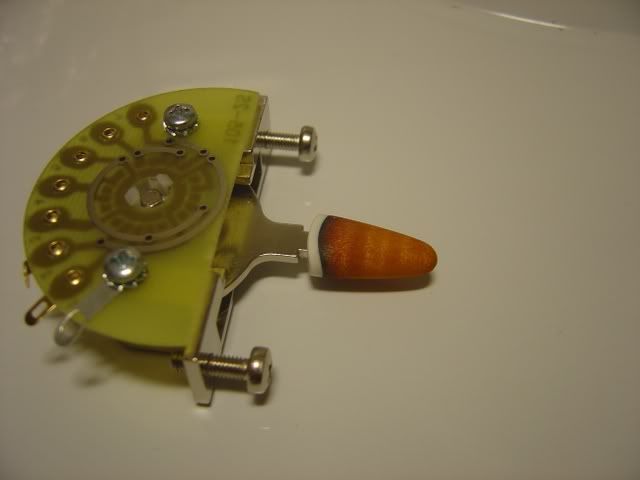
This guitar will have two regular potentiometers and one concentric (the one nearest the output jack). One problem with this is choosing what type of knobs to use. I think amber speedknobs would look good, but they won't fit on the concentric pot since that one doesn't have a knurled shaft. I would also have to make a knob for the lower part of the pot. I could use metal barrel knobs since those are available in stacked format as well. Not sure about the looks though... Does anyone know of other types of knobs that will fit concentric pots?
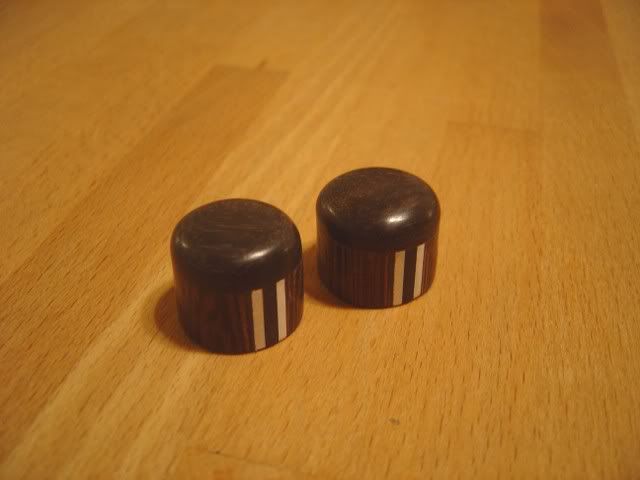
Anyway, I also tried making my own knobs out of leftover wood and binding material. The top is ebony and the rest is wenge/binding/ebony/binding/wenge. There's more shaping to do, but you get the idea. Kind of hard to do this by hand, making a square piece of wood round etc.
-
Thanks everybody!
Here's the link to the sunburst video tutorial Mattia writes about: http://www.taunton.com/finewoodworking/Ski...e.aspx?id=30182
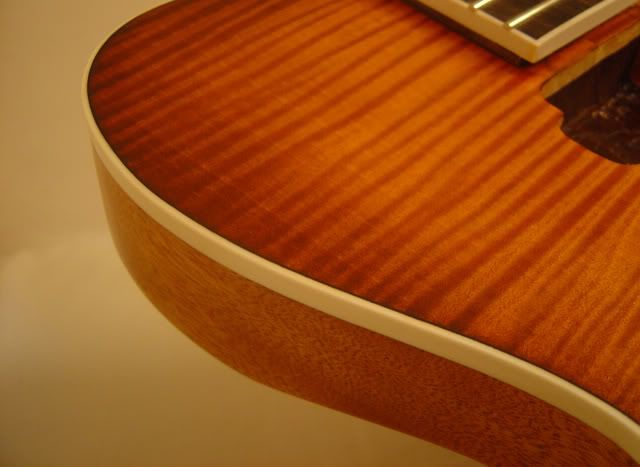
I wrote earlier that I didn't stain the mahogany back and liked the result. Here's a pic that shows top and back colours, the pic is a little off colourwise but you can see that the top and back looks pretty good together. The mahogany got a little darker with the clear lacquer on of course.
-
Sh!t, awesome work, Pukko.
Thanks a lot!
I forgot to show what I did last night:
Flame maple and two layers of binding like on the body, not too often you see a sunburst switch knob...
-
Thanks a lot for the reply !!! I absolutely love the subtle sunburst effect you achieved. I'm very tempted to attempt something similar. When the time comes I will do some tests on the maple offcuts and see how it goes.
Did I get it correctly ?? You use the brighter stain (yellow) to actually rub off some of the previous darker stain, right ??
Thanks, glad you like it! It actually works really well with the natural mahogany back too, I wasn't sure if I was going to stain the back a little darker as well but I'm glad I didn't...
Yeah, use some offcuts of the same wood that you used for the guitar if possible to get an accurate colour test. You might want to make a bigger test piece too, not necessarily from maple though, just to get the feel for staining something the same size as a guitar. I tried on offcuts too, but it's another thing doing it on a bigger area.
I used the yellow last to brighten it up a bit, I don't know if it turned brighter because I rubbed off the darker stain or if the yellow stain kind of pushed the darker stain down into the wood and sits on top of it... It's not a dramatic change of colour, just a little highlighting.
I was lucky to get the colour I wanted right away, I guess the safe way is to stain it a little brighter than you would think was right and if it actually turns out too bright you can always stain it again to get a darker colour. Easier that way than going from dark to bright... But if you use your scrap pieces of maple to get the right colour and keep notes of how you did it I think you'll find it pretty easy to get a good result. Good luck!
-
>>Kenny
Thanks! Yeah, black might work as well. I'm going to have to think about this for a while, there's no rush deciding anyway since the lacquer has to dry for a month or so befor I start putting it all together...
>>eddiewarlock
Thank you!
>>Blackdog
Thanks! I got very inspired by Mykas thread about staining, here it is: http://projectguitar.ibforums.com/index.php?showtopic=12912
I started by sanding up to 400 grit, wetted the wood to raise the grain, sanded again, wetted, sanded, etc. until the grain stopped raising. I began with a medium brown stain, let it dry, sanded that back to get more contrast in the flaming, and put on a mix of the same brown stain (with a little more more water in it) and some yellow stain. After that I made the burst edge with the medium brown stain and some other type of even darker brown just touching the edge a little. To get the burst edge smooth I took some yellow stain in the middle and made that blend with the brown edge. After that had dried I stained the whole top with yellow to make it a little brighter.
I used water based stain, I figured that would leave me with more time to correct any mistakes made since alcohol based stain dries a lot faster. The stains I used are made in Sweden so I guess there's no point in naming the specific colours... I used ordinary kitchen sponges to apply the stains, worked pretty ok. Have a couple of pieces of sponge ready to use (one for each stain, one for pure water and a couple as spares just in case...) , some water in a bucket, all the different stains, some cotton rags (old t-shirts are great!) might get useful too if you need to wipe off excess stain.
I hope that might help you, if I forgot anything just ask!
-
Started the clearcoating today... Nitro lacquer in spray cans.
Back: http://i188.photobucket.com/albums/z35/pukko3/DSC04455.jpg
-
I'd go with aluminum, I think it would make a good compliment to the brown AND solve your shielding situation.
The shielding problem will be solved no matter what I put on the back of the plate I guess. Just put some aluminium or copper tape on. Maybe I should put some mahogany on the back of it to keep the wenge-mahogany back/maple-ebony front theme going? Aluminium would be cool though, there's some chrome up at the tuners that could use some company down at the body...
-
>>Andronico
Thanks!
>>Xanthus
Thanks! You'll have to wait for yours though, with this work pace this one will be done in like 10 years... Yes, that's holes right through the back plate. I've never really thought about leaving it that way though. I'm going to put something on the back of it, I just don't know what material yet. Maybe pearloid, maybe aluminium (would solve the shielding problem too...). My first idea was to put some flame maple there, but the flaming isn't really visible because of the small holes anyway so I ditched that idea pretty fast.
-
Well, she ain´t too pale anymore...
Before staining: http://i188.photobucket.com/albums/z35/pukko3/DSC04364.jpg
Stained brown: http://i188.photobucket.com/albums/z35/pukko3/DSC04372.jpg
After this I sanded it back a bit, forgot to take pictures...
And here it´s stained, first the whole top with the same brown as before blended with yellow, then a burst with the brown and a darker brown around the edge. After that some yellow all over for a little highlighting. It´s still wet in the picture, looks a little strange in places because of that. I'm waiting for it to dry to see if I´ll stain some more or if it´s good as is.
>>CrazyManAndy
<<TemjinStrife
Thank you!
-
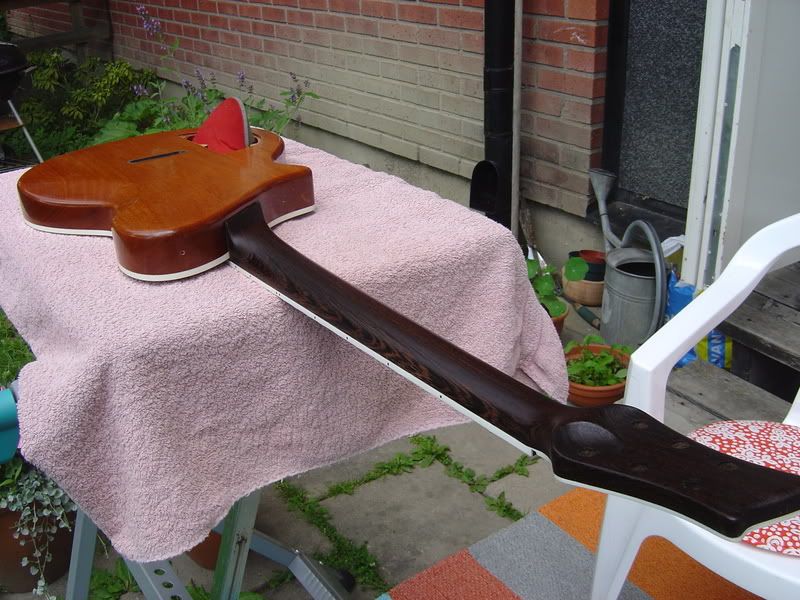
Since this guitar will have a hardtail bridge with strings through body I had to have something anchoring the strings in the back. First I just thought I would use standard Telecaster style ferrules, but then I figured I should do something a little more unusual than that. the neck and control cavity plate are both made of wenge, so I made a string anchor out of wenge as well. The small metal ferrules are there to stop the strings from wearing the wood out. I think they´re called blind rivets in English? The anchor isn´t all the way into the body in the pics, I wanted to be able to get it out again...
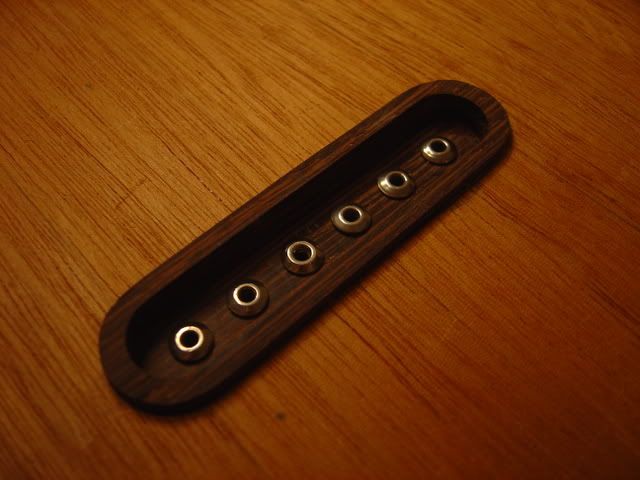
A pic of the whole back: http://i188.photobucket.com/albums/z35/pukko3/DSC04351.jpg
>>travismoore
Thanks! Yeah, I know what you mean, I remember playing a Warwick bass like 10-15 years ago and it had a wenge neck. They don´t make them with wenge necks anymore, do they?
-
Carved the neck today. Lots of work left to do but since my kitchen is my workspace and I live in an apartment I figured it was time to let the neighbors have their good nights sleep... Here´s what it looks like now anyway, I tried to shape the volute a little differently. With some more shaping and sanding (lots of it...) it might turn out OK I think.
Another pic of the neck: http://i188.photobucket.com/albums/z35/pukko3/DSC04309.jpg
-
>>Maiden69
I don´t have access to a spray gun, and it´s impossible to find tinted clear laquer in spray cans here in Sweden (at least where I live). Never seen anything like those preval spray cans either, had to google it to know what it was... I´m aiming to do a pretty thin burst edge, so if the flaming doesnt stand out as much there I can live with that. Thanks for the tip anyway, I´m definitely going to look for some way to use a real spray gun in the future so then I´ll try it your way!
>>tim_ado
Thanks!
>>Prostheta
I´ve done some test staining on scrap pieces of maple, and I understand what you mean about the reaction to moving in light. I've tried some double staining, and the "stain black, sand back, stain with other colour" method totally kills the movement in the flaming. The flames do get a very high light/dark contrast but the 3D effect totally goes away... I don´t think that problem is at all as big when you double stain with a darker shade of the same colour.

Fender Vi Replica Project
in In Progress and Finished Work
Posted
Glad to see you decided to post it! A cool and unusual type of guitar to build!