


jaycee
-
Posts
650 -
Joined
-
Last visited
-
Days Won
1
Content Type
Profiles
News and Information
Tutorials
Product Reviews
Supplier Listings
Articles
Guitar Of The Month
Links and Resources
Forums
Gallery
Downloads
Posts posted by jaycee
-
-
hehe, I only posted this poll as a joke.
See what you done Dig.. opened a whole can of worms....

-
Many of the guys on this UK based forum are on here but you may get a quicker answer if you post on there.
I have thought of using Rustins plastic coating, but as yet have not.
Their Danish oil is nice for the fretboard tho
-
make a nut shim of the correct height using wood veneer
+1 or anything that is hard and has an even thickness, not something like cardboard because the ammount you may have to use considering the hieght of your nut will have to be at leas 1-2mm, and the compression off the treble strings will compress it on the one side. Me thinks
-
[quote
what are some better pickupsto go for in future? rest of guitar is good... tbh
quote]
That's a question you will get a hundred different answers to.
There are so many pickup manufacturers out there ( just google it and you'll find out)
You have the usual ones Seymour Duncan, Di- Marzio, Armstrong........etc but at the end of the day it comes down to taste and what type of sound you like.
Hopefully some of the other PGers who have more experience with pups will pitch in. The ones I have on my strat, I am quite happy with and they are peavey, but until I decide if and when I would like a diffent sound I'll stick with them.
Some of the pickup manufacturers will have sound bites so you can hear what they sound like
-
You can allways improve on the pickups. Keep in mind though what the guitar is worth and the quality of it, you don't want to go into overkill and have better hardware than the guitar warrants.
But as a start those components should get you up and going.
-
Welcome to the forum Rich.
All the elctronics seem to be there, all you have to do now is connect have fun
-
thanks guys. I lost this post, until now, as I was looking at pup's and remembered I had posted this question.
-
That is a quality build, you can see everything nothing hidden by paint, and I do prefer natural finishes. You should enter it for Guitar of the month
-
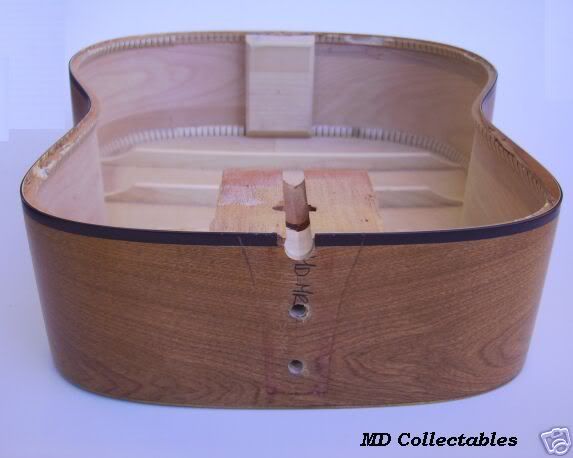
It seems that the original top on the body was arched. the waist is slightly higher than the front and back, the back of the neck block must be 2mm higher than the sides and the heel block slopes up. I guess it must have sat ok this way, should I keep it like this or sand everything level and have a completely flat top?
EDIT: the thing I was worried about is that the top would not make a good enough contact with the kerfing, but I found a piece of 4mm ply and put that on the top pressed down and it bent enough to keep out all the light. I assume a solid top would be just as pliable as the ply, so I may leave it as it is
-
-
If I have read this correctly you basically want a blue guitar with the white image left on it?, the white being the undercoat?
Could you make a stencil and use low tack masking tape stuck back to back with double sided sticky tape ( so effectivly the masking tape becomes the double sided sticky tape ) and use that to stick the image on the white, then when you paint the blue, the image will peel right off. If you use the masking tape on the edges you will have clean lines with no blue seeping onto the image.
-
Thats a better picture.
You could try and get as much glue in the break as possible, and the chances are it would hold. But the split nearer the top hole the D string one would have little or no glue in at all.
What I am not sure of is the ammount of pressure exerted on these areas when the guitar is strung, and if doing the above would compromise the repair.
From the picture, it looks as if the crack would taper off and come out of the back of the headstock just past the last peg hole, I would be tempted to complete the break gently so that it follows its natural course. What you are faced with then is a clean break where you can apply the glue to the whole of the area and have a good strong repair.
With some cosmetic work on the headstock you wouldn't know it had ever been broken.
But as I said earlier wait for replies from Setch and or Mattia and see if they have any other suggestions
-
From your description of the break and the pic, does it run from the bottom of the headstock to the side and the first tuning peg, then from the first tuning peg to the second one but from the inside to the outside of the head,
If it is running between the shafts (dowels) of the tuning pegs then it may be a case of the holes needing to be "eased" a little, being that the shafts may be a little to big for the holes causing pressure and the break.
If this is the case then I would remove the row of machine heads, open the break without causing it to split anymore, fill the crack with wood glue (preferably Titebond original) although a good wood glue should suffice, clamp the repair, leave for 24 hours.
When you have done that push the shafts through the holes to see how easilly or difficult they go through. It should be a snug fit so that they don't move about or bind as they go through. If there is any binding a light sanding of the holes to relieve the binding should do the trick.
It's worth waiting to see what Setch has to say on this as well before you go any further unless it is apparent that what I said is the problem
-
Thanks Rich
-
I have uncovered a spreadsheet that I stumbled upon ages ago when doing some research. As I remember it came from an instruments makers college or something simillar in the UK.
I'm not familliar with the workings of spreadsheets ( never having the need to use them) and this looks pretty useful.
here's a section of it
Neck Join to Top of Sound Hole 3.85 3 27.3 97.8
Neck Join to Center of Sound Hole 5.73 5 23.3 145.5
Nut 100th Inch 32nd MM
Width of Nut 0.16 0 5.0 4.0 4
Neck Edge to Base String of Nut 0.13 0 4.0 3.2 5
Neck Edge to Treble String of Nut 0.13 0 4.0 3.2 6
Neck & Fingerboard 100th Inch 32nd MM
Distance to Body + Nut 14.57 14 18.4 370.2
Width of Neck at Nut 1.88 1 28.2 47.8 7
Width of Neck at Body 2.13 2 4.0 54.0 8
Angle of Neck Taper 0.49 15.6
Width of Fingerboard at Sound Hole 2.19 2 6.1 55.6
Maximum Width of Fingerboard 2.20 2 6.3 55.8
Maximum Length of Fingerboard 18.63 18 20.0 473.1
Bridge 100th Inch 32nd MM
Compensation 0.16 0 5.0 4.0 9
Scale + Compensation 25.56 25 17.8 649.1
Distance from Neck Join to Saddle 11.14 11 4.4 282.9
Space Between 1st & Last String at Bridge 2.13 2 4.0 54.0 10
Fixed Space Between Each String 0.43 0 13.6 10.8
Computed Spacing at Bridge 2.04 2 1.3 51.8
Computed Space Between Strings 0.41 0 13.1 10.4
Length of Saddle 3.13 3 4.0 79.4 11
Length of Bridge 6.00 6 0.0 152.4 12
Width of Bridge 1.25 1 8.0 31.8 13
Depth of Bridge 0.38 0 12.0 9.5 14
Backset of Neck 100th Inch 32nd MM
Height of Fingerboard (with frets) 0.3125 0 10.0 7.9
everything is a bit wokey because it hasn't cut and pasted well , but as I say it is a spreadsheet and you can put different values in the cells and re calculate If any one knows more about it or would like a copy let me know. It was freely offered from the website and emailed to me, so I'm guessing I can do the same
-
Nice one W S Doesn't it feel so good when you finish your first guitar. I still look at mine now and give myself a mental pat on the back (glances over shoulder to see afore mentioned instument next to amp
) and still can't believe I built it -
Trashman it's good to know that the repair worked and it has remained good for those years. At least if anyone else has the same problem (and i'm sure they will) we can advise them accordingly, before they try their hand at major surgery
-
Can anyone offer advice about where I can get pre-shaped and slotted bass fingerboards here in the UK?
I like the Maple/walnut idea - see what you're getting at about the different pore sizes. Any other recommedations for good pairings, from a workability point of view?
Simo from the UK forum has some stuff for sale on ebay inc fretboards here
you could ask him if he can sort you out with what you need
-
I have to agree with Jon on this, although it seems hard enough with so much pressure on the joint I reccomend you leave it at least 24 hours for the glue to realy "cure"
Hopefully the repair isn't compromised and will hold.
-
Take off enough binding so you can glue the top on (block plane should do the trick, or a big sanding board), no more than that. You'll route the rest off when you route for the new binding. No muss, no fuss. Much, much, much easier than trying a drop fit.
That had gone through mind and i'm pleased someone suggested it. One concern I have however is when I am routing is there a chance that the binding (which is plastic)could tear out some of the side?. I will route perhaps 2mm below the existing binding anyway to hopefully avoid this
-
http://projectguitar.ibforums.com/index.ph...=32888&st=0
Have a look at this thread with a simillar problem. Some of the guys responding to this thread have a vast ammount of experience at guitar builds than I have.
-
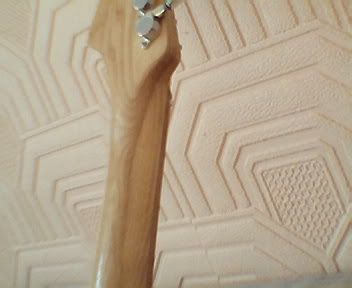
Here my Ash neck on the Strat I made. It was two pieces laminated along its length, if you look closely you can see the change in grain where they are joined, I have had no problems with it at all
The piece in the middle has a nice tight grain to it so I thought it would be stronger and more stable that the other Piece, which has more of an open wider looking grain which looks nice when profiled.
On my next project I have laminated a piece of Ash and Mahogany together which I think will look good when profiled. This neck is also laminated horizontally
-
From what you describe it sounds as though the fretboard is keeping the neck together, that's if the crack has gone conpletely throgh the neck but managed to stop when it came to the fretboard.
If that is the case you need to I doubt if squeezing glue into the break will be strong enough to hold it.
Another problem is the amount of gluing surface you have, the more the better, whereas in your case it seems as if there is very little.
Anyway see how the repair turns out and try and get us some pics.
Hope all goes well
-
Pictures would help. It sounds as if the crack is across the neck behind the second fret......yes? as if it has fallen against a table

First Build Finished.
in In Progress and Finished Work
Posted
Simply beautiful, very clean, lovelly lines as I said on a previous post enter it for GOTM