


jaycee
-
Posts
650 -
Joined
-
Last visited
-
Days Won
1
Content Type
Profiles
News and Information
Tutorials
Product Reviews
Supplier Listings
Articles
Guitar Of The Month
Links and Resources
Forums
Gallery
Downloads
Posts posted by jaycee
-
-
Thanks MiKro and Blackdog!
Well, I think that I am just going to keep working on the body for now. I've been so busy with the new baby that I have not had any time to really consider how to proceed on the neck. Rather than doing anything in haste I'll just stick to the process that I am sure about!
Congratulations and that's a good idea. how does the saying go "work in haste, repent at leisure" something like that
-
Never used it so I cant comment, and I thought it would be polite to answer looking at the date..............

-
ann@gilmerwood.com
-
Thanks Wez, I was on there site yesterday but didn't notice the square profiled rods only the round stuff, must have had my "blinkers" on,
Maybe my missus is right after all

after going onto the site I cannot find the 5 x 5mm rod using the site navigation or search facility, the only way I can find it is by clicking on the link you supplied me with
-
The fingerboard is the next part to be glued on when I decide what type I want and if I put the C F in. ( it's not attatched to the body tho)
Being that the neck is allready tapered I will set up a straight edge with the center line of the neck runnung parrellel to it secure everything and then route
Just a point about CF rods I can't find any here in the UK with a square, and on another thread some one said that round ones are as good as square ones, with tubes being better again, has anyone any experience of this?
-
Thanks Matt, I have to go into town today so I will pop into the music shop and check them out there as well. As soon as the size is confirmed I can get on with drilling the holes and thicknessing the head stock.
-
The threaded bars with pine blocks used as clamps is a cracking Idea and so simple.
-
10 to 15 degrees, seems to be the range for the headstock angle with 13 being the commonest. Between this range you get the optimium gluing surface area, whilst having sufficient downforce on the nut.
Too shallow an angle reduces the pressure on the nut, whereas to much angle reduces the ammount of gluing area, therefore compromising the strength of the joint.
-
I have made the neck allready but have not got the fingerboard, but I may well look at the CF rod ideas
Cheers guys
-
Just a note on radiusing which I found useful. Start at the end of the fretboard with the end of your radiusing block, then push over the board and off the other end, if you get tempted to use the usual forward and back motion with the block allways in contact with the board the middle section gets more sanding than the ends. If this happens you then have to tidy the ends up (as mentioned earlier) . It may take a little longer but the finish is well worth it
-
EIR stands for east indian rosewood.
Sometimes you'll see it typed as IR or EI rosewood.
indubitably
Thanks
-
Thanks Rich, I just want something stiffer as a "backup" type of thing to give me piece of mind.
Forgive my ignorance but whats an EIR fretboard, ( and I bet i'm going to regret asking this )
-
Thanks guys,
I've been thinking about ways to make the joint stronger using two dowels where the red dots are. I could use wooden dowels and drill holes the correct size for them and then use wood glue. The other option would be to use 5mm threaded steel bar in a 6mm holes and epoxy to hold everything together.
Any thoughts? I know it's a bodge but if I can get it to work it will make a handy pratice guitar.
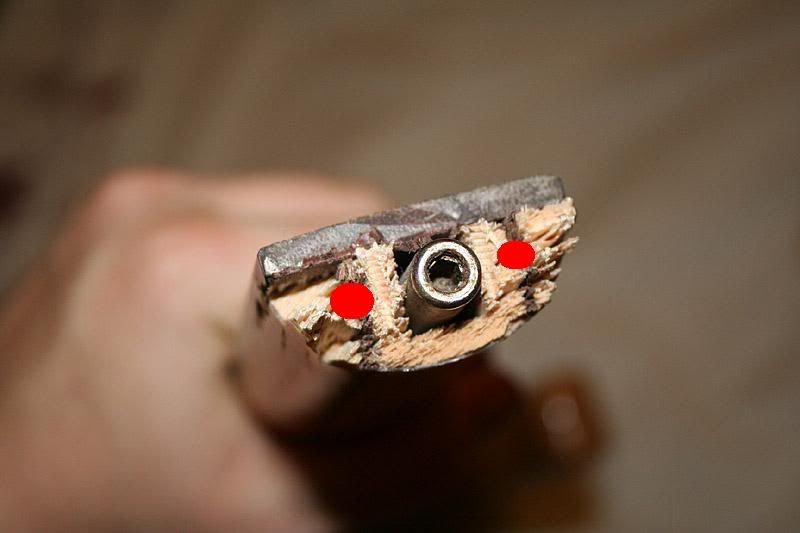
I've tried simillar ways to this and unless you have got a jig thats set up perfectly for both ends it won't work
-
As soon as I saw the break I said Ouch then scrolled down and notice that Setch said the same thing.
As the others have said that is the worse type of break you can have. The reason for this is there is very little surface area. The more surface area the stronger the bond. A strung guitar has around 60kg of pressure on it so the joints need to be strong.
If it was me having a go as there is nothing to lose if it doesn't work I would
Firstly glue the neck back together leave for a few days. Test the joint by trying to re-break itby using your hands only. If it breaks simply re- glue as the first attempt the glue didn't get into all the nooks and crannies. Then router out two rebates either side of the neck and extending say 3 " one side of the break and straight through the head stock.
In order to get nice rebates you will have to clamp the neck to a piece of flat timber (4 x 2 for eg) to provide a good base for the router
This would mean that you have 2 gluing surfaces per side.The neck where the 2 pieces have been glued on would have to be shaped as well as the headstock area tiedied up
If you're going to chuck it may as well give it a try.
-
I am going for a Ebony fretboard for my 12 string, the reason behind this, is that I think it will give more strength and stiffness to the neck.
Does anyone have any other ideas on fretboard timbers which would do the same?
-
OK thanks guys.
Out of interest what diameter hole did you have to drill for the Gotoh mini's
That double neck is sweet by the way
-
Just a few links that describe how necks are made:
The second PG Tutorial doesn't have an angled head stock, but it shows the wings.
Maybe if there is a point of reference we can work from it may make things clearer.
Hope it helps
-
I have just finished "ramping the heel" (I just love that expression) as Cumpiano calls it. The shaping is more or less done as well, which I must say was a quite rewarding experience. I did it all by hand using a chisel and scraper, seeing the square heel morph into the heel shape was very pleasing.
Any way on to my question
I am in nearing the "drilling machine head holes " in the headstock. are there specific machine heads for a 12 string e.g. smaller and lighter , or can I use a regular heads (10mm hole dia) that I used on my first guitar? Which was an electric
-
Interesting one this. I was told on here a long time ago "it's not what you do that makes things easier and better it's order in which you do them" which I have found out to my cost a few times. I think this is one of those moments.
Ideally what should have happened is the headstock angle shouldv'e been cut first, then the "ears" glued on.
If you don't want to take the ears off then I would go with Mikro's idea, doublesided sticky tape to the end of the neck making it parrallel and running it through a band saw.
I am sure Martin guitars are one piece and they cut there necks out firstlly on a band saw, then they are tiedied up later
-
no problems with that!!
I'm finishing off # 25 & 26 and I've never cut a fret slot yet......
does that mean I'm cheating?
Don't care!!
That's what I like to hear
I am leaning toward a butt joint Matt, if it's good enough for, and works for them then that fine with me.
I am making a 12 string will the xtra tension make a difference?
-
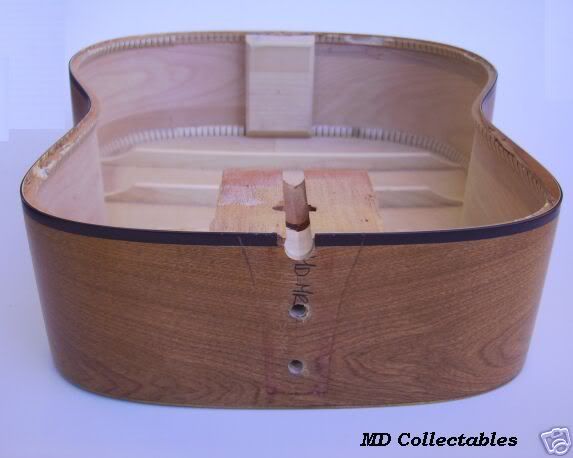
I came across this on Ebay and thought "that would save me a lot of hassle" not having any bending gear etc. I bought it for £36.00 which included p&p.
The materials would have cost that much and these ones are pre assembled.
I felt a bit guilty at first it seemed like "cheating" but hey I thought it's my first acoustic build, and the solution to bending the sides was there.
Its a simon and Patrick Body Cherry Back and Sides.
I was planing on a mortise and tenon bolt on neck joint which would mean routering out this one, what say you guy's on this
-
I keep mine inside so no problem here.
When you store your tools in a shed with little or no insulation and or heating then the damp gets in and rust starts. Also if you keep them in your car for too long during cold /wet/damp periods this will have the same effect
-
I like the inlay on the bluebridge, although it is very busy.
I think you would have to square the headstock off first before gluing the other pieces on because
1/ the buttons of the machine heads would be very close to the headstock due to the extra timber.
2/ It may be difficult getting the correct radius for the corners and the top of the headstock, unless you veneer the top and bottom of it, then you may have a thickness problem.
3, trying to blend the new in with the neck -to- headstock profile could be tricky.
However you could just put a thin veneer on the face of the headstock ( making sure the machine heads still fit ) and trim the edges to fit the original.
The headstock shape stays the same but you haven't got all the decal on it
P.S you say you take it rather than your expensive ones, from a quick google ( I had not heard of them b 4 ) $950 is a reasonable amount of money in my book for a guitar. Why not part ex it for something you like more?
-
I have just downloaded my copy of Fretboard Theory by Desi Serna http://guitar-music-theory.com/
Theres basically 10 chapters in the book, the 11th is a short summary type chapter. I printed them out and stapled them into chapters so I now have 10 "mini books" and plan to work on each chapter in succession.
I have briefly read through the whole thing it is well written and the more I read and play the better understanding I am having.
Some of the topics covered are the Pentatonic scale from the 1st positon to the 12th fret and how to link them, he explains the CAGED system as well as anyone I have seen.
I got my download copy for $10 which is a real bargain. I think he is still selling them at this price.
Even if you can't grasp all of it (which I can't at the mo) I'm sure as I progress through the book all will become clearer, as is happening now.

Simon And Patrick
in Acoustic and Hollowbody Guitar Chat
Posted
I've got used to it now and glad that I have it as my funds have dried up fir the moment.
The only problem I have to solve now is whether to attempt and take the binding / purfling off hoping not to mess up the edge on the sides, or to make the top so that it fits into the body then put some type of purfling / edging around the top to finish it off