


Setch
-
Posts
2,494 -
Joined
-
Last visited
Content Type
Profiles
News and Information
Tutorials
Product Reviews
Supplier Listings
Articles
Guitar Of The Month
Links and Resources
Forums
Gallery
Downloads
Posts posted by Setch
-
-
If you know how to select brace wood (split billet, sawn parallel to split face etc, twist samples to check for runout/stiffness) then go right ahead. Relatively small cross sections like braces will dry pretty quickly, so privided you store it well and allow time to aclimate and dry out you'll be juts dandy.
-
1/16th at the first fret is like a limbo dancing rig!
The correct height at the nut is just high enough to clear the 1st fret if you press the string down between fret 2 & 3.
-
Before you dive into this too far, I'd give serious thought to making a new body from scratch, and possibly a neck too. It will almost certainly be less complicated and time consuming than trying to modify an existing body to suit your aims, and you'll end up with a better guitar at the end. Getting a raw body blank to the point of being thicknessed and cut to shape is very little work, and this is essentially all you'll have once you've sanded, filled and reworked your existing guitar.
Just my 2 cents...
-
Give the whole area a very gentle levelling, nothing coarser than 400 grit. You might also try using a hard pencil erasor to clean the glue away around the joint. It may be due to the photo, but it looks like you have either a good deal of squeezout to remove, or quite a thick, very white, glueline.
Show some photo once it's been lightly levelled and cleaned of any squeezeout, and I'll be able to offer more advice.
-
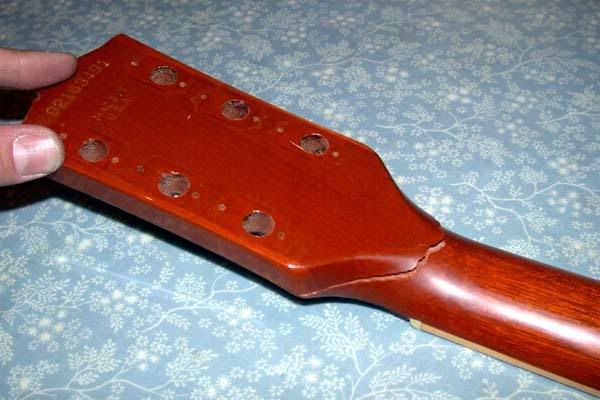
I'm a little concerned - if you have cracks which require filling, you can't have a tight enough joint for the glue to do much good. What kind of glue did you use?
With a crack like that, and a good tight repair, you should have very little visible glue or crack left, just surface checks in the finish.
-
I'd tighten down the fluid setting on your gun, or keep it moving faster - it looks like your coats are going on rather heavy, and you're getting a bit of sag and gloopyness. Far better to build half the amount, and spray another coat, than to get it all in one and have to knock it back later.
It'll look fine after buffing and levelling (as shown by the blue burst), but you'll save yourself a lot of time and effort if you lay the coats down smoother from the get go.
-
Not just what, but why!
-
If you cut an angled shim which tapers from 3mm or so at the pickup end, down to a feather edge at the end of the heel, you'll probably end up with good action. I'd cut if from the offcut of body and glue it into the pocket once you're sure it works. If you fit it carefully to the shape of the pocket it should be pretty inconspicuous.
-
Scarfed heads are stonger, for the reasons given at length above. Gibson heads break when subject to mild knocks, harsh language etc, and that's a pretty compelling reason to avoid the design.
I love how they look, but I hate it when this happens:
Fortunately, with a bit of care and panning you can make a scarfed head look every bit as good as a single piece. Dont forget, 1 piece necks were concieved as a cost cutting measure, not because they offered any tonal or mechnanical advantages over the more traditional joined headstocks.
-
Nice work Perry, but that's always a given.
I'm curious, did you manage to get the grain match to extend through the end grain? I always hate working on the end grain at the arse end of the guitar, even if I'm just doing a straight natural/clear finish.
-
I'm also interested to try something described by Mario Proulx on MIMF and OLF - he says that he's found it beneficial to keep frets clamped for a few minutes after pressing each one, it helps them 'set' in place better by holding them stable whilst the wood is compressed by the barbs.
I plan to cut and de-tang each fret individually when fretting, whilst the previous fret stays clamped down in the press.
-
Anyone who knows me will testify that I share that curse.
It's genetic. When my grandfather died, we found a tobacco tin in his shed, neatly labelled 'Bits of string too short to be useful'. Sadly, my day job provides me with a near endless supply of 'treasure' which will come in handy one day.
-
Updates to the blog have been a bit thin on the ground lately, but I finally got round to finishing my DIY version of Stew Mac's Jaws fretpress, and posting it on there.
http://home.asparagine.net/ant/blog/?p=223

Works a treat!
-
You should start by giving your thread a sensible name

Indeed.
Please try to make your post titles clear and concise, and describe what the thread is about, it makes life easier for other users, and increases your chance of getting a helpful reply. I have changed the name to something more appropriate, next time I'll probably just delete it.
Thank you
-Setch (forum moderator)
-
I concur with the others - seriously tasty!
-
Nice work - looks very clean and well attended to.
Keep us posted...
-
Well I'm exited - I look forwards to seeing it finished.
Nice headshape - different, but elegant and in keeping. Also, nice job on the heel - I have a junior underway with a near identical neck joint, and it's amazing how much access you gain by knocking away the corner of the joint.
-
Very approximately, 13", working from my very flawed memory.
Infact, lemme go measure...
***
Yup - 12 13/16" - or about 13"
-
I don't see this being achievable without redoing the sunburst. Like ihocky says, it's likely built up with tinted lacquer over a stained base, and even if it wasn't it would be nigh on impossible not to sand through.
I'd think in terms of back to porefiller, and if that isn't acceptable to the client, decline the job.
-
For what purpose?
-
Well, hindsight is 20/20, but it's still against TOS, even if it's manifestly true
I've never understood why people get so funny about deleting accounts - especially without even asking for the account to be deleted!
-
Grain direction - if you orient the short grain in the long edges of the ring it will disintegrate if you so much as sniff at it.
-
If the bridge allows you to set the height where you want it, the neck angle is fine.
If the strings buzz at the height you want them set at, you have 3 explainations:
-Your neck isn't straight = adjust trussrod
-Your frets are not level = relevel the frets
-You're aiming for an unrealistically low action = readjust your expectations
It's really that simple...
-
What ? !!! Me giving advice to the "tool man" . LOL !
Yeah, bought some little round end bits from McMaster. They go on the Dremel. You know how the stock Dremel router base accepts two steel rods for an edge guide ? Well, I rig up some really long rods in there instead. Radius caul is clamped down to a jig (well, I put two counter-sunk screw holes in all my cauls, so they can be bolted down- in order to mill the radius into them). Then like a little moving, milling compass, I rout that groove in there with the Dremel. BUT, I think the way I do it is too complicated.
What I should do is use that same Dremel router base like a little router table and make some kind of little piece that surrounds the ball-cutter bit most of the way, or half-way, so that just a portion of the ball cutter is sticking out. Then you just work your caul across it and it's got that "safety stop" to make the depth the same across.
That Stew-Mac article actually shows something like that, except more basic (they seem to rely on the ball-cutter bits shaft acting like a depth stop. I think that would allow too deep of a cut).
I guess I should also mention that my "stock" dremel router base has a base I made, which is larger than the stock one, plus it's square, so it is like a little router table when turned up-side-down.
Heck, this is the kind of thing I usually only share with certain people off the forum.
Hah - great minds think alike. I actually made up a slotted guide with a ball ended diamond cutter, like you describe, to groove my cauls, but it made a very rough cut - the diamond on the dremel cutter is very coarse, and the aluminium a bit too soft to machine well.

Please Advise On Best Way To Finish Crack Repair
in Inlays and Finishing Chat
Posted
Right. Do you have any dyes available?
You need to get the areas where finish is missing to match the colour of the lacquered areas. The quickest way is to wipe it over with a cotton bud dipped in stain/dye then wipe of any excess with a cloth, so it only remains in the bare areas. Once you've got a decent colour match, spot fill the cracks with CA or lacquer, depending on the finish used - as a rule of thumb, cheapo imports will be a job for CA.
Once your drop fills have cured fully (24 hrs for CA 2-3 weeks for nitro) level with a razor blade scraper then 600 grit, then check for shiny areas. If there are none, you've got no low spots, so wet sand to 1500 or so, and buff out. If you've got shiny spots, repeat your filling/levelling until they're gone, then level and buff.