


RestorationAD
-
Posts
5,345 -
Joined
-
Last visited
-
Days Won
67
Content Type
Profiles
News and Information
Tutorials
Product Reviews
Supplier Listings
Articles
Guitar Of The Month
Links and Resources
Forums
Gallery
Downloads
Posts posted by RestorationAD
-
-
This is what I have for the Jem.

-
I don't use the Lowe's or Home Depot type as they tend to suck.
Go to a hobby store and get a good tube of CA. Most Hobby stores have Zap. I use the Klingspore brand at my local Woodworkers shop.
I use the Thin to fix cracks and checks. For dings or chips in the clear finish I have had really good success with the thick Super glue. Also use the thin to glue paint chips back down.
and for future wet sanding, might i recommend using naptha instead?What are the advantages of naptha other than making better firewood?
-
Meat not withstanding warmoth makes a decent truss rod. I have used them on several occasions to make wizard replicas.
-
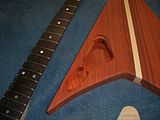
it looks like the carve goes under the pickup rings on the bass side, gotta be careful about that in future builds... i dig the depth of the carve though, it looks pretty good.
Pickup rings suck anyway....

-
+1 CA and wood dust.
-
I would be very worried about drift using that setup
Their router bits are cheap. Are they any good?
-
I found this on talk bass. I think this is the trick. I have had real issues doing figured maple on the jointer (tear-out) and I don't have a reliable table saw.
-
Router Tear-out Sucks. Make sure you test routing on scrap when using a new species you are not familiar with and get a feel for how to cut it.
-
I did a saber for a friend and it wasn't as hard as you think.
<making something seem entirely easier than it is>
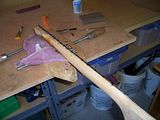
So do all your routing while the body is still square. Then use a nice angle grinder and round it off.... block sand, sand some more, scrape, sand, scrape, etc....
</making something seem entirely easier than it is>
-
On a side note "I am done with Padauk for a while." I am tired of everything being red-orange, Tired of tearout. Tired of Splintering and Chips. I am moving back to Mahogany and maybe Sapele if I can find a local supplier.
-
Waiting on the finish to cure...
-
I admit I am a metal player... and I have used 6105 for years and it is big and fast. But 6100 is humongous and almost scalloped in the feel of the neck. When you use fret wire that big you need to plan the ergos of the neck. I try to build a thinner flatter neck profile (think Ibanez Wizard) when using really big wire like that as it adds to the overall dimensions of the neck.
My hands are usually sore the next day after a fret job with 6100 as it is difficult bend and cut.
-
I found that while sanding down my guitar, the hardest part was the inside of the horns. What I did is cut out a bunch of pieces of sandpaper in circles about the size of a 50 cent piece and attached them to the end of my Dremel tool. The sandpaper is really flexable, so it works great.
Con: you have to have ALOT of circles cut out ( I used about 20 of em on my guitar), one slip and it tears the sandpaper.
You have to be extra carful of youll make grooves.
What I llike about it is it takes only about 2 hours total including sandpaper changes to do both horns. I used 100 grit and it came out smooth as butter. Touched it up by hand with 60 grit, then finished it with 220. Seems good to me.
2 hours? Eesh...You can get so-called 'flap sanders', which are like little drums with bits of sandpaper sticking out. They won't reshape things, but they will clean stuff up quite quickly. Other than that, I'm liable to just us a sanding pad (shaped, or stiff foam), and good quality paper, nothing coarser than 120. 60 and 80 grit scratches are hell to get out of end-grain. For the rest, I use my orbital sander. Finish sanding the whole guitar, with quite a bit of hand-work, should take max 2 hours. Unless you're oiling/going a lot finer than 220/320.
Only Build Flying Vs
-
+1 WezV and Setch on recessing bridge and glued in neck shim. Looks like you need to attack it from both angles.
I would trace the bridge outline on the top of the guitar, mask it off with blue tape, use my dremel to move the bridge down about 4 -5 mm, shim the neck with a nice angle shim, then glue it in.
-
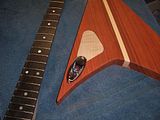
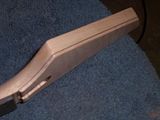
The black burst looks good... but that has got to be the most uncomfortable placement for a jack imo. My Rhoads is all I play anymore, and I'd hate to have a cord hanging down between my legs
 That is why you experiment on your friends and families guitars not your own....
 Over the weekend the burst has gone almost Purple.... I hope it blackens as I put the finish on. I am still torn on what to do on the finish. I am tempted to Tung Oil it and be done. However I think the Paduck needs grain fill. I want to use epoxy but am hesitant to make a lot of work for my self... If I use epoxy then spray laquer the whole thing it will be nice but hte weather is starting to turn cold and will make for a messy finishing project. Any suggestions?
-
<2 cents>
I used to move the volume knobs on my stage guitars... Now on my customs (for myself) I make sure the volume knob is not in the swing path of the hand....
</2 cents>
-
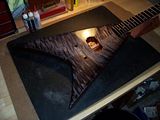
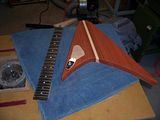
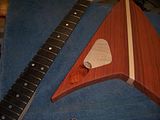
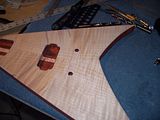
Black Stain Burst and the neck glued in
-
This is how I do it.
Drill your hole into the post cavity and stick a wire in there. When you screw the post in it will contact the post and be tight enough. No solder necessary....
-
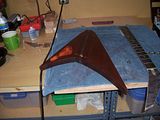
You need a point on the top bout to offset the point on the bottom horn.
-
I have 3 V's and hate the jack position on all of them... so I am going to try something different on this one. I will let you know how it works out.
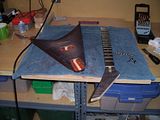
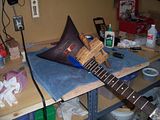
I wanted to recess the TOM more but I am out of depth on the posts. I can lower the action until it is within a 1/32" of touching the 22 fret so it will do. I might try to squeeze another 1/32nd out.... However I hate to mess something up this late in the build.
-
This body is thin. So the control cavity/input jack was a bit of a challenge however this is what I figured out. I know you guys like to plan but I am still winging this build.
Finished filling the fret slots with ebony dust and CA
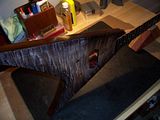
Recessed the TOM. I was going to use a neck angle but the "Black Machines" thinness of the body really doesn't lend to it.
Stripe in the headstock
-
Using a 10" Mill file with the handle cut off.
-
I've spent too much to really know. I'm into my third of fourth hand held router, third Dremel (or is it the fourth?), I’m into my fifth and sixth power drill, the third pillar drill (this time a combined pillar drill/mill), the fourth, fifth and sixth spray gun and so on. So the value of what’s in the workshop right now is just a part of what I have spent on tools. The total amount is probably not as high as for MiKro and RestorationAD, but well over 5000$
Its ok it doesn't make me a better builder.... just makes my hands hurt less.
-
+1 on chemical stripper bad.
+1 on roughing up the current finish with 400 grit and some fine 0000 steal wool.
Scraper and a razor blade is the only way to tackle this issue if you are insistent on removing the finish. I used chemicals on my Charvel and it was bad. I used a heat gun on one of the King Vs I did and it was nice. However getting that fine line will not happen with a heat gun.


Touching Up Lacquer Chipping Around Control Holes
in In Progress and Finished Work
Posted
Have you tried it yet? How well does it work? it seems a rather toxic solution...