


henrim
-
Posts
942 -
Joined
-
Last visited
-
Days Won
109
Content Type
Profiles
News and Information
Tutorials
Product Reviews
Supplier Listings
Articles
Guitar Of The Month
Links and Resources
Forums
Gallery
Downloads
Everything posted by henrim
-
Fair enough, and the good thing is it’s not a big deal to fix on a guitar sized object.
-
I may be stating the obvious but you make it sound like it is a feature, when it is an avoidable flaw
-

Logo Transfer To Roasted Maple with Water Based Finish
henrim replied to SonOfMI's topic in Inlays and Finishing Chat
What I forgot to mention is that you don’t necessarily need solvent for the laser transfer. Heat source like clothes iron is what I used to use for PCB transfers when I used laser transfer method. Obviously with wood, especially if it has glue seams, you want to be extra careful not to apply excess heat. And you may want experiment with different print materials. Fine magazine cover style paper works in my experience better than plain paper for heat transfer. One other thing is that print density adjustment can make a huge difference, if your machine allows it. Anyways I think you can likely get much better result with a water decal than laser transfer. -
Logo Transfer To Roasted Maple with Water Based Finish
henrim replied to SonOfMI's topic in Inlays and Finishing Chat
I don’t know those products but laser transfers can be done with acetone. I have done them mostly on copper and aluminum. On birch plywood too. Should work on pretty much on any material. But it is a bit of a hit and miss process. Different printers yield different results. I suggest you to experiment some before making a headstock logo. -
I suppose it is what it is. Uneven. Maybe too thick layers? I have never coated a guitar with wipe-on. I once tried the procedure though, on a batch of test pieces, and found out it’s not my kind of process. No gain over spraying. I was hoping to free my self from spray gun cleaning. But no cigar.
-
Is it worth it? Sell everything for 1 Vintage Guitar
henrim replied to GuitarMan686's topic in Solidbody Guitar and Bass Chat
I don’t think there’s anyone but you who can tell whether it makes sense or not. If it’s your dream and that’s what you want then go for it. Does a vintage guitar make you a better player? No. Is it so much better instrument than what you already have? Highly unlikely. On the contrary. With a high value vintage instrument you need pay more attention to how you keep it in good shape. It may not be the first choice for daily playing. Just my two cents, if even that valuable. -
Have you got any link to those pencils? Are they actual pencils or are they more like touch-up markers? Anyway, I think it’s kinda hit and miss to find a readymade matching maple color, as the color can vary a lot depending on how the object was finished and how it was exposed to light.
-
Yeah, the shape is pretty much there, I just need to skim a mm or so. This would be a good time to put strings on, but I haven’t made the bridge yet. On the other hand I think I can finish this neck without strings because the neck profile is same as in my padouk top guitar. Which is a profile I like the best. Skinny but round, if that makes sense
-
Just as I was so proud of myself yesterday, about being able to list next steps in advance, I carved the neck today. Rough carve it is and I need to think about the heel area a bit before carving it.

-
There’s been more playing than building. And when you play, you realize how the guitar you pare playing could be made better. So, before dismantling any existing guitars I thought I should continue with this one instead. After some more fiddling I got the neck in proper alignment and drilled holes for the neck mounting bolts. Next I need to drill holes for the string ferrules and make access holes for the electric stuff. Then I can start shaping the body.

-
Right, you better listen to @ADFinlayson advice. He’s done more binding than I ever will.
-
It sounds like a good idea to me to have the seam there. That way you have the ends of the binding where the most complex curves are, and you can do the bends from two directions. That said, I’m not really the best person to answer questions about bindings as I don’t really do them. I speak from my experience and knowledge about plastics in general. If it is an ABS binding we are talking about here. Although if it was a wood binding, I think I’d like to have the seam there in that case too.
-
Technically I can’t see any real problems. Because of the neck pocket the back binding is a bit trickier to do than the front, I guess. But doable.
-
Ok, good to know. That’s how it goes. Old tools can be a bit like the ship of Theseus. Although the sole in your plane is probably original
-
I’m so used to wet sanding that I never got to try Abranet. One of their factories is about one kilometer away from where I live, so I guess I should support local business and try it out
-
Stanley No. 5 has been made about 150 years now. Although on a quick look they may all look the same, there have been a wide variety of finishes and materials in use. And quality has not always been the same. I’m not deep in to the subject as I’m not a Stanley man myself, but as I have understood they can be dated quite accurately by studying the casting markings and so on. I would start there if I was going to restore the plane. If against all odds, it turned out to be a golden era specimen, I would think twice before proceeding with restoration. If it was from not-so-desirable era, I would just strip all the finish layers and re-coat with whatever clear coat I happened to have in hand. I think it would still make a decent jack plane for fast wood hogging.
-
Yes. Although if you had to move the bridge on that particular guitar, it would be easier to make a new body
-
Wow, this thread is soon turning 20 years old! Yes, like @Bizman62 says, if the scale length stays the same the only difference between 22 and 24 frets is the length of the fretboard. If you shortened the fretboard and somehow filled the empty space between the fretboard and the neck pickup the guitar would look like something like the second example in this crude photoshop I did. Probably an easier solution would be to pull off the last two frets and slope the end of the fretboard (example 3). This would probably be easier to make decent looking than filling the space between the fretboard and the neck pickup if the whole fretboard was shortened. If you wanted the fretboard to end where it ends now and make it 22 frets, you would have to shorten the scale length. Which would require making a new neck or chopping the existing one.

-
Wrap around bridge placement
henrim replied to Maurice Lavergne's topic in In Progress and Finished Work
Mathematically it would be. At 1,5° the change maybe negligible, or at least you can compensate the error with the bridge adjustment screws. Of course it's always good idea to get it right if you don't have stud holes there already. Btw, how did you end up tilting the neck 1,5 degrees? Is there math behind it or is it just a guess? To get an optimal angle, I'd either do the trigonometry or use my preferred method; draw the side profile in 1:1 and measure from there. That way you get the correct angle and intonation line too. Double check the scale length first, though. Place the studs so that you can adjust the bridge further back for intonation adjustment. If the high E is on spot you will never need to adjust the bridge towards the fretboard. I like to leave just a little bit for adjustment to that direction too. To be able to compensate for drilling inaccuracies and so on. Also the LP bridge is tilted a few degrees. I don't know how much exactly, but you need to check that to get a sufficient adjustment range.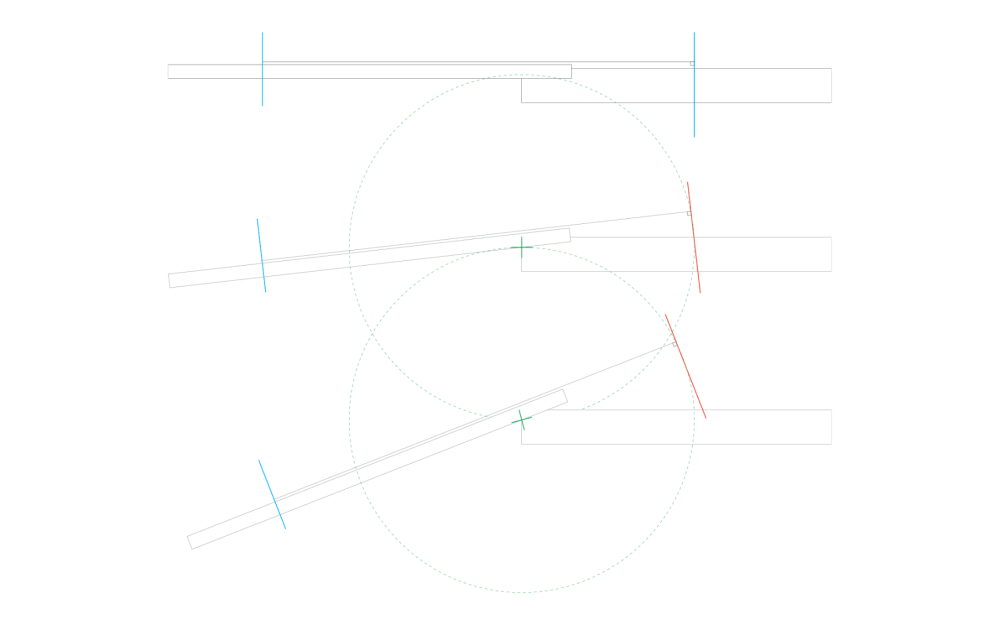
-
What ever it is, I'd be surprised if the dye wasn't so deep in the endgrain that you have to sand off more than just the surface.
-
Dean ML Dimensions/Blueprints
henrim replied to CravingAlpaca43's topic in Solidbody Guitar and Bass Chat
The linked PDF is there, although my phone (iPhone/Safari) failed to open it. Got it downloaded on desktop. File itself is probably not working the way it was meant to, at least it looked odd when I opened it in Illustrator. That said, the already linked blueprint looks like it's in the ballpark. https://www.electricherald.com/wp-content/uploads/TP119-Dean-ML-Floyd-Templates-1-Plan.jpg -
Wow! That came out nice and easy. Very much a subjective thing. Personally I'm not into gold hardware. Only guitar I have ever had with gold hardware was an alpine white Les Paul Custom. Although I'd probably never do that myself, that combination kinda works for me. But that is pointless because solid colour is of course out of question in your case. If I recall it correct, you made a beautiful graphite grey finish on one guitar with figured top? That could work. Or that tobacco burst you mentioned. Done right, it would tame down the gold and blend the hardware to the body and make it all more subtle. I'm confident you could make that work.
-
I assumed from the first post that the contacts were already cleaned. But that oxidation can be rather stubborn. If you go with abrasives, go lightly. I’d say 320 is on the coarse side. It also eats metal, not just oxidation. Non abrasive way to remove oxidation from copper is to use chemicals, like salt-vinegar mixture. Better just not leave any residue in.
-
Ok. A multimeter in continuity mode would help to sort the problem if it isn’t apparent to eye. I’m afraid I can’t be of more help on this without seeing the switch in person. Hopefully someone else can.
-
I’d check that the non functioning pickup is wired properly. Or in case of EMG’s that the connector is not backwards and is properly seated. The switch may not be the problem.


